How Javascript works
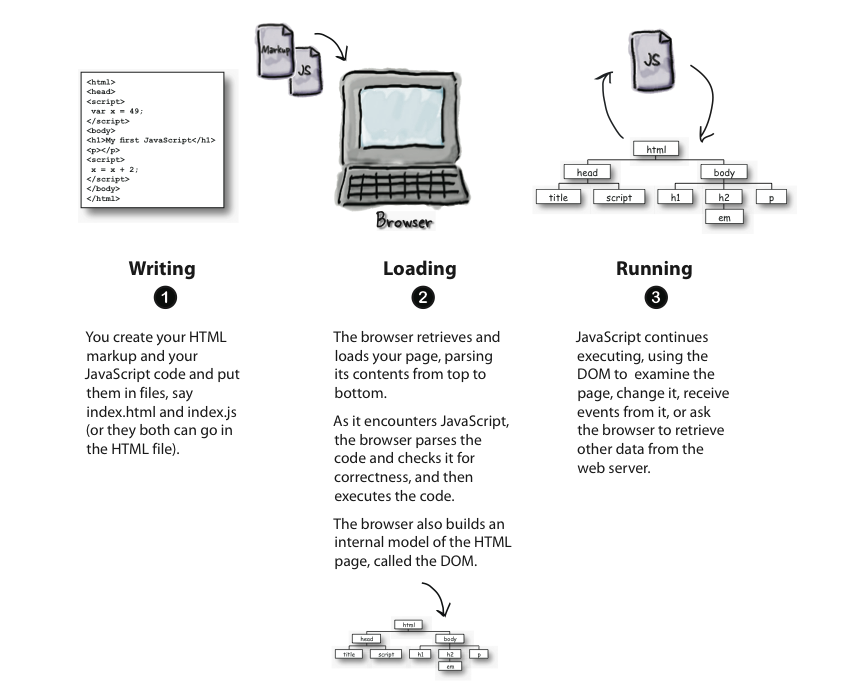
Whenever the browser fetches an HTML page from a web server, it will parse its content starting from the beginning to the bottom. When it completes this process, it creates an internal model of the HTML page, called the DOM.
The DOM is a tree representation of the HTML page, as we have discussed before. Then, during the interaction with the page, Javascript uses the DOM to perform actions upon the document (e.g. change its appearance) or handle user events.
Accessing the DOM
To access the DOM, we use the variable name document. Because the variable
is already created when the page is loaded, there is no need for us to define it, we
will simply use it. You can try this out on the Console, by typing document
and seeing that you get as a result the whole HTML document tree.
Most of the time, we are interested not in the whole document, but only in one of
its elements. Therefore, we need a way to access such elements. This is very similar
to what we needed to do when applying CSS to our page. In that occasion, we used the
tag names and the id and class attributes. The document object (we will discuss
soon what an object is), has several built-in methods that allow us to do the same in Javascript.
Here is a list of some of such methods:
- document.getElementById
- document.getElementsByClassName
- document.getElementsByTagName
- document.getElementsByName
However, these methods restrict us on working only with elements that have an
id, class, or name attribute. As we discussed in CSS, sometimes we need to use
more complex selectors in order to access either nested elements or pseudo-classes.
Since CSS3, we can use two new Javascript methods document.querySelector
and document.querySelectorAll, that allow us to use the same selector
names used in CSS. Let's see some examples:
document.querySelector("#main"): the element whose ID is "main". This usage is probably the most common.document.querySelector("#zipcode"): the element whose ID is "zipcode". This might be used in a form that is asking for someone's snail mail address, but we need to remember to put an ID attribute in the input element.document.querySelector("[name='zipcode']"): the element whosenameattribute has the value "zipcode". This might be used in a form where we gave the input a name but not an ID.document.querySelector("p.authorName"): the paragraph of classauthorName. There had better be only one, becausedocument.querySelectoronly wants to return one element. Later in the course, we'll learn about returning more than one element.
There are also more complex forms that can be useful in certain circumstances
document.querySelector('#myform
            input[type="radio"]:checked')
: this finds the checked radio button that is a descendant of the element whose ID ismyform(probably a form).document.querySelector("#content img:nth-of-type(1)"): this finds the first image that is a descendant of the element whose ID iscontent.
Because this method is much faster than the other methods and allows us to keep our HTML clean of id and class attributes on every element, we will make very frequent use of it in our examples.
In fact, you might remember that we used this method in a few examples in the Javascript lecture, such as the grail quest.
Event Handlers
As we discussed in the section of Event Attributes, in order to interact with a page, we need to write so-called event handlers, which are Javascript code that is executed when an event is triggered. When the event handling code is short, it can be written as an inline attribute value for the event attribute. Otherwise, it needs to be wrapped inside the body of a function which either will need to be associated with the event attribute inline or through some more complex code. We will see all these scenarios in the following.
Inline Event Handlers
An inline event handler looks like the example below:
<button onclick="alert('I was clicked!');">Click me</button>
Notice the event attribute onclick, to which we attached the
event handler code that will display an alert pop-up dialog.
The special variable this
Whenever an event occurs, the browser knows not only what kind of event happened (a click, a key press, etc.)
but also the element that the event happened to. Such an element is called the target of the
event. In such cases, through some Javascript magic, the target element can be referred within the event
handler with the special variable name this.
Some examples are shown in the following.
<button onclick="alert(this.innerHTML + ' was clicked.');">Winter</button>
Notice how clicking on the button, displays the text that is enclosed within
the <button> element. By making use of the special variable
this, we can create very interesting effects, such as making things appear and
disappear, changing images, creating drop-down menus, etc. We will study this examples later
this semester. Here is a very simple one that changes the color of text.
<span onmouseover="this.style.color='blue';">Wellesley College</span>
Wellesley College
Writing inline event handlers makes sense only if we are doing something very simple, small, and that applies to a single element. Very often though, we want to perform more complex operations within the Javascript event handler, which might not need user interaction (for example, the code executes when the pages loads) or that it applies to many HTML elements (for example to all images in a gallery).
You might say that we can solve this problem by entering our code within the <script>
tag. However, that will not be enough. This is because everything inside that tag will be executed
in the moment the HTML document is loaded by the browser (remember, the code is parsed from the beginning
to end and all Javascript portions are executed). In such cases, we need to have a special way
of defining our code so that it cannot be executed immediately, but only when an event is triggered.
This special way of organizing code is know as a function.
Functions
A function allows us to package up many lines of code in one chunk, give it a name, and invoke it
whenever we want. Invoking a function means to run it (execute the code). You have seen
several examples of Javascript built-in functions so far, alert(), prompt(),
parsetInt(), etc. The difference is going to be that we will have to define our own
functions and then invoke them.
<script>
function greetings(){
    var inputField = document.querySelector("[name='firstName']");
    var name = inputField.value // read value from input
    alert("Nice to meet you, " + name);
}
</script>
<p><input name="firstName"></p>
<button onclick="greetings();">Greet me!</button>
Understanding functions
Functions are one of the most important building blocks of a program, but they are a bit hard to understand for novices. This is because using them involves two steps:- Declaring the function - this means specifying a blocks of code that has a name and a body of many lines.
- Invoking the function - this means simply using the name of the function with the pair of parentheses.
Explore on your own
Open the Console and copy one line at a time the code within
the body of greetings(). Whenever you declare a
variable, type then its name to see its value in the Console. Do
you see what the program does? Do you see the
method document.querySelector in action? Do you see
the attribute value?
jQuery
We will learn jQuery in more detail later in the course, but it simplifies many things that we use JavaScript for, so we'd like to start using it in a few simple ways now.
There's only one catch to using jQuery (we'll often abbreviate
it JQ, and JavaScript as JS), and that is that it's
an add-on
to the JS language, so we have to load it from a
file using the <script> tag:
<script src="https://code.jquery.com/jquery-1.10.2.min.js"></script>
This tag loads JQ from the cloud. Put that code at the end of
your HTML files, before any script elements that
use JQ, and you'll be fine.
The jQuery library is immensely popular and is used by Google, Facebook, and many other websites.
Accessing the DOM using JQ
So far in this course, we would access a part of the
document using the method document.querySelector
and a CSS-style selector string. With JQ, we use the function
named $ (yes, just a dollar sign — very
terse) and the same CSS-style selector string. Here's a
side-by-side comparison:
| JavaScript | jQuery |
|---|---|
var box = document.querySelector("#grail");
|
var box = $("#grail");
|
Modifying the DOM using JQ
Once you have a set of elements using JQ, you can
modify their contents using .html()
or .text(), and you can modify their CSS
using .css().
One advantage of JQ is that there's a greater consistency in how you can operate on things.
Homage to Monty Python Example
Here's the complete example. The setup is exactly the same:
<div id="grail">
  Your name here
</div>
#grail {
  border: 5px solid gray;
  color: gray;
  width: 50%;
}
Here's the code using JQ:
Accessing Form Values with JQ
As you might guess there's a .val() method in JQ to access
a form element:
<input id=age name="age">
<script>
  var userage = $("#age").val();
</script>
Adding a Click Handler with JQ
We can also add functions as event handlers using
JQ's .click() method. Here's a re-working of the earlier
example, using the .val() method and
the .click() method. You'll also notice that we used a lot
of IDs instead of the [name='firstName'] CSS selector. Why
do you suppose we did that?
<p><input id="firstName2" name="firstName"></p>
<button id="greet_button">Greet me!</button>
<script>
function greetings2(){
    var inputField = $("#firstName2");
    var name = inputField.val() // read value from input
    alert("Nice to meet you, " + name);
}

$("#greet_button").click(greetings2);
</script>
You'll also see that we organized the JS/JQ code after the HTML code. That's necessary because the event handler has to be added to a button that already exists. We didn't have to do this earlier because we used an inline event handler, but the JQ way is better because then the JS/JQ code is completely separate from the HTML code. This is analogous to separating the HTML and the CSS, and for the same reason.