In this reading, we'll learn how to build slideshows, both manually advanced and automatic (sometimes called a carousel). We'll also see how to put a random image on a page.
All of these cool JavaScript applications rely on several ideas:
- We'll have a numbered list of images
- We need a way of getting one of the images using its number
Both of these ideas are implemented in a fundamental data structure called an array.
Arrays
Arrays are found in every programming language; they're that important. There are sometimes minor differences, but the basic idea is the same:
- A storage structure for multiple pieces of information (data),
- where each piece of information (datum) is in a numbered position, and
- a particular piece of information can be retrieved by its number (called its index).
Imagine that we have a JavaScript program that needs to record some
information about Hermione, including her name, age and the courses she
is taking in her third year. (The list of courses is not complete.)
Here's how we might picture it:
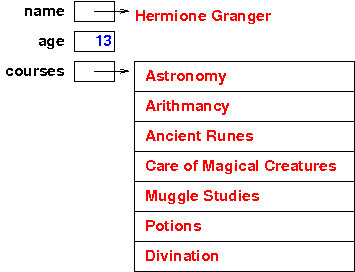
Here's the JS code that would produce that arrangement of data:
var name = "Hermione Granger";
var age = 13;
var courses = [ "Astronomy",
                "Arithmancy",
                "Ancient Runes",
                "Care of Magical Creatures",
                "Muggle Studies",
                "Potions",
                "Divination" ];
Try copy/pasting that code into the JS console and then looking at the contents of each variable.
Syntax
In the previous example, we used the syntax for an array literal, where all the values are known in advance. That's what we'll do most of the time in this course. A few things to note about the syntax:
- The array is enclosed by square brackets:
[]. - Each item is separated from the others by commas. An array of three
elements looks like this:
[ "Harry", "Ron", "Hermione" ] - There's no comma after the last item. An array of one element
looks like this:
[ "Voldemort" ] - It can appear on the right-hand side of an assignment statement
just like any other value. It's just longer, so we typically spread it
over multiple lines. But short ones can be done on one line:
var friends_of_harry = ["Ron", "Hermione"];
- Arrays can hold any kind of data, not just strings. Here's an array of
numbers stored in a variable.
var scores = [17, 23, 25, 29, 37];
Compound Data and Indexing
So far in this course, we have learned about different types of data:
- Numbers
- Strings
- Booleans
- Dates
With the exception of dates (and objects in general), each of these seems like a single piece of information. With arrays, we have a collection of information, so we call an array a data structure. Indeed, it is a compound data structure.
So, given the different items in the array of Hermione's courses, how do we extract a particular item? We do that using an index, which is just the numerical position of the item in the array.
Note: the numbering of the items starts at zero. So, item zero in the array above is "Astronomy" and item 6 is "Divination". This is an oddity of Computer Science, but it's quite consistent. (The reason for it is that the low-level implementation is that the index is the distance from the beginning or the number of items to skip to get to the desired one. So, naturally, the first one is index zero.)
Try the following:
var courses = [ "Astronomy",
                "Arithmancy",
                "Ancient Runes",
                "Care of Magical Creatures",
                "Muggle Studies",
                "Potions",
                "Divination" ];

alert( "course 0 is "+ courses[0] );
alert( "course 6 is "+ courses[6] );
alert( "course 2*3 is "+ courses[2*3] );
var index = 6;
alert( "course "+index+" is "+ courses[index] );
Note the syntax for getting an item out of the array. We give the name of the variable containing the array, then square brackets enclosing the numerical index of the one we want. In the previous example, we saw three equivalent ways to get element 6 out of the array.
We can even replace an item in an array if we want to. If Hermione drops Divination and replaces it with "History of Magic", we could do this:
var courses = [ "Astronomy",
                "Arithmancy",
                "Ancient Runes",
                "Care of Magical Creatures",
                "Muggle Studies",
                "Potions",
                "Divination" ];

alert( "course 6 is "+ courses[6] );
courses[6] = "History of Magic";
alert( "course 6 is "+ courses[6] );
In our course, we will rarely modify an array. We'll mostly use arrays as numbered lists of information. Nevertheless, it's good to understand. You can think of an array as a bunch of variables, addressed by both name and number.
Length of an Array
Arrays also have a built-in property called length that
tells how many elements are in the array. So, for example, if we want to
know how many courses Hermione is taking, we can execute code like this:
var courses = [ "Astronomy",
                "Arithmancy",
                "Ancient Runes",
                "Care of Magical Creatures",
                "Muggle Studies",
                "Potions",
                "Divination" ];

alert( "The courses array has "+ courses.length + " elements." );
The indexes of an array will be from 0 up to one less than its length. If the length is 7, the indexes will be from 0 to 6.
Note the syntax:
courses.length
The variable has a dot and then the name of the property. This should remind you of the syntax for a method on an object and that's no coincidence, except that we omit the parentheses because it's just a value, not a function.
Days of the Week
Let's see another example. Earlier, we learned that the date object would tell us the number of the day of the week, but not the name. Partly, this is because the days could vary with language (English versus French) or with the amount of abbreviation ("Wednesday" vs "Weds" vs "Wed" vs "W").
Suppose we want to map the day number to the day name. We could use arrays for this. Not coincidentally, the fact that days are numbered starting at zero will help us. Consider the following function:
function dayNamesEnglishAbbr(dayNum) {
   var names = [ "Sun", "Mon", "Tues", "Wed", "Thurs", "Fri", "Sat"];
   return names[dayNum];
}

alert( "day 0 is "+dayNamesEnglishAbbr(0) );
alert( "day 1+2+3 is "+dayNamesEnglishAbbr(1+2+3) );
This function works like any other, so its argument is still enclosed
in parentheses. The value of the dayNum parameter is then
used in the square brackets to retrieve the desired name for that day of
the week.
If we wanted to be more careful (perhaps the programmers invoking our
function are sometimes sloppy), we can check that the value is okay. We
can use the length property here:
function dayNamesEnglishAbbrCareful(dayNum) {
   var names = [ "Sun", "Mon", "Tues", "Wed", "Thurs", "Fri", "Sat"];
   if( 0 <= dayNum && dayNum < names.length ) {
      return names[dayNum];
   } else {
      return "invalid daynum";
   }
}

alert( "day 13 is "+dayNamesEnglishAbbrCareful(13) );
Slide Show
We now have the foundation on which we can build our slide shows. Here's the basic conceptual structure:
- We'll have an array of URLs, one for each picture we want to
show. We'll call that
slides. - We'll have a global variable that keeps track of which
image we are showing by storing the index of the current
picture (slide). We'll call that
currentSlideIndex. - We'll have a place in the document where we display the current slide. This will work just like a gallery.
Note: it's helpful if all the images are the same dimensions (width and height) or at least the same aspect ratio, so that they will all comfortably fit in the target IMG, without the page having to change its layout. Here, we resized all the images to be 1024 x 768 px, which you'll see reflected in the filenames.
Here's the code we'll write:
var slides = [ "harry-potter-1024.jpeg",
               "ron-weasley-1024.jpeg",
               "hermione-granger-1024.jpeg" ];

var currentSlideIndex = 0;
The HTML for our slide display is familiar. We put a button on top of it to use for advancing the slideshow.
Displaying the Slide
Let's write a function that will display the slide. Since we kept the
URLs simple, instead of the full relative URL
of potterpics/harry-potter-1024.jpeg tack on that folder name
now.
function displaySlide() {
    var file = slides[ currentSlideIndex ];
    var url = "potterpics/" + file;
    document.getElementById("slideshow").src = url;
}
We really should do something about the ALT and the FIGCAPTION, but we'll leave that as an exercise for the reader. Hint: you could have an array of values for each of those.
Advancing the Slide
The easy part of advancing the slide is just to increment the
currentSlideIndex and then
invoking displaySlide, like this:
// advance and display next slide
currentSlideIndex++;
displaySlide();
The tricky part of advancing the slide comes when we get to the last slide. In our example, we have just three slides, so the indexes will be 0, 1 and 2, but not 3. What do we do then? An easy thing to do is to start over again at zero. To make the function more general, we can have it use the length of the array, so that if we add another image or two, we don't have to modify this code at all. Here's the function:
// advance and display next slide
currentSlideIndex++;
if( currentSlideIndex >= slides.length ) {
    currentSlideIndex = 0;
}
displaySlide();
This will have the effect of making the slideshow seem circular
,
where it starts over again seamlessly.
The next step is to package this up into a function that can be attached to the button under our figure to act as an event handler. Here's the next step:
function nextSlide() {
    currentSlideIndex++;
    if( currentSlideIndex >= slides.length ) {
        currentSlideIndex = 0;
    }
    displaySlide();
}
We then can add a button to the page and attach this function to the button, like this:
< img id = "slideshow" src="potterpics/harry-potter-1024.jpeg" height = 200 alt="" >
Here's the final slideshow:

Later, when we learn about animations, we'll learn a cool effect for transitions between slides.
Implementing a previous slide button is left as an exercise for the reader, possibly in lab.
Carousels
A carousel or automatic slide show is just one that advances without the user clicking a button. It's a nice effect, though it can also be annoying if (1) the movement distracts from other information on the page, or (2) the user would like to linger longer on some slides than others. Nevertheless, a carousel is often a very nice effect, so let's learn how to do it.
We already have a function that will advance the slide show, namely the
nextSlide function. If there were a way to have the
browser automatically invoke that function every so often, we'd have an
automatic slide show. It turns out that the browser provides exactly
the tool we need, namely setInterval.
The setInterval function takes two arguments:
- A function. This function is being given to
the
setIntervalfunction, not being invoked, so we'll use the name without the parens after it. - A time interval in milliseconds. Every time this many milliseconds has elapsed, the function will be invoked again.
Here's how we would arrange for our nextSlide function to
be invoked every 2.5 seconds:
setInterval( nextSlide, 2500 );
Let's see it in action:
Here's the final carousel, with no button needed.
Random Images
In the slideshow and carousel, the code marched steadily through the array from 0 to the end, and then started over again. Something different we can do is to choose a random element of the array. Perhaps you want the opening page of your website to be a little different from visit to visit, so your code will display a random element each time.
To do that, we'll use the following function. This function is not built-in to the JavaScript language or to jQuery, so you'll have to copy its definition to your own .js file. In a later section, we'll learn how the function works, but for now, we'll just trust it.
function randomElt(array) {
    var len = array.length;
    var randIndex = Math.floor(Math.random()*len);
    return array[randIndex];
}

/* ================================================================
example */

var myArray = ["H", "He",
               "Li", "Be", "B", "C", "N", "O", "F", "Ne",
               "Na", "Mg", "Al", "Si", "P", "S", "Cl", "Ar"];
alert("Random Element is "+randomElt(myArray));
Try executing the code above a few times. You should get a different element each time.
So, to display a random element each time the page loads, we just have
to employ this randomElt function in a script element, so
that it runs when the page loads. Remember that the code has to
be after the IMG into which it will be loaded
exists.
  var file = randomElt( slides );
  var url = "potterpics/" + file;
  document.getElementById("randomPicture").src = url;
Here it is in action. Try reloading the page a few times:
How randomElt Works
The following is a little mathematical, but explains how
the randomElt function works. Here's the code again:
function randomElt(array) {
    var len = array.length;
    var randIndex = Math.floor(Math.random()*len);
    return array[randIndex];
}
We can describe the operations in 4 steps:
- Generate a random decimal between 0.00000 and 0.9999999. Call it x (0 ≤ x < 1)
- Multiply x by the length of the array. If the length of the array is 3, then 3x is between 0.0000 and 2.999999. Call the value y. (0 ≤ y < 3)
- Take the
Math.floorof y, which chops off the decimal part and gives us one of {0, 1, 2}. Call that valuei. - Use
ias the index into the array, returning whatever element is there.
The following figures illustrate the procedure:
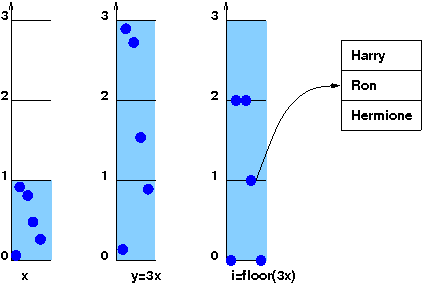
Math.floor causes each value to
drop to the next lower integer, like weights dropping to the
floor. Finally, these integer values are used to index into the
array. Here, we only show the index value of 1 getting Ron
out
of the array.