Dynamic DOM
We know from our earlier work with jQuery that one way to manipulate the DOM is to dynamically add elements, though we haven't done so in an assignment yet. Now is the time.
The CoffeeRun example dynamically creates a checkbox when a coffee
order is submitted. The checkbox is then appended to a list in the
Pending Orders
part of the page. When the checkbox is checked,
the order disappears.
The disappearing checkbox is done via a new and important kind of event handler called a delegated event handler, which is the ideal technique for dynamically created DOM elements. That will actually take up most of the reading.
- Constructing DOM Elements
- The AppendTo Method
- Attributes
- Pitfalls When Creating HTML
- Nested Structures
- The CheckList Class
- Helper Functions
- Removing Rows
- Searching down the tree
- Searching up the tree
- Removing
- Click Handling
- Event Delegation
- Motivation
- Event Delegation Pattern
- Event Delegation and jQuery
- Event.target
- Checklist Event Handler
- Client Code
- Form Values and .val()
- Summary
- Appendix
- Event Delegation and THIS
Constructing DOM Elements
If we think of the document as a living tree, what we are doing is grafting a new branch, complete with twigs and leaves, onto the tree.
Let's start simple though, by adding a single item to a list of
items. To create an LI element, we can use jQuery, supplying the tag
in angle brackets:
var elt = $("<li>"); // a new LI element
(Aside: note the difference between the above code, which creates a new LI element that is not attached to the page, from the following code, which matches all LI elements that are currently on the page.)
var li_elements = $("li"); // all current LI elements
Once we have a new LI element, we can modify it using jQuery, using the same techniques and methods we've used before, but now working with this unattached DOM element in a variable. For example, we can set the text inside the element:
var elt = $("<li>");  // a new LI element
elt.text("milk");
Finally, we can append that element to the page. Supposing that the
element #groceries exists on the page, here's one way to add our new
item to the list:
var elt = $("<li>");  // a new LI element
elt.text("milk");
$("#groceries").append(elt);
Here's an example in action:
The AppendTo Method
An alternative to using append is to use appendTo, which reverses the roles. So instead of:
$("#groceries").append(elt);
we can say
elt.appendTo("#groceries");
So what? Well, the alternative can be nice if you are a fan of chaining and concise coding. So we could do:
var elt = $("<li>");  // a new LI element
elt.text("milk").appendTo("#groceries");
Or even:
$("<li>").text("milk").appendTo("#groceries");
Here's an example:
Which should you use? You can use either technique. You should use whichever you feel comfortable with. But it's nice to know about these alternatives.
Attributes
One common thing we do is to add attributes to the new element. With
li we might add a class, but otherwise they don't normally have a
lot of attributes. (I recommend avoiding IDs for dynamically created
elements.) But checkboxes have several attributes.
You can, of course, use the .attr method in the normal way. Like this:
var box1 = $('<input>').attr('type','checkbox').attr('value','pepperoni');
or, equivalently,
var box1 = $('<input>')
                .attr('type','checkbox')
                .attr('value','pepperoni');
That works fine.
An alternative is to add a second argument to the jQuery function that is a JS object literal (a dictionary) of attribute/value pairs. Like this:
var box1 = $('<input>', {'type':'checkbox',
                         'value':'pepperoni'});
That's just a little more succinct in many cases, and CoffeeRun uses
it. But if you'd rather use .attr in your own code, that's fine too.
Pitfalls When Creating HTML
An alternative to the structured creation of DOM elements described above is to put a pile of HTML into a string and hand it to jQuery to parse and build DOM elements out of. I don't recommend it, but let's see it first.
Here are two examples:
var box1 = $("<input type='checkbox' value='pepperoni'>");
var li2 = $("<li class='optional'">candy</li>");
That seems pretty nice and easy, but I discourage it for these reasons:
- it has embedded quotation marks, which can get ugly when strings get longer and more complicated
- it's much harder to do when you have variables that you want to use in the string (say the "value" attribute is in a variable)
- it can't use the two-argument version of jQuery, where we specify attribute/value pairs
- it can't be easily combined with the other jQuery methods like
.attrand.text
While this can be made to work, I think it's better to use a more structured approach.
Nested Structures
So far, we've looked at building a simple li and adding it to the
page. What about more complex, nested structures? For example, the
checkbox input (like this: ) is just a box. It
needs to have some associated text, and both the text and the checkbox
need to be children of a label. Like this:
<label>
   <input type="checkbox" value="likes_cats">
   check here if you like cats
</label>
How could we build that? All we have to do is build three things:
the label, the checkbox and a string, and append them together the
right way. We can then append the result to where we want it. Like
this:
var label = $("<label>");
var box1 = $('<input>', {'type':'checkbox',
                         'value':'likes_cats'});
var text = "Check here if you like cats";
label.append(box1)
      .append(text)
      .appendTo('#checkbox_div');
Here it is in action:
The CheckList Class
We now understand the basic principles, so we can start understanding
the CheckList class in CoffeeRun.
Here's an outline of the class, omitting some other methods that we'll get to next:
class CheckList {
    // The constructor takes a selector string which specifies the
    // container HTML element for the set of checkboxes.
    constructor(selector) {
        if (!selector) {
            throw new Error('No selector provided');
        }

        // find the container element and store it for later
        this.$element = $(selector);

        if(this.$element.length == 0) {
            throw new Error(`No element was found for selector ${selector}`)
        }
        if(this.$element.length > 1) {
            throw new Error(`Too many elements were found for selector ${selector}`);
        }
    }

    // Adds a row to the list. Argument is an object with all the
    // information about the coffee order.
    addRow(coffeeOrder) {
        this.removeRow(coffeeOrder.emailAddress);
        let rowElt = makeRowElt(coffeeOrder);
        this.$element.append(rowElt);
    }

}
The constructor takes a CSS selector string just like the
FormSubmission class that we looked at before, and it does similar
checking, so we won't say more now. It saves the selected element in
an instance variable called $element. This element is the container
for all the dynamically added checkboxes. (Remember, the dollar sign
isn't special; it's an allowed, albeit unusual, character in a
variable name. Here, it reminds us that the variable contains a jQuery
object, so we can use jQuery methods.)
The addRow() method takes a coffee order, removes any existing row
with the same email address (a customer can only have one pending
order at a time), creates a DOM element to represent this order, and
then appends it to the container.
Helper Functions
To keep the code uncluttered, the file uses some helper functions to build rows/checkboxes. The first one is this:
// This function takes an order (represented as a JS object literal)
// and returns a DIV containing a checkbox for that order. The DIV is not
// attached to the page.

function makeRowElt(order) {
    let $div = $('<div>', {
        'data-coffee-order': 'checkbox',
        'class': 'checkbox'
    });

    let $label = $('<label>');

    let $checkbox = $('<input>', {
        type: 'checkbox',
        value: order.emailAddress
    });

    $label.append($checkbox);
    $label.append(makeDescription(order));
    $div.append($label);
    return $div;
  }
Here we see some dynamically built HTML. It uses another helper function that we haven't looked at yet:
// This function takes an order (represented as a JS object literal)
// and returns a string describing it.

function makeDescription(order) {
    let description = order.size + ' ';
    if (order.flavor) {
        description += order.flavor + ' ';
    }
    description += order.coffee + ', ';
    description += ' (' + order.emailAddress + ')';
    description += ' [' + order.strength + 'x]';
    return description;
}
That function is mostly working with strings and isn't very interesting, but feel free to ask me if you have any questions.
That code actually does all the work to add checkboxes like the following to the page:
<div data-coffee-order="checkbox" class="checkbox">
    <label>
        <input type="checkbox" value="scott.anderson@wellesley.edu">
        grande caramel Earl Grey,  (scott.anderson@wellesley.edu) [67x]
    </label>
</div>
Removing Rows
One line of code we didn't discuss above is this:
this.removeRow(coffeeOrder.emailAddress);
Now let's look at the definition of that method:
    // Remove existing orders using that email address, if any.
    removeRow(email) {
        // This selector is complicated by needing to put quotation marks around
        // the email address. We use single-quotes outside and double-quotes within
        let sel = '[value="'+email+'"]';
        // use jQuery chaining to find existing orders, if any, go up
        // to the checkbox, and prune the whole subtree
        this.$element
            .find(sel)
            .closest('[data-coffee-order="checkbox"]')
            .remove();
    }
Wow, that's basically all jQuery magic. Deep breath; we can understand this.
The first thing is does is create a CSS selector that will match the email address in a checklist item. (We search for email addresses, since they are what uniquely identifies an order.) Suppose we want to search for the checklist item at the end of the last section, namely:
<div data-coffee-order="checkbox" class="checkbox">
    <label>
        <input type="checkbox" value="scott.anderson@wellesley.edu">
        grande caramel Earl Grey,  (scott.anderson@wellesley.edu) [67x]
    </label>
</div>
We want to find something that has
value="scott.anderson@wellesley.edu". Since the email address is in
a variable, email, we do the following:
let sel = '[value="'+email+'"]';
Once we have that selector, we want to:
- Search the container of checklist items, searching down the DOM tree, to find the element that matches that selector,
- Then, we search up from the checkbox to the surrounding
div. For specificity, we search for the element matchingdata-coffee-order="checkbox" - Then we remove that element from the page
Let's look at these steps.
Searching down the tree
We have used jQuery many times to search the entire page. For example:
$("#fred")
$("[data-coffee-form=myform]")
The expressions above search the entire document for elements that
match the given selector, but what if you already have a jQuery
wrapped set for part of the document (a subtree), and you want to
search that subtree? In that case, you can use jQuery's .find()
method:
$("#fred").find('[data-coffee-form=myform]')
Or, if you already had something saved in a variable:
var $elt = $("#fred");
...
$elt.find("[data-coffee-form=myform]");
It's more efficient to search a small part of a document than to
search the whole thing. Furthermore, find is necessary when
searching a branch that is not (yet) attached to the document. So,
find is a useful method in jQuery.
Searching up the tree
Sometimes, you want to search up the tree, along your list of ancestors
(but not off the list: parent, grandparent, and great-grandparent, but not
uncles, great-aunts and the like). jQuery's .closest() method is good
for that. For example, the following finds the closest ancestor that is a
DIV:
$elt.closest('div')
The closest method starts at the given node ($elt in the example
above) and goes from child to parent, up the ancestor chain, until
some ancestor matches the CSS selector that is the argument to
closest. It stops at the first (closest) matching ancestor.
Removing
To remove an item from the page, jQuery provides a .remove()
method. It removes all the items in the set. In CoffeeRun, we go to
some effort to make sure we find the correct DIV to remove.
Click Handling
We remove checkboxes for prior orders by the same person, if any, but we also remove checkboxes when an order is completed. That's done by an event handler for the checkboxes.
However, those checkboxes don't exist when the page loads. So far in the course, we have always added event handlers to things that already exist.
<button id="myButton">click me</button>
<script>
$("#myButton").click(function () { alert('thanks!')})
</script>
But with these checkboxes, we can't add the click handler to them when the page loads, because they don't (yet) exist.
To handle that common but tricky situation, jQuery provides a cool feature called event delegation. In short, the event handling is delegated to something that exists when the page loads. In CoffeeRun, that will be the container for all the checkboxes:
<h2>Pending Orders</h2>
<div data-coffee-order="checklist">
</div>
The div may be empty, but it exists. Let's look at event delegation.
Event Delegation
Event delegation is a powerful jQuery technique that allows you to put one event handler on an ancestor and delegate to it handling all the events of a certain kind for all of its descendants. For example, try clicking on the items on this grocery list:
- apple
- banana
- chocolate
Rather than put an event handler on each item (here only three, but you should see how long my grocery lists get, especially when I'm hungry), we can put one event handler on the UL element, and say
"anytime an LI is clicked, run this function"
We do that with the following code:
$("#groceries").one().on(
    'click', // first arg is the event, as usual
    'li',    // this argument is new; the descendant who delegates the CLICK
 // the function moves to third, but is otherwise unchanged
    function (event) {
        var clickee = event.target;
        var text = $(clickee).text();
        alert("You clicked on the "+text);
});
Let's take this one line at a time:
$("#groceries").one().on(
This selects the ul item that we created. It is an ancestor of all
the li elements we are interested in. Eventually, when we use
delegated with dynamically created things, the li elements will be
dynamically created and the ul will be empty. One of the most common beginner mistakes is to have something like:
<ul id="groceries3"></ul>
and to attempt the add the event handler to the li elements, of
which there are none. But jQuery doesn't mind empty sets, so your code
just silently fails.
Therefore, in the example code above, I used the .one() method from
my jQuery plugin, to check that the selector matches exactly one
thing.
Let's add a few lines:
$("#groceries").one().on(
    'click', // first arg is the event, as usual
    'li',    // this argument is new; the descendant who delegates the CLICK
 // the function moves to third, but is otherwise unchanged
    function (event) {
The arguments to the on method are the event (click) and a
selector for the kind of descendant we are interested in ('click) and
finally the event handler function. Here, we are interested in theevent` object that the browser will create and invoke our function
with. Now let's fill out the rest:
$("#groceries").one().on(
    'click', // first arg is the event, as usual
    'li',    // this argument is new; the descendant who delegates the CLICK
 // the function moves to third, but is otherwise unchanged
    function (event) {
        var clickee = event.target;
        var text = $(clickee).text();
        alert("You clicked on the "+text);
});
The reason we are interested in the event object is because the
event.target is the actual element that was clicked on. More on it
below. You can also use this which jQuery sets to the delegating
element (the LI in our example above). Usually this and
event.target are the same, but there are subtle differences which
I'll put off for now.
Motivation
What is event delegation? Why do it? In Ottergram, there were 5 or 10 pictures of otters, to which we attached an handler to each one, so 10 nearly identical event handlers. In the Concentration assignment, we creating 16 nearly identical event handlers. In both of these, the event handlers were added when the page loads. This leads to two problems:
- it's wasteful of memory to create many nearly identical event handlers, and
- any elements that are dynamically added after the page loads don't get event handlers
Event Delegation Pattern
If we have a list of groceries like this:
- apples
- bananas
- chocolate
The DOM elements might look like this:
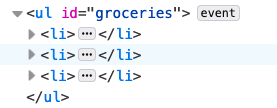
With event delegation, we put the event handler on the UL, rather
than on each of the li elements. The screenshot shows that the event
handler is on the ul, not the three li elements. Because of the
way browsers work, clicking on an li counts as clicking its parent
(the ul), its grandparent, and each of its ancestors, in turn, all
the way to the body element.
This is called event bubbling.
This solves both our problems: there's only one event handler, regardless of how long our grocery list is, and it works even for dynamically added grocery items.
Event Delegation and jQuery
jQuery allows us to do event delegation in an easy way. We just use
the .on method that we used before, but we add an extra argument,
between the event argument and the function argument. So instead of:
$(sel).on('click',
                  function () { ... });
We do:
$(sel).one().on('click',
               'descendant selector',
               function () { ... });
(I'm going to use .one() in these examples, to emphasize that we are
adding the envent handler to exactly one element.)
Any descendant of sel that matches descendant selector will
delegate its click events to the ancestor, which runs the given
function.
Look again at the grocery example from above:
$("#groceries").one().on(
    'click', // first arg is the event, as usual
    'li',    // this argument is new; the descendant who delegates the click
    // the function moves to third, but is otherwise unchanged
    function (event) {
        var clickee = event.target;
        var text = $(clickee).text();
        alert("You clicked on the "+text);
});
The anonymous function, the event handler, takes the event.target,
pulls out the text, and does an alert.
Event.target
What is event.target? Remember that event object that the browser
creates whenever an event occurs and is passed to our function as an
argument? Here's yet another thing that the event object does: it can
tell us the DOM element that got the event.
So, the event object:
- has a
preventDefault()method - has a
codeproperty that we can use for keyboard callbacks, and - has a
targetproperty that tells us what DOM element got the event
We'll see more things in the event object later in the course.
Checklist Event Handler
We're now ready to understand the click handling in CoffeeRun:
class CheckList {

    // method to add a callback function to the checklist. This function is invoked
    // anytime a checkbox is clicked. Its argument is the email address of the order.
    addClickHandler(callback) {
        // Use jQuery's delegated handler mechanism
        this.$element.on('click',
                         'input', // Only interested in INPUT descendants
                         // note the arrow function
                         (event) =>  {
                             let email = event.target.value;
                             this.removeRow(email);
                             callback(email);
                         })
    }
}
This method adds a delegated event handler to the $element, which
will be the container for checklist items. (The constructor checked
that it exists and is only one element, so we skipped the .one()
here, though it wouldn't hurt to add it. The delegation is all input
descendants; those will be the checkboxes.
The event handler does some routine stuff and then uses a callback to
do the specific stuff. The routine stuff is just to remove the row
that the user clicked on. Note that this is the instance of the
CheckList class; we use an arrow function so that it doesn't change.
Client Code
Given the class we defined, the client code is now pretty straightforward:
    list1 = new CheckList(CHECKLIST_SELECTOR);
    list1.addClickHandler( (email) => { truck1.deliverOrder(email) } );
So, when we click on a checkbox, the order is not just deleted from
the list of pending order, the truck.deliver() method is used to
deliver the order.
Form Values and .val()
We've looked at the val method before, but let's learn another trick.
As you know, if you just want one value from a form, the
.val() method can get the
value of an input:
To get the value, just invoke .val() with no arguments:
$(selector).val()
For example:
$("[name=zip_code]").val()
$("[name=pizza_size]").val()
This method works on text input elements, select elements
(drop-down menus), and textarea elements.
For radio buttons, you can use the :checked pseudo-class to get the
value of the one that is checked:
$('input[type=radio][name=size]:checked').val();
You'll need to use .val() for the Quiz assignment.
It's also possible to set the value of an input, but we don't need that.
Summary
- DOM elements can be static (defined in the HTML file) or dynamic (added/removed by JavaScript/jQuery)
- DOM elements are dynamically created by creating them, one node at a
time, attaching them using tools like
appenduntil you have a branch of a tree. - The branch can then be added to the document, again using something
like
append. - JS/JQ code can search a branch (whether attached to the document or
not) by using the
findmethod - JS/JQ code can search up the document, from child to parent, using
the
closestmethod. - Event handlers can use delegation, in which as static ancestor of a set of elements can handle the events for all of them.
- Event delegation is more efficient and also much more convenient for elements that are dynamically added and removed.
Appendix
If you're not mentally exhausted, we can discuss event delegation and
the this keyword, but you can also return to this, since the
CoffeeRun code does use this as described here.
Event Delegation and THIS
Here's a slightly different grocery list, with some more structure in each item. Compare clicking on the emphasized stuff versus non-emphasized.
- apples, specifically Honeycrisp
- bananas, which I like but my kids don't
- chocolate, especially dark chocolate
<ul id="groceries5">
   <li>apples, specifically <em>Honeycrisp</em></li>
   <li>bananas, which <em>I</em> like but my kids <em>don't</em></li>
   <li>chocolate, especially <em>dark chocolate</em></li>
</ul>
Again, we just put one event handler in the page, attached to
#groceries2 but handling any click on an LI that is a descendant
of #groceries2.
$("#groceries2").on('click',
    'li', // this is new
    function (event) {
        var clickee = event.target;
        var target_text = $(clickee).text();
        var this_text = $(this).text();
        if( clickee == this ) {
            alert('both clickee and this are the same: '+this_text);
        } else {
            alert('clickee is '+target_text+' while this is '+this_text);
        }
});
Note that this is the li element, while event.target is the
actual element that was clicked on, which might be descendant, such as
the em. Try clicking apples and also Honeycrisp.
Most of the time, the event.target will be the same as the LI that
was clicked on, but if the LI contains other HTML elements, as it does
here, those descendants might end up being event.target. Sometimes
the different will matter, but often not. Something to keep in mind.