wx appliance
The wx appliance is a virtual machine that provides all the software tools for CS 240 and CS 251. You can run the appliance as an application alongside others on your own computer with minimal fuss.
Contents
- Target Audience
- Installation
- Startup and Shutdown
- Management
- Use the Appliance
- Under the Hood: Software and Licenses
- Troubleshooting
Target Audience
Use the wx appliance if you want the flexibility of working on your own computer but you want to avoid:
- installing and configuring the various tools for this course;
- worrying about tricky low-level compilation differences between your computer and our grading computers; or
- spotty network connections that cripple remote logins to CS machines.
Regardless of whether you work on a CS machine, working in the microfocus or S173 labs is great for class camaraderie! (And you might even get some great tips from peers.)
Benefits
- The wx appliance is ready to run out of the box. One installation gets you all the course tools. Your only further configuration steps (see below) will be to change the password, optionally create a new account for yourself, and tell Mercurial your name and SSH key.
- Your work is isolated from the rest of your computer – no worries about messing up other software you have installed while trying to install software for this course.
- You have a GNU/Linux environment available on your laptop any time you want to tinker with it for other projects. (GNU/Linux operating systems power a huge swath of the internet.)
- Learning about virtual machines is a useful skill, as more and more computing infrastructure becomes virtualized. Topics like these might just spur you to further study of computer systems.
Caveats – READ THIS!
Infrastructure described in this document is currently experimental and in its first semester of deployment. Things should work, but expect to find an occasional surprise. Your assistance in finding and debugging these surprises is appreciated.
There is currently no support for “repair” as part of the warranty on wx appliances. If your wx appliance stops working, you can replace it easily with a new one, but you will lose all the files you stored on the old one. That means you should backup anything of importance stored on your appliance. Luckily, this is pretty easy if you are using version control to manage your work as we do in CS 240 and CS 251. If you add, commit, and push often, your important work is already backed up!
Eventually (but not yet) we plan to support:
- Accessing your CS department account (“tempest”) files directly on the wx appliance file system.
- Replacing the software part of your appliance from scratch without losing your personal files.
Requirements
Most computers from the last 5 years or so should suffice. You need:
- a fairly recent 64-bit Intel or AMD processor;
- Mac OS X 10.8 or later, Windows Vista SP1 or later, or any recent major distribution of GNU/Linux; and
- 15GB of free disk space (to be comfortable; 10GB probably enough, maybe even less)
Ask if you are not sure if your machine will work. (Or be a scientist and experiment: just try it!)
Installation
-
Download
wx.ova[~4.5 GB] to your computer. This will take a while. Do it on the campus network.Alternatively, use
scpto get the file if you have a CS account andscpinstalled (allows access from anywhere, not just campus):$ scp your_username@cs.wellesley.edu:~bpw/public_html/campus/wx/wx.ova . - While you are waiting, download and install the latest version of VirtualBox 5.
- Once
wx.ovahas finished downloading, start VirtualBox and choose the menu item File > Import Appliance…. - Click the folder icon and browse to select
wx.ova, then click Continue. - Check the box for Reinitialize the MAC address of all network cards.
- Click Import to accept the default machine parameters. This will take a few minutes.
(If you know what you are doing, feel free to fiddle with other settings, of course.)
Startup and Shutdown
The wx appliance can be started and shut down much like a physical computer. It can also be paused. Read the VirtualBox manual to learn how to control it and how it interacts with your mouse and keyboard.
Start up the appliance: open VirtualBox, select wx in the list on the left, and click the Start button. This launches a separate application running the appliance.
Shut down the appliance by clicking the set of icons in the upper right corner of the wx screen, then clicking the power button.

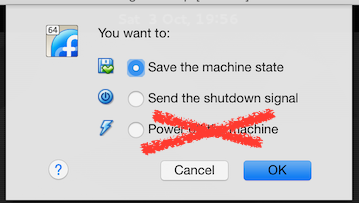
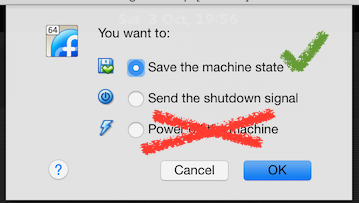
This is equivalent to yanking out the battery or power cord while the computer is running. (Notice the lightning bolt next to that option!) Students who do this end up with corrupted Mercurial repositories. The Send the shutdown signal option is OK. This asks the wx appliance to shut itself down.
Pause and Resume
Pausing and resuming the appliance is convenient if you want to keep some windows open in the appliance but you want to free up resources on your computer while you work on something else.
Pause the appliance by clicking to close the VirtualBox window holding the wx screen. Choose Save the machine state and click OK. VirtualBox will take a few seconds to save the wx appliance’s current state, then it will close the wx appliance. The listing for the wx appliance in VirtualBox will now show it as Saved (vs. Powered Off). This is like stopping time, and is similar to sleeping/hibernating.
Resume an appliance whose state has been saved the same way you start an appliance.
Management
Users
The wx appliance comes with one user, creatively named wx. This user’s password is also wx. wx is logged in automatically when the wx appliance starts. You may use this account as your own, or optionally create your own account with your Wellesley username, which has some benefits, and keep the wx account for administrative tasks.
Change the wx User’s Password
Using a weak password and automatic login is NOT a good idea for your personal machine. Even here, on a virtual machine that is protected to some degree inside your personal machine, it is a bad idea.
Change wx’s password to something stronger that you will remember. You will need it again later.
- Click the Activities menu in the upper left of the screen.
- Click the screwdriver-and-wrench icon to open system settings.
- Click Users.
- Click Unlock at the top of the window and enter the password for
wx. (It is stillwx!) - Turn off automatic login for the
wxuser. - Click the dots in the Password field and enter a new password in the window that pops up.
- Close the settings window.
Optional: Create a New User
- Open and unlock the Users section of the system settings.
- Click + in the lower left to add a new user.
- Fill out the fields, then click Add at the top.
- Close the settings window.
- Click the icons in the upper right of the screen, click the power icon, and click Restart. (Don’t just log out or switch users. A small bug currently causes weird behavior if you log
wxout immediately after creating your first new user. The switch user function has proven buggy on occasion in our experience.) - Log in as you!
Reclaim Space
If you have successfully installed and started using your copy of the wx appliance, you can safely delete the several-GB wx.ova file that you downloaded. The imported version has copied everything it needs from this file.
Updates
If your appliance prompts you to install updates, do so. (You may need to enter wx’s password.)
From time to time, we may also need to install new software or make changes to your copy of the wx appliance. We will let you know when this is needed. To get updates from us, log in as the wx user, open a terminal, and run the command:
$ wx upgrade
Use the Appliance
More documentation: The wx appliance uses the Fedora distribution of the GNU/Linux operating system, including the GNOME 3 user interface and applications. We have removed some non-essential software packages from the default distribution and installed several programming-related packages. Consult the Fedora/GNOME documentation or our own tool documentation page for more.
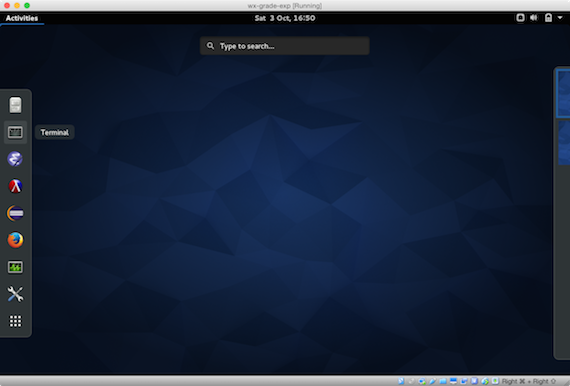
Launch Applications
To open a dock holding common applications, click Activities in the upper left corner of the wx screen or press and release the Control key (Windows keyboards) or the Command ⌘ key (Mac keyboards). For more applications, click the grid icon at the lower left.
Host-Guest Integration
The wx appliance comes with extensions installed in the guest operating system to support some useful features such as:
- a clipboard that is shared between the host (the software on your personal machine) and the guest (the software running in the wx appliance)
- shared folders that appear in both the host and guest
- drap-and-drop may also be supported in some cases.
Check the Devices menu in the running VirtualBox VM application to enable or disable these features.
Read the VirtualBox manual for more information.
Under the Hood: Software and Licenses
The wx appliance is currently available only to students, faculty, and staff within Wellesley College.
The wx appliance uses a mix of free software and open-source software, plus a couple management tools of our own design that will eventually be released under such licenses.
We use VirtualBox (manual) to package and execute the wx appliance.
The wx appliance runs the Fedora 22 GNU/Linux distribution, including the GNOME 3 user interface and applications. We have removed some non-essential software packages from the default distribution and installed several programming-related packages. See the CS 240 and CS 251 tools pages for details.
Troubleshooting
Please report issues to Ben Wood. Detailed descriptions and any troubleshooting you have tried (or solutions you have found) are very useful.
Windows 10 and VirtualBox
UPDATE: VirtualBox >= 5.0.3 appears to have resolved this issue. We have confirmed working installations (with no extra tweaking) on Windows 7, 8.1, and 10.
“VT-x” or “AMD-V” Unavailable or Disabled
When trying to start your wx appliance from VirtualBox, some Windows machines may give an error about “VT-x” or AMD-V” being unavailable or disabled. These two features are Intel and AMD’s special hardware support for faster virtual machines. If you have a relatively recent computer (last few years), it is likely you have these features, but they are disabled.
To enable virtualization support:
- Reboot your computer and hold the F2 or F10 key as it is starting up. This will cause it to enter a mode (known as BIOS or firmware settings) allowing you to set low-level hardware options. (If the first of F2/F10 that you try doesn’t work, try the other. The screen probably tells you which.)
- Use the arrow keys to navigate to the Security or Virtualization Settings (or similary named) tab.
- Enable hardware support for virtualization.
This will not affect the workings of the rest of your applications, but allows VirtualBox to run the wx appliance.
You may need to delete the virtual machine you created in VirtualBox and reimport wx.ova for it to recognize the virtualization support.
Here is what worked for one student with Windows 10 and VirtualBox 5.0.2. The change that these instructions perform is to configure a firmware (very close to hardware) option that gives permission to use special CPU hardware features (Intel’s “VT-x” or AMD’s “AMD-V”) that support virtual machines.
Here are the steps I went through to get the VM to work on a Windows 10. The tutorials I was working with was in Windows 8 so it should be applicable as well.
The error message I had was: “vt-x/amd-v hardware acceleration is not available on your system”
– In Settings, go to Update & Security -> Recovery
–> Advanced Startup
–> Troubleshoot
–> Advanced Options
–> UEFI Firmware Setting (clicking this will ask to restart the computer)
It brings the user to a screen similar to MS-DOS (blue screen, white letters)
–> Navigate to Security Tab
–> Virtualization
–> Enable the two things listed
–> Save & ExitHope this helps!