Facebook API Tutorial
Preparation
To follow this tutorial you need a Facebook account. We will write HTML and Javascript code, but in order to test it, it needs to be uploaded in the server. Thus:
- Use Fetch (or your preferred SFTP client) and within
cs249create a folderAM2. - On your machine, create three files:
am2.html,am2.js,am2.css. - Move these files on the server using Fetch, and put them in the
AM2folder. - Then, right-click on each of these files and say "Edit with ..." and choose your editor (e.g. Brackets, etc.). This should allow you to edit on your machine, and see the results on the web.
- Write a
h1title on your page, and see the change, going to the URL of your page on the CS server.
Alternatively, if you have taken CS230 and have learned to use Emacs, you can login on the CS server through a terminal, and use emacs to edit your code.
Part 1: Register your app
To use the Facebook API in a web app, we need to register our app, by providing its URL to Facebook.
- Go to the https://developers.facebook.com/.
- In the menu bar, find the tab "My Apps" and in the drop-down menu choose "Add a new app".
- In the pop-up dialog that appears, choose the last option, Website (WWW).
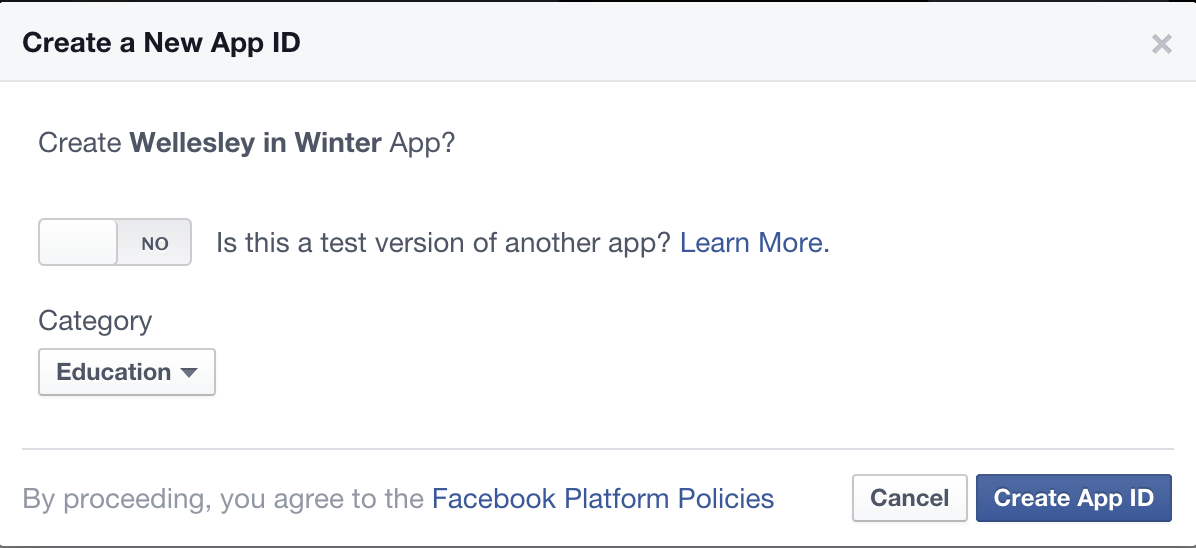
- You'll be prompted to enter a name for your app. Careful, don't use the word "Facebook" or "FB", they are not allowed. Because this title will show in your page under the Facebook Login button, choose something meaningful, e.g., "Wendy's Faves" or "Wellesley One Stop", etc.
- Once you entered a name, you'll have to choose a Category for your app before clicking
on "Create App ID" (see screenshot below).
- In the next step, you'll be shown some Javascript code. Don't copy it in your
HTML file! We will take the lines between the two
<script>tags and copy it into ouram2.js, because we will put all Javascript code there. - Below this code, there is a form asking for the URL of your website. Enter the URL of your
am2.htmlfile, for example:http://cs.wellesley.edu/~YOURACCOUNT/cs249/AM2/am2.html
and click "Next". - To test the Facebook integration, copy the code for the Facebook like button in your
HTML file:
<div
  class="fb-like"
  data-share="true"
  data-width="450"
  data-show-faces="true">
</div>
Now, if you go to your URL on the browser, and refresh the page, you should see the Facebook buttons Like and Share showing on the page. Our first part is completed successfully.
Part 2: Login
In order to be able to do something more meaningful with the Facebook API, we need to get the users to login, give permission to our web app to access some of their information, and then use this authorization to perform requests to the API on behalf of the logged in users. Here are the steps to follow, while we continue using our files as in Part 1.
- In
am2.html, comment out or delete the div for the FB like button. - Instead, copy in the HTML the following code for the FB login button and a div where to display messages from the API.
- In the Javascript file,
am2.js, we will add the following function as the event handler for the FB button click, below the existing code:function checkLoginState() { FB.getLoginStatus(function(response) { statusChangeCallback(response); }); } - As we can see, the function
checkLoginStateinvokes first a FB method, within which a second function is invoked, whose definition is given below and also goes at the end of our JS file:// This is called with the results from from FB.getLoginStatus(). function statusChangeCallback(response) { console.log('statusChangeCallback'); console.log(response); // The response object is returned with a status field that lets the // app know the current login status of the person. // Full docs on the response object can be found in the documentation // for FB.getLoginStatus(). if (response.status === 'connected') { // Logged into your app and Facebook. testAPI(); } else if (response.status === 'not_authorized') { // The person is logged into Facebook, but not your app. document.getElementById('status').innerHTML = 'Please log ' + 'into this app.'; } else { // The person is not logged into Facebook, so we're not sure if // they are logged into this app or not. document.getElementById('status').innerHTML = 'Please log ' + 'into Facebook.'; } } - This last function invokes yet another function,
testAPI(), which is defined below. This also goes in our JS file.// Here we run a very simple test of the Graph API after login is // successful. function testAPI() { console.log('Welcome! Fetching your information.... '); FB.api('/me', function(response) { console.log('Successful login for: ' + response.name); document.getElementById('status').innerHTML = 'Thanks for logging in, ' + response.name + '!'; }); } - Finally, we add the
FB.getLoginStatusmethod inside thewindow.fbAsyncInitmethod as well, because we are able to say whether a user is already logged in on Facebook, even without them using our Login button. This is done to avoid having users to login multiple times, if they already had a recent FB login. The following code goes right after the ending});forFB.init.FB.getLoginStatus(function(response) { statusChangeCallback(response); });
<fb:login-button data-show-faces="true" width="400"
                    data-scope="public_profile,user_likes" onlogin="checkLoginState();">
</fb:login-button>

<div id="status">
</div>
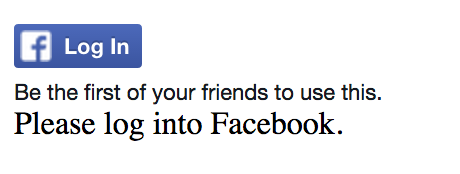
If you entered this code correctly in the HTML and JS file, you should be able to see the following when you refresh the page (left) and the message in the console (right):


Part 3: Permissions
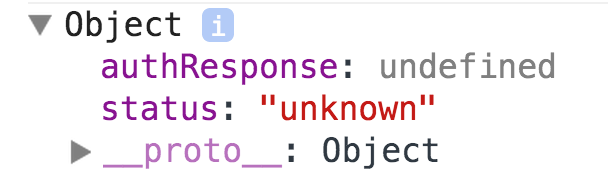
We see the message above, because we are already logged in on Facebook (when creating the app), and we only thing that we need to do is to give authorization to the app to access our data. However, if we open an Incognito tab on Chrome and go to the page again, we'll see a different message on the page and the console:
Eventually, if we click on the button, but we have not yet authorized the application, we'll see a dialog box like below (left side):
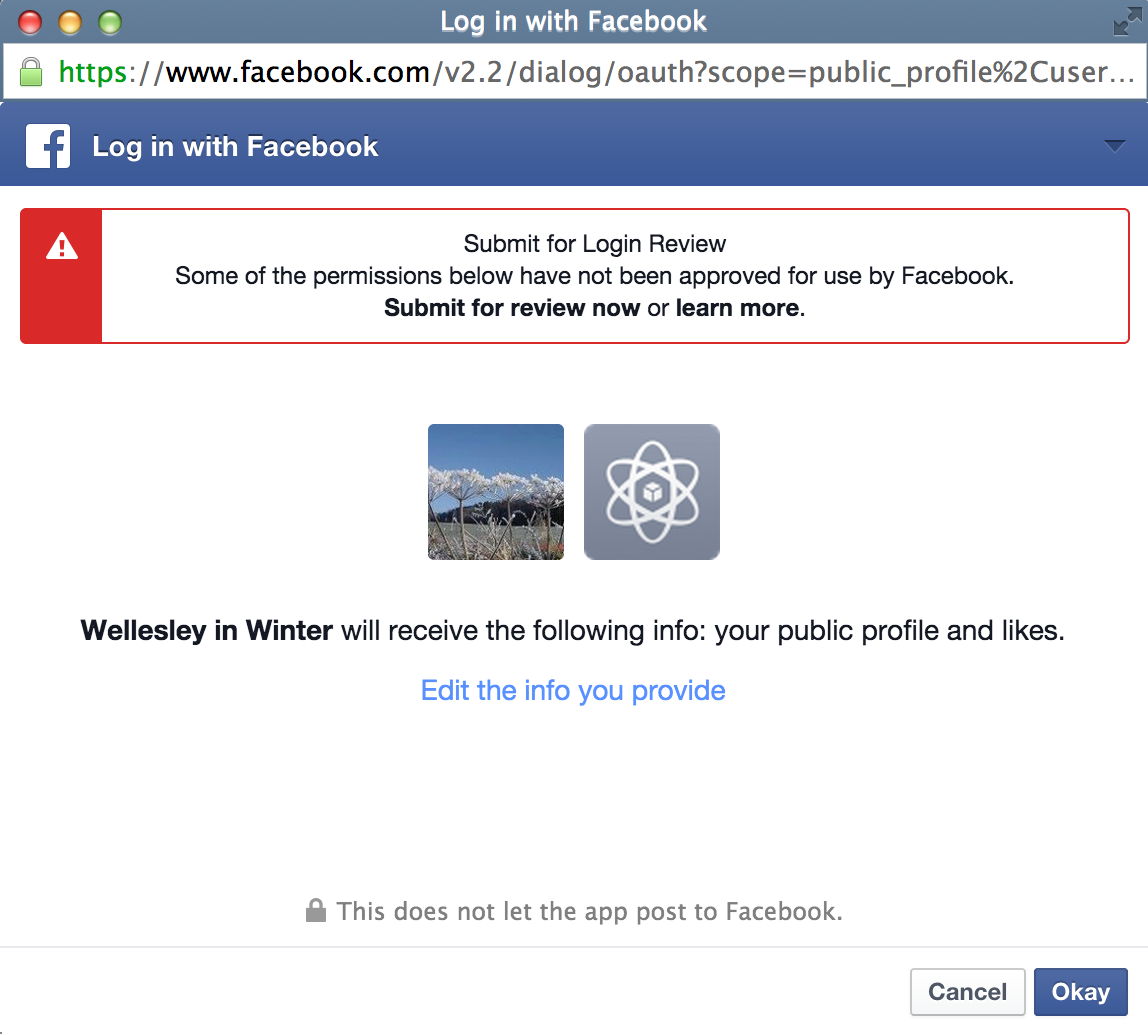
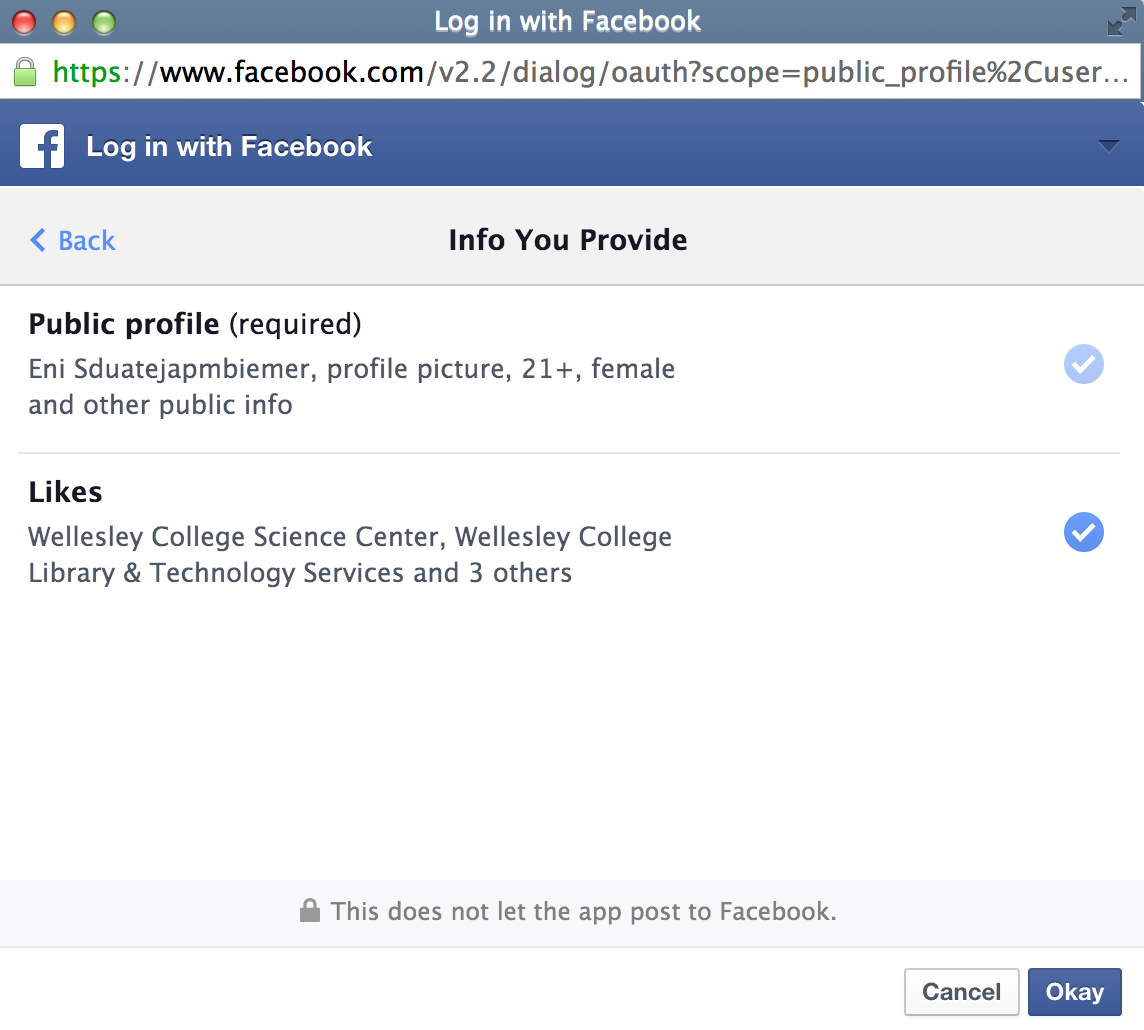
If the user clicks on "Edit Info you provide", they have the ability to deny permission to certain data (but not the public info, that will be shared as is - see the right screenshot).
Finally, once the user gives permission, the following shows on the page and the console:


Asking for permissions
We were able to ask for "user_likes" because we included that permission in the
data-scope attribute of the FB login button:
<fb:login-button data-show-faces="true" width="400"
                    data-scope="public_profile,user_likes" onlogin="checkLoginState();">
</fb:login-button>
public_profile, email, and user_friends can be asked without problem, however, all permissions beyond that, need to be reviewed by Facebook. This is why our dialog box above showed a warning message in red.
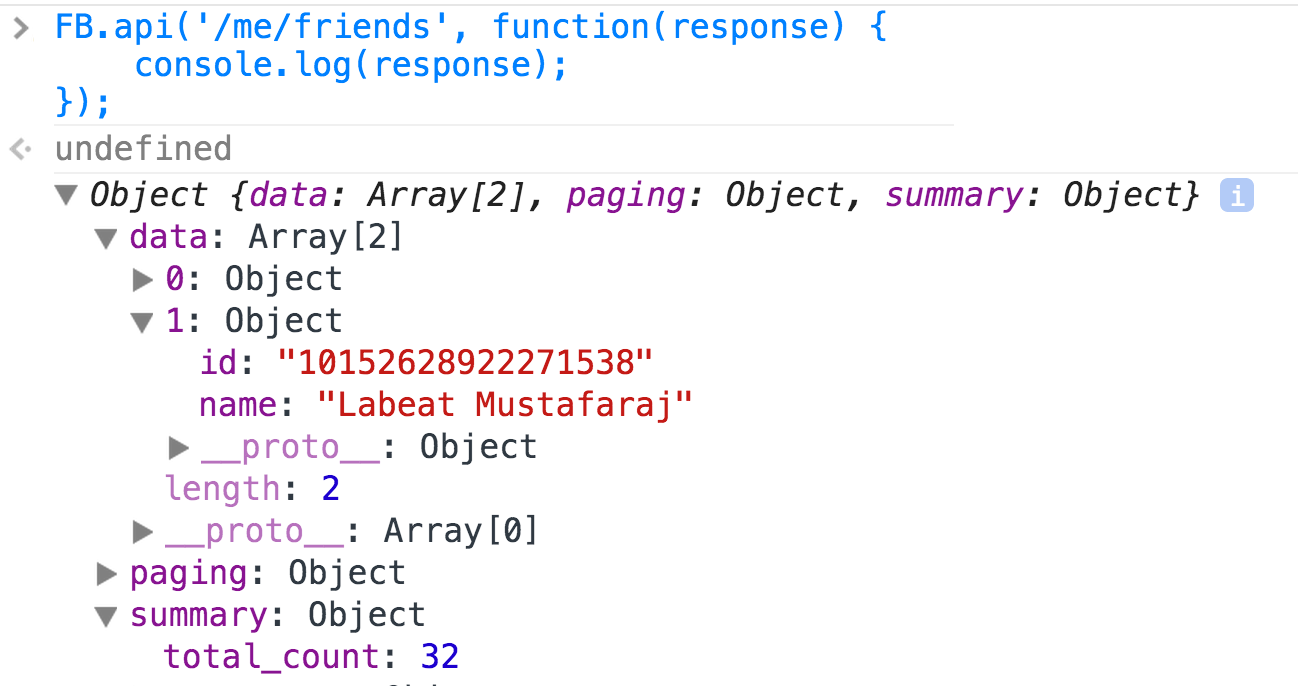
However, the fact that it's easy to ask for "user_friends", doesn't mean that if we didn't ask, we can get the list. You can test that easily in the console, by typing:
FB.api('/me/friends', function(response) {
    console.log(response);
});
The response will be an object that has an array with 0 elements. Now, go and add the permission "user_friends" in the FB login in the HTML code and refresh the page. You'll see that the FB login button appears again in the page, so that you can see the dialog and accept the access to your list of friends. Once you do this, and go and rerun the above code in the console, you should be able to see the total number of your friends and the friends who have also given access to the same app. See how this looks for me in the screenshot below.
Share the link of this page with some of your family and friends and ask them to give your app permission to access their profile, because you are learning to work with the FB API. The more people you get to give permissions to your app, the easier will be for you to do interesting things with your app (such as map their locations, etc.). However, you'll need to add the fields you are interested in, to the scope attribute in the FB button, because almost anything interesting in Facebook is not accessible without user permission anymore.
Link to the
reference of properties for a user. Try out to ask for permission
for "user_hometown" or "user_location", by adding them to the list of permission in the
data-scope attribute.
Talking to the API
Once a user is logged in, you can use the method FB.api() to send requests
to the API for either user's personal information, or for other public information on FB.
The syntax for this method call is always the same:
FB.api("the string request here", function(response){
  // do something with the response
});
The API call is asynchronous, we send the request, but cannot wait for the response. When this comes back, it will invoke the callback function that is the second argument in the method call above.
When the function is going to perform many tasks, you can give it a name and define it outside the API call, for example:
FB.api("the string request here", processData);

function processData(response){
  console.log(response);
  // some other things here
}
Here are some examples of API calls that are important to us for AM2. Try them
out in the console of your browser, where am2.html is open.
// 1. Get the likes of the logged-in user:

FB.api('/me/likes', function(response){
  console.log(response);
})

// 2. Search for pages with a certain phrase:
FB.api('/search?q=wellesley+college&type=page',
        function(response){
            console.log(response);}
      )

// 3. Search for a page or person using their unique ID
FB.api('/24012621919', function(response){
  console.log(response);}
  )

// 4. Addition to call nr. 2
// Turns out, we can add more fields to the search call to return what we need
FB.api('/search?q=wellesley+college&type=page&fields=name,likes,link,cover',
        function(response){
            console.log(response);}
      )
Your Turn
The following three API requests are the only ones that are used in AM2. The 1st and 2nd request can be used as they are given, but the third one not, because we will not know in advance all pages that will be returned. Thus:
- Write a for loop that iterates through the results from the 2nd request and sends the appropriate 3rd request for each item.
- We don't need a FOR loop with the 3rd call! Simply use call nr. 4 above and the results will contain what we need.
- For each returned result, print on the console the
name, thelikesand thelink(here we need a for loop to iterate through the results). - Find out where the URL for the image is and print it out. Careful, some pages are missing the cover property and will not have a URL for the cover image, for example, the Math Department.
Now that you know how to get these pieces of information, you simply need to write a Javascript function that will display them on the page. For the moment, don't worry about the CSS and formatting. Just make them appear on the page.