This reading introduces the Document Object Model, or DOM, and a widely-used JavaScript library called jQuery. jQuery is used in thousands of websites and is supported by Google, IBM and other tech companies because it makes working with the DOM much easier and more reliable.
Document Object Model
Earlier in this course, we use HTML to structure our web pages and supply them content. We used CSS to give them some style. Then we introduced JavaScript, but the JavaScript barely seems to have anything to do with the HTML and CSS, other than running in the web browser.
There's one exception, and that is code like the following:
document.querySelector("#fred").innerHTML = "I'm Fred";
The preceding JS code will actually modify the web page, changing the
contents of the #fred element (the element whose id
is fred), to contain the string "I'm Fred".
The first part of the JS expression above, namely:
document.querySelector("#fred")
returns an object that represents something in the web
page. That thing could be a paragraph, a header, a div, or any
other element. The object has properties, such
as innerHTML, and modifying that property modifies the web
page. Thus, the web page is dynamic.
To understand this better, let's review what we know about web pages.
The DOM
The Document Object Model (DOM) is the application programming interface (API) to represent and interact with an HTML document.
The DOM represents the HTML document as a tree of nodes. Every node represents a portion of the document. Explore below an example of how a simple HTML file is represented by its DOM.
<!doctype html>
<html lang="en">
<head>
  <title>My blog</title>
  <meta charset="utf-8">
  <script src="blog.js"></script>
</head>
<body>
  <h1>My blog</h1>
  <div id="entry1">
    <h2>Great day bird watching</h2>
    <p>
      Today I saw three ducks!
      I named them
      Huey, Louie, and Dewey.
    </p>
    <p>
      I took a couple of photos ...
    </p>
  </div>
</body>
</html>
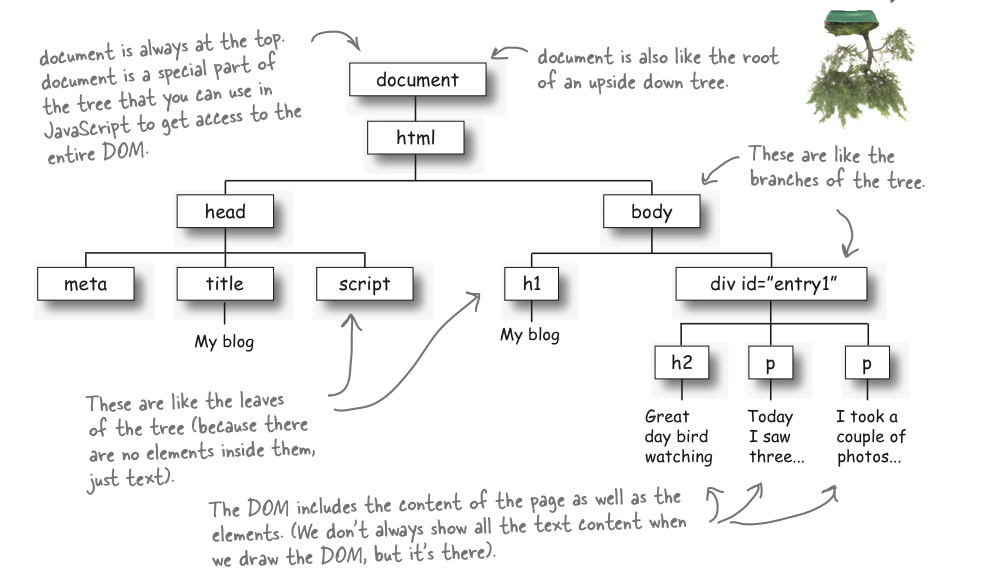
Important Note
The DOM represents both the structure and the content of the HTML
page. All elements of the structure (i.e., tags) are represented by
nodes surrounded with a border in the tree. In the Javascript
representation they are all objects. The content of
these objects is shown in the graphical representation without a
border, and it's accessed by properties (such
as innerHTML) of the objects that contain them.
DOM as a Bridge
The DOM is a bridge between the HTML world of elements (paragraphs, lists, divs, and so on) and the JavaScript world of variables, functions, objects, and methods. Every web browser has the DOM built-in, and the code we saw earlier is part of it:
document.querySelector().innerHTML
However, we will not be using the built-in DOM. Instead, we will be using an add-on library called jQuery. We prefer jQuery for several reasons:
- Consistency: Different browsers often build their DOM slightly differently, and jQuery hides those differences. It will translate our jQuery code into whatever works in the user's browser.
- Brevity: jQuery code is wonderfully concise, and so everything is much easier to accomplish.
- Power: there are a few things that jQuery does that are so powerful that, while you could implement them in the native DOM, in practice you wouldn't.
Let's start with an example of jQuery's conciseness. The following two lines of code are equivalent:
document.querySelector("#fred").innerHTML = "I'm Fred";
$("#fred").html("I'm Fred");
The latter, of course, is jQuery, the topic that we turn to now. If you want to learn a bit more about the DOM, the following answers the question What is the DOM? in a brief page consisting of four big pictures and a small amount of text.
jQuery Basics
jQuery is a library written in Javascript that is specialized for changing web documents on the fly. It is one of the most used libraries on the web. However, because it's not built-in to the browser, it has to be loaded. If you don't load jQuery, none of these examples will work.
Load jQuery
In order to use jQuery in a webpage, we need to include it with
the <script> tag. The library itself is a big
Javascript file with hundreds of lines of code. We can either download
this file from the jQuery
website, or we can use an absolute URL to some web server that keeps
a copy of the library online. For simplicity, we will do the
latter. Here is how we will include jQuery in our programs:
<script src="http://ajax.googleapis.com/ajax/libs/jquery/1.11.0/jquery.min.js"></script>
As of this lecture, the most current version of jQuery is 2.2.1, but
1.11.0 will do. (The main difference between the 2.x and 1.x versions is
whether older browsers like IE 6/7/8 are supported.) In your reading or
examples from the Web, you will notice other version
numbers. The .min part of the filename
means mininfied. This refers to the practice of deleting all
newlines and other space to reduce file size. If you open this file,
you'll notice that it doesn't show the structure of a normal Javascript
program with indentation and nesting. Thus, it is not for human
consumption. However, it does load faster, because the file is
smaller.
jQuery wrapper
Once we have the jQuery library linked to our page, we can start using its main method, the jQuery Wrapper. This is a function that has two forms:
$()   // Short form is common

jQuery()  // Long form is rare
In practice, the dollar sign is used almost always. The long form is only used in a few odd cases when your page is loading several libraries, both of which use the dollar sign. In this course, you will always use the dollar sign.
As we said earlier, jQuery is a bridge to the web page, so most of what we will be using it for is to dynamically modify the web page, or to attach behaviors to it. Here are some of the things we might want to do:
- Modify the HTML inside an element
- Modify the CSS of an element or other attributes of it.
- Add new elements to the page
- Remove elements from the page
- Hide/show elements on the page
We'll see most of those today. In later readings, we'll see even more that jQuery can do.
Syntax
Code using jQuery has a very nice, consistent, concise syntax, so let's take a minute to learn that syntax using an example we already understand, namely modifying the HTML in an element.
Our example uses a element created by the following HTML/CSS code that
creates an empty, green-bordered box on the page, whose ID
is pandora.
<div id="pandora">This is Pandora's box</div>
<style>
  #pandora {
      width: 80%;
      margin: 0 auto;
      border: 2px solid green;
      padding: 5px;
  }
<style>
Suppose we wanted to put some text dynamically into Pandora's box (replacing what is there). The following lines of JavaScript/jQuery do the trick.
Try putting hope
into the box instead.
Let's try to understand this example of jQuery code. (Remember, jQuery is an extension of JavaScript, not a whole different language, but it can seem like a different language at times.) Here it is again:
var contents = prompt("What to put in Pandora's box?", "all evils");
console.log("putting "+contents+" into Pandora's box");
$('#pandora').html(contents);
The first two lines of code are things we have seen
before: prompt() gets a string from the user and the first
statement stores that string in a variable
called contents. The second line glues a few strings together
(some of which are string literals and one of which is in
the contents variable) and then writes the combined string
onto the console log.
The third line puts the string into the box, using a jQuery incantation:
$('#pandora').html(contents);
How does the incantation work? There are basically three things going on here:
$(selector).method(stuff);
- selector This is a string
that selects an element or set of elements within the
document. We can then do something to all of those elements. jQuery
uses the same ways of selecting elements that CSS does. In this case,
it is choosing exactly one, unique element, the one whose id
is
pandora. Hence it uses#pandora, exactly like the CSS does. Thus, all your skills with selecting elements using CSS will serve you well when using jQuery. - method The word after the parens
and the dot names one of the built-in jQuery methods. Here, we used the
the html method, which replaces the
contents of an element with some string. Using the
.html()method replaces the contents of all the elements that were chosen by the selector (in this case, just one). - stuff This is the stuff that we want to replace the contents of the selected elements. In this example, we replaced it with the string that the user gave us in the first line. In general, the method may take additional arguments, and they are listed here.
So, in summary, we used jQuery to find the div and insert the user's input into it. What we haven't shown you is how to trigger this behavior in a more elegant way than one of these execution boxes. That will have to wait for a later lecture. Be patient. For now, though, we'll demonstrate some of the abilities that JQ has to dynamically alter a web page. We won't go into great detail in any of them; we just want to give you the basic idea.
The html() Method
As we've seen, the html method modifies the contents of
the page. It doesn't have to take just text; in general, it can take any
HTML. (To learn all there is about it, read the documentation for
the html method.) Here's
another example, using a list.
<ol id="horcruxes"><li>currently empty</li></ol>
- currently empty
Let's replace that with some other HTML
Modifying Attributes
jQuery has several ways to modify the attributes of an existing elements. Let's start with changing the CSS of a figure:
<figure id="fig1">
  <img id="img1" src="potterpics/harry-potter-thumb.jpeg" alt="Harry Potter">
  <figcaption id="cap1">Harry Potter as played by Daniel Radcliffe</figcaption>
</figure>

We could change the CSS by adding a border, centering, a background-color and some padding. Click the button to implement these changes. Notice the descendant selectors we use for the caption.
The .css() method takes two arguments, a property and a
value, just like static CSS. It works exactly like inline CSS. Try
inspecting the figure and figcaption elements above; you'll see that they
have had inline CSS attributes added to them. (However, this is not a bad
use of inline CSS, because the CSS is not mixed with the static HTML code;
it's being dynamically specified.)
There are other attributes we could change, such as the SRC and ALT for the image here:
<figure id="fig2">
  <img src="potterpics/hermione-granger-thumb.jpeg" alt="Hermione Granger">
  <figcaption>Hermione Granger as played by Emma Watson</figcaption>
</figure>

The attributes above can be changed using jQuery's attr()
method. Watch what we can do with it; it's like magic!
Hide/Show Elements
If you want to make something disappear, you could modify its CSS to
have the property display:none. You could undo that change to
make it re-appear. This is so common that jQuery has special
methods, .hide() and show(). Here's our figure
again, this time as fig3:
We could describe more methods, but hopefully you are seeing the pattern: select an element and operate on it using a method. So, let's turn to some slightly different tricks jQuery has up its sleeve.
Wrapped Sets
So far, we've always seen the selector part of the jQuery expression pick out just a single element. However, jQuery is more general and powerful than that. In most cases, if the selector matches more than one element on the page, jQuery operates on all of the elements in one fell swoop. Here's an example:
<ol id="characters1">
  <li class="gryffindor">Harry</li>
  <li class="gryffindor">Ron</li>
  <li class="gryffindor">Hermione</li>
  <li class="gryffindor">Fred</li>
  <li class="gryffindor">George</li>
  <li class="ravenclaw">Cho</li>
  <li class="hufflepuff">Cedric</li>
  <li class="slytherin">Draco</li>
  <li class="slytherin">Crabbe</li>
  <li class="slytherin">Goyle</li>
</ol>
- Harry
- Ron
- Hermione
- Fred
- George
- Cho
- Cedric
- Draco
- Crabbe
- Goyle
Method Chaining
The jQuery wrapper function always returns the set of elements it
matches, so you can operate on it again, if you like. Knowing that the
jQuery wrapper always returns something is very useful for
chaining
jQuery methods. This is done to avoid storing results in temporary
variables, or repeating a search for set of matches. So, some of our
examples above could be even more concise:
We could change the CSS by adding a border, centering, a background-color and some padding. Click the button to implement these changes.
This is not only less to type, it's easier to understand and it's faster to execute, because it now finds the element once and does a series of operations on it.
Note, though, that we also omit the semi-colon on all the lines except the last. The semi-colon breaks the chain of method calls.
Let's turn to a more advanced case of chaining, along with some other cool tricks that jQuery can do, namely
- Creating elements, which you can do by putting HTML code (with
angle brackets) in the selector. Such an element is not (yet) attached
to the web page. You can think of it as being
off stage
. - Modifying the created, unattached element.
- Attaching the element to the web page.
Let's see it in action on this list, repeated from above, but now with
the ID characters2
- Harry
- Ron
- Hermione
- Fred
- George
- Cho
- Cedric
- Draco
- Crabbe
- Goyle
The code above creates a new empty list item, sets its contents to
Percy, adds the Gryffindor class to give it the correct styling, adds some
addition CSS to strike him out (since he's such a git), and finally
attaches it to the page at the end of the element whose ID
is characters2 (our list).
You don't have to use the chaining technique if you don't want to, but it can be very clear to read (once you are used to it) and it is commonly used in online tutorials and examples. We will use it whenever it's convenient.
A Pitfall
Common practice for many years has been to put JS code in the HEAD of a web page, but that lays a trap for us. If we write some JQ code to find an element and do something to it, as we've done many times in this reading, but the HTML for that element is further down on the page, the element will not exist when the JQ code runs. Here's an example:
<head>
   <!-- load jQuery -->
   <script src="http://ajax.googleapis.com/ajax/libs/jquery/1.11.0/jquery.min.js"></script>
  <script>
    var d = new Date();
    $("h1").html("News for "+d.toLocaleDateString());  // insert date into H1
  </script>
</head>
<body>
  <h1>News for Today</h1>  <!-- replaced by today's date -->
  ...
Our intention is pretty clear: find the H1 and insert today's date in it. However, when the JavaScript/jQuery code runs, the H1 does not yet exist, so it won't get filled in with today's date.
Even worse, we won't get an error message! jQuery successfully matched a set of elements; it just happened to be the empty set, which is fine by jQuery, if not for us.
Is the DOM ready?
The pitfall we just described leads to the important question of when our jQuery code should be executed. Putting the code in different parts of the HTML file might have different effects on the page, based on when the browser reads and interprets the code. This is why, normally, the jQuery code should be executed only after the DOM has been created and is ready for dynamic manipulation.
Most examples you'll see in the provided reading, will show code
usually wrapped in a big event handler for the document
object, as shown below:
$(document).ready(function(){

  // all other jQuery code goes here

});
For example, the date insertion we did above would be done like this:
<head>

   <script src="http://ajax.googleapis.com/ajax/libs/jquery/1.11.0/jquery.min.js"></script>
  <script>
   $(document).ready(function () {
      var d = new Date();
      $("h1").html("News for "+d.toLocaleDateString());
   });
  </script>
</head>
<body>
  <h1>News for Today</h1>
  ...
This works correctly, but is complex to understand. It uses the jQuery
wrapper function with the special document object and the
result gets the ready() method is triggered when the DOM is
ready), and to this method it passes as an argument an anonymous function.
It's also a syntactic nightmare: notice that the final line
is });.
Another way to make sure that the DOM is ready is to put the JavaScript
code at the very end of the page (right before </body>
instead of in the head. This way, we know that the previous HTML lines
have been already processed by the browser and the DOM is ready. In other
words, the following code would also work for putting today's date in the
H1 element, and is simpler and easier to understand:
<head>
</head>
<body>
  <h1>News for Today</h1>
  ...

   <script src="http://ajax.googleapis.com/ajax/libs/jquery/1.11.0/jquery.min.js"></script>
  <script>
    var d = new Date();
    $("h1").html("News for "+d.toLocaleDateString());
  </script>
</body>
In this class, we'll load jQuery and put our code at the end of the file, when the DOM has been built and is ready.
Avoiding $(document).ready(function(){..});
We taught you about $(document).ready() not because we
will use it in this course, but because it is extremely common in
examples and tutorials about jQuery on the web. We want you to be able
to understand those.
We'll learn more about jQuery this semester. If you can't wait, there are many good tutorials online. One place to start is W3Schools jQuery Tutorial.
Loading Code From Another File
jQuery can help us with a common pitfall in larger websites: the problem of copied code. For example, suppose every web page of a 10-page website (like your CS 110 project sites) has the same navigation bar. So, all 10 pages have the same HTML, something like the following (assume there's also some nice CSS to lay out the links and make them look pretty).
The obvious thing to do is to copy/paste those lines to each of the 10 pages of your site. That works fine, but if the boss decides to change the nav content (say, adding another link), you'll have to edit all 10 pages of the site. Note that if the boss just wanted to change the CSS, you'd be able to just change the shared CSS file. Having things just written once is a big advantage.
Using jQuery, we can mitigate this problem. We can put the master copy of the nav on the home page, and use jQuery to dynamically copy that content to the other pages. The other pages have an empty element where the nav will be copied to:
<div id="nav-goes-here"></div>
Then, they have some jQuery code that looks like this:
$("#nav-goes-here").load("home.html nav");
That incantation dynamically loads home.html into memory,
pulls out the <nav> element and inserts it into the
element whose ID is #nav-goes-here.
Additional Material
You can stop here if you like. The following is for the interested reader.
Suppose we had some class definitions that we wanted to use:
.gryffindor { border: 2px solid red; background-color: gold; }
.slytherin  { border: 2px solid green; background-color: silver; }
.hufflepuff { border: 2px solid black; background-color: yellow; }
.ravenclaw  { border: 2px solid blue;  background-color: bronze; }
Here's the source code for the figure above:
<figure id="fig2a">
  <img src="potterpics/hermione-granger-thumb.jpeg" alt="Hermione Granger">
  <figcaption>Hermione Granger as played by Emma Watson</figcaption>
</figure>
Click the button to change the figure to use Slytherin's colors. Try changing the code and clicking again to change to Gryffindor's colors.
Append Elements
TBD
Remove Elements
TBD
Some jQuery Methods
Here is a list of jQuery methods used in our interactive example or in the assignment for this week.
- .ready()
- .append()
- .appendTo()
- .click()
- .show()
- .hide()
- .html()
- .text()
- .attr()
- .val() // for input fields
- .parent()
- .clone()
- .addClass()
- .removeClass()
- .find()
To see more examples and explanations for these methods, you should consult the jQuery API documentation.