Exercise 1: Bee Cells
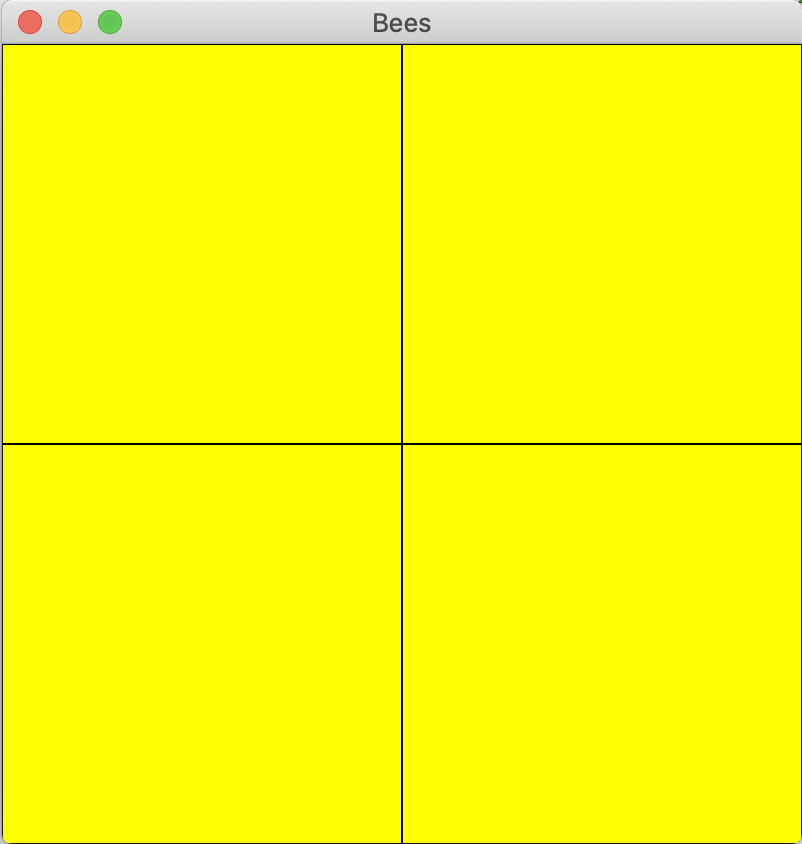
Draw the following picture on a 400x400 Window (remember that is the default size) and call the Window "Bees". See below for the picture to emulate.

Note that the width here of the Pen stroke is 1.
Boot the server to get going.
s.boot;
The class Window is used to create GUI windows. To create a window, we use the class method Window. There are several arguments for the window:
name: A String for the text that will be displayed in the title bar. The default is 'panel'.bounds: A Rect specifying position and size of the window. The size does not include the border and title bar. Position is measured from the bottom-left corner of the screen. The default is size 400x400 and is centered on the screen.resizable: A Boolean indicating whether this window is resizable by the user. The default is true.border: A Boolean indicating whether this window has a border. Borderless windows have no title bar and thus can only be closed in code. The default is true.server: This is a dummy argument which is here to provide compatibility with SwingOSC and has no effect.scroll: A Boolean indicating whether this window will add scrollbars if its contents exceed its bounds. The default is false.~w = Window.new("GUI Introduction"); // Create a new window with the title GUI Introduction
~w.front; // Open the window and place it on the front of the screen.
Window.allWindows // returns an array of all windows
~w.close // Closes and destroys the window
Window.allWindows // will be an empty array now
To change the size of a window, we need to use an instance of the class Rect. Rect specifies the a rectange on the screen where the window will appear. It can also be used to draw a rectange in a window. But for the moment, we will just use it specify the bounds of the window.
// A window that will be placed 100 units to the right and 200 units up from the bottom left
// corner of the screen. The width of the window will be 800 and the height will be 400
~w = Window.new("Window of Different Size", Rect(100, 200, 800, 400));
~w.front;
~w.close
Create a window to draw on.
~w = Window.new("GUI Introduction"); // Create a new window with the title GUI Introduction
~w.front; // Open the window and place it on the front of the screen.
Each window has a drawFunc method that can be used to place elements on the screen. The class Pen is used to draw on the screen.
The objects are drawn with the class Pen, which has numerous class methods that can draw all sorts of figures (termed paths) on the window.
.fill: fills the object with the color specified by Pen.color (black, by default).stroke: outlines the object with a border specified by Pen.width
If you fail to use either of these methods, then nothing will be displayed on your screen!When objects are placed on a window or any subcontainer in a window, coordinates are relative to the upper left corner of the window. Positive y-coordinates go down.
Rectangles are some of the simplest figures we can draw but also are useful as a way of expressing dimensions for other GUI objects. Rectangles take four arguments:
When placing rectangles in windows or other GUI objects, these coordinates are relative to the upper-left corner.
~w.drawFunc = {
    var r1 = Rect(50, 100, 100, 30);

    Pen.addRect(r1); // A path for a rectangle
    Pen.width = 3;
    Pen.stroke; // Add a stroke (i.e., border) to most recent path
};
~w.refresh; // Need to redraw the window
We can also fill objects using Pen as well.
~w.drawFunc = {
    var r1 = Rect(50, 100, 100, 30);
    var r2 = Rect(250, 100, 100, 30);

    // Set the color and width
    Pen.width = 3;
    Pen.strokeColor = Color.blue;
    Pen.fillColor = Color.red;

    Pen.addRect(r1);
    Pen.fillStroke; // Only fills the last path drawn

    Pen.addRect(r2);
    Pen.fillStroke; // Only fills the last path drawn
};
~w.refresh; // Need to redraw the window
~w.close
Draw the following picture on a 400x400 Window (remember that is the default size) and call the Window "Bees". See below for the picture to emulate.

Note that the width here of the Pen stroke is 1.
// General algorithm:
// 1) Create a window
// 2) Add a drawing function
// 3) Bring the window to the front. You do not need to refresh and .front
// will draw the drawing function

// Your code here
~w = Window.new("Bees");
~w.drawFunc = {
    var r1 = Rect(0, 0, 200, 200);
    var r2 = Rect(0, 200, 200, 200);
    var r3 = Rect(200, 0, 200, 200);
    var r4 = Rect(200, 200, 200, 200);

    Pen.width = 1;
    Pen.strokeColor = Color.black;
    Pen.fillColor = Color.yellow;
    [r1, r2, r3, r4].do({
        arg rect;
        Pen.addRect(rect);
        Pen.fillStroke
    });
};
~w.front
~w.close
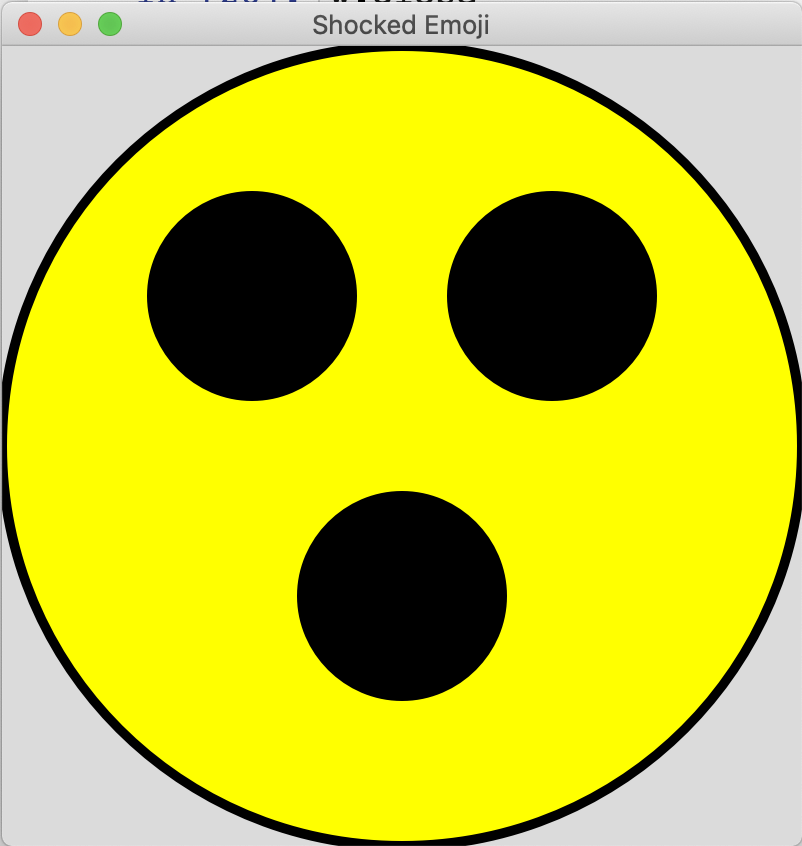
Draw the shocked emoji. To do so, you will need to use the Pen method called .drawOval which can draw any circle or oval. Note that .drawOval takes a Rect which specifies the box with which the oval should fit inside.
See the picture below for the image to emulate.

Note that I set the width here to be 5.
// Your code here

~w = Window.new("Shocked Emoji");
~w.drawFunc = {
    var face = Rect(0, 0, 400, 400);
    var eye1 = Rect(75, 75, 100, 100);
    var eye2 = Rect(225, 75, 100, 100);
    var mouth = Rect(150, 225, 100, 100);

    Pen.width = 5;
    Pen.strokeColor = Color.black;
    Pen.fillColor = Color.yellow;
    Pen.addOval(face);
    Pen.fillStroke;

    Pen.fillColor = Color.black;
    [eye1, eye2, mouth].do({
        arg part;
        Pen.addOval(part);
        Pen.fillStroke
    });
};
~w.front
~w.close
In SuperCollider, views are the GUI objects that are placed on windows. Some views (called containers) are capable of holding other views. Example: Each window has a view that is used to hold all of the GUI objects within itself.
When a view "A" holds a view "B", we say that "A" is the parent view and "B" is the child view. The view occupies a rectangular space of the window within which it draws itself to display some data or to indicate a mode of interaction between the user and the program.
Views receive keyboard and mouse events generated by the user and respond to them by controlling the behavior of the program. They also display information about the state of the program and the data on which it operates.
The class Slider is a view for a moveable slider that can be mapped to values for some other aspect of your program.
~w = Window.new("Slide");
~s1 = Slider.new(~w, Rect(10, 10, 100, 40));
~w.front;
~s1.value // Get the value of the slider
The .value method will get the value of the slider. However, we often want sliders, knobs, or other interactive devices to change some aspect of the sound in real-time. Therefore, it is better to have a function that is evaluated each time the slider is moved.
.action¶Each view has an action function that can be set to be evaluated for each change to the view.
~s1.action = {
  arg view;
  view.value.postln;
};
Now when we move the slider the values get posted as the slider changes.
Here's a practical example where we can change the cutoff frequency using a slider, similar to the Moog assignment.
SynthDef(\saw, {
    arg cutoff_freq = 2000;
    var sig;

    sig = LFSaw.ar(250, mul: 0.1);
    sig = RLPF.ar(sig, cutoff_freq);
    Out.ar(0, sig ! 2)
}).add;
~saw = Synth(\saw)
~saw.free;
~saw.set(\cutoff_freq, 1000)
Below is an example to show how to change the cutoff frequency. Notice that we need to map the linear values from 0 to 1 of the slider to appropriate values for the cutoff frequency.
~w = Window.new("Slide");
~s1 = Slider.new(~w, Rect(10, 10, 100, 40));
~s1.action = {
    arg view;
    ~saw.set(\cutoff_freq, view.value.linlin(0, 1, 300, 10000));
};

~w.front;
~saw = Synth(\saw);
~w.close;
~saw.free
If you listen carefully to the sawtooth wave when the slider is changed, there are discrete blips. Our ears are sensitive enough to hear a "jump" or "glitch" when the cutoff frequency is moved. Remember that the slider is producing discrete values.
To fix this, we can use Lag to smooth out the transitions. If the lag time is reasonably small we will not hear any delay.
SynthDef(\saw_smooth, {
    arg cutoff_freq = 2000;
    var sig;

    sig = LFSaw.ar(250, mul: 0.1);
    sig = RLPF.ar(sig, Lag.kr(cutoff_freq, lagTime: 0.2));
    Out.ar(0, sig ! 2)
}).add;
~w = Window.new("Slide");
~s1 = Slider.new(~w, Rect(10, 10, 100, 40));
~s1.action = {
    arg view;
    ~saw.set(\cutoff_freq, view.value.linlin(0, 1, 300, 10000));
};

~w.front;
~saw = Synth(\saw_smooth);
~w.close;
~saw.free
The class Knob is another view that can be used to control SuperCollider code.
~w = Window.new("Knob");
~k = Knob.new(~w, Rect(10, 10, 200, 200));
~w.front;
~k.value
~w.close
Below we will use a knob to control the volume of the robot noises made from this SynthDef below.
// Courtesy of Eli Fieldsteel

SynthDef(\blips, {
    arg amp = 0.1;
    var sig, freq, mod;
    freq = LFNoise0.ar(8!8).exprange(60, 1500).round(60);
    mod = VarSaw.ar(8, 0, 0.004).range(0, 1).pow(4);
    sig = LFTri.ar(freq);
    sig = sig * mod;
    sig = Splay.ar(sig); // spread the array over a stereo field
    Out.ar(0, sig * amp)
}).add;
~b = Synth(\blips)
~b.free;
~w = Window.new("Blips");
~k = Knob.new(~w, Rect(10, 10, 380, 380));
~k.value = 0.1; // set the initial value of knob to match default
~k.action = {
    arg view;
    ~b.set(\amp, view.value.postln);
};

~w.front;
~b = Synth(\blips);
~b.free;
~w.close
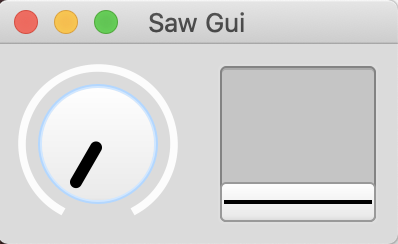
Take the example from below that has arguments for sustain time and mix and create a GUI to control both of those parameters. Use a knob to control the sustain time and a slider to control the mix of the reverb. Below is a picture of what an example GUI might look like.

SynthDef(\shortSawPattern, {
    arg out = 0, freq = 40, susTime = 0.05, mix = 0.33;
    var env, sig, gate;

    gate = Impulse.kr(6);
    sig = Saw.ar(
        freq * TIRand.kr(1, 2, gate) * Select.kr(TIRand.kr(0, 3, gate), [
              1, // root
            (1.0595 ** 3), // three semitones up
            (1.0595 ** 7), // seven semitones up
            (1.0595 ** 8), // eight semitones up
        ])
    );

    // Envelope triggered by gate
    env = Env.linen(
        attackTime: 0.05,
        sustainTime: susTime,
        releaseTime: 0.05,
        level: 0.3,
        curve: 'sine'
    );
    env = EnvGen.kr(env, gate);

    sig = sig * env ! 2;
    sig = FreeVerb.ar(sig, mix, 0.5);
    Out.ar(out, sig);
}).add;
As a reminder, here is what that SynthDef sounded like.
~saws = Synth(\shortSawPattern)
~saws.free;
Write your code here. You should do the following:
// Your code here
~w = Window.new("Saw Gui", Rect(100, 200, 200, 100));

// Control the sustain time
~k = Knob.new(~w, Rect(10, 10, 80, 80));
~k.action = {
    arg view;
    ~saw.set(\susTime, view.value.linlin(0.0, 1.0, 0.0, 0.3));
};

// Control the mix
~slider = Slider.new(~w, Rect(110, 10, 80, 80));
~slider.action = {
    arg view;
    ~saw.set(\mix, view.value)
};

~saw = Synth(\shortSawPattern);
~w.front;
Write two lines to free the saw Synth and close the window.
// Your code here
~saw.free;
~w.close;
The class Button is useful in music GUIs usually to trigger events. Buttons in SuperCollider can have any number of states valued from 0 to one less than the number of states. The states of a button are an array of arrays where each inner array is a button state of text, text color, and background color.
~w = Window.new("Button");
~button = Button(~w, Rect(120, 110, 100, 100));
~button.states = [
    ["yes", Color.green, Color.white], // value of 0
    ["no", Color.red, Color.blue] // value of 1
];
~w.front;
Like the other views, we can set the action function to grab the value from each state.
~button.action = {
    arg view;
    view.value.postln; // Posts the value of the button
};
The class StaticText is used to display non-editable text.
~w = Window.new("Text");
~staticText = StaticText.new(~w, Rect(50, 50, 200, 200));
~staticText.string = "This is some text"; // set the text
~staticText.align = \center; // center the text
~staticText.stringColor = Color.blue; // Set the text color to blue
~staticText.background = Color.grey; // Set the background to grey
~w.front;
The class Font can be used to change the Font for any view that displays text like StaticText.
~staticText.font = Font("Helvetica", 40);
~w.refresh;
You can get an array of all the available fonts using the method below.
Font.availableFonts
Below are optional things you may want to consider if building your own GUI, particularly for the final project.
The class Window contains a container view called TopView. Container views are views that are capable of holding other views. The TopView class is only for Window. If you want a parent view to organize several children views, use the class CompositeView.
Properties of CompositeView:
Advantages:
Composite views do not have any special/unique methods. They are simply a container/organizer for other views.
~size = 600;
~w = Window("Test Window", Rect(100, 200, ~size, ~size));
~comp = CompositeView(~w, Rect(0, 0, ~size/2, ~size/2));
~s1 = Slider2D(~comp, Rect(0, 0, ~size/4, ~size/4));
~s2 = Slider2D(~comp, Rect(~size/4, 0, ~size/4, ~size/4));
~s3 = Slider2D(~comp, Rect(0, ~size/4, ~size/4, ~size/4));
~s4 = Slider2D(~comp, Rect(~size/4, ~size/4, ~size/4, ~size/4));
~w.front;
Notice how all the 2D sliders are moved simply by moving the composite view.
~comp.moveTo(~size/2, ~size/2);
~w.refresh;
We have seen how views can be arranged by hardcoding position and sizes within container views like Window’s container view TopView and CompositeView. Decorators automatically handle the positioning of views within a container view. There is one decorator in SuperCollider called FlowLayout. A decorator can be assigned to a View through the view’s .decorator method or by using the instance method .addFlowLayout for CompositeView or Window.
~w = Window.new("GUI Introduction", Rect(200,200,320,320)).front;

// notice that FlowLayout refers to w.view, which is the container view
// automatically created with the window and occupying its entire space
// Have the flow layout occupy the space of the top view from the window
~w.view.decorator = FlowLayout(~w.view.bounds);

// Views provided with a point for bounds are interpreted as width by height
14.do{ Slider(~w, Point(150, 20)) };
Here we let the decorator control the layout of the four spaces.
~size = 400;
~w = Window("Flow layout example", Rect(200, 200, ~size, ~size)).front;
~margin = 10;
~gap = 10;
~w.view.decorator = FlowLayout(~w.view.bounds, Point(~margin, ~margin), Point(~gap, ~gap));
["Volume", "Pan", "Freq", "Phase"].do({
    arg text;
    var view, size, st;
    size = ((~size - (~margin * 2 + ~gap))/2).trunc; // Truncate to prevent rounding up half pixels
    view = CompositeView(~w, Point(size, size));
    view.background_(Color.rand);
    Knob(view, Rect(size/4, 0, size/2, size/2));
    st = StaticText(view, Rect(0, size/2, size, size/2));
    st.string_(text);
    st.align_(\center);
    st.font = Font("Monaco", 32);
});
Layouts offer a middle ground, providing the user more flexibility than a decorator but automating some of the process. Layouts distribute the amount of space given to the view on which they are installed among the children of that view.
Types of layouts:
Layouts can be added to a view by setting the layout with .layout method for the specific view. You should not combine decorators and layouts. Behavior is undefined.
~w = Window.new("Vertical Layout");
~w.layout = VLayout(
    //Provide VLayout an array of views/layouts/nothing (represented as nil)
    Slider().orientation_(\horizontal), // First item.  Note we don't provide a parent
    nil, // Second item is nothing
    StaticText().string_("String cheese").align_(\center), // Third item
    nil, // Empty Space
    HLayout(Knob(), Knob(), Knob()) // Another layout of three knobs
);
~w.layout.margins = [20, 40, 20, 40]; // Order: [left, top, right, bottom]
~w.front;
~w = Window.new("Horizontal Layout", Rect(400, 400, 400, 100));
~w.layout = HLayout(
    [Knob(), stretch: 1], // Occupies 1/5 of horizontal space
    [Slider().orientation_(\horizontal), stretch: 3], // Occupies 3/5 of horizontal space
    [Knob(), stretch: 1] // Occupies 1/5 of horizontal space
);
~w.front;
~w = Window();
~w.layout = GridLayout.rows(
    [Slider2D(), Slider2D(), [Slider(), rows:2]], // row 1
    [Slider2D(), Slider2D()], // row 2
    [[Slider().orientation_(\horizontal), columns:2]] // row 3
);
~w.front;
~w = Window();
~w.layout = GridLayout.rows(
    [Slider2D(), Slider2D(), [Slider(), rows:2]], // row 1
    [Slider2D(), Slider2D()], // row 2
    [[Slider().orientation_(\horizontal), columns:2]] // row 3
);
~w.layout.setColumnStretch(0, 1);
~w.layout.setColumnStretch(1, 2);
~w.layout.setColumnStretch(2, 1);
~w.layout.setRowStretch(0, 1);
~w.layout.setRowStretch(1, 2);
~w.layout.setRowStretch(2, 1);
~w.front;
The End!