Chapter 2 Companion
The first chapter on Ottergram does a nice job of introducing bits of HTML as needed. Read that first. Here's an organized summary of what we learned, plus a bit more.
Languages
We learned that web pages are written using three languages
- HTML, which is the skelton and organs
- CSS, the skin and clothes. We'll look at that in the next chapter.
- JavaScript, which defines the behavior. We'll get to that later.
HTML template
Our basic page had the following template:
<!doctype html>
<html>
    <head>
        <meta charset="utf-8">
        <title>Ottergram</title>
    </head>
    <body>
        <header>
            <h1>Ottergram</h1>
        </header>
    </body>
</html>
Tags
We learned the following tags. Look at W3Schools or MDN to learn more.
headholds meta information about the documentmetatells the browser the character set. More about this much later in the course. We'll always useutf-8titleis used for window titles, bookmarks, and is used by search engines. More important than you'd think.bodyholds all the contentheaderholds headers and related stuff like logosh1holds the text of a major headinglinkconnects a separate file of CSS rules to an HTML file. The URL of the CSS file is thehrefattribute.ulis a container for an unordered list (bullet list)liis a container for a list itemimgis replaced (a replaced element) with an image loaded from a separate file, specified using thesrcattribute.ademarks a clickable hyperlink
Meaningless Tags
All the tags above have some kind of meaning associated with them. They
are for some kind of content. However, HTML also comprises two
meaningless tags, span and div. A span demarks some text or other
inline information. (Inline content is stuff like text that fills up a
line before flowing onto the next line.) A div demarks a big block or
division of a document.
These tags are useful for styling and behavior (attaching JavaScript to them).
Chrome Developer
They described the Chrome Developer. This is how we look behind the matrix to see what's really happening.
Some other useful tags:
emto emphasize some text. Typically is italic.strongwhich is likeembut more so. Typically is bold.h2toh6for different levels of headerspfor a paragraph. Can't nest or contain other block elements.brfor a line break. Usually avoid this because it can break layoutsolfor an ordered (numbered) list
Tags should be properly nested:
<foo> <bar> </bar> </foo>
not
<foo> <bar> </foo> </bar>
Here links
Once, it was very popular on the web to have links like this:
It seemed so clever and intuitive, making the clickable text be the word "here." There are two big problems with this, though:
- Accessibility: Screen-reading software for the blind often will read the text of the links on a page so that the user can easily navigate to other pages. Links like those above read as "here," "here," "here" — useless.
- Indexing: Search engines pay special attention to the click text on a page, since those are often an important clue about the content of the destination page. The links above don't show what the important words are.
So what do you do instead? Just wrap the link tags around important words:
- Here are some apple pie recipes.
- Click here for peach pie recipes.
- Yo, check out the prune pie recipes.
Accessibility is very important in this class, so keep that in mind.
The ALT Attribute
An IMG tag looks like this:
<img src="url/of/picture.jpeg" alt="picture of something">You noticed that we added an ALT attribute to the IMG tag that is a small
piece of text that can be used in place of the image in certain
circumstances. The ALT attribute is an important part of the HTML
standard. Perhaps its most important use supports accessibility.
Unfortunately, not everyone has good enough vision to see the images that
we use in our websites, but that doesn't mean they can't and don't use the
Web. Instead, they (typically) have software that reads a web page to
them, including links. When the software gets to an IMG tag, it reads the
ALT text. If there is no ALT text, it may read the SRC attribute, hoping
there's a hint there, but all too often the SRC attribute is something
like "../images/DCN87372.jpg" and the visually impaired web
user is left to guess.
Therefore, you should always include a brief, useful value for the ALT attribute. If your page is an image gallery, then your ALT text could be a description of the image. However, describing the image is not, in general, the idea. For example, if the image is a link whose target is made clear by the image, then the ALT text should say something like, "Link to ..." so the user will know what to do with it. The sole exception is for images that are just used for formatting, such as blank pictures that fill areas or colorful bullets for bullet lists. In those cases, in fact, it's better to include an ALT attribute that is empty, so that the user doesn't have to listen to the SRC attribute being read. In both cases, the text should be useful for someone who wants to use your site but isn't sighted. It helps to turn off images and view your site to check.
Furthermore, you should avoid having critical information on your website conveyed only in images. There may be times when it is unavoidable, but to the extent that it is possible, we want our websites to be easily usable by all people, including the blind and visually impaired.
Accessibility is important in modern society. We build ramps as well as stairs, we put cutouts in curbs, and we allocate parking spaces for the handicapped. Indeed, most federal and state government websites are legally required to be accessible, and ALT attributes are just one part of that.
In this class, we expect you to always use the ALT attribute. If you find an image or an example where we've forgotten to use one, please bring it to our attention.
For more information, you can read the following
Figures
Now that we know about the img tag, it's useful to know about a semantic
tag that can be used with it. We can use figure to surround an img
tag, paired with figcaption for the caption text:
<figure>
    <img src="../images/hermione-granger-256.jpeg" alt="Hermione Granger">
    <figcaption>Hermione Granger as played by Emma Watson</figcaption>
</figure>
Here's what it would look like:

Note that images can be used without figure; a figure is often used as
in a book, where the text refers to a figure to provide additional
information. Also, the use of figcaption doesn't remove the obligation
to provide alt text. Still, this can be a useful tag to know about.
Comments
From the very first computer program, programmers have needed to
leave notes
in the code to help themselves and others understand
what's going on or what the code's purpose is. These notes are called
comments. Comments are a part of the program text (they're
not written separately, because then, well, they'd get separated),
but they are ignored by the computer. Comments aren't about what someone
can discover by reading the code, but should cover the background context
of the code, or its goal.
Because it's important to get in the habit of putting comments in your HTML code, we will require comments in this course. At this point, you won't have a lot to say, and that's fine. You will start by labeling each file with its name, your name, the date, and any sources you consulted (such as the source code of other web pages). Think of this as signing your work. Later, when you're designing a website with many coordinated pages, you can use comments on a page to talk about how it fits into the overall plan.
Comment Syntax
The HTML comment syntax is a little odd-looking. Here's an example:
<!-- I can say anything I want in a comment. -->
The syntax starts with a left angle bracket < then an
exclamation point and two hyphens, then the comment (anything you want)
and ends with two hyphens and a right angle bracket >.
Validation of HTML Code
How can you be sure you've followed every nit-picky rule that the HTML
standards committee devised? (The standards committee is the World Wide Web Consortium
or W3C.)
Even if you have memorized all the rules, checking a page would be tedious
and error-prone – perfect for a computer! Fortunately, the W3C
created an HTML validator. You can
validate by supplying a URL, by uploading a file, or even copy/pasting in
some HTML. An HTML validator is an excellent tool to help you debug your
HTML code.
Validation also helps with accessibility. One important aspect of accessibility is having the proper HTML syntax for each page in your site. Visitors with accessibility needs will use the alternative browsers and screen readers, and that software will be aided by syntactically correct HTML. Read the following for a longer discussion of why to validate your HTML pages.
Throughout the semester, if you need to validate a web page, you can find the HTML validator and others in the reference page.
Icon Declaring Validation
Once you get your page to validate, you can put some HTML code on your
page to give it a seal of approval
, declaring that it is valid (and
what standard it meets). You will see in lab examples of this strategy.
The very cool thing about this icon is that it is clickable, and clicking it will cause the validator to process your page again. Thus, you can modify your page, upload the changes, and click the icon to re-validate it, making validation very easy. In fact, we suggest that you put the icon on your page before it's valid, and use it during your debugging process.
The snippet of code is just the following, so go ahead and copy/paste it into your pages. The code doesn't use anything we don't know, so read it!
<p>
  <a href="http://validator.w3.org/check?uri=referer">
     <img
       src="http://cs.wellesley.edu/~cs204/Icons/valid-html5v2.png"
       alt="Valid HTML 5"
       title="Valid HTML 5"
       height="31" width="88">
  </a>
</p>
As we've said, HTML was designed to structure the content of a web page.
That explains the existence of tags like <p>,
<h1>, <ol>, etc. However, when web
developers started creating pages with a lot of content, it became clear
that to make better use of the available screen space, a way to organize
the page content in bigger chunks was needed. Then, CSS could be used to
arrange their position on the page. Therefore, the tag
<div> was born (short for division), which is
currently the most used (and overused) tag in every webpage. While this
seemed to have solved the page layout problem, HTML code became difficult
to understand, other computer programs (e.g. search engines) couldn't make
sense of all divs in a page, if they wanted to use the organization of the
page for inferring the meaning of the content.
HTML5 introduced a series of new tags that have meaningful names and can be used universally to express what the content is about, beyond the existing simple tags. Additionally, to make the pages more alive with different kinds of content, several new tags that allow content to be embedded in a page were also added. In the following, we will give a short summary of some of these tags. Try to make use of them in your pages. They will make your code better and more readable to the programs of the future.
Semantic Tags
Here is a list of new HTML5 tags that are known as semantic tags, because their names have specific meaning.
| Tag Name | Short Description |
|---|---|
<header> |
Specifies a header for a document or section. |
<footer> |
Specifies a footer for a document or section. |
<section> |
Defines sections in a document (e.g. chapters). |
<nav> |
Defines a set of navigation links. |
<aside> |
Defines content which is relevant but not central (e.g. callouts, sidebars). |
<main> |
Defines the main content of a page. |
<article> |
Defines independent, self-contained content (e.g., blog post, news story). |
<abbr> |
Indicates an abbreviation or acronym.
See an example in action in the paragraph below for the word W3C. |
<figure> |
Indicates an figure or other graphical content |
<figcaption> |
A caption inside a figure element |
Which Tag to Use?
Given all the tags listed above, along with DIV, you might feel bewildered as to which one to use. Here is a helpful HTML5 sectioning flowchart from html5doctor.com . Click on the image to see a larger version:
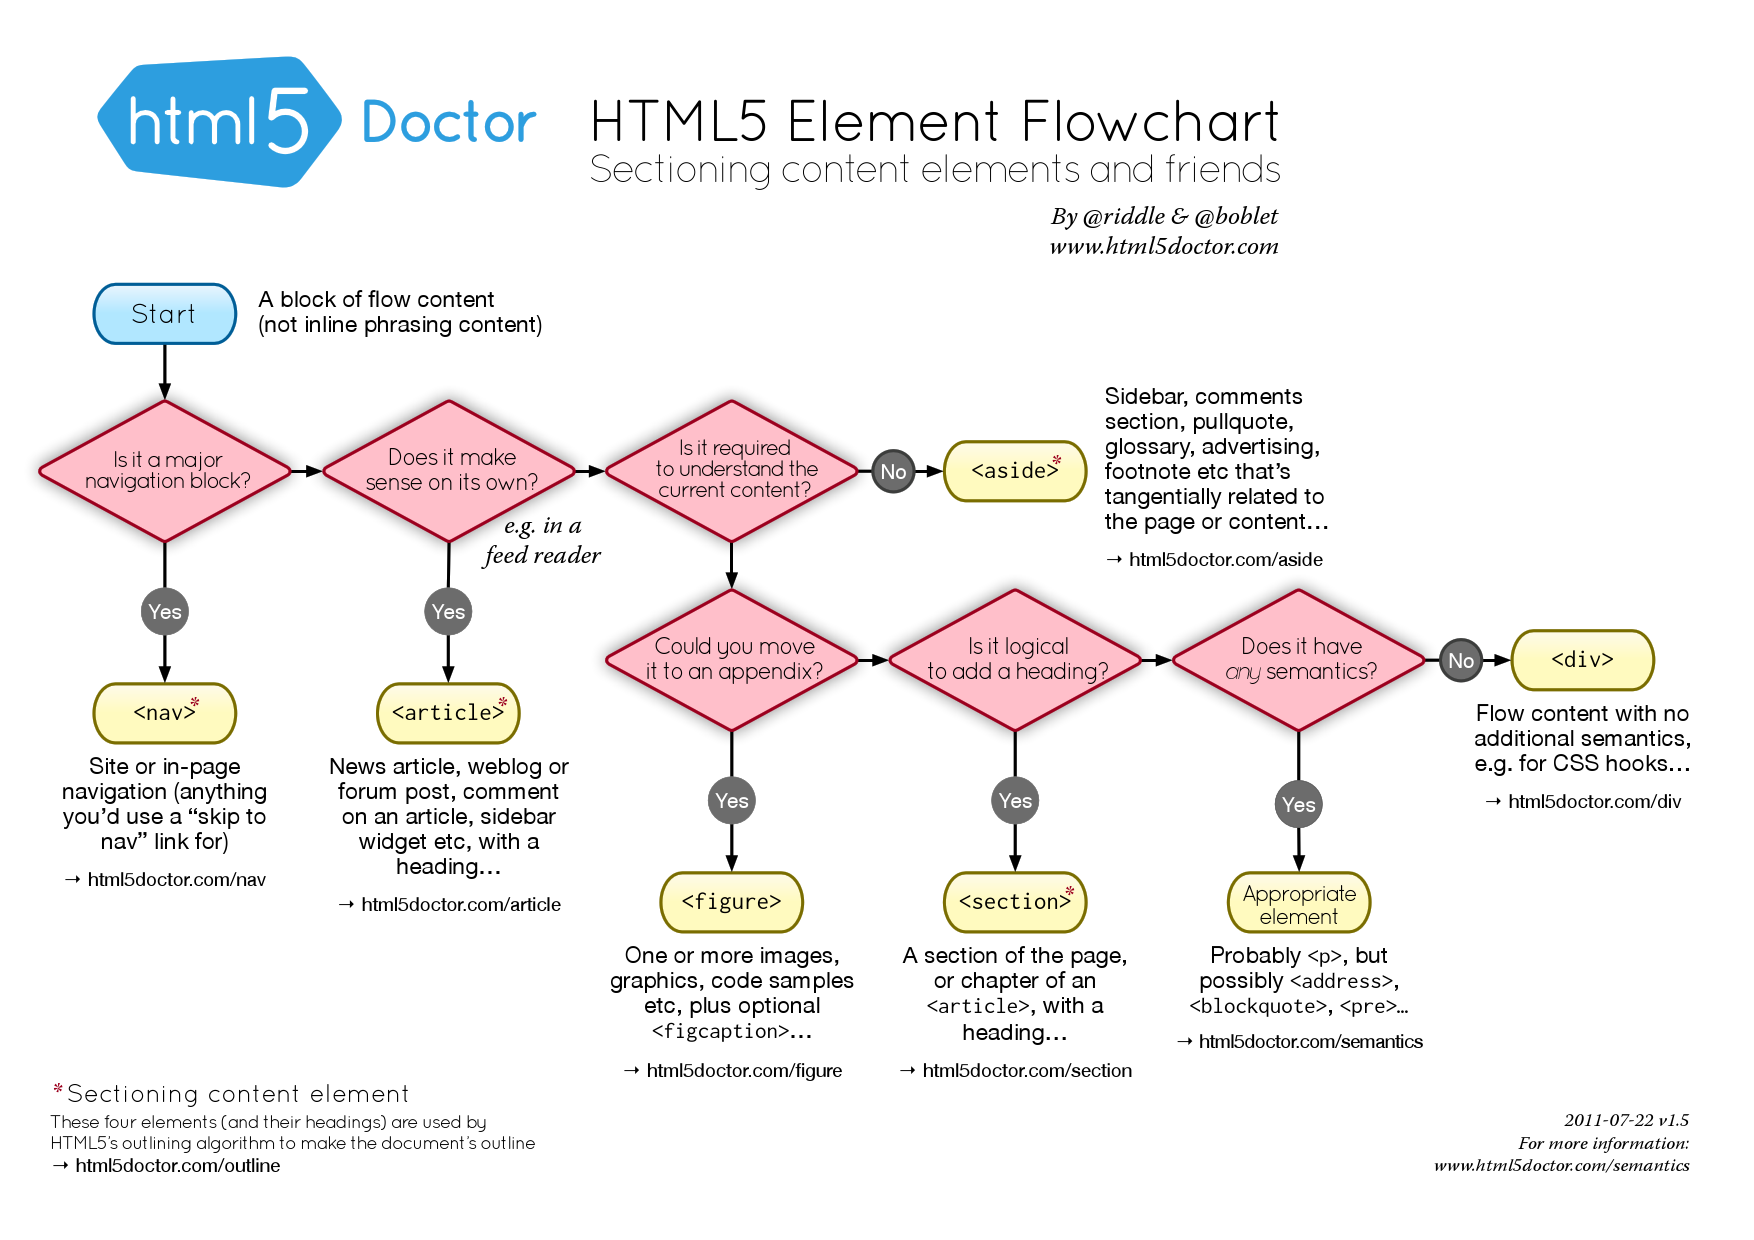
Click on the image to see a larger version
Review of URLs
In class, we learned about two kinds of URLs: relative and absolute:
- absolute URLs start with a slash (or
httporhttps) and specify the same destination regardless of starting location - relative URLs start with a name (or
..) and specify a destination as a series of steps from the starting location
Relative URLs have the advantage that if the starting file and ending file are moved to a different place, but continue to share the same relationship (for example, they are in the same folder), then the relative URL will continue to work after they are moved, while an absolute URL will necessarily break.
Here are the rules for relative URLs:
- a bare name, like
fred.htmlis a file or folder in the same folder as the starting point. - a slash means to go down into a folder. So
stuff/fred.htmlmeans thatstuffis a folder in the current folder (by rule 1) andfred.htmlis insidestuff - a
..means to climb out of a folder and go to the parent folder. So../fred.htmlmeans thatfred.htmlis in the folder above the starting point.
These rules can be combined to yield long relative URLs like
../../africa/botswana.html which is a file in the africa folder that
is two folders above this one.
The End
This is just the beginning of HTML. There's a lot more you could learn, but this will do for now.
Chapter 3 Supplement
Chapter 3 on Styles does a nice job of introducing bits of CSS as needed. Read that first. Here's an organized summary of what we learned, plus a bit more.
CSS concepts
- normalize.css removes some of the formatting differences between browsers, making it easier to build consistent websites
- A CDN is a content delivery network, useful for lots of common files, including jQuery
- CSS rules, which include
- selector(s)
- properties and values
CSS rules
header, footer {
    margin: 0;
    padding: 8px 4px;
    background: cornflowerblue;
    color: inherit;
}
CSS Properties
- background background colors
- border an optional box around the element
- color font colors
- display how an element is laid out on the page:
blockstacks vertically,inlineis like text. There are other values, likenoneto act as if the element doesn't exist - font-family sets the font for the element
- font-size sets the size of the font
- list-style can change or remove the bullets in a bullet list.
- margin spacing outside the element's border
- padding spacing between the box and the contents
- text-align can center text, right-align it and such
- text-decoration can add or remove underlines and such
- text-transform can capitalize, lowercase or uppercase text
- width is the width of the contents of the element, not including any padding, borders or margins. This can be very confusing.
Several of the above are shorthand properties. You can be more specific, like border-left-style
Box Model
The box model is most easily learned by playing with the dev tools, but the idea is simple:
- block elements work like big boxes that are (by default) stacked vertically on the page
- they have, outside to inside:
- margins. These just have widths. They have the background color of the parent block
- borders. These can have widths, styles, and colors
- padding. These just have widths, but they take on the background color of this block
- content. This has width and many other properties
You can use display:block as a declaration to turn a non-block element
(like A, IMG or SPAN) into a block element.
Selectors
There are quite a few kinds of selectors available in CSS. Some are used often, some only rarely. Here are some that are simple and very common:
- tag: style every such tag (e.g. paragraphs
<p>or list items<li>) You have to specify one of the existing HTML tags, likep - classes: style every element with that class. Make up a class name, say
fredand use.fredas the selector. Specify the class with an attribute, like<p class="fred"> - id: style the (unique) element with that ID. Make up an ID, say
georgeand use#georgeas the selector. Specify the id with an attribute like<p id="george">
Our book authors advocate avoiding ID. I don't really agree with their reasoning, but their way is fine, too. If something is definitionally unique, I don't see a problem with giving it a unique ID. Furthermore, IDs are the only way to specify a location within a page using a URL. Let's turn to that now.
IDs
This section is not covered in the chapter, or indeed, in the book, as far as I can tell. Still, it's worth explaining the <a href="#"> that they used in Chapter 2.
This section is really about URLs. We learned that URLs uniquely specify a single webpage in the world. URLs are even more powerful than that. They can even specify a location within a page. This is done by doing two steps:
- Giving the location an ID. That's done in HTML with the ID
attribute. Any element in HTML can be given an ID, like
<span id="george">George Weasley</span>. - The absolute URL to specify that location is like
http://domain.com/path/to/page.html#id-of-elementThe#is a special character (called a hash mark, sharp sign, pound sign) separating the URL for the page from the ID of the element (called a fragment).
With relative URLs, you can omit things. So a within-page link to a
fragment would just be #id-of-fragment.
Try these two examples, and look at the location box in your browser:
When a web designer wants a link to the current page, they will usually
use # as the entire URL, letting everything default. Here's a link to
this page.
Attribute Selectors
You can select elements by their attributes:
a[href="#"]selects anchors (hyperlinks) with anhrefattribute that has a hash as its value.a[href]selects every hyperlink that has anhrefattribute (usually all of them would)[href]selects every element that has anhrefattribute, say hyperlinks and LINK elements
Attribute selectors aren't used much in CSS, but they're used a lot more when we get to JavaScript and jQuery
Structural Selectors
You can also combine these simple selectors. If A and B are both simple selectors, you can do:
- A B: selects every B that is a descendant of any A
- A > B: selects every B that is a child of any A
- A ~ B: selects every B that follows (is a later sibling) of any A. That symbol is a tilde (probably next to the exclamation point on your keyboards)
- A + B: selects every B that immediately follows (is the next sibling) of any A
Multiple Selectors
If you have a declaration block that you'd like to have apply to more than one set of elements, just list all the selectors before the block:
A, B {
    prop1: val1;
    prop2: val2;
}
Style Inheritance
Some CSS declarations (property-value pairs) are inherited, which means they apply to all descendants of the selected elements. This is usually pretty intuitive: font-size and background color are inherited, but border is not.
Color
Computers use a three-dimensional color system for colors. Every color is composed of red, green and blue (RGB). Consider a shade of chartreuse. You can give it as:
- a name: background:chartreuse
- an RGB triple of percentages: background-color:rgb(50%,100%,0%)
- an RGB triple of values from 0-255: background-color:rgb(127,255,0)
- a hex value: background-color:#7fff00
Transparency
More recently, browsers support a four-dimensional system of colors, where the fourth dimension is transparency, also called alpha. So the system is RGBA. Alpha is measured on a scale from 0 (perfectly transparent) to 1 (completely opaque). If you want to use transparency, though, your choices are more limited:
- RGBA percentages: background-color:rgba(50%,100%,0%,0.5)
- RGBA values: background-color:rgba(127,255,0,0.5)
Fonts
They explained how to download a font for your website and then to use it
using CSS. It involves some incantations, so I won't repeat those here.
Eventually, you define a font-family that can then be used as a new
value for the CSS font-family property.
Some built-in values for font-family include:
- verdana; the quick brown fox jumps over the lazy dog
- arial; the quick brown fox jumps over the lazy dog
- Times New Roman; the quick brown fox jumps over the lazy dog
- Georgia; the quick brown fox jumps over the lazy dog
- fantasy; the quick brown fox jumps over the lazy dog
Web Fonts
As we mentioned, with traditional fonts that come pre-installed in our machines, we have only a limited number of choices (since the fonts need to be installed in the machine of the viewers of the page too, not only your own). However, with web fonts (supported by all modern browsers) there are new ways to deliver fonts (either by having your files as part of your website, or by linking to other web servers) so that everyone can see the pages with the font we intended.
Be aware that not all fonts on the Web are free. For some of them you need to pay. Thus, it is better to start your search with one of the services that aggregate fonts that are free for use. Such a website is Font Squirrel, from which you can download the fonts you like.
Suppose after browsing the available fonts, you decided to use the handdrawn font Desyrel
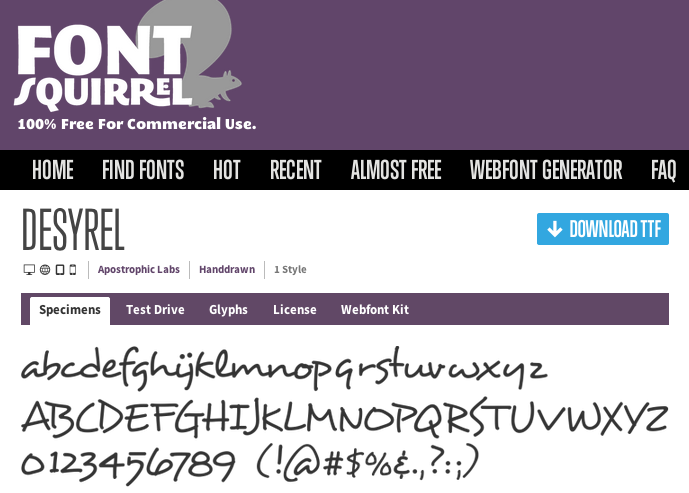
Clicking on the "Download TTF" button, you can get the file with the font
(after unzipping), desyrel.ttf. Then, you can create a subfolder fonts
in the folder where your HTML and CSS files are stored and then use this
font as shown below:
@font-face {
       font-family: desyrel;
       src: url("path/to/desyrel.ttf") format("truetype");
       font-weight: normal;
       font-style: normal;
}

p {
       font-family: desyrel, cursive;
       font-size: xx-large;
}
This sentence was written with the Desyrel font, downloaded from FontSquirrel.
Unfortunately, things are not so simple. Because there are so many
browsers and platforms, to make sure that all of them will display the
desired font, we will need to provide the font in many different
formats. Thus, the rule for @font-face will look a bit more
complicated. The good news is that this code and all the files can be
automatically created for you by Font Squirrel, using its menu for
WebFont Generator, after you upload the file desyrel.tff (or some
other font). Here is how the automatically generated CSS will look:
@font-face {
    font-family: 'desyrelregular';
    src: url('desyrel-webfont.eot');
    src: url('desyrel-webfont.eot?#iefix') format('embedded-opentype'),
         url('desyrel-webfont.woff') format('woff'),
         url('desyrel-webfont.ttf') format('truetype'),
         url('desyrel-webfont.svg#desyrelregular') format('svg');
    font-weight: normal;
    font-style: normal;
}
Notice that the files are referred directly, and you might need to add the relative path to the folder you'll be storing these files.
If this looks like a lot of work, there is an easier way, that doesn't involve having to keep the font files on our own server, we explain this method in the next section.
Google Fonts API
The easiest way to incorporate fancy fonts in your pages is to use the free service provided by the Google Fonts API
- Find fonts that you like from the list of Google Fonts,
and click the button
Add to Collection
. - On the bottom part of the browser, in the Collection tab, click on the button
Use
and verify your choices. - Copy the provided
<link>code to your HTML file (it goes in thehead) - Add the CSS code to the CSS rules you want.
You're done. Google takes care of providing all needed format files, you don't have to provide such formats as part of your website.
Here is an example of the code you need to write to create the shadowed header below:
The <link> element goes into the head of the HTML file:
<head>
    ...
    <link href='http://fonts.googleapis.com/css?family=Wallpoet' rel='stylesheet' >
</head>
The font-family style goes in the CSS file (inside the rule for the desired element):
  h2 {
      font-family: 'Wallpoet', cursive;
      font-size: 200%;
      color: black;
      text-shadow: 4px 4px 4px gray;
}
This header uses Wallpoet from Google Fonts
The font was created by Lars Berggren
Putting fonts into your CSS File
The previous code works fine, but if you have a dozen pages in your site,
and you want to use Wallpoet in all of them, every one of those pages
would have to have the link tag in the head. That is a lot of
redundancy and is contrary to our goal of stating the CSS information once
in the shared external CSS file.
What we can do instead is, in the Google Fonts browser, instead
of using the default link code, switch to the @import tab.
In that tab, you'll find code like this (it's the same URL as in the link):
@import url(https://fonts.googleapis.com/css?family=Wallpoet);Copy/paste that into your shared CSS file, and you'll be able to use Wallpoet in any file that uses that CSS file.
Google Fonts can break HTML Validation
When you use several Google Fonts for a page, the URL generated by Google
contains the operator | to separate the different fonts. HTML doesn't
like such special characters, thus, your page will not deemed valid by the
W3 validator. To fix this issue, you should replace the character
| with %7C.
Chapter 4 Supplement
This reading summarizes and expands on the concepts of responsive and flexible layouts that we learned in chapter 4.
Mobile First
We should first design our websites so that they work effectively on small devices, and only later take advantage of greater space. Some rules of thumb:
- don't lay things out horizontally; stack things vertically
- give images CSS declarations like
width:100%so that they scale to smaller displays - don't use table elements and such that might be wider than the display
- specify widths in percentages when feasible
- don't specify widths of elements in pixels (or, at least, wide widths) which might result in the dreaded horizontal scrolling
inline-blocks
In the last chapter, we learned about inline elements, like span, that
are found in running text and would move around as the browser gets wider
and narrower.
We also learned about block elements, which use the box model, can (typically) contain other block elements, and stack vertically on the page.
We now know about inline block elements, achieved with
display:inline-block. Such elements act like inline elements in terms of
filling out the width of their container (moving other inline elements up
from the next line until there's no more space), but they act like block
elements in that they can contain other block elements.
Note that the default width of a block or inline-block element is 100%,
which means that there is never any room left to bring another one up from
the next line. So, it only makes sense to use inline-block where you are
setting the width (or it's a replaced element, like an img, and so the
width is derived from the contents). Like this:
selector {
    display: inline-block;
    width: 20%;  /* five on a line */
    ...
}
New HTML
- main The main content of a page. Bigger than an article
- div A meaningless block container. Useful for structuring the page
Flexbox
With Flexbox, there is
- a container that is limited in size. Presumably takes the whole screen or a portion thereof. Get these with
display:flex. Contrast that with a Wikipedia page that is as long as it needs to be - a set of flex-items to be displayed, all children of the container. This is automatic.
- a direction or main axis that the children will be oriented in (horizontally or vertically)
- a cross axis that is perpendicular to the main axis
- a specification for what happens with any leftover space in the flex container
Flex containers can be nested, so you have have rows with columns, columns within rows, even rows within rows and columns within columns.
Flex items can grow and shrink. We learned two uses of the flex shorthand property:
flex: 0 1 automeans don't grow me, shrink me if needed, and calculate my size from my contentsflex: 1 1 automeans grow me as much as possible, shrink me if needed, and calculate my size from my contents
New CSS Properties
Pretty much all of these are related to the new flexbox layout
- align-items aligning (e.g. centering or stretching) flex-items. If the item doesn't fill the space allocated to it, where does it end up in that space. MDN align-items
- display:flex to specify an element as a flex container
- flex how a flex item shrinks or grows
- flex-direction row or column
- justify-content what happens with leftover space in a flex container?
- overflow set what happens when an element's contents is bigger than it is. Scroll? Hide? Show?
- order what order does this flexitem go in? source order? after others? before others? contents is bigger than it is. Scroll? Hide? Show?
- text-shadow can add a shadow to some text by reprinting the text in a different color and a small displacement
- white-space what happens with white space in an element: normal? nowrap?
Absolute and Relative Positioning
Normally, we let the browser figure out where an element should land on the page, based on its size, the size of the container, whether it's a block or inline element, and so forth. This is because the default value of the position CSS property is static. It has two other interesting values:
position:relativewhich allows you to shift the element from its static positionposition:absolutewhich allows you to place the element within a Cartesian coordinate system
Here's how that's done. First, the CSS:
.up_and_right {
    position: relative;
    top: -1em;
    left: 2em;
    color:red;
}
Here's the HTML:
Here's a sentence in which a single red
<span class="up_and_right">word</span>
has been moved from its usual place.
In general:
- The element is shifted vertically using either
toporbottomand giving a signed distance by which to move the top or bottom of the element. - It's shifted horizontally using either
leftorrightand another signed distance. - The starting location is where it would have
been if it had been
position:staticrather thanposition:relative. - Note that other elements don't move as a result of the movement of this one. (There's a gap left in the sentence above, where the word was moved from.)
Position absolute is similar, except that the distances are measured not from the element's static position but in an absolute coordinate system, where the origin of the system is the first non-static ancestor and if no non-static ancestor is found, the browser window.
Therefore, another use of position:relative is to set the coordinate
system for its descendants. I like to think of this as "my descendants
are positioned relative to me". Here's an example:
This is done by:
- putting
position:relativeon the ancestor (here the box with gray background) - putting
position:absolute; top:30px; left:50pxon the pink child - putting
position:absolute; top:-10px; left:-20pxon the green child - putting
position:absolute; bottom:20px; right:30pxon the blue child
Use this feature sparingly. Sites where everything is positioned in
absolute coordinates are incredibly inflexible. You want a site that is
responsive to the size of the browser. Nevertheless, sometimes
position:absolute can be useful.
Note that with position:static, elements can never overlap. In
particular, text can't overlap. But with position:absolute and
position:relative you can do that, if you want.
Flexbox versus Float
Flexbox is relatively new (circa 2014, though proposals go all the way back to 2009). Prior to widespread support for flexbox, web developers used float, which still has some useful features and is still worth knowing about.
Here's a simple example of float, where we get the text to wrap around an image:
 Hermione Granger was indispensable in the Harry
Potter series. Harry had the title role, and he was clearly critical to
the story, but he did not have exceptional magical skill. His nemesis,
Lord Voldemort, was an extraordinary wizard, matched only by
Dumbledore. Harry, was good, but no more than good. Hermione, on the other
hand, was "the brightest witch of her age" according to Remus Lupin. There
was no spell she couldn't do, and her cleverness and foresight saved Harry
countless times.
Hermione Granger was indispensable in the Harry
Potter series. Harry had the title role, and he was clearly critical to
the story, but he did not have exceptional magical skill. His nemesis,
Lord Voldemort, was an extraordinary wizard, matched only by
Dumbledore. Harry, was good, but no more than good. Hermione, on the other
hand, was "the brightest witch of her age" according to Remus Lupin. There
was no spell she couldn't do, and her cleverness and foresight saved Harry
countless times.
Float causes the floated elements to be
- Removed from the flow, so that later stuff moves up on the page, and
- shoved back into the page, causing block elements to overlap it and inline elements to wrap around it.
The example above shows the idea. Hermione's picture is floated (to the left in this case) and the paragraph text (inline elements) flows around it.
Centering Block Elements and Text
People love centering, particularly novice designers. Centering moves things away from the edges, which makes it feel more comfortable, without having to decide how much to move it. But there are two kinds of centering. There's centering block elements and centering inline elements like text. Let's start with centering text:
Centering Text
Centering text is pretty easy: just specify text-align:center on its
parent element (or, in general, some ancestor, since the setting is
inherited.)
You should almost never center lines of text in a paragraph. You get ragged edges left and right, which looks ugly. Also, depending on the font, amount of text and the width of the region, the last line may be weirdly short (and centered). Here's a Tolkien quote:
You probably don't want that single word centered on the second line. But that can happen (and all-too-often does) when you center text and don't have complete control over browser-width, font-size, and the like.
Instead, what you probably want is to have normal, left-aligned text in a box that is itself centered. Let's see how to center boxes.
Centering Blocks
Here's an example of a block element (blue background) centered within its container (red border):
Note that, by default, block elements are width:100% which means that
they are as wide as their container will let them be. So, by default,
centering is not possible, because there's no extra space to center
within. Therefore, to center a block element, you usually have to set its
width to something smaller than its normal width. The blue block above is
80% of its container. One exception is IMG elements, since they get their
width from the actual image, not from the container. However, pictures
are often quite wide, so you typically have to scale them down using a
width setting anyhow.
The trick to centering a block element is to set its margin-left and
margin-right to auto. Auto margins means to take whatever space is
leftover in the container and distribute it equally to the two margins.
The example above used a shorthand: margin:10px auto which means the top
and bottom margins are 10px and the left and right are auto.
Galleries with Floating Elements
We often want galleries of elements, where there should be as many on a
line as will fit, but fewer if necessary, without any horizontal
scrolling. One way to do that is by setting display:inline-block and
set the width on the gallery elements, which allows you to put arbitrary
content in each element, while still having them fill the line like inline
elements.
Another way is to use float:left as shown by W3schools
Gallery
Chapter 5 Supplement
This reading summarizes and expands on the concepts of adaptive layouts with media queries that we learned in chapter 5.
Summary
- standard term is responsive though I agree with their objection
- viewports:
- layout viewport: what the developer (and the browser) uses for
- layout (where elements go and how big they are: think "magazine layout")
- visual viewport: what the user sees
- often the visual viewport is narrower than the layout viewport, requiring
- zooming out
- scrolling
- set the layout viewport with this:
<meta name="viewport"
content="width=device-width, initial-scale=1">- media queries using (in CSS) like this:
@media all and (min-width: 768px) {
    selector {
        flex-direction: row;
    }
    /* other CSS rules */
}- setting print styles:
@media print {
    body {
        /* Note "pt" (points) not "px" (pixels).
           72.27pt = 1 inch */
        font-size: 12pt "Times New Roman";
    }
    /* other CSS rules */
}
Media Queries
A media query, like all CSS rules, overrides earlier rules. So, the question is, what is the default: the large device or the small device?
Given the primacy of mobile nowadays, it's better to design for small and later make use of larger devices.
Therefore use min-width:
@media all and (min-width: NNNpx) {
    /* rules for large devices */
}
rather than max-width:
@media all and (max-width: NNNpx) {
    /* rules for smaller devices */
}
Breakpoints
What widths make sense to use to call in a different layout? Common values are:
- 320px smartphones
- 786px tablets
- 1024px laptops and desktops
These are called breakpoints where you switch from one layout to another. See Media Queries for Common Device Breakpoints
Of course, those values aren't cast in stone. New devices and pixel densities are always coming out.
JavaScript
CS 111 is a prerequisite for CS 204, so our introduction to JavaScript will compare it to Python. If you skipped CS 111 or have forgotten Python, let me know.
Finally, there's some practical information on how to run JavaScript
JavaScript Methods
In this reading about JavaScript methods, we will be using methods for several kinds of objects, but not defining or implementing methods. We'll also talk about JS object literals as collections of data, but not yet in the sense of supporting method invocation.
Our first example will be to use the JavaScript Date object, which is
built into the language.
Displaying the Date Dynamically
We can display the current date and time on a web page. For example:
If you reload this page, you'll notice that the date and time change appropriately.
Before we explain the JavaScript code that can do this, we need to
understand how time is represented in JavaScript. We begin by creating a
Date object:
var dateObj2 = new Date(); As we've seen before, the keyword var in var dateObj2 creates a new
variable named dateObj2 for storing a value. What we haven't seen
before is the keyword new, which causes a JavaScript object to
be created. In this case, the object represents the current date and
time. JavaScript comes equipped with a few pre-defined object types like
Date.
We can extract information from a Date object by invoking
methods on it. The table below shows some of the important
methods that Date objects understand. The elements of the
Value column are dynamically computed by evaluating the JavaScript
expressions in the Expression column, so reloading the page will
update these appropriately.
| Expression | Value | Notes |
|---|---|---|
| dateObj2.getFullYear() | Full year | |
| dateObj2.getYear() | Avoid this! Varies from browser to browser | |
| dateObj2.getMonth() | 0=Jan, 1=Feb, ..., 11=Dec | |
| dateObj2.getDate() | 1 to 31 | |
| dateObj2.getDay() | 0=Sun, 1=Mon, ..., 6=Sat | |
| dateObj2.getHours() | 0 to 23 | |
| dateObj2.getMinutes() | 0 to 59 | |
| dateObj2.getSeconds() | 0 to 59 | |
| dateObj2.getTime() | Milliseconds since Jan 1, 1970 (the "epoch") |
Objects
Dates are examples of objects. In JavaScript, an object is a kind of value that has two important characteristics:
- state, which is given by what JavaScript calls properties.
- behaviors, which are specified by what JavaScript calls methods.
Both properties and methods are selected from an object using dot
notation. In the examples above, the variable dateObj2
contains a date object. The expression to the left of the dot in
dateObj2.getDate() is a variable, dateObj2, that
contains a date object. To the right of the dot is the name of the thing
we want to compute based on the object. In this case, we invoke the
getDate() method, which returns the numerical day of the
month in a date object. (You can tell we're calling a method rather than
selecting a property by the presence of parentheses after the name.)
W3 Schools has a complete list of Date methods
Date Formatting
Now let's return to our date and time display. A date object contains a collection of information about the date and time, but for human-readability, we will need to format that data in some conventional way, using, for example, slashes and commas to separate the various numbers.
Here is JavaScript code that creates the correct string. (Next time, we'll look at how to insert it into the document using the DOM).
Let's examine the code. The first statement creates a Date
object representing the current date and time, and stores it in a variable
named dateObj. Subsequent statements extract components of
this Date object and piece them together.
As shown below, we could get by with only the single variable
dateObj. Although the other variables are not strictly
necessary, they can help to make the code more readable. Note that
there's nothing special about naming the variable dateObj.
We could have called it anything else, such as today or
now or fred (but fred
would not be a good
name, since it wouldn't suggest the meaning or value of the data).
var dateObj = new Date();

var current_date = ( (dateObj.getMonth() + 1) + "/"
                             + dateObj.getDate() + "/"
                             + dateObj.getFullYear());
var current_time = ( dateObj.getHours() + ":"
                             + dateObj.getMinutes() + ":"
                             + dateObj.getSeconds());
Other Date Methods
We've used the example of dates to teach you about:
- Objects (encapsulations of data and methods to operate on it)
- methods (ways to extract or modify the data in an object)
Lots of other objects and methods exist in JavaScript.
Here's another method, this time on numbers, the
toFixed() method. Note that you'll have to open the
JavaScript console to see the output, but using the console allows you to
see all the results as once. This reading will typically use console.log
rather than alert from now on, so you might find it useful to keep the
JavaScript console open as you read this material. (You should read this
on a real computer, not a phone, so you actually have a JavaScript console
and can run the examples by clicking the "execute it" buttons.)
The toFixed() method returns a string representation of the
number, with the number of decimal places given by the argument. It does
not change the value of the variable, as the last step shows.
Other Date Functions
The earlier date manipulation code was all numerical. That's partly
because JavaScript is global, and they decided not to have a built-in
function to map month zero to January
when it could just as easily
have been Janvier (French), Enero (Spanish) or Styczen (Polish).
Despite this, we decided to implement a simple function that maps month-numbers (ranging from 0 to 11) to English month-names. Try it out:
How would you print the name of the month 10 months from now?
Array Methods
Here are some handy methods for JavaScript arrays
pushadds a new element onto the end of an arraypopremoves and returns the last element of the arrayshiftremoves the first element of an arrayunshiftadds an element onto the frontindexOfsearches for an element and returns its index (-1 if not found)spliceoptionally removes some elements and optionally inserts someslicecopies an array
Try them out. The following uses JSON.stringify to convert an array into
a string, so that we can print it easily. We'll learn more about that
function later.
the forEach method
Arrays also have a forEach method that takes a function as its
argument, invoking the function for each element of the array. The
function is invoked with 3 arguments: the array item, its index in the
array, and the array. (You don't usually need the last argument.)
JavaScript Object Literals
It's now time to return to talking about JavaScript objects in general rather than just date objects.
In JavaScript, an object is a collection of data (properties and methods). This collection can be arbitrarily complex, including having other objects inside the containing object (much like a folder can contain other folders), but for now let's keep it simple:
A object is a collection of properties (also called keys) and values. We use the properties (keys) to look up the values. We'll use the termspropertiesandkeysinterchangeably
We'll ignore methods for now and focus on properties.
Let's be concrete. Imagine that we have an object to keep track of a user's info, including their name, year of graduation and whether they're going to the party. So, the three properties will be:
namegradYeargoing
We'll begin with a particular person, Alice, who is the class of 2019 and
is going to the party. We'll store all that info in a single object and
we'll store the object in a variable called person1. We can
make a second object about another person, Betty.
Consider the following JavaScript code:
var person1 = {name: "Alice", gradYear: 2019, going: "yes"};
var person2 = {name: "Betty", gradYear: 2020, going: "no"};
Try copy/pasting that code into a JavaScript console. Look at the resulting objects:
> person1
> person2
JavaScript even has a cool dir feature that breaks out all
the properties into separate, clickable things. This is particularly
useful for big, complicated objects, such as windows. Try it:
> dir(person1)
> dir(window)
Let's repeat those assignment statements, together with an abstraction:
var person1 = {name: "Alice", gradYear: 2019, going: "yes"};
var person2 = {name: "Betty", gradYear: 2020, going: "no"};
var personN = {prop1: value1, prop2: value2, prop3: value3};
The things on the right hand side are called object literals. The syntax of an object literal is an opening brace, a series of property/value pairs separated by commas, and a closing brace. Each property/value pair consists of a property (which follows the same rules as the names of variables), a colon, and a value. The value can be any JavaScript value, such as a number, string, or another object. Each of these object literals has three property/value pairs, but a JavaScript object can have any number of pairs, including none:
var empty_person = {};
JSON
The JavaScript Object Notation is pretty simple and easy to read:
- braces around key:value pairs
- key:value pairs separated by commas
- keys separated from values with a colon
- keys are strings
- values are either
- atomic data like strings, numbers, and booleans, or
- compound data like arrays or objects
Because of this simplicity and readability, JavaScript Object Notation
(JSON) has become very popular for passing data around the web. To turn a
data structure into a JSON string, use JSON.stringify(). To reverse that
operation, use JSON.parse:
The above uses JavaScript's typeof operator which can tell you the
datatype of something at run-time.
Object Operations
Given an object, there are a few things you might want to do to it:
- Retrieve the value associated with a property
- Modify the value associated with a property
- Add a new property/value pair
- Remove a property/value pair
Here are some specific examples of those operations with the person1
object:
You'll notice that the way we add a new property/value pair is identical to the way we modify an existing property/value pair: just an assignment statement. That's because JavaScript creates the property if necessary, and then updates the value. In practice, removing a property/value pair is rarely done, so we really only need to remember two operations: getting and setting.
Here are two assignment statements that demonstrate both getting and setting. On the right hand side, we get a value out of one object and on the left hand side we set a value of an object.
The syntax for getting and setting look the same: a variable, a dot, and a property.
The markers on a Google Map are another example of objects. Those markers
are objects with properties like lat and lng
(latitude and longitude), along with other info. For example, something
like:
// Wellesley's location
var marker1 = {lng: 42.296612,lat: -71.301956};
Unknown or Odd Properties
The syntax we learned above to get and set a value in an object
(variable.property) is simple and effective but fails in two
cases: if the property is unknown and if the property contains odd
characters, such as spaces or hyphens.
For example, suppose instead of calling the property
gradYear, we wanted to call it grad year (with a
space in it). The following doesn't work at all:
person1.grad year = 2020;
Usually, we can get around this very simply by limiting ourselves to property names that don't have spaces, hyphens, semi-colons and other oddities.
A slightly more difficult case comes where we don't know the property in
advance. For example, we have an object that stores the dimensions of an
image, with properties width and height. We
want to retrieve the larger dimension, and we've stored the name of the
property (a string) in a variable called larger_dim. The
following fails, because it tries to look up a property named
larger_dim instead of one named height.
There is a solution to both problems: the syntax to get/set a value in an object can be a string in square brackets. Here's an example that works. Note that the expression in the square brackets is a literal string.
Here's the same syntax used to solve the second problem of an unknown
property. Note that here, the expression in the square brackets is a
variable (larger_dim) that contains a string.
In fact, if you want to, you can always use the square bracket notation, and ignore the dot notation. For example:
However, most programmers appreciate the brevity and reduced punctuation of the dot notation, so you will see it a lot.
Looping over an Object's Properties
Sometimes it's useful to be able to loop over all the properties of an object. JavaScript has a built-in syntax, a special kind of loop, for doing just that. For example, the following will log all the properties in an object:
The following variation logs all the values in an object. Note that
using the square bracket notation is necessary here, because each time
through the loop the variable prop has a different value.
The syntax for this loop is
for ( var P in OBJ ) {
    // loop body here
}
The P is a new variable and we declare it here
using var to avoid creating a global variable. (We could
also have used let, which would be superior in this example,
since the variable wouldn't exist outside the loop.) The variable is given
a value (as if by an assignment statement) before each time through the
body of the loop. Those values will be the properties of the object.
The OBJ is an
existing variable that holds an existing object.
Here's one last example, which counts the number of properties in an object.
Summary
Objects in JavaScript are general collections of data represented as key/value pairs. They can also be used to support methods to operate on the data. Later, we'll learn how to define methods. Title: The DOM: The Document Object Model
- Languages
- HTML template
- Tags
- Meaningless Tags
- Chrome Developer
- Some other useful tags:
- Here links
- The ALT Attribute
- Figures
- Comments
- Comment Syntax
- Validation of HTML Code
- Icon Declaring Validation
- Semantic Tags
- Which Tag to Use?
- Review of URLs
- The End
- CSS concepts
- CSS rules
- CSS Properties
- Box Model
- Selectors
- IDs
- Attribute Selectors
- Structural Selectors
- Multiple Selectors
- Style Inheritance
- Color
- Transparency
- Fonts
- Web Fonts
- Google Fonts API
- Putting fonts into your CSS File
- Google Fonts can break HTML Validation
- Mobile First
- inline-blocks
- New HTML
- Flexbox
- New CSS Properties
- Absolute and Relative Positioning
- Flexbox versus Float
- Centering Block Elements and Text
- Centering Text
- Centering Blocks
- Galleries with Floating Elements
- Summary
- Media Queries
- Breakpoints
- Displaying the Date Dynamically
- Objects
- Date Formatting
- Other Date Methods
- Other Date Functions
- Array Methods
- the forEach method
- JavaScript Object Literals
- JSON
- Object Operations
- Unknown or Odd Properties
- Looping over an Object's Properties
- Summary
- DOM References
- The DOM in raw JavaScript
- jQuery
- Loading JQuery
- Click Handling Example
- jQuery Usage
- jQuery API
- Method Chaining
- jQuery's Flaw and a Plug-in
- Building Structure
- DOM Events
- Recap
- Raw JS versus jQuery
- Thumbnails
- Using Descendant Selectors
- Raw JS versus jQuery
- Keyboard Events
- Pseudo Classes
- CSS Transitions
- Easing
- Custom Timing Functions
- jQuery Animations
- Scope
- Other Scopes
- What is a Closure?
- Functional Programming
- An Example: A Shopping Example
- Event Handler Maker
- Closure Variables
- Namespaces
- Functions as Namespaces
- JavaScript objects are namespaces
- Inside and Outside
- General Idea
- Programming Classes and Objects
- Modern Syntax
- Classic Syntax
- Exercises
- Invoking a Constructor
- The THIS variable in normal functions
- Basic Method Invocation
- Method Invocation Bug
- Closures to the Rescue
- The bind method
- What bind does
- The Bug from Chapter 8
- Buggy code
- Debugging
- Using the Chrome Debugger
- The form tag
- Form Fields
- The input Tag
- The SELECT input
- The textarea input
- Labels
- Name and Value
- Placeholder
- Radio Buttons
- Testing Accessibility
- Coffeerun From from Chapter 9
- Topics we didn't cover
- Binding this
- Form Submission
- Submit Handlers
- Preventing Defaults
- jQuery and its pitfall
- Serializing Forms
- Bind
- Constructing DOM Elements
- Calling Methods
- Searching down the tree
- Searching up the tree
- Delegation
- Event Delegation and jQuery
- Event Delegation and THIS
- Form Values and .val()
- What is Form Validation?
- Asynchronous Requests
- LocalStorage
- Data Abstraction
- Abstraction Barrier
- Polymorphism
- Inheritance
- The instanceof Operator
- New Syntax
- Summary
- Slideshows
- Automatic Slideshows
- Clickable Dropdowns
- jQuery UI Overall
- API Key
- Google's Tutorial
- Tutorial
- Motivation
- The POUR Principles
- Checklist Dozen
- Images
- Videos and Audios
- Hyperlinks
- Labels for Form Controls
- Avoid Color
- Accessible JavaScript
- Accessible jQuery
- Learning More
- Conclusion
The DOM: The Document Object Model
One of the key things that you can do with JavaScript is to modify the contents of the browser: changing the structure of the document, including adding and removing content. You can also alter the style of the elements, dynamically changing the CSS classes of elements or directly altering the CSS rules.
The API or Application Programming Interface by which JavaScript can modify the document is called the Document Object Model, or DOM for short.
The DOM entails a lot, but one thing to know is that your document is a
tree of nodes. So, for example, this paragraph is a child of the
BODY element, and the em tag earlier is child of
this paragraph. Next in this section is a UL (unordered
list), which is the nextSibling of this paragraph, and has
several child elements, each of which is a LI (list item).
And so on.
DOM References
Many of the following are excellent introductions to the DOM, but they will use the native JavaScript API. The raw DOM is actually not that hard to use from JS, but the jQuery library makes it even easier, so rather than learn two ways to modify the DOM, we'll skip over this and modify the DOM via JQ.
The following is a list of useful but optional references, but you don't need to learn the raw JS API to the DOM, so feel free to ignore those parts.
The DOM in raw JavaScript
Your book starts by using the JavaScript DOM API that is built into the browser and only later introduces jQuery. We will use jQuery from the beginning, but let's take a minute to look at the built-in API first. Specifically, we'll look at these:
document.querySelector()takes a CSS-style selector as a string argument, and returns the selected node. (If more than one matches, it returns the first.)document.querySelectorAll()is just like the previous method but it returns an array-like list of selected nodes.node.textContentis an property that corresponds to the content of the selected node. You can set it to replace whatever is there. You can only set it to text, not arbitrary HTML.node.addEventListener(type,function)takes an event type (such as "click") and a function as its arguments. When the specified event type happens to the node (e.g. someone clicks on the node), the function is invoked. That function can thenhandle
the event in any way it wants to.
The following code implements a click handler for the button below, so that if you click on the button it will change to a random number. Try it! Click as many times as you like!
1234
By the way, did you notice the anonymous function literal that is the
second argument of addEventListener? That's the code that runs when the
button is clicked.
Because jQuery makes manipulating the DOM easier, let's learn jQuery.
jQuery
jQuery is a JavaScript library of useful methods for manipulating the document, by which I mean things like this:
- Adding structure. For example, the back-end sends some new Facebook content; JQ can add that to the page.
- Removing structure. You finish composing a Gmail message in a little sub-window of your browser window and you click on send. JQ can remove the sub-window and put the focus back on your main Gmail window.
- Modifying style. You type some stuff into a Google Doc, and moments later, the phrase "all changes saved" appears at the top of the window, then fades to gray and disappears over the course of several seconds. JQ not only inserts the text, but sets its color and animates its changing color and opacity.
It does a few other things as well, including Ajax. For example, those Facebook updates, sending mail from Gmail, and sending the document changes in Google Docs are all done via Ajax.
jQuery has a small footprint, which means it doesn't take a long time to download to your browser and doesn't take up too much memory once it is loaded. It's well-supported and extremely popular. Google, Facebook, and many other tech companies use and support it.
For extreme brevity, everything in the jQuery library is accessed by via
one function whose name is $ — yes, the dollar sign
character. A synonym of the $ variable/function is
jQuery, but that's rarely used. After all, it may be
clearer, but it's six times as much typing!
Loading JQuery
jQuery isn't built into the browser the way that raw JavaScript is. You have to load it. Many sites host versions of jQuery, and so typically, we load it from one of those.
Skim this page about Google Hosted Libraries
Then, put the following in your page(s):
<script src="https://ajax.googleapis.com/ajax/libs/jquery/3.4.1/jquery.min.js"></script>Note that, as with most programming languages, you have to load jQuery before you use it.
Click Handling Example
As a point of comparison, let's compare jQuery code equivalent to the example we saw using the raw API.
As before, the following code implements a click handler for the button below, so that if you click on the button it will change to a random number. Try it! Click as many times as you like!
1234
You can see that jQuery is a bit more terse than the raw API, which is nice, but not decisive. jQuery also tries to work the same in all browsers, hiding their idiosyncracies. It's extremely popular for those reasons.
jQuery Usage
There's a pattern to most jQuery usage:
$(selector).method(arg);The selector argument uses CSS syntax to select some set of
nodes in your document to operate on. The method then
operates on that set in some way. If the method needs to know additional
info, that's supplied in the arguments.
Here are some examples:
// change the CSS of all paragraphs (P elements)
// to make the text blue:
$("P").css("color","blue");

// change the CSS of all elements of class "important"
// to have red text:
$(".important").css("color","red");

// change the CSS of the navbar to be red on white.
// Notice the use of an object literal to package up two changes
$("#navbar").css({"color":"red","background-color":"white"});

// add the class "important" to all H2 elements:
$("h2").addClass("important");

// change the text of all H1 elements to "Cool Stuff"
$("h1").text("Cool Stuff");

// change the HTML of the copyright notice to this year
var d = new Date();
$("#copyright").html("© "+d.getFullYear());

// add bananas to the grocery list.
$("ul#groceries").append("<li>bananas</li>");

// delete all H3 elements from the document
$("h3").remove();

// hide (make invisible via CSS display: none)
// all paragraphs in the sidebar
$("#sidebar p").hide();
We could go on, but you get the idea.
jQuery API
The jQuery API is well documented. Here are some of the methods we used above:
You can learn a lot just by poking around in there and reading some of their examples and notes.
Method Chaining
The implementation of jQuery uses a clever trick that can create a great deal of efficiency and brevity. Supplying a selector to the jQuery function and invoking it returns a object that represents the set of matched elements. That object supports the methods like the ones we looked above. Furthermore, most of those methods return the same object as their return value, which means that we can keep operating on the same set, just by invoking another method, chaining them together.
That's all very abstract, so let's see some examples.
This first example is how a novice might do a series of things with some selected objects:
$(sel).addClass('important');        // make them important
$(sel).css('color','red');           // make them red
$(sel).append("<em>really!</em>");   // add an exclamation
$(sel).hide();                       // and hide them??
That works fine, but the trouble is that jQuery has to keep finding all the objects, so it wastes a lot of work.
A more experienced or efficiency-conscious person might do the following:
var $elts = $(sel);                 // get some DOM objects
$elts.addClass('important');        // make them important
$elts.css('color','red');           // make them red
$elts.append("<em>really!!</em>");  // add an exclamation
$elts.hide();                       // and hide them??
That's efficient, but a bit tedious to type. (Note that it's a common convention, but not required, to name variables that hold jQuery objects with a dollar sign).
We still haven't done chaining. In jQuery, most methods return the wrapped set, which means that we can just invoke another method on the return value. That allows us to chain several methods together.
Using chaining, an experienced and terse jQuery coder might instead do the following:
$(sel).addClass('important').css('color','red').append("<em>really!</em>").hide();Of course, that's really ugly and hard to read, all in one line like that. The important point is that each method is just called on the return value of the one to its left. The layout of the code isn't important, so we are free to lay out the code nicely, maybe with comments. So, the true jQuery expert writes the following (notice the lack of semi-colons, which would interrupt the chain by ending the statement):
$(sel)                           // get some DOM objects
   .addClass('important')        // make them important
   .css('color','red')           // make them red
   .append("<em>really!!</em>")   // add an exclamation
   .hide();                      // and hide them??
The preceding is concise, efficient, and easy to read.
jQuery's Flaw and a Plug-in
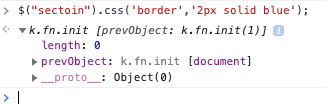
One of the only things I don't like about jQuery, its Achilles Heel, is the fact that a wrapped set that is empty is okay, generating no error message or warning. That can be useful sometimes, but most of the time, if the wrapped set is empty, it's because I made a mistake in the selector string.
Here's an example, where a typo in the selector string keeps the code from working, yet jQuery doesn't complain:
$("sectoin").css('border','2px solid blue');So if your jQuery isn't working and there's no error message, scrutinize your selector expressions. In fact, I often end up checking the size of the returned set when I'm debugging. In the following screenshot, you can see that the wrapped set is empty:
In fact, I got so annoyed with this flaw in jQuery that I wrote a jQuery plugin for checking the size of the wrapped set in an easy way. With the plugin loaded, just do:
$("sectoin").some().css('border','2px solid blue');And you'll get an error if there are zero things in the set. There's also
a .one() method, which throws an error if there isn't exactly one
match. Here, if I mistype fred as ferd, I get a useful error:
$('#ferd').one().css('color','red')You can load the bounds plug-in like this:
<script src="https://cs.wellesley.edu/~anderson/js/bounds/bounds-plugin.js"></script>Both jQuery and my bounds plug-in are already included in the template file.
Building Structure
Before we get to events, we should take few minutes to look at operating on the structure of the document. We'll use jQuery to do this. We'll start with adding a list of prime numbers to the web page. First, we need to have a destination for them:
<div id="prime-container">
  <p>Our primes:</p>
  <ul id="prime-list">
  </ul>
</div>
Now the code to add some primes to that list:
function addPrimes( primes ) {
    primes.forEach(function(p) {
             $('<li>').text(p).appendTo('#prime-list')
         });
}

addPrimes( [2, 3, 5, 7, 11, 13, 17] );
Here it is:
Our primes:
You might wonder what the '<li>' does as the argument of the jQuery
function, since it's not a CSS selector. What happens is that jQuery
creates the given element, but it is not (yet) attached to the
document. Here, we attach it to the document with the jQuery appendTo
method.
An alternative way to do this is to build the entire list up and only attach it to the document at the end. This is more efficient, since the document only has to be re-rendered once for the list, as opposed to once for each element.
  <div id="prime-container2">
    <p>Our primes:</p>
  </div>
Here's the variant JS/JQ code:
function addPrimes2(primes) {
    var $ul = $('<ul>');
    primes.forEach(function (p) {
        $('<li>').text(p).appendTo($ul);
    });
    $ul.appendTo('#prime-container2');
}
addPrimes2( [2, 3, 5, 7, 11, 13, 17] );
Here it is:
Another list of our primes:
DOM Events
In addition to letting us work with the DOM, jQuery lets us work with events. Events are important ways of hooking into user behavior: a user clicking on something or mousing over something is an event, and we can make things happen when that event occurs.
The way that event-handling in the DOM works is that you can say:
when event E occurs to DOM element D, please invoke function F.
Here's a partial list of some common DOM events:
- click: when you click on something
- dblclick: when you double-click something
- mouseover: when your mouse is moved onto an element
- keypress: when a key on the keyboard is pressed
- load: when the document or an object like an image finishes loading
- submit: when a form is submitted
H3 Events
Let's make that more concrete. Just above is an H3 header with an ID and
the ID is h3events. Let's write some code that would turn
that header a random color:
var colors = ['red','orange','green','blue','purple'];
var randIndex = Math.floor(Math.random()*colors.length);
var randColor = colors[randIndex];
console.log('turning it '+randColor);
// jQuery magic to turn it a random color:
$("#h3events").css('color',randColor);
Okay, very nice, but that's not yet what we want. We'd like the user to
be able to turn the header a random color just by clicking on it. So, one
step on the way to do that is to package up that code into a function, say
turnEventsRandomColor:
function turnEventsRandomColor() {
    var colors = ['red','orange','green','blue','purple'];
    var randIndex = Math.floor(Math.random()*colors.length);
    var randColor = colors[randIndex];
    console.log('turning it '+randColor);
    // jQuery magic to turn it a random color:
    $("#h3events").css('color',randColor);
}
Then, whenever we want to turn that header a random color, we just invoke the function:
turnEventsRandomColor();However, we want the user to be able to have that function invoked by
clicking on the header. More precisely, we want to say that whenever the
#h3events element gets a click event, we'd like
that function invoked. jQuery provides a very easy way do to this, using
the same pattern we've seen many times:
$("#h3events").click(turnEventsRandomColor);Scroll back and try it!
Now, there are some very important points to make: we are
not invoking the turnEventsRandomColor function
right now. Instead, we are giving it to the click method,
much like we gave the 'color' string and the value of the
randColor variable to the css method above.
That is, the function is merely a piece of data that is being passed as an
argument. It is not being invoked now.
To invoke a function we give its name (or, equivalently, a variable whose
value is the function) followed by parentheses containing any arguments to
be passed. Since we are not invoking turnEventsRandomColor
now, it's not followed by parentheses.
When does it get invoked? The browser will invoke it when the event happens. The function is an event handler.
The function is also an example of a callback. A callback is a general Computer Science term for a function that is invoked later, when something happens or has happened. They're used in graphics programming, processing data, GUI programming and lots of other situations.
By the way, an experienced jQuery programmer wouldn't bother to devise
that cumbersome name (turnEventsRandomColor) for a function
that she is never going to refer to again after handing it to the
click method. Instead, she uses an anonymous
function literal, putting all the important code right where she needs it:
$("#h3events").click(function () {
    var colors = ['red','orange','green','blue','purple'];
    var randIndex = Math.floor(Math.random()*colors.length);
    var randColor = colors[randIndex];
    // jQuery magic to turn it a random color:
    $("#h3events").css('color',randColor);
});
The whole function literal is the argument of the click
method — notice the close paren on the last line, after the closing
brace of the function literal.
Handling Events with JavaScript
This is an action-packed chapter, where they introduce JavaScript, the DOM, events and event handlers all in one. We've spread that out over the last few class meetings, but now it's time to delve into what the chapter covered.
The main goal of the chapter is to add an event handler to the thumbnail otter pictures so that clicking on a thumbnail will cause that picture to be displayed in the larger version (called the detail image). This is a very cool and useful effect, often used in web pages with image galleries like this one.
Recap
I won't try to recap everything in this dense chapter, but I'll try to remind you of the main points
- we can add arbitrary information to a DOM element by adding
attributes. To make sure that the attribute doesn't conflict with one
that has meaning to the browser, we need to ensure that the first five
characters of the attribute name is
data-. For example, if I want to add information to an element about how classy it is, I could add adata-class=fancyattribute. - we can look up a DOM element using
document.querySelector()where the argument is a string that contains a selector expression in the CSS language, such as#fredor.gryffindoror even[data-image-role="target"]which looks up an element that has that attribute/value pair. - the JS objects returned by
querySelectorhave properties that we can modify, thereby updating the page. For example,obj.src="otter1.jpg"changes thesrcof an element (presumably an IMG), which would cause the browser to load and display a different picture. - there is a
setAttribute()method that achieves the same effect - we should specify
"use strict"as a string at the top of our JS functions to ask the browser to be a bit less permissive about possible errors. For example, if a variable hasn't been declared (maybe because you mispelled it) the browser will complain instead of just creating a new global. - we can attach a function as an event handler for an event using
the
.addEventListener()method. The function will be invoked by the browser whenever the event occurs - the function that we attach can either be named or anonymous, meaning a
function expression or function literal, like
function () { ... } - the argument function is passed in without parens after it, because parens would invoke the function and only pass in the return value. Instead, we want to pass in the function itself
- the callback function is invoked with a JS object that contains a bunch of information about the event. This is called the event object
- the event object has a method called
preventDefault()which, if invoked, will cause the browser not to do the "normal" thing, whatever that normal thing is. In Ottergram, we're clicking on a hyperlink, and the normal thing is to visit the URL specified in thehref. We want to not do that, so the event handler executesevent.preventDefaultwhereeventis just the parameter that gets assigned the event object. - If we want to select more than one element (e.g. all the thumbnails), we can use
document.querySelectorAll()Note that that returns a NodeList which is like an JavaScript array but doesn't support all the array methods. Best to iterate over it with aforloop. Alternatively, convert it to a JS array using[].slice.call.(*nodelist*)
Raw JS versus jQuery
Your book decided to defer the introduction of jQuery. This is a fine decision; they're already throwing a lot at you in this chapter. Because we're spreading the content out over several meetings, I decided to introduce jQuery. So, let's talk about the correspondence between raw JS and JQ.
| Raw JS | document.querySelector(sel_string) |
| jQuery | $(sel_string) |
| use | get a DOM element |
| Raw JS | document.querySelectorAll(sel_string) |
| jQuery | $(sel_string) |
| use | get a list of DOM elements (jQuery always returns sets) |
| Raw JS | elt.getAttribute(attrib_string) |
| jQuery | jq_set.attr(attrib_string) |
| use | get the value of an attribute |
| Raw JS | elt.setAttribute(attrib_string,value_string) |
| jQuery | jq_set.attr(attrib_string,value_string) |
| use | set an attribute to a value |
| Raw JS | elt.textContent = string |
| jQuery | jq_set.text(string) |
| use | set the text inside the element |
| Raw JS | elt.addEventListener(event_type,callback_function) |
| jQuery | jq_set.on(event_type, callback_function) |
| use | attach an event handler to an element |
| Raw JS | elt.addEventListener('click',callback_function) |
| jQuery | jq_set.click(callback_function) |
| use | attach a handler for click events to an element |
You see that the jQuery methods are similar to raw JS, just as intuitive, more consistent (they are always methods, while raw JS is a mixture of methods and attributes), and more concise.
Note that we didn't learn jQuery's .on() method; instead, we learned a
special case for click handlers, namely click(). I added on above for
completeness.
Thumbnails
Note that in Ottergram, the same image file is used for both the thumbnail (small) and the detail (big) version. If there were many thumbnails, such that you expect most of them won't get clicked on, that would be a poor design, because your page would have downloaded many big images only to scale most of them down. Thus, your download would be increased for no benefit: a waste of time and bandwidth.
In Ottergram, there are only a few pictures, so the waste is negligible. In a different application, we might create special thumbnail versions. Note that their code doesn't assume that the URL of the detail image is the same as the URL of the thumbnail, so their code is ready for that improvement. That's good design.
Visual Effects with CSS
This is an eye candy
chapter. Eye candy is fun and nice to have,
but in most cases is not essential. On the other hand, managing the
limited space on the screen by having thing appear and disappear is
important for the useability of a site.
This is a brief summary of the chapter. Read the chapter first for all the important concepts and techniques.
Using Descendant Selectors
The first important point is that we can change the layout of the page by adding and removing classes to the elements that need to change. However, the disadvantage of this technique is that if we make N changes via JavaScript, the page needs to have its layout recomputed N times. It's better to make one change that all our layout rules react to.
We can do that by adding a class to a top-level element of our page (such
as the body), and using descendant selectors on all the lower-level
elements of the page that need to change.
Raw JS versus jQuery
Your book uses
node.classList.add(classname)
to add a class to the list of classes on an element. (Think of this as converting
<div class="sidebar"> ... </div>to
<div class="sidebar hidden"> ... </div>You can achieve the same effect in jQuery with the
$(selector).addClass(classname);
Keyboard Events
There are three keyboard events that you might potentially be interested in:
keydownkeyupkeypress
The last is only for real characters, not modifiers like shift or control.
The keypress event is officially
deprecated
in favor of device-independent events, but it's likely to be supported for
a long time.
Your book uses keyup, so we will too.
The event listener is invoked with an event object, and that will contain
a keyCode property that is the Unicode codepoint of the key that was
entered. We'll stick to ASCII, and the
Escape key has a value of 27 (decimal). So, we can do something like:
document.addEventListener('keyup',function (eventObj) {
    var ESC = 27;
    if( eventObj.keyCode === ESC ) {
        eventObj.preventDefault();
        ...
    }
});
Pseudo Classes
You can add a pseudo-class to a CSS rule that will apply when the element is in a particular state. For example, a hyperlink that has been visited can be shown differently than an unvisited hyperlink, even though they are both hyperlinks. The default blue/purple for unvisited versus visited hyperlinks could be done as shown below. We can even make them green when they're hovered over and red at the moment they are clicked:
a:link    { color: blue; }
a:visited { color: purple; }
a:hover   { color: green; }
a:active  { color: red; }
Try it on the following link:
We will use the :hover pseudo-class in this chapter to trigger a transition
CSS Transitions
Instead of instantaneously changing the appearance of a page when applying new CSS rules, the browser can gradually change the layout to produce animations. The MDN article on transitions is, I think, a little clearer than our book. Here's an example. Hover over the middle box to see the effect.
Here are the CSS rules that accomplish that example. Note that the middle
box is defined with the same rules as the before box, and the :hover
pseudo-class is the same as the after box. The sole unique rule is the
transition property, which specifies which properties change and how
long. Here, I made them all 2 seconds long.
.box {
    display: inline-block;
    font-family: arial;
    width: 30%;
    vertical-align: top;

}
#before, #during {
    border: 1px solid green;
    font-size: 10px;
    height: 50px;
    background-color: #4080ff;
    }
#during {
    /* transition these properties over 2 seconds each */
    transition: border 2s, height 2s, font-size 2s, background-color 2s;
}
#after, #during:hover {
    border: 4px solid red;
    height: 150px;
    font-size: 30px;
    background-color: #80ffff;
}
Easing
The transitions are, by default, just done in a linear way. For example, if the height has to change by 100px in 1 second, then it might change in 10 discrete steps of 10px every 100 milliseconds. (The length of time between steps is determined by the refresh rate of the browser.) However, the linear transitions can be changed using easing which changes the timing function. There is a list of timing functions on MDN.
Custom Timing Functions
You can even create your own timing functions, say using cubic-bezier.com
jQuery Animations
The effects that our book describes are for the newest browsers (see some
of the warnings an MDN). jQuery provides another way to do animations in
an easy way that is compatible with older browsers, since the animations
are done by jQuery. You can read the details here: jQuery animate()
method. jQuery's animate() method even
includes options for different easing functions.
It's very easy to use. Try clicking on the following box:
Here's the JQ code. You'll see that the .animate() method's first
argument is a JS object literal that contains a collection of target CSS
values, just like the .css() method. The second argument says how many
milliseconds it should take to achieve that change.
$("#box1")
    .css({height: "50px", "font-size": "10px"})
    .click(function () {
        $("#box1").animate({height: "200px", "font-size": "20px"},
                           2000);
        });
Note that I could have specified the initial CSS using CSS style rules
instead of JQ's .css() method, but I like using the same medium for
specifying both the starting and ending values.
Title: Closures and Namespaces
Closures and Namespaces
This reading is supplemental to Chapter 8 (through page 173), which uses Immediately Invoked Function Expressions (IIFEs) to establish namespaces. This reading also discusses closures, which are briefly described on page 133.
A closure is a special kind of function, and a namespace is a way that a programming language can support separation of code. Consequently, you'll learn more about these concepts in CS 251 (Programming Languages), but they are important, practical concepts that arise naturally in JavaScript code, so we'll learn about them now.
But, before we get to closures, let's review some ideas that you probably remember from prior CS classes, but I want to bring to the top of your mind.
Scope
In JavaScript, variables can be local or global. A global variable can be seen by any code anywhere; local variables can only be seen from a small part of the code. For example, consider the following code:
var glob = 13;

function fred(x) {
    return x+glob;
}

function george(x) {
    x = Math.random();
    glob = Math.random();
    return x+glob;
}
The global variable glob is visible to both functions. (The function
names fred and george also go into the global namespace and so are
visible to each other. For example, they could invoke each other.)
The local variable x is local to each function. I could
simultaneously
invoke fred and george with different values for x
and nothing would go wrong, because they are different names and therefore
different storage locations. Imagine each function is a family, and both
families have a child named x (short for Xenophon
and
Xerxes
). Different kids, different storage locations, but the
identical names cause no confusion. For the functions, the x variable
exists only during the function call and disappears when the function
completes.
Other Scopes
There are other scopes in addition to local and global. We actually used these in the Plotting assignment without realizing it. Here's an example; see if you can figure out what it does:
function curve13(max, incr) {
    var xvals = range(max);
    var f = function (x) { return x+incr };
    var yvals = xvals.map(f);
    newPlot(xvals, yvals)
}
Focus on the f function. What is the scope of x? It's local to f,
of course. What is the scope of incr? The incr variable is local to
curve13 but it is non-local to f. The incr variable refers to the
environment that curve13 created.
A variable that is non-local like incr means that f is a
closure. We say that f is a "closure over incr".
If a closure is returned from a function, it can continue to refer to
its original environment. We did this in the Plotting assignment as well:
the functions returned from quadratic and cubic continued to refer to
their original environments, which is how they continued to know their
coefficient and roots.
What is a Closure?
Formally, a closure is a function plus an environment (you can read more about them in the Wikipedia article on Closures), so to begin getting a handle on them, we start with some more observations about functions.
Functional Programming
The following functions f1 and f2 depend only on their inputs (rather
than on some global state information), which makes them easier to
understand than the function g1 which depends on some global variable
glob. (For example, suppose glob is a string: then the value of g1
is a string, too.)
var f1 = function (x y) { return x + y; };
var f2 = function (x) { return x + 4; };
var g1 = function (x) { return x + glob; };
When we talk about ''functional programming'' in Computer Science, we are
thinking about functions like f1 and f2, where calling the functions
with the same inputs always yields the same output. The same can't be said
of g1. In general, when we say some code is functional, we mean that
it depends only on its arguments, not on external state (like glob) or
even internal state (its prior history of executions). We'll return to
this later.
Function f1 is just the add function; we might call f2 the add4
function. Since functions are first-class objects in JavaScript, we can
dynamically create them and return them from functions. So, the following
function can create functions like add4:
var makeAdder = function (delta) {
    return function (x) { return x+delta; }
    };
var add4 = makeAdder(4);
alert(add4(3));
Now, what kind of function is add4? It's functional, in the sense that
its value only depends on its arguments, not on any global state
(certainly none that can change). Yet the code looks nearly the same as
g1. What's the difference? The difference is that the glob that g1
refers to is global and can change dynamically, while delta is a
lexical variable in the environment of the anonymous function returned
by makeAdder. That function includes both the function plus that bit of
environment, so it is a closure.
If you think about our earlier discussion of scopes and environments, the
environment of the anonymous function returned by makeAdder includes the
parameter delta and the delta continues to exist even though
makeAdder has returned. It continues to exist because the anonymous
function needs it. We say that the anonymous function has closed over
the name delta.
An Example: A Shopping Example
Let's see closures in action in a web page. Suppose we have a page that has an item for sale, say apples, and it has an associated button that increments a counter, updates a database, updates the web page and maybe other things. So, you write some code like this:
function updateAppleDatabase(n) {
    console.log("Apple Database updated with "+n);
}Here's the HTML code:
And here's the JavaScript code:
The event handler function we've written is not functional (it depends
on the global variable appleClicks). Nevertheless, the code works fine.
Next, we decide to add additional buttons for bananas, coconuts, dates, eggplants, figs and the rest of the alphabet. Of course, we could copy/paste the code above for each of our grocery items, but copy/paste usually a bad idea. Duplicate code means that if we change our implementation, we have to update all the copies of the original implementation.
Event Handler Maker
But how do we write a generic
event handler? We could write a
function to make one. While we're at it, we'll make the
updateAppleDatabase function more generic.
function groceryClickHandlerMaker(item,outputId) {
    var counter = 0;
    return function () {
         counter++;
         updateDatabase(item,counter);
         $(outputId).html(counter);
         };
}
How do we use the groceryClickHandlerMaker? Here are two examples, where we
invoke the groceryClickHandlerMaker function to return a closure that
we then attach as the click handler.
Here's the JavaScript code:
Closure Variables
Let's look again at the groceryClickHandlerMaker:
function groceryClickHandlerMaker(item,outputId) {
    var counter = 0;
    return function () {
         counter++;
         updateDatabase(item,counter);
         $(outputId).html(counter);
         };
}
What variables does it close over? It closes over every variable that is not defined within the function. Here there are three:
itemoutputIdcounter
The first two closure variables won't change ever, so the JavaScript engine can really just substitute the values as static constants. The counter, however, is interesting, because it's updated by the closure invocation, which means that the closure isn't functional in the technical sense of its behavior only depending on its arguments. Its behavior depends on how many times its been executed before.
Namespaces
Some very cool properties of the counter variable used by the click
handlers above are that
- there are several of these variables, one for each handler
- they all have the same name, but
- they are all completely unrelated, and
- they are all completely private
Think about that last property for a moment: each click handler has its own private state variable. (This should remind you of instance variables in object-oriented programming.) Indeed, each closure has its own private namespace.
What's a namespace? In general, a namespace is a mapping from names (symbols) to values. You can think of the names as variables, as we will here, since in JavaScript we can assign a function to a variable. Namespaces are important in programming because they help us avoid name collisions. For example, many years ago, I was doing some graphics programming and I has some variables that stored the hex codes for various colors:
var red = 0xff0000;
var white = 0xffffff;
var tan = 0xd2b48c;
var teal = 0x00ffff;
...
I also needed to compute the tangent of an angle:
var tan_theta = tan(theta);I'm embarrassed to admit that it took me hours to understand why the
tangent function wasn't working. The problem was a name collision: I had
only one namespace, so tan could only have one value.
In JavaScript, the tan function is safely in the Math object and so we
say Math.tan to use it. The Math object gives us a kind of namespace.
We could create one for Colors very easily in JavaScript using objects:
var Colors = {};
Colors.red = 0xff0000;
Colors.white = 0xffffff;
Colors.tan = 0xd2b48c;
Colors.teal = 0x00ffff;
We can put functions in the object as well, like the tan function is in
Math. Suppose we had a function lighten and we didn't want to clutter
up the global namespace with it. We could put it in Colors:
Colors.lighten = function (color) { ... };This technique is very common in JavaScript programming. Another, even more common, is to use functions.
Functions as Namespaces
Let's take a very abstract example so that the details of the code don't
confuse the issue. Suppose we want to have a bunch of global variables
and functions with short, succinct names for brevity. The functions might
be mutually recursive, might refer to the globals, and so forth. After all
those definitions, the thing we actually want to do is compute f(1) and
insert the result into page . Our code might look like this:
var a = 123;

var b = 456;

var f = function (n) { ... g(a*n); ... };

var g = function (x,y) { ... f(b*x)+f(b*y)...; }

$("#ans").html(f(1));
This code would work, but it would not be good software engineering, because of the potential for namespace conflicts. So, we can just make all these variables be local variables of a new, anonymous function that we will immediately execute.
(function () {

     // code from above

})();
Notice that the function expression is wrapped in parentheses: that's necessary so that it won't be treated as just a top-level function definition. The parenthesized function expression is then followed by a pair of empty parentheses which causes the function to be invoked. This is called an Immediately Invoked Function Expression or IIFE. Wikipedia has more about Immediately Invoked Function Expressions.
Using an IIFE means that no names are added to the global namespace, so
the code has no footprint at all. (The footprint
of code is the set
of names that are added to the global JavaScript namespace.)
Modules, Objects and Methods
This reading is supplemental to Chapter 8 (page 173 to the end).
Many of you are familiar with Python from CS 111. Python has a nice module system in which we can import various helpful modules into our main program. Our code might look like this:
import math, cs1graphics

def modifyPicture(pic,angle):
    cs1graphics.adjustY( pic, math.tan(angle) )
Don't worry about the details of the code. I doubt that adjustY exists;
I just made it up. The point is that we can use functions that are defined
in different modules by using the syntax module.name where the part to
the left of the dot is the name of the module (math or cs1graphics)
and the part to the right is one of the names that lives in that module.
Moreover, the set of names in each module is separate. If, by coincidence,
both modules use the same name, there's no conflict. One could be
math.PI and the other could be cs1graphics.PI
Separating sets of names like this is useful in CS, because it reduces the chance of accidental name collisions.
A set of names and values like this is called a namespace. There are lots of kinds of namespaces; a Python module is just one. We'll see a few more.
In fact, Python dictionaries are a kind of namespace, because again they comprise a set of names and values. We look things up and store things under various keys which can be strings or names
math2 = dict()
math2['pi'] = 3.2
math2['e'] = 2.71828

colors = dict()
colors['red'] = 0xff0000
colors['tan'] = 0xd2b48c
Indeed, my understanding is that Python's modules are implemented using dictionaries.
JavaScript objects are namespaces
We can do the same thing as Python modules in JavaScript by using objects, which are just like Python dictionaries. They also conveniently give us separate sets of names. For example:
math2 = {pi: 3.2,
         e: 2.71828,
         tan: function (angle) { "complex code here"; },
         sqrt: function (num) { "newton's method"; }
         };

colors = {red: 0xFF000,
          green: 0x00FF00,
          black: 0,
          white: 0xFFFFFF,
          tan: 0xd2b48c};
math2.tan != colors.tan;
The above code creates two objects that work just like Python modules:
they give us module.name sets of names and the names are distinct, so
if, by coincidence the same name is used in both modules, everything is
okay.
Inside and Outside
From outside a module, you have to access a value using the dot notation,
like math.PI. From inside a module, you can usually use a shorthand
that omits the module name. That is, inside the math module, your code
can just refer to PI and it means the PI in this module.
In fact, in Python a module doesn't necessarily know its name, and it can be imported as something else. In England, they probably do the following:
import math as maths

print(maths.tan(2*maths.PI))
Can we do that in JavaScript? We can, but we will use the function namespace to do it.
What do we mean by a function namespace? A function has an "inside" and an "outside": inside the function, we can refer to local variables, and those are not useable from outside. We'll use a function's local variables for the inside of our module.
math2 = (function namespace() {
    var PI = 3.2;

    function area(radius) {
        return PI*radius*radius;
    }

    var mod = {};
    mod.PI = PI;
    mod.area = area;
    return mod;
})();
Title: Object Oriented Programming
Introduction to Object Oriented Programming
Many of you are already familiar with the ideas of Object-Oriented Programming (OOP), but let's review so that it's fresh in our minds
General Idea
In OOP, an object is a kind of value (data structure) that can have two important characteristics:
State: This is information describing the object. For example, a ball object could be have a state like: being color red, have a radius of 12 inches, and have polka dots.
Behavior: This is the information describing the actions of the object. For instance, a ball object can bounce.
In order to create specific objects, we need to describe a class of objects and then create some instances of the class. (Note that these are different from the HTML classes!) Imagine a class as a general kind of thing, and objects are the specific instances of that kind. Here are some examples of classes and objects.
- Class: Ball
- Objects:
- b1: Red, has a radius of 12, has polka dots, bounces
- b2: Blue, has a radius of 5, does not have polka dots, bounces
- Class: Wellesley College Student
- Objects:
- stu1: Beatrice, Class of 2019, MAS major, says "hello!"
- stu2: Jackie, Class of 2018, biology major, runs to lab
- stu3: Kate, Class of 2020, English major, sings
Programming Classes and Objects
In discussing how to implement Object-Oriented Programming in JavaScript, we have a choice. In 2015, the JavaScript language was expanded to include specialized syntax to support classes and objects. That was pretty new when our book came out, and so our book does not discuss it. Moreover, older browsers might not support the new syntax (though there are tools that can convert the new syntax to the old syntax). Therefore, it's useful to understand the old way of doing OOP in JS.
However, I will start with the new syntax because it is simpler and easier to understand. In fact, that's its purpose: to be a better syntax for an existing implementation. This is sometimes called syntactic sugar. So, for that reason, we'll introduce the new syntax first, and then proceed to the older syntax that means the same thing.
Modern Syntax
In this presentation, I've followed the Mozilla Developer's Network web docs on Classes, but that document isn't intended for novices. Nevertheless, you're welcome to read it if you want more depth and rigor.
Let's describe our ball objects using the class syntax:
class Ball {
    constructor(color, radius, hasPolkaDots) {
        this.ballColor = color;
        this.ballRadius = radius;
        this.doesThisBallhavePolkaDots = hasPolkaDots;
    }
    getColor() {
        return this.ballColor;
    }
    setColor(color) {
        this.ballColor = color;
    }
    bounce() {
        console.log('Booiiiinng. Ball is bouncing.');
    }
}
Some observations:
- a class has a special function called a constructor which initializes the instance variables of each new object (instance of the class). The constructor is automatically invoked whenever you create a new instance.
- a class can have any number of methods. Here we have three:
getColor,setColorandbounce.
Let's see how our code would use this class definition:
// examples of creating two instances of the class
var b1 = new Ball("Red", 12, true);
var b2 = new Ball("Blue", 5, false);

// examples of invoking a method
console.log(b1.getColor()); // "Red"

b1.setColor("Green");

console.log(b1.getColor()); // now "Green"

// example of retrieving an instance variable
// it would be better to define a method to do this
console.log(b2.ballRadius); // 5
More observations:
- a method is invoked by giving the object (or a variable containing the object) a dot and the name of the method, along with parentheses around any arguments to the method. As with function invocation, there are always parentheses, even if there are no arguments to the method. Indeed, that's because a method is just a special kind of function.
- we use the
newoperator when creating an instance of a class. Thenewoperator creates the new, empty, object, binds it tothisand then invokes the constructor. The constructor can then initialize the object by using the magic variablethis. - similarly, methods can refer to the object using
thisin their code. Thethisvariable above is always the object inb1but we could easily invoke a method onb2.
You can see that code in action using the ball modern demo. Note that the web page will be blank. View the page source to see the JS code, and open the JavaScript console to see what was printed to the console.
Type in the names of the two variables, b1 and b2 to see how
they are displayed.
There are other features of the new syntax that we won't go into now, but we may look at later in the course.
Classic Syntax
Let's revisit our ball example but without the helpful syntactic sugar. Remember that the ideas and implementation is the same.
function Ball(color, radius, hasPolkaDots) {
    this.ballColor = color;
    this.ballRadius = radius;
    this.doesThisBallhavePolkaDots = hasPolkaDots;
};

Ball.prototype.getColor = function() {
    return this.ballColor;
};

Ball.prototype.setColor = function(color) {
    this.ballColor = color;
};

Ball.prototype.bounce = function () {
    console.log('currently bouncing');
};
This defines a constructor (the Ball function) and three methods, all
defined as functions stored in the prototype property of the
constructor. Very different from the new syntax, but means the same thing.
Interestingly, the code to use the Ball class is exactly the same:
// examples of creating two instances of the class
var b1 = new Ball("Red", 12, true);
var b2 = new Ball("Blue", 5, false);

// examples of invoking a method
console.log(b1.getColor()); // "Red"

b1.setColor("Green");

console.log(b1.getColor()); // "Green"

// example of retrieving an instance variable
// it would be better to define a method to do this
console.log(b2.ballRadius); // 5

b1.bounce();  // Booiiiiinng. Ball is bouncing
b2.bounce();  // Booiiiiinng. Ball is bouncing
You can see that code in action using the ball classic demo. Again that the web page will be blank. View the page source to see the JS code, and open the JavaScript console to see what was printed to the console.
Let's break the code into sections. The first 5 lines of this code are:
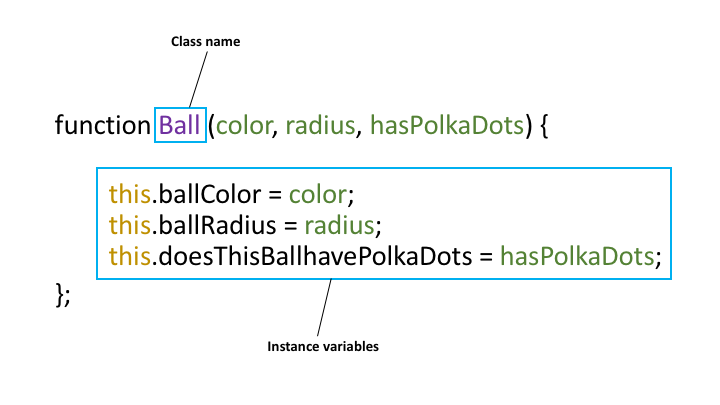
The class name is Ball, as indicated by the box and purple in the
picture. By convention, class names are always capitalized. When creating
a Ball using new, it needs to be given a color, a radius, and whether or
not it has polka dots, as shown by the green. The code with the keyword
this indicates that you are storing the green parameters
(color, radius, hasPolkaDots) to the instance variables (ballColor,
ballRadius, doesThisBallHavePolkaDots). The instance variables describe
the properties or state of the object, as described earlier in this
reading.
Comparing this to the modern syntax, we see that the capitalized function plays the role of both class and constructor function.
Now let's turn to methods.
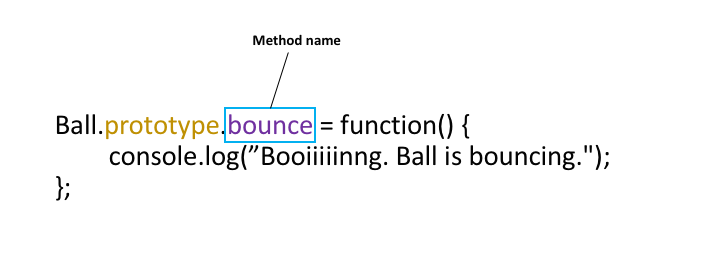
Just as instance variables describe state, methods describe the
behavior of the object. Here, the name of the method is bounce as
indicated by the box and the purple. When a ball bounces, it logs
"Booiiiiinng. Ball is bouncing." When you create new methods, you always
preface the function with the name of the class (in this case, Ball) and
the key word prototype.
Comparing this to the modern syntax, we see that methods are defined as properties of the prototype property of the class (constructor function). Every instance gets the class as its prototype, so putting methods as properties of the prototype means that every instance gets those methods.
Here are some examples:
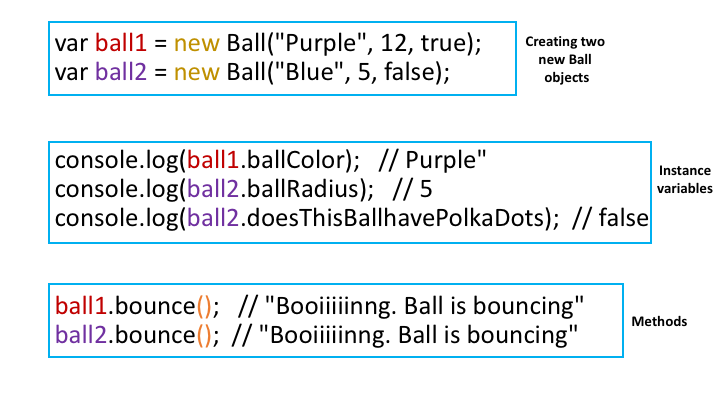
After you create the Ball class, you can create specific instances of
Ball objects. The first two lines of code create b1 and b2, each with its
own characteristics. Notice that when you create brand new objects, you
must use the keyword new. The next three lines of code
accesses the different instance variables. For example, b1 is
purple. Finally, the last two lines of code access the method of the Ball
class. Both b1 and b2 have the method bounce, so they will behave the
same way. Notice that when you access methods, you must use parentheses
at the end! (as shown by the orange).
Furthermore, if you compare the old syntax with the new, you'll see that using OOP (creating instances and invoking methods) are exactly the same between the two. The new syntax just makes it easier to describe the class, its constructor and methods.
Exercises
- Here is the Ball code in JSfiddle to explore. Open up JSfiddle and the console, and try creating new objects, accessing instance variables, and calling methods. Afterwards, try creating new instance variables and methods to your liking.
- Create your own Person class. Add instance variables and methods of your choices.
Title: Constructors, this, Methods and Bind
Constructors, this, Methods and Bind
- Languages
- HTML template
- Tags
- Meaningless Tags
- Chrome Developer
- Some other useful tags:
- Here links
- The ALT Attribute
- Figures
- Comments
- Comment Syntax
- Validation of HTML Code
- Icon Declaring Validation
- Semantic Tags
- Which Tag to Use?
- Review of URLs
- The End
- CSS concepts
- CSS rules
- CSS Properties
- Box Model
- Selectors
- IDs
- Attribute Selectors
- Structural Selectors
- Multiple Selectors
- Style Inheritance
- Color
- Transparency
- Fonts
- Web Fonts
- Google Fonts API
- Putting fonts into your CSS File
- Google Fonts can break HTML Validation
- Mobile First
- inline-blocks
- New HTML
- Flexbox
- New CSS Properties
- Absolute and Relative Positioning
- Flexbox versus Float
- Centering Block Elements and Text
- Centering Text
- Centering Blocks
- Galleries with Floating Elements
- Summary
- Media Queries
- Breakpoints
- Displaying the Date Dynamically
- Objects
- Date Formatting
- Other Date Methods
- Other Date Functions
- Array Methods
- the forEach method
- JavaScript Object Literals
- JSON
- Object Operations
- Unknown or Odd Properties
- Looping over an Object's Properties
- Summary
- DOM References
- The DOM in raw JavaScript
- jQuery
- Loading JQuery
- Click Handling Example
- jQuery Usage
- jQuery API
- Method Chaining
- jQuery's Flaw and a Plug-in
- Building Structure
- DOM Events
- Recap
- Raw JS versus jQuery
- Thumbnails
- Using Descendant Selectors
- Raw JS versus jQuery
- Keyboard Events
- Pseudo Classes
- CSS Transitions
- Easing
- Custom Timing Functions
- jQuery Animations
- Scope
- Other Scopes
- What is a Closure?
- Functional Programming
- An Example: A Shopping Example
- Event Handler Maker
- Closure Variables
- Namespaces
- Functions as Namespaces
- JavaScript objects are namespaces
- Inside and Outside
- General Idea
- Programming Classes and Objects
- Modern Syntax
- Classic Syntax
- Exercises
- Invoking a Constructor
- The THIS variable in normal functions
- Basic Method Invocation
- Method Invocation Bug
- Closures to the Rescue
- The bind method
- What bind does
- The Bug from Chapter 8
- Buggy code
- Debugging
- Using the Chrome Debugger
- The form tag
- Form Fields
- The input Tag
- The SELECT input
- The textarea input
- Labels
- Name and Value
- Placeholder
- Radio Buttons
- Testing Accessibility
- Coffeerun From from Chapter 9
- Topics we didn't cover
- Binding this
- Form Submission
- Submit Handlers
- Preventing Defaults
- jQuery and its pitfall
- Serializing Forms
- Bind
- Constructing DOM Elements
- Calling Methods
- Searching down the tree
- Searching up the tree
- Delegation
- Event Delegation and jQuery
- Event Delegation and THIS
- Form Values and .val()
- What is Form Validation?
- Asynchronous Requests
- LocalStorage
- Data Abstraction
- Abstraction Barrier
- Polymorphism
- Inheritance
- The instanceof Operator
- New Syntax
- Summary
- Slideshows
- Automatic Slideshows
- Clickable Dropdowns
- jQuery UI Overall
- API Key
- Google's Tutorial
- Tutorial
- Motivation
- The POUR Principles
- Checklist Dozen
- Images
- Videos and Audios
- Hyperlinks
- Labels for Form Controls
- Avoid Color
- Accessible JavaScript
- Accessible jQuery
- Learning More
- Conclusion
This reading is supplemental to Chapter 8 (page 183 to the end).
Invoking a Constructor
As you know, a constructor should be invoked with the keyword new in
front of it. Like this (this version of bank accounts require specifying
the owner) invocation:
var george = new Account("george",500);The new keyword causes a new, empty, object to be created, with
its prototype set to the prototype property of the constructor.
What happens if we forget the new? Open up a JS console for this
page and try the following:
var fred = Account("fred",500);Print the value of fred. Print the value of balance
What happened? Here's a screenshot from when I did it:

The balance global variable is initially undefined. The fred
variable is undefined, because Account returns no value, and
balance is a new global variable, because this meant the global
object (essentially, window).
All because we forgot the new keyword!
FYI, if you want to protect against this error, make your constructor like this:
function Account(init) {
    if( this === window ) {
        throw new Error("you forgot the 'new' keyword");
    }
    this.balance = init;
}
The THIS variable in normal functions
Here's another aspect of the weird properties of this. In normal
functions, the variable this is bound to window. Try it:
function this_vs_window() {
    if( this === window ) {
        console.log('same');
    } else {
        console.log('different');
    }
}
Here's the screenshot:
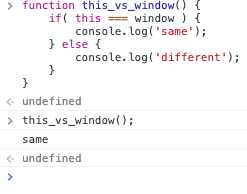
Basic Method Invocation
As we saw earlier, methods have access to this. Here's the example:
function Foo(z) {
    this.z = z;
}

Foo.prototype.sum = function (x,y) { return x+y+this.z; };

var f1 = new Foo(1);
f1.sum(2,3);   // returns 6
The syntactic rule is that whenever we invoke a method, the special
variable this gets bound to the object, which is the thing to the
left of the dot.
Method Invocation Bug
Here's a way that method invocation and the value of this can get
messed up. Imagine we add a method to our bank account that will help
us set up a donation button on a page. That is, it'll add an event
handler to the button that will deposit 10 galleons into the
account. Here's our attempt:
Let's take a moment to understand that code: 1. The method is going to add some code as an event handler to a button. 1. The button's ID is passed in to the method. 1. The event handler (which is invoked when the button is clicked) adds 10 galleons to this account.
So far, so good.
Let's use this new method to create a donation page for poor Ron. Here's the button and its code:
Here's the code to add a button handler to help Ron:
Try it! Click the button to help Ron, and look in the JS console at the error message. Here's the screenshot of the error I got:
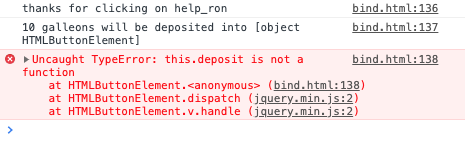
The error is a little hard to understand. It literally says
"this.deposit is not a function". But in our code above, in
add_donation_handler, the variable this seems to be the bank
account. But what happened is that, in the event handler, the value of
this is the button element that was clicked on, not the value it
had in the add_donation_handler method (namely, Ron's bank account).
The trouble arises because this is constantly changing value. Here,
the event handler was invoked, which is a function call, and (as we
learned earlier in this reading), this changes: Rather like the
pronoun me which means a different thing for each person who says
it.
THIS is Slippery
The value of this changes:
- when a function is called
- when a method is called
- when an instance is created with
new
Closures to the Rescue
Hang on, isn't the event handler actually a closure? Yes, it is. It has
two non-local variables, namely buttonId and this. The buttonId
variable has its proper value, but not this.
That's because this is special: It is not closed over.
However, almost any other variable can be closed over. Traditionally,
JavaScript programmers use the variable that. Here's an example:
The code is nearly identical to our earlier add_donation_handler
method. The difference is that we create a local variable called
that, assign the value of this to it, and then create the event
handler referring to that instead of this.
Here's the button and its code:
Here's the code to add a button handler to help Ron:
It works! Try clicking the button, and you'll see that each click increases Ron's balance. You can also open the JS console and check his balance yourself. Here's what I saw after clicking the button twice:

So the that trick works.
The bind method
The need for the that trick is so common that JavaScript added a method
to the language to solve it in a general way, without tricks like that.
If I take any function and invoke the bind method on it, it returns a
new function that has the given value as the value of this. Here's an
example:
f = function () { this.deposit(10); };

g = f.bind(ron);
If you invoke f, you'll get an error, because this has no value. If
you invoke g it'll successfully add 10 to Ron's bank account.
Try it in a JavaScript console! Copy/paste the definitions of f and
g and then invoke them. Here's a screenshot of what I got, showing
Ron's balance before and after, the error from f and the success
with g:
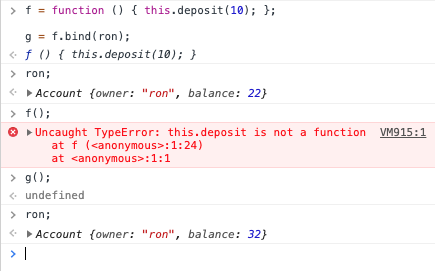
Go back and compare f with the event handler in add_donation_handler,
you'll see that they are the same (if you remove all the console.log and
alert statements). So the bind method will solve our trouble without
having to use that. Here's how:
The code using bind is nearly identical to our first
attempt, except near the end, where the anonymous function
that is the argument to .click() has .bind() invoked on it, to
nail down the value of this.
What's weird and confusing about the code is that we are binding the
value of this (inside the anonyous function) to the current value
of this (outside the anonymous function). So it sounds like a
tautology, like saying x=x. It's not a tautology because of the
slippery nature of this. We know that, without using bind, the
value of this would change from the outside to the inside.
Let's try it. Here's our last button to help Ron:
Here's the code to add a button handler to help Ron:
So, using bind is simple and easy. It just hard to understand,
because what it's doing is so very, very abstract.
What bind does
Let's recap:
bindis a method on functions- its argument is a value for
this bindreturns a different function- the return value is just like the argument function except that is has a fixed value for
this
Here's an almost silly example. It's silly because you'd never do this
in real life. It's useful because it shows how bind fixes a value
for this. ["fix" in the sense of "fasten securely in place" rather
than "repair"]
function what_is_this() {
    return this;
}

var the_other = what_is_this.bind(5);

x = what_is_this();
y = the_other();

console.log(x);
console.log(y);
Here's what I get when I copy/paste that code into the JS console:
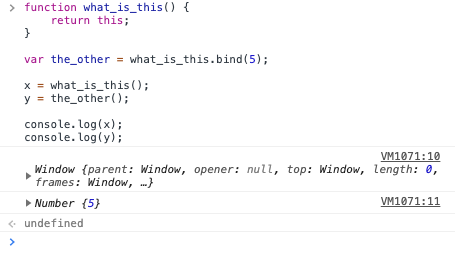
The first return value is "window" as we saw at the top of this
reading. The second is 5, because we used bind to nail down that
value.
Copy/paste the silly example yourself.
The real-life uses of bind are what we saw with the button to help
Ron: we had a function that needed to refer to this but we knew that
the value of this would change, so we needed to nail it down.
The Bug from Chapter 8
Our book created a common and tricky bug to illustrate this subtle issue
with this and method invocation. They did an excellent job of setting up
the bug and motivating the use of bind in only a few lines of code.
We'll go over it in class, but here's some preparation:
Buggy code
The situation with the buggy code on page 183 is inside a method
definition, so we have a value for this but then we want to invoke a
method on some other object, and that changes the value of this:
// This is the buggy version from page 183
Truck.prototype.printOrders_buggy = function () {
  var customerIdArray = Object.keys(this.db.getAll());

  console.log('Truck #' + this.truckId + ' pending orders:');
  customerIdArray.forEach(function (id) {
    console.log(this.db.get(id));
  });
};
Debugging
Let's learn how to use the Chrome Debugger. (Debuggers in other browsers work similarly.)
We can replicate the bug with the function bugSetup that I implemented
for us, to avoid a bit of typing. We'll look at the definition first:
var myTruck;
function bugSetup() {
    myTruck = new App.Truck('007',new App.DataStore());
    myTruck.createOrder({ emailAddress: 'm@bond.com',
                          coffee: 'earl grey'});
    myTruck.createOrder({ emailAddress: 'dr@no.com',
                          coffee: 'decaf'});
    myTruck.createOrder({ emailAddress: 'me@goldfinger.com',
                          coffee: 'double mocha'});
}
This code just creates a truck (in the global variable myTruck) and
creates some orders so that there is something to print.
Using the Chrome Debugger
I'll visit this coffeerun app with the bug, which opens in another tab/window.
Then, we will try the following method invocations:
bugSetup();
myTruck.printOrders_buggy();
Debugging Steps:
- Set a breakpoint at the line of the error
- show that
escopens/closes the drawer - run
myTruck.printOrders_buggy()again - try pieces of the code, like
id,this.db.get(id)and so forth in the console - click up/down the call stack and try them again
- resume execution
- remove the breakpoint
- re-run the code to make sure the breakpoints are gone
Chrome seems to remember the breakpoints forever. I've had Chrome jump into the debugger when I'd set the breakpoint the previous semester. It's pretty easy to remove the breakpoints and resume the code, but it can be confusing to end up in the debugger when you didn't expect to.
Title: Forms
Forms
This reading supplements Chapter 9, which introduces forms along with Bootstrap. This reading focusses just on the forms.
Forms are an import part of any website in which the user interacts, such as suppling information or making choices (e.g. menu options).
We will not be covering all aspects of HTML forms. We'll focus on just a handful that are useful in this course. If you want to learn more, there's some additional material at the end, and you're welcome to ask. The most important kinds of inputs we'll learn are:
- text inputs (a single line of text, such as someone's name or favorite color
- textareas (longer blocks of text, such as someone's address or blog entry)
- menus (one of a set of choices, pre-defined by the form's author, such as
- buttons, which don't so much give input as trigger behavior.
The form tag
HTML has a dedicated tag, form, that is used as a container
to package data that might be sent to a web server. In this course, we
won't always be submitting the form to a web server, so we will
occasionally use form inputs without surrounding them with a form tag,
but mostly we will use it. Your book does in Chapter 9.
The attribute method of the element allows the form to either
request data from the server (method="GET"), or send data to
the server (method="POST"). However, in order for both these
operations to happen, the server needs to have some dedicated programs
(also known as scripts) that can deal with the form data. At this point,
we will not talk about how this happens (we'll postpone this discussion
for later in the semester), and only concentrate on the HTML elements that
are contained inside the form.
Let's see an example form, and then we'll look at the code that creates it.
Here's the code that creates that form:
<form class="example"
      id="pizza-form"
      method="GET"
      action="https://cs.wellesley.edu/~cs304/cgi-bin/dump.cgi">
  <p><label>Customer name: <input name="customer"></label></p>
  <p><label>Telephone: <input type=tel name="phone"></label></p>
  <p><label>E-mail address: <input type=email name="addr"></label></p>
  <p><label>Size:
      <select name="size">
        <option value="">choose size</option>
        <option value="small">small (10-inch)</option>
        <option value="medium">medium (12-inch)</option>
        <option value="large">large (14-inch)</option>
      </select>
    </label></p>
  <p><label>Preferred delivery time:
      <input name="due" type=time min="11:00" max="21:00" step="900">
  </label></p>
  <p><label>Delivery instructions:
      <textarea rows="3" cols="30" name="instructions"></textarea>
  </label></p>
  <p><button type="submit">Submit order</button></p>
</form>
As you can see, there's an outer FORM element that wraps
up the form inputs. There are input elements that correspond to
different places where the user can enter information. Most of the
inputs use the INPUT tag, but some use tags
like SELECT (for a drop-down menu)
and TEXTAREA (for larger blocks of text). The general term
is control. Finally, there's a BUTTON input at
the end. In a more complete example; clicking this button would send the
form data to the web server; this one doesn't do anything.
Form Fields
Let's look at the different input elements (also known as
controls). The following table shows the HTML syntax for
including different HTML elements in a form. As you will notice, the
most common element is <input>, which, based on the
value for its attribute type will display a different
kind of input. Play with the rendered version of a tag in every row in
the table.
| Control HTML | Rendered Control | More Info |
|---|---|---|
text: <input type="text"> |
info | |
number: <input type="number" min="1" max="120"> |
info | |
range: <input type="range" min="100" max="200"> |
info | |
date: <input type="date"> |
info | |
time: <input type="time"> |
info | |
<button type="button">Click me</button> |
info | |
long text: <textarea rows="2" cols="10"> </textarea> |
info | |
menu: <select><option>Black <option>White </select> |
info |
For more information on the form elements and all its
fields, consult the W3Schools page on
forms.
Let's look at some of the more important controls, and then other aspects of forms.
The input Tag
The input tag is fairly straightforward, but you can
specify the type of input you are looking for by using the
TYPE attribute. It has many more types, which we are not
listing here; consult W3Schools page for
input to see the complete list. Here are just a few:
text: allows the user to type in a word or phrasepassword: allows the user to type in a word or phrase, but its value isn't echoed, so no one can look over their shoulder and see it.email: like a text type, but should look like an email address. New with HTML5.date: for entering dates. New with HTML5.time: for entering times. New with HTML5.
Some of these types (such as time, date, number, range, etc.) were
introduced in HTML5, which means that not all browser versions are
able to support them. For maximum portability, you should stick to
type=text. However, sliders like we get with
type=range are fun, and we'll use them sometimes.
The SELECT input
To specify a menu, from which the user can choose only one option, you
use the SELECT
tag inside the form. You specify the NAME of the input in the
SELECT tag, and each menu item is specified using the
OPTION
tag. Here's an example:
<form action="">
  <p>Drink:  <select name="beverage">
      <option value="">choose one</option>
      <option value="Coke">Coca-Cola</option>
      <option value="Pepsi">Pepsi-Cola</option>
      <option>Beer</option>
      <option>Wine</option>
   </select>
</form>
(The closing </option> tag is optional, like a
closing </p> tag or </li> tag,
but it's best to use it.) Any option can have a separate "value"
attribute; if none is specified, the value is the option itself.
Specifying a non-option
as the first item in the list helps to
tell whether someone has actually made a choice or just overlooked
this menu. Making the non-option have a value of the empty string
helps with validating the form, which we'll talk about later.
The textarea input
If you want to allow your user to type in a long response, you should
define
a textarea
inside your form. This tag has attributes called ROWS and
COLS that let you specify the size of the area.
<textarea name="thoughts" rows="3" cols="40">
A chicken is an egg's way of making another egg
</textarea>
The default value is the region between the beginning and ending tag. Typically, you want the default value to be empty, so put the tags right next to each other, as in this example here:
<textarea name="thoughts" rows="3" cols="40"></textarea>Don't let even a single space creep in, or the initial value will be a string of one space, and not the empty string. That will affect any code that cares about the default or original value, such as certain kinds of validation
Labels
A form consisting of a bunch of bare boxes would be useless, so how is
the user to know what input box means what? That's done with the
label tag. There are two ways the label can be used. One
option is to wrap both the input and the text in the label:
<label>
    Given Name
    <input type="text" name="givenname">
</label>

<label>
    Family Name
    <input type="text" name="familyname">
</label>
The other is to give the input an ID and reference that ID in a
for attribute of the label. The <label> tag still wraps
the textual label, but it no longer wraps the control/input.
<label for="givenname">Given Name</label>
<input type="text" name="givenname" id="givenname">

<label for="familyname">Family Name</label>
<input type="text" name="familyname" id="familyname">
The latter is a bit more work, but it is necessary in some cases where the structure of the HTML doesn't allow the input to be a child of the label, as with a table. Your book uses the for/id approach.
Using labels is important for accessibility. More on this below.
Name and Value
When the form gets submitted, the form data gets sent to the server. It gets sent as a set of name/value pairs, which we can think of as like a little table. Here's some data as if from our pizza form:
| name | value |
|---|---|
| customer | Hermione |
| phone | 555-8888 |
| addr | hgranger@hogwarts.ac.uk |
| size | large |
| due | 21:00 |
| instructions | please deliver by owl |
Since the fields of a form need to be processed both by Javascript code on the client-side (by the browser) and the scripts on the web server, it is necessary to use the different attributes of these elements to distinguish and access them.
Consequently, the two most important attributes that we will use very
frequently are name and value
- The
nameattribute is chosen by us, the authors of the form. It is used by Javascript to reference the HTML elements that use it, but most importantly is used by the server to distinguish between the different fields of the submitted form. We will discuss it again later when we talk about submitting the form to the server. In the meantime, it will be good practice to start using it every time we create form fields. - The
valueattribute is the information from the user. It can be typed in by the user, chosen from a menu, or some other way.
Placeholder
Another useful attribute for input controls is
placeholder, which can be used to provide a hint or
example of the kind of value that should go in a field. For example,
this HTML
<input type="text" placeholder="Hermione Granger">will be rendered like this:
.
Radio Buttons
Radio buttons are used for a set of mutually exclusive options, like the buttons on a car radio, to choose the station.
Important: Radio and checkbox input items should all have the same name, so that they are considered as related. Without the same name, radio buttons will not be mutually exclusive.
| HTML | Rendered HTML | More info |
|---|---|---|
<label for="wbur">WBUR</label> <input type="radio" name="station" id="wbur"> <label for="wzly">WZLY</label> <input type="radio" name="station" id="wxly"> |
info |
Try choosing one button and then the other.
Testing Accessibility
Accessibility is a big complex subject, and professional websites have trained developers, automated tools, and human testers to ensure accessibility. All that is outside the scope of this course, but I will introduce three important tools and require you to use them.
All HTML must be valid, which means it satisfies the structural rules set out by the WWW consortium (W3C). Valid HTML is important because screen readers and such can do a better job understanding the structure of the page if it follows the rules. Most browsers are much more forgiving, so don't assume that if it looks good in a browser that it's good.
You can validate your HTML using this website from the W3C: https://validator.nu/. We've done this before in this course.
All CSS (see below) must be valid, for similar reasons as the HTML.
The W3C also provides a CSS validator that works the same way as the HTML validator: https://jigsaw.w3.org/css-validator. Again, we've used this before.
Check the page for common accessibility issues with the WAVE, the Web Accessibility Evaluation tool, https://wave.webaim.org/. It's important to note that getting no errors from the WAVE tool doesn't mean your site is accessible — only a person can decide that — but it's a useful tool nevertheless. Not passing the WAVE test is certainly undesirable.
Like the earlier validators, WAVE can retrieve a publicly hosted page given its URL and evaluate it. It doesn't have a mode where you can copy/paste your code, but there are two browser plugins that will evaluate the page in your browser. In less than 1 minute, I installed the Chrome plug-in, a page, and evaluated it.
Coffeerun From from Chapter 9
Here's the finished code from chapter 9
We'll explore it some, just to look at the form they created. Note:
- The controls that they created
- The names of those controls
- The values of the controls
- We'll try submitting the form and observer the name/value pairs in the URL
- The
coffeeinput is an ordinarytextinput - The
emailAddressinput is anemailinput (fallback to text if the browser doesn't supportemail) - The
sizeinput is a set of radio buttons - The
flavorinput is a dropdown menu - The
strengthinput is arangeinput type, which gives us a fancy slider widget - We'll look at the
submitbutton as well. - We'll adjust the slider and see the numbers in the URL.
- We'll look at some of the CSS formatting that we get from Bootstrap.
Topics we didn't cover
- fieldset and legend
- checkboxes
- size of inputs
- validation
- others?? Title: Forms and JavaScript
Forms and JavaScript
This reading supplements Chapter 10, which introduces JS code to process data that is entered into forms. We'll look at the following topics:
bind(this is from Chapter 8, but re-occurs in Chapter 10)- submit handlers
- preventing defaults
- jQuery and its pitfall
- serializing forms
- resetting forms
Binding this
We saw bind back in Chapter 8, but it rears its ugly head again in
Chapter 10.
If you'd like to explore bind with more examples, check out the MDN
explanation of
bind
If you're not feeling okay about it, please talk to me or to our tutor.
Form Submission
Now let's talk about forms. HTML forms were invented so that a page could
collect information from the user and allow it to be packaged up and
submitted to a server for some kind of processing. Think about forms on
Amazon.com or Ebay.com or any other kind of web application. Think about
the customer feedback
questionnaires we are constantly being asked
to fill out. Even Facebook posts. All of those are forms being submitted
to servers.
We can write JavaScript code that gets triggered when a form is submitted. In this chapter, the authors write some sophisticated, abstract code for setting up some general-purpose code for handling form-submission. In this part of the reading, we'll look at more concrete examples, so that the abstract code will make a bit more sense.
Let's start with the following form
Go ahead and fill it out and submit it if you like.
Submit Handlers
The first thing we want to do is add a JS function that will be invoked when the form is submitted. Form submission is a kind of event, so this is a kind of event handler.
What should our function do? For now, let's just alert the user that they submitted the form. A little bit of jQuery will suffice.
$("#form2").submit(function () { alert("form submitted!"); });The jQuery submit method is just a shortcut for using on and the name
of the event, which is what your book does:
$("#form2").on('submit', function () { alert("form submitted!"); });Note that the URL changes when you submit this form, with your form data (key/value pairs) appearing in the URL.
Preventing Defaults
Usually, we want to send the data to a server when a form's submit button
is clicked (or the user presses enter in a text field), but in this case
we don't. We want to prevent the default behavior, so we'll change our
event handler to get the event object and use the preventDefault()
method:
$("#form3").on('submit', function (evt) {
    evt.preventDefault();
    alert("form submitted!");
});
Note that the URL doesn't change with this event handler. Of course, that's because we've prevented the default behavior.
jQuery and its pitfall
What's wrong with the following combination of HTML and CSS and JavaScript?
<form id="form3"> ...</form>#from3 { border: 1px solid green; }$("#from3").on('submit', function () { alert("submitted"); });Right; spelling. In CSS, you won't get an error message; it's just a rule that doesn't happen to apply to anything. Similarly, in jQuery, it'll look up everything that matches that selector, and add the given function as a submit handler. Alas, nothing matches that selector, but jQuery doesn't give you an error message. It treats it as an empty set: valid but useless.
Sometimes, jQuery's behavior is exactly what you want, but often, you'd like to know if you've done something wrong. So check the number of matched items:
var $form = $("#from3");
if ($form.length === 0) {
    throw new Error("couldn't find form...");
}
$form.on('submit', function () { alert("submitted"); });
(In the code above, we've used a dollar sign in the name of the variable. That's a common but not universal convention for variables that contain jQuery results, since it helps you remember that you can use jQuery methods on the value of that varible. But it's also a little ugly. Your book chooses to use this convention; don't let it bother you.)
In fact, you might even create a higher-level function that will search, check and then add the event handler. Like this:
function addFormSubmissionHandler(selector, fn) {
    var $form = $(selector);
    if ($form.length === 0) {
        throw new Error("couldn't find form...");
    }
    $form.on('submit', fn );
}
That's what they've done in this chapter. Actually, they also know that whatever submit handlers they write, they always want to prevent the default behavior of submitting the form, so they do this:
function addFormSubmissionHandler(selector, fn) {
    var $form = $(selector);
    if ($form.length === 0) {
        throw new Error("couldn't find form...");
    }
    $form.on('submit', function(evt) {
        evt.preventDefault();
        fn();
     });
}
One important thing to notice about the code above is how a function
(fn) is passed in. That function does the rest of the work of the form
submission handler. So, you can think of the addFormSubmissionHandler
function as:
- find the form using a selector
- if the selector didn't work, complain
- set up a submission handler for that form
- the submission handler will do some routine stuff and then,
- invoke a function arg to do the specific stuff for this form
Serializing Forms
In general, forms have several inputs and all of them get packaged up and submitted to the server. To do that, the form inputs have to each be converted into strings and those strings have to be concatenated together. That process is called serializing. The key with serializing is that it has to be reversible: all of it has to be done in a way that the server can reverse the process and get back the original set of name/value pairs.
jQuery has a method that will serialize a form for you. It's called,
unsurprisingly, .serialize(). You can also get the inputs as an array
of objects; that's called .serializeArray(). Each object in the array
consists of a single name/value pair from the form. That is, a form asking
about pizza preferences:
<form id="pizza">
    <input name="kind">  <!-- e.g. pepperoni or veggie -->
    <select name="size">
        <option>large (16 inch)</option>
        <option>medium (14 inch)</option>
        <option>personal (12 inch)</option>
    </select>
</form>
Might serialize like this:
$("#pizza").serializeArray();
[{name: 'kind', value: 'veggie'},
 {name: 'size', value: 'personal (12 inch)'}]
Check out jQuery .serializeArray to learn more.
In this chapter, they arrange for all form submission handlers to serialize the form into an array, and then collect all the form inputs into a single object. Like this:
var data = {};
$(this).serializeArray().forEach(function (item) {
    data[item.name] = item.value;
    });
The earlier pizza form would serialize into an object like this:
{kind: 'veggie',
 size: 'personal (12 inch)'}
The form submission handler then invokes the callback function with the form data object as its input. So the overall plan is now:
- find the form using a selector
- if the selector didn't work, complain
- set up a submission handler for that form
- the submission handler will do some routine stuff namely
- prevent the default, and
- serialize the form into a single object
- invoke a function arg with the form data object to do the specific stuff for this form
Here's the code:
  FormHandler.prototype.addSubmitHandler = function (fn) {
    console.log('Setting submit handler for form');
    this.$formElement.on('submit', function (event) {
      event.preventDefault();

      var data = {};
      $(this).serializeArray().forEach(function (item) {
        data[item.name] = item.value;
        console.log(item.name + ' is ' + item.value);
      });
      console.log(data);
      fn(data); // invoke the callback with the form data
    });
  };
Re-read the code above keeping the abstract plan in mind.
Bind
They've set up this very abstract code to attach a submission handler to a form with the routine stuff factored from the specific stuff. The code for the specific stuff will be passed in as a callback function. Now they'll use this to attach a submission handler to a form.
Unfortunately, the callback function that they want to use is, in fact, a
method. It's the createOrder method of a Truck object. So, they'd
like to do the following:
var myTruck = new Truck('ncc-1701', new dataStore());
var formHandler = new FormHandler(FORM_SELECTOR);
formHandler.addSubmitHandler( myTruck.createOrder ); // doesn't work
The last line doesn't work. It doesn't work because createOrder is a
method, and it needs a value for this. We could do the following:
var myTruck = new Truck('ncc-1701', new dataStore());
var formHandler = new FormHandler(FORM_SELECTOR);
formHandler.addSubmitHandler( function (form_data) {
     myTruck.createOrder(form_data);
     });
but it works just as well do to the following:
...
var myTruck = new Truck('ncc-1701', new dataStore());
var formHandler = new FormHandler(FORM_SELECTOR);
formHandler.addSubmitHandler( myTruck.createOrder.bind(myTruck) );
The latter is what our book uses. Use whichever technique you understand
better. Using bind is also a little more concise, though that's not an
important reason.
Title: Data to DOM
From Data to DOM
This reading supplements the reading from Chapter 11, titled Data to
DOM. We know from our earlier work with jQuery that one way to manipulate
the DOM is to dynamically add elements. This chapter walks us through the
code to have our Coffee Order app add a checkbox item to the page (in a
list of Pending Orders
) every time a coffee order form is
submitted.
The key concepts are dynamically constructing DOM elements and, later,
calling a method while being able to specify the value of this.
Constructing DOM Elements
If we think of the document as a living tree, what we are doing is grafting a new branch, complete with twigs and leaves, onto the tree.
Your book does a very good job of describing this, with good pictures, so this section is just a short recap:
- We will build a complete branch first, before adding it to the tree
- We will build each node of the branch independently, adding them to the
branch using jQuery's
.appendmethod to make one node a child of another. - We can build a simple node like this:
$("<div></div>") - To build a node with attributes, supply a JS object literal with the attribute names and values:
$("<input></input>", {'type': 'checkbox', 'value': 'fred'})
Your book's authors do this as part of an object constructor, with the finished branch stored as an instance variable. Only later is the finished branch grafted onto the document.
Calling Methods
In the next part of the chapter, page 235, the authors modify the form submission handler to invoke two methods on two objects. Here's the code:
formHandler.addSubmitHandler(function (data) {
    myTruck.createOrder.call(myTruck, data);
    checkList.addRow.call(checkList, data);
});
They introduce the JavaScript call method, which is a way to invoke a
function as a method and supply the value of this in doing so.
It's an interesting example of the use of call, but it's
unnecessary. You have an object and its argument, and you know what method
to run, so the code is equivalent to two ordinary method calls:
formHandler.addSubmitHandler(function (data) {
    myTruck.createOrder(data);
    checkList.addRow(data);
});
(In fact, their solution code uses the above code, rather than the code in the book.)
We will have occasion to see .call() later in the course, when we learn
about object inheritance.
Searching down the tree
We have used jQuery many times to search the DOM. For example:
$("#fred")
$("[data-coffee-form=myform]")
The expressions above search the entire document, but what if you already
have a jQuery wrapped set for part of the document (a subtree), and you
want to search that subtree? In that case, you can use jQuery's .find()
method:
$("#fred").find('[data-coffee-form=myform]')
Or, if you already had something saved in a variable:
var $elt = $("#fred");
...
$elt.find("[data-coffee-form=myform]");
Searching up the tree
Sometimes, you want to search up the tree, along your list of ancestors
(but not off the list: parent, grandparent, and great-grandparent, but not
uncles, great-aunts and the like). jQuery's .closest() method is good
for that. For example, the following finds the closest ancestor that is a
DIV:
$elt.closest('div')
Delegation
Event delegation is a powerful jQuery technique that allows you to put one event handler on an ancestor and delegate to it handling all the events of a certain kind for all of its descendants. For example, try clicking on the items on this grocery list:
- apple
- banana
- chocolate
Rather than put an event handler on each item (here only three, but you should see how long my grocery lists get, especially when I'm hungry), we can put one event handler on the UL element, and say
"anytime an LI is clicked, run this function"
We do that with the following code:
$("#groceries").on('click',
    'li', // this argument is new; the descendant who delegates the click
    function (event) {
        var clickee = event.target;
        var text = $(clickee).text();
        alert("You clicked on the "+text);
});
Note that the event.target is the actual element that was clicked on.
Event Delegation and jQuery
jQuery allows us to do event delegation in an easy way. We just use
the .on method that we used before, but we add an extra argument,
between the event argument and the function argument. So instead of:
$(sel).on('click',
           function () { ... });
We do:
$(sel).on('click',
          'descendant selector',
           function () { ... });
Any descendant of sel that matches descendant selector will
delegate its click events to the ancestor, which runs the given
function.
Why use event delegation? First, it's more efficient to have one event handler than many. Second, if we are dynamically adding and removing things from the list (as we are in the CoffeeRun app), the event handling is much simpler and cleaner if we don't have to worry about adding and removing event handlers as well.
Event Delegation and THIS
Here's a slightly different grocery list, with some more structure in each item. Compare clicking on the emphasized stuff versus non-emphasized.
- apples, specifically Honeycrisp
- bananas, which I like but my kids don't
- chocolate, especially dark chocolate
<ul id="groceries2">
   <li>apples, specifically <em>Honeycrisp</em></li>
   <li>bananas, which <em>I</em> like but my kids <em>don't</em></li>
   <li>chocolate, especially <em>dark chocolate</em></li>
</ul>
Again, we just put one event handler in the page, attached to
#groceries2 but handling any click on an LI that is a descendant
of #groceries2.
$("#groceries2").on('click',
    'li', // this is new
    function (event) {
        var clickee = event.target;
        var target_text = $(clickee).text();
        var this_text = $(this).text();
        if( clickee == this ) {
            alert('both clickee and this are the same: '+this_text);
        } else {
            alert('clickee is '+target_text+' while this is '+this_text);
        }
});
Note that this is the li element, while event.target is the
actual element that was clicked on, which might be descendant, such as
the em. Try clicking apples and also Honeycrisp.
Form Values and .val()
In Chapter 10, we learned how to serialize all of a form's values into an array of objects, and then iterate over that array to assemble them all into a single object.
That's a fine technique, but if you just want one value, there's an
easier way. jQuery has a .val() method
that can get the value of an input:
To get the value, just invoke .val() with no arguments:
$(selector).val()For example:
$("[name=zip_code]").val()
$("[name=pizza_size]").val()
This method works on text input elements, select elements
(drop-down menus), and textarea elements.
For radio buttons, you can use the :checked pseudo-class
to get the value of the one that are checked:
$('input[type=radio][name=size]:checked').val();You'll need to use .val() for the next assignment (Quiz)
It's also possible to set the value of an input, but we don't need that.
Grid Systems, Skeleton and Bootstrap
When we have a display device larger than a phone, we often want to switch to a different layout, with different columns and such. For example, we might have a nav bar on the left and a twitter feed to the right in addition to a wide column of main content in the center. We might even have multiple columns of content. To make things neat and orderly, we often have a layout based on a grid. (Typically, you'll see the grid based on 960px, not because that amount matches any device size, but because 960 is divisible in lots of ways.)
For an idea of the theory, please read the Mozilla Developer Network article on grids Fair warning, though, it is long. Stop when you get to Line-based Placement. Our goal is to learn the basic concept and some of the techniques, but not every detail.
In this class, I'm using Skeleton which I like a lot because it's simple and well-documented. However, I acknowledge that many people like Bootstrap, and you're welcome to use that, too. The MDN article used to mention both Skeleton and Bootstrap; but it's been revised.
Form Validation
Chapter 12 on form validation is pretty clear, except that it doesn't explain much about regular expressions.
Regular expressions are a powerful and efficient way to match a pattern against a string. Most civilized programming languages have them available, either built-in or as an easily loaded module.
You should think of regular expressions as a whole new language with its own syntax and grammar. It's not a programming language, but it definitely changes the meaning of different characters. Unfortunately, there are often variations in the regular expression languages from Java to Python to JavaScript and so forth.
The MDN article on regular expressions in JavaScript is good and comprehensive, probably more comprehensive than we need. Read the book chapter first, so you understand the role that regular expressions will play, then read part of the MDN article to learn a bit more. Specifically, read from the beginning, up until it explains the meaning of the decimal point. That will explain all the stuff going on the the chapter.
What is Form Validation?
Later in the course, we'll talk about submitting the form data to a server for more elaborate processing, but before we do that, we should discuss validation. What is form validation? Essentially, it means checking to see that the form has been filled out correctly (as far as we can tell).
Form validation could be used to ensure that someone hasn't overlooked a text input, menu or radio button group, and can check that, for example, the zip code is 5 digits (or 9) and that a telephone number is 10 digits, and that an email address looks like an email address.
Form validation can actually cancel the submission of the form, so that the data never leaves browser. The reason we validate forms is twofold: to give the user immediate feedback that they've missed something, instead of waiting for the server to respond, and to protect the server from having to handle all those invalid forms. Of course, a determined nefarious person can simply disable our form validation JavaScript and hammer our server with invalid forms, but that's rare. The vast majority of invalid forms are just human error.
Obviously, the browser can't tell whether you entered your correct
phone number, but it can check that you typed the right number of digits
(and only digits). Similarly, it can't check that your spelled your name
correctly (and whether your name really is Mickey Mouse
), but it
can check that you didn't leave that input blank.
With HTML5 and modern web browsers, form validation has gotten a lot easier. In the past, web developers would write JavaScript code that would look at the values in the form to check for bogus values. They wrote libraries and jQuery plug-ins to make the job easier for others.
However, the vast majority of form validation can be done with a few simple things:
- Add the attribute
requiredto any input that you want to require the user to fill out. - Use the fancy new form input types that HTML5 has added, such as:
- tel, for telephone numbers
- email, for email addresses
- date, for just a date (year, month, day)
- time, for time (hour, minute, seconds)
- datetime, combining date and time inputs
- and others
Here's a demonstration:
<form action="/cgi-bin/dump.cgi">
  <p>Username: <input required name="username">
  <select required name="hogwarts_house">
    <option value="">Hogwarts House</option>
    <option>Gryffindor</option>
    <option>Hufflepuff</option>
    <option>Ravenclaw</option>
    <option>Slytherin</option>
  </select>
  <p>Email address: <input required name="email" type="email">
  <p>Birthday: <input required name="birthday" type="date">
  <p><input type="submit" value="submit form">
</form>
Here's the actual form, so you can change the values of inputs:
Try to submit an incomplete form!
Ajax
Before Ajax, the way that a browser communicated with a server (the "back-end") was typically to submit a form (or get a URL), whereupon the web page was replaced with the response. That replacement can sometimes interrupt a user's experience. Imagine if everytime you clicked "like" on a Facebook page, the entire page was replaced with a new one, even if it looked 99% like the old one.
Ajax is a powerful modern technique whereby a browser page can communicate with a server without having to be replaced by the response. Instead, it's in a kind of "side" conversation going on in parallel (asynchronously) with the browser paying attention to you.
Asynchronous Requests
When we invoke a function, we wait around for the response, like this, and then we can use the result as the argument to other functions:
var val = foo(x);
bar(val);
more_work();
That's fine in the context of normal programming, but it doesn't work for
lengthy operations. Suppose foo took tens of milliseconds to return.
Not only does bar have to wait (it would anyhow), but so does
more_work, even if it doesn't depend on foo. More importantly, if the
browser has something else to do (such as pay attention to the user), it
can't be sitting around waiting for foo to complete.
Instead, we want to use an asynchronous style of programming, where
instead of foo returning a value, we pass foo a function that it
should invoke on the result. Meanwhile, neither more_work nor the
browser will have to wait for foo to complete. Here's the programming
style:
foo(x, bar);
more_work();
The more_work function and whatever else the browser is doing can
execute immediately. Some tens of milliseconds later, once foo is
done, foo will arrange to invoke bar.
That's how Ajax works, because the Ajax call starts a network connection to the server and waits for the response:
$.post('url', data, func);The first argument is the URL of the server to send the data to. The second argument is the data, usually as a JavaScript object literal. Finally, the last argument is a callback function that will get invoked with the response from the server. Here's a bit more detail:
function gotit (response) {
    console.log('Got '+response);
}

$.post('url', data, gotit);
In the coffeerun app, they send the data to an application they have running on Heroku.
The .get() method works the same way. In fact, both are wrappers for a
general .ajax() method that needs to know what HTTP request you want to
make:
$.ajax('url', {type: 'get', data: data, success: func});
$.ajax('url', {type: 'post', data: data, success: func});
$.ajax('url', {type: 'delete', data: data, success: func});
LocalStorage
Instead of saving things to a remote server, you can save them in the
browser, using localStorage. Note that localStorage is persistent,
which means that it will last even if you quit the browser and restart
it, even days later. That's not the case with regular JavaScript
variables, which live just in that one browser tab and will disappear
if the browser tab is closed or re-loaded, let alone restarting the
browser.
Setting a value
To store something in the local storage of your browser, any of the following will work:
localStorage.fred = 'Fred Weasley';
localStorage['george'] = 'George Weasley';
localStorage.setItem('harry', 'Harry Potter');
To get the values back out, just use the expressions on the left hand
side, or the getItem method:
console.log(localStorage.fred);
console.log(localStorage['george']);
console.log(localStorage.getItem('harry'));
There are also methods .removeItem which removes a single key, and
clear which removes all keys.
Title: Inheritance in JavaScript
Inheritance in JavaScript
Object-oriented programming (OOP) has many advantages:
- data abstraction: objects hide implementation and provide behavior
- polymorphism: objects can provide similar behavior for different types
In addition, OOP often provides for inheritance. That is, the behavior of a class can be extended or modified in subclasses.
We'll see how all these play out in JavaScript.
A good companion reading to this is the MDN article on Inheritance in JavaScript. The article has some good but different examples.
Data Abstraction
Suppose we are using JavaScript for a 2D computer graphics system. In our system, we're going to have rectangles.
How shall we represent them? We could do any of the following:
- upper left and lower right corners
- upper left corner, width and height
- any two corners
- center and width and height
- ...
What if we decide on a representation and change our minds later? Will that affect the users of our system?
What kind of behavior (methods) do we want to support? We might list
quite a lot of methods, including drawing it on the screen (which we will
not discuss unless you twist my arm). For now, we're only going to
provide the area method.
Regardless of how we represent the rectangle internally, how shall we allow the user to construct a rectangle?
For the purposes of this example, suppose we allow the user to give any two corners in the constructor.
Furthermore (switching to the other side of the abstraction barrier), let's suppose that we decide to implement the representation as the upper left and lower right corners.
Here's a JavaScript implementation of rectangles. Please read the code; it's only about 20 lines.
Abstraction Barrier
The client of these rectangle objects only knows that they can report their area. They don't know or care what the internal representation is. This is called an abstraction barrier.
The implementor of these rectangle objects provides a constructor and that behavior (method).
Note that, the implementor might decide that, if clients ask for the area a lot, maybe it would make sense to pre-compute it, or switch to a representation that doesn't require so much computation. The behavior remains the same, but it's now faster and more efficient. We have the freedom to change our representation.
Polymorphism
Suppose that we also want to have circles. They should also support an
area method. What will the internal representation be?
- Center and radius?
- Top and bottom points?
- Left and right points?
Here's an implementation of rectangles and circles. Please read the code. The new circle code is only two dozen lines.
Note at the end of that code that we have a list of objects, some of the
rectangles and some of the circles. We can compute the area of all of
them by using the area method that they both support.
This is called polymorphism: a single interface to entities of different types.
One thing that's great about polymorphism is that we don't have to have a "master" function that knows how to compute the area of all kinds of shapes (and which then needs to be updated if we add a new kind of shape). Instead, the knowledge of how to compute the area of a shape is distributed among the shapes. Each knows how to compute its own area.
Inheritance
What if we have some behavior that is common to both rectangles and circles? Since we are supposing that this a 2D graphics system, maybe each has to keep track of its color (fill mode, stroke width and many other such properties).
We will define a new class called Shape. It will take a color as its
argument. We'll also define methods to get and set the color and one to
help print a shape, overriding the toString() method that every object
inherits from Object, the ancestor of all JavaScript objects.
function Shape(color) {
   this.color = color;
}

Shape.prototype.getColor = function () { return this.color; };

Shape.prototype.setColor = function (color) { this.color = color; };

Shape.prototype.toString = function() {
    return "[A "+this.color+" "+this.constructor.name+"]";
};

var s1 = new Shape("red");
console.log("s1 is "+s1.toString());
The constructor property
As you surely noticed, an object can know what function constructed
it. For s1 it's the Shape function. Functions have properties like
name, which we used here in our toString() method.
Using the constructor name is not common, but it clarifies some of the issues we will discuss next.
Defining Subclasses
We'll redefine our classes for rectangles and circles to use
inheritance. In honor of this change, we'll call them Rectangle and
Circle.
Both of our Rectangle and Circle classes will inherit from
Shape. (Shape will be described as the parent class or sometimes the
superclass. Rectangle and Circle will be described as the child
class or the subclass.)
Setting up inheritance requires several steps:
- To properly initialize a new object, we must invoke the parent's
constructor from the child's constructor. True, we could assign the
colorinstance variable ourselves, but what if the parent changes the initialization code, say to check the color? Then we'd have to copy those changes to every child: very bad. - We have to specify that the child's prototype is an instance of
Shape. Since each object inherits instance variables and methods from its prototype chain, we have to make sure that chain is correct. - Setting the child's prototype has the unwanted side-effect of changing
the
constructorproperty, which we use in the name, so we set it back to the correct value.
Here's a high-level view of creating a subclass:
function Rectangle(color,c1,c2) {
    // initialize using superclass
    Shape.call(this,color);
    ...
}

Rectangle.prototype = Object.create(Shape.prototype);
Rectangle.prototype.constructor = Rectangle;
Here we see a good use of the call method that functions have. We invoke
the Shape function but we supply a value to use for this (it happens
to be the same as the current this) and any additional arguments it
needs.
The following file has a complete implementation of these ideas, with
rectangles and circles. It also adds Triangles, but it "forgets" to set
the prototype and prototype constructor. The result is that triangles
don't inherit from Shape, which you can see in the console.log output.
Here's the file: shapes.html
Please read the code; it's not terribly long, and much of it is familiar to you from the earlier examples, so you can focus on the differences.
Notice that one of the cool things about inheritance is code reuse: all
the children (grandchildren and further descendants) of Shape get its
methods.
The instanceof Operator
There is a special JavaScript operator that will go through the prototype chain for an object to determine whether it inherits from a particular "class". Remember that JavaScript doesn't really have classes; we simulate that with constructor functions, so the constructor functions stand in for classes:
// All true
console.log("r1 instanceof Rectangle: "+(r1 instanceof Rectangle));
console.log("r1 instanceof Shape: "+(r1 instanceof Shape));
console.log("r1 instanceof Object: "+(r1 instanceof Object));

// False
console.log("r1 instanceof Circle: "+(r1 instanceof Circle));
New Syntax
In JavaScript/ECMAScript 2015, a new syntax was introduced for defining
classes. At the same time, they introduced a new syntax for inheritance,
namely the extends keyword to the new class syntax. For a quick
introduction, see the following:
- read the first example in this section on subclassing with extends
- the extends keyword
- Class inheritance
One important thing to note is that you must invoke the constructor for
the parent class using super(); that invocation is not automatic. You
can also use super in method definitions, which is very cool.
Example
The following file re-implements the shapes from above, using the new syntax.
Here's the file: shapes-new.html
With the new syntax, it's impossible to get the prototype chain wrong, so it's a clear winner.
Summary
Many object-oriented languages, such as Java and Python, have classes and objected, with classes being the templates and factories for objects. JavaScript doesn't have this "classical" (as Douglas Crockford, author of JavaScript: The Good Parts, describes it) inheritance system, but instead uses prototype chains. Nevertheless, we can implement this classical OOP inheritance in JavaScript, and many JavaScript libraries do so. For example, Threejs, a library for doing 3D computer graphics in JavaScript.
Galleries and Drop-downs
Our topic for the next class is learning how to do two very common tasks on websites: image galleries (slideshows) and drop-down menus.
There are many solutions for these problems, including fancy transitions between slides and much more. We're going to keep it fairly basic, though.
Rather than write up how to do this, I'm going to defer to two descriptions that are on W3Schools. Let me know whether you find the links below reasonably clear. We will talk about them in class and implement some examples.
Slideshows
A slideshow displays one of a set of images, rotating through them. It has arrows to advance the slideshow or move it backwards, little buttons to indicate where we are in the set and lots of other eye candy.
Automatic Slideshows
To have a slideshow automatically advance, it's sufficient to have a
function that will manually advance the slideshow, and then have the
browser invoke that function every few seconds. That's easily done with
the built-in JavaScript setInterval function.
Learn more about setInterval from MDN: setInterval
Clickable Dropdowns
We want to be mobile-friendly and old-fashioned drop-down menus typically drop-down when the mouse is hovered over them. But we can't "hover" on a touch-screen device. Instead, we will click to open/close a drop-down menu. Here's one way:
jQuery UI
jQuery itself is a JavaScript library for manipulating the DOM in a convenient way. We've used it many times this semester.
However, there are lots of common user interface (UI) widgets and effects that people commonly want to do that jQuery doesn't do. Fortunately, many of these UI widgets and effects are packaged up in something called jQuery UI.
In this reading, I'll ask you to look at a selection of these. There is nothing particularly special about the ones I've chosen except that I have used most of them in the past and found them helpful and relatively easy to use.
jQuery UI Overall
First, take a few minutes to look over the home page and look at the options:
Then, take the time to read the about page: about jQueryUI
Next, I'll ask you to look at several specific items. Each item has a main page with a demo. In fact, it usually has several demos; make sure you study at least the default demo. The demo will have a way to look at the source code of the demo. Please look at the source code.
You'll notice that the source code usually loads quite a few files and other code, such as
- jquery-ui.css
- some additional custom CSS
- some example-specific CSS in a
styletag - jquery itself
- jquery UI
- some example-specific JavaScript, that puts these libraries into action.
So, when you're reading the code, don't neglect to notice all these parts.
You'll see that these jQuery UI features have "API documentation" that shows how they can be customized in a bewildering number of ways. We typically won't be using these customizations; we'll try to stick to the most common cases. You're welcome to look at the API documentation, but I am not asking you to do that on this first reading. Let's get the high-level view down first. Still, it's good to know that if a jQuery UI feature is close to what you want but not quite right, it's probably customizable in the way that you want.
In class, we'll get some more experience with using these.
- autocomplete Developers should always use this for "state name" when asking for an address.
- datepicker So easy and useful. We'll use this in the final project as well
- tabs A nice way to organize a page without having lots of scrolling or switching to other pages. jQuery Mobile is based on this idea.
- sortable We might use this in the final project
Four features should be enough to get us started, but if there is something else that you see that you think is cool, let me know and we'll see if we can learn about it.
Title: Google Maps
Google Maps
Google Maps is a useful feature to add to many websites and it's (almost) free! Both Google and the W3Schools have nice tutorials and a number of fun examples. We won't read all of them, but a few will be helpful.
API Key
I said Google Maps was almost free. What that means is that Google generously allows you to make queries to their map servers per month for free (it's many thousands), but after that, they will bill you (and the charge is pretty low, $7 per thousand queries, I believe).
Unfortunately, all of that means that in order to use Google Maps, they need to be able to bill you, even if you're just playing around and won't be doing industrial-scale numbers of queries.
This "we need to be able to bill you if we need to" policy, while understandable, is a serious impediment for us. If you have a personal Google account, you can give them a credit card for billing purposes then create an API key and use that.
Unfortunately, the Google accounts that we have thanks to Wellesley College don't allow us to add a credit card. So, I've given my credit card to Google for my personal Google account, and created an API key for that. I can share that with you for educational purposes; just don't cost me any money. :-)
So, when you read these tutorials and they refer to the API key, understand that that is a unique identifier that tells the Maps server who is making the query, so that they can count how many queries you make and, if it gets beyond the free level, can bill you.
Google's Tutorial
First, read this one (longish) web page that is Google's tutorial on adding a Google Map with a Marker
Tutorial
Then, please read through the first two pages of the W3Schools tutorials (linked below). You can just start at the first one and click the big green "next" button on each page.
- Maps Intro
This is the set up to show a nice, static map, at a place of your choosing
(specifying the
centergiven a latitude and longitude. Note that latitude measures north/south location and ranges from -90 (south pole) to +90 (north pole). Longitude measures east/west location and ranges from -180 (middle of the Pacific) to +180 (same as -180) with 0 degrees longitude being Greenwich, England. - Maps Basic
This is more information on the basic map, explaining about the map container (a
div) and the initialization function. It also shows a demo of four different map types (ROADMAP, SATELLITE, HYBRID, and TERRAIN)
Title: Accessibility
Accessibility
A website is accessible if it can be used effectively by people who have disabilities, such as blindness, deafness, or paraplegia. We've mentioned accessibility many times in this course, and we've made it an important part of the way we build web sites. This reading will cover a lot of what we haven't yet covered, though we won't be able to cover everything we would like to.
Motivation
Overall, the web has been good for accessibility. Because the text is already in computer form, it can be easily processed by a screen reader for the blind (as opposed to print, which would first require optical character recognition). Nevertheless, many modern websites can be frustratingly difficult for people with disabilities.
We can assume that the designers who made the inaccessible websites didn't set out to do so. Most of us see the need and responsibility for building designers to allow for wheelchair ramps and curb cutouts to allow access to public buildings, along with braille signs in elevators and many other accommodations. Furthermore, the Americans with Disabilities Act or ADA requires that many websites be accessible in the same way that public buildings must be accessible. See the website Web Accessibility in Mind for much more information. Much of what is covered in this reading is drawn from that resource. Their materials are copyright © 1999-2016 WebAIM (Web Accessibility in Mind).
The POUR Principles
Having decided to build an accessible website, we have to figure out what that means. First, consider different kinds of disabilities:
- Visual: people can be blind, have low-vision, be color-blind, and more
- Auditory: people can be deaf or hard of hearing
- Motor: people can be unable to use a mouse, be slow or lack fine motor control
- Cognitive: people can have learning disabilities or poor ability to focus
To make a website accessible, we want to keep four guidelines in mind:
- Perceiveable
- The information should be accessible by the visitor's working senses, so, for example, information should not be presented solely by sound (a video with narration but no captioning).
- Operable
- The website shouldn't require the use of a mouse in order to access the information
- Understandable
- The content is clear, at least to the target audience.
- Robust
- The website should be accessible to a wide range of assistive technologies
These make the acronym POUR.
Checklist Dozen
These are wonderful principles, but our task in this reading is to see how to achieve them. Let's start with a list of the dozen most important principles. I've copied this list from the WebAIM website, and I've included links to their elaboration on each principle. You're encouraged to go to their site to learn more.
- Provide appropriate alternative text
- Alternative text provides a textual alternative to non-text content in web pages. It is especially helpful for people who are blind and rely on a screen reader to have the content of the website read to them.
- Provide appropriate document structure
- Headings, lists, and other structural elements provide meaning and structure to web pages. They can also facilitate keyboard navigation within the page.
- Provide headers for data tables
- Tables are used online for layout and to organize data. Tables that are used to organize tabular data should have appropriate table headers (the
<th> element). Data cells should be associated with their appropriate headers, making it easier for screen reader users to navigate and understand the data table. - Ensure users can complete and submit all forms
- Ensure that every form element (text field, checkbox, dropdown list, etc.) has a label and make sure that label is associated to the correct form element using the
<label>element. Also make sure the user can submit the form and recover from any errors, such as the failure to fill in all required fields. - Ensure links make sense out of context
- Every link should make sense if the link text is read by itself. Screen reader users may choose to read only the links on a web page. Certain phrases like "click here" and "more" must be avoided.
- Caption and/or provide transcripts for media
- Videos and live audio must have captions and a transcript. With archived audio, a transcription may be sufficient.
- Ensure accessibility of non-HTML content, including PDF files, Microsoft Word documents, PowerPoint presentations and Adobe Flash content.
- In addition to all of the other principles listed here, PDF documents and other non-HTML content must be as accessible as possible. If you cannot make it accessible, consider using HTML instead or, at the very least, provide an accessible alternative. PDF documents should also include a series of tags to make it more accessible. A tagged PDF file looks the same, but it is almost always more accessible to a person using a screen reader.
- Allow users to skip repetitive elements on the page
- You should provide a method that allows users to skip navigation or other elements that repeat on every page. This is usually accomplished by providing a "Skip to Main Content," or "Skip Navigation" link at the top of the page which jumps to the main content of the page.
- Do not rely on color alone to convey meaning
- The use of color can enhance comprehension, but do not use color alone to convey information. That information may not be available to a person who is colorblind and will be unavailable to screen reader users.
- Make sure content is clearly written and easy to read
- There are many ways to make your content easier to understand. Write clearly, use clear fonts, and use headings and lists appropriately.
- Make JavaScript accessible
- Ensure that JavaScript event handlers are device independent (e.g., they do not require the use of a mouse) and make sure that your page does not rely on JavaScript to function.
- Design to standards
- HTML compliant and accessible pages are more robust and provide better search engine optimization. Cascading Style Sheets (CSS) allow you to separate content from presentation. This provides more flexibility and accessibility of your content.
This list does not present all accessibility issues, but by addressing these basic principles, you will ensure greater accessibility of your web content to everyone. You can learn more about accessibility by browsing our articles and resources.
Images
There are generally two kinds of pictures on a website: informative and decorative. If a picture is informative, you must provide some way for a blind user to get equivalent information in a textual form. The usual way to do this is to provide an ALT attribute on the image:

    <img src="../images/harry-potter-thumb.jpeg"
         alt="Daniel Radcliffe as Harry Potter">
Note that this ALT is often incorrectly called an "alt tag" but of course it's an attribute not a tag. The general concept of providing a textual alternative is called "alt text," so that's probably the easiest and best way to describe this. Also, the alt text doesn't say "picture of ..." because that will be clear from the screen reader.
However, sighted people won't (typically) read this alt text. Maybe the text preceding this image says that Daniel Radcliffe plays Harry Potter, but a better way to do this would be to use a FIGURE and a CAPTION:
    <figure>
        <img src="../images/harry-potter-thumb.jpeg" alt="">
        <figcaption>Daniel Radcliffe as Harry Potter</figcaption>
    </figure>
In this case, the screen reader software can use the caption as the ALT text, so we explicitly leave the ALT attribute empty, so that the blind visitor isn't having the same text read twice.
This figure with a caption is now better for both blind and sighted visitors, an example of where accessibility can improve the experience for everyone.
What about other uses of images, say with slideshows and galleries? In most cases, a similar approach will work: if the sighted visitor is expected to get some information from the picture, you should provide that same information in textual form. A gallery of pictures showing the executive board of your club, should have each person described with a caption. If the pictures are somewhat generic, it's reasonable to give a common caption ("picture from our annual soccer game") that will apply to all the pictures in the slideshow.
If a picture is purely decorative (a picture of a soccer ball on the page describing the annual soccer game), the ALT text can be explicitly set to the empty string. Alternatively, you can make the image be a background image using CSS:
   #soccerball {
      width: 240px;
      height: 240px;
      background-image: url(/images/240px-Soccer_ball.svg.png);
   }

   <div id="soccerball"></div>
The advantage of a background image is that, using media queries, you can easily omit these decorative images when the screen size is small.
Videos and Audios
Video and audio elements pose the same issues as still images. Blind visitors won't be able to see your video, so it should have a textual transcript. Deaf visitors won't be able to hear the narration or speakers, so the video should have captioning. This is not always easy or inexpensive. However, there is a benefit that search engines will be able to do a better job with indexing this content if the textual equivalent exists.
Hyperlinks
We already know that hyperlinks shouldn't have "here" or "more" as the click text. Screen readers often read links out of context, so the link text should stand on its own. However, there's a lot more to know about hyperlinks. Here are just a few items:
- People expect that links are underlined. Unless the context makes the link obvious (a navigation bar), don't use CSS to remove the default underline
- An image that is a hyperlink will use the ALT text as the description of the hyperlink.
- Don't say "link to X" or "go to Y"; the screen reader will indicate that the element is a hyperlink
If you want to learn even more, I suggest Making Accessible Links: 15 Golden Rules for Developers.
Labels for Form Controls
Each form control (input element, such as a text input or a menu) needs to have a label. It can be tempting to omit the labels when you have placeholders and such, but labels are necessary.
Avoid Color
Not everyone sees colors correctly. Color blindness is more common in men than in women, but it does happen in both sexes. Don't use color as the sole means of conveying information. It's fine, for example, to mark the required form inputs with red, but you should also add a bit of text or an asterisk or something. It can be a red asterisk.
Accessible JavaScript
- don't use mouseover, mouseout and hover, since those are mouse-only
- use :focus for links that are in focus
Accessible jQuery
Many jQuery methods, such as .hide() and .slideUp() use the CSS
setting display:none to achieve the hiding. That method means the
resulting content is inaccessible to a screen reader. If you don't
want that, a better idea is to add an after-event handler to the
jQuery code to display the content but offscreen (or using one of the
other techniques for hiding content).
Learning More
- Accessibility Useability For All
- Understand the Social Needs for Accessibility
- Create Accessible Websites with the Principles of Universal Design
Conclusion
Assistive software and hardware are always evolving, as are the CSS techniques that attempt to help them while not hindering other visitors. The main thing is to consider accessibility when you are considering coding some fancy new interface: will it work if the user only has a keyboard? will it work if the user is blind? Will it work if the user has limited motor control? Sometimes, this will mean foregoing that fancy feature, but the goal of making our website for all instead of the lucky few is worth the price.