HTML
This reading is about HTML, the basic language for describing the structure and content of our web pages.
The goal for this reading is to understand the basic structure of a page, and how to use a few of the most common tags. You should not try to memorize a long list of tags. There are over a hundred HTML tags, of which we'll probably use less than dozen.
- Video Overview
- Browser Inspection Tools
- JS Fiddle
- Example Web Pages
- Wikipedia
- Freecycle
- CS Fun
- Ottergram
- Substance
- HTML, CSS and JavaScript
- CS Fun Code
- HTML Elements and Tags
- Nesting
- Tag Syntax
- Structural Tags
- Title
- Header Tags
- Text Tags
- List Tags
- Hyperlinks
- Here Links
- Using Images
- The ALT Attribute
- Figures
- Comments
- Comment Syntax
- Block Elements versus Inline Elements for Layout
- Tags as Containers
- The need for meaningful tags
- Semantic Tags
- Which Tag to Use?
- Ottergram
- Span
- Validation of HTML Code
- Summary
- The End
Video Overview
Here is a video overview of HTML. Outline of the video:
- Demo of several websites:
- View Source
Other videos will cover:
- The Firefox developer tools This video references CSS, which we'll learn very soon, but don't worry about it right now.
- jsfiddle.net and a demo of jsfiddle
Browser Inspection Tools
The videos above demonstrates two important tools that we will use when developing web pages. These tools are found in all browsers, but I will discuss how they are used in Firefox, and I strongly urge you to use Firefox for this course. Many of you prefer a different browser, and you're welcome to keep using that browser for other content, but when I talk about "viewing the source" or "using the inspector," I'd like us all to be using the same tool.
So, please
Use Firefox in CS 204
View Source
The "view source" option is available on every browser, and just shows the HTML code that the browser loaded from the server. Often, it's colorized, with errors shown in red.
In Firefox on a Mac it's found by either the menu item "Tools > Browser Tools > Page Source":
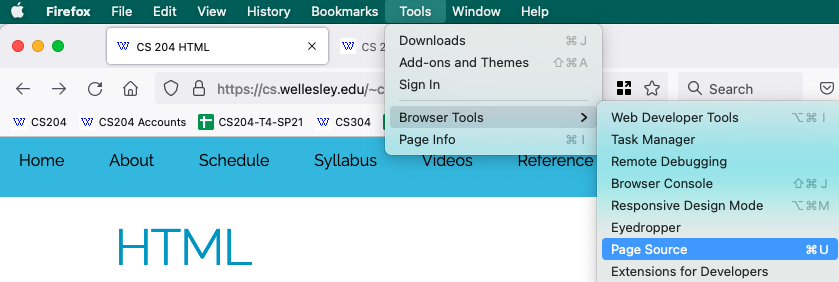
Or, as you can see, you can use the keyboard shortcut:
command-U: ⌘ U
I use the keyboard shortcut; it's worth committing to memory.
The Developer Tools
A much more powerful resource is the Web Developer Tools. We'll learn more about it as the class progresses; for now, it gives you a way to look at the HTML in an interactive way. In Firefox, find it under the menu item "Tools > Browser Tools > Web Developer Tools":
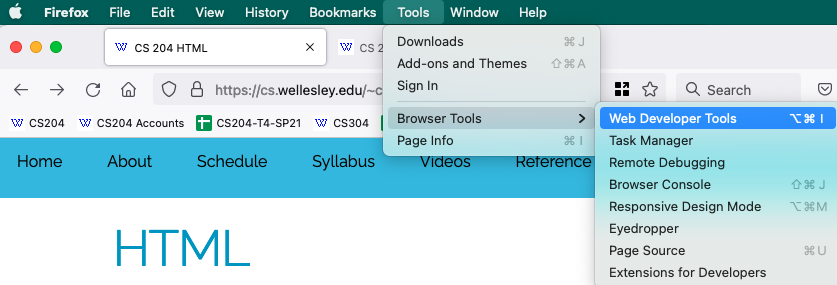
Or, you can use the keyboard shortcut:
option-command-I: ⌥ ⌘ I
That's also worth committing to memory, but an alternative is to right-click (control-click) on the element you want to inspect and use "inspect item" option in the context menu:
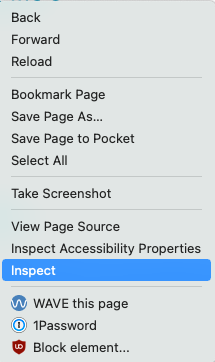
That's my preferred way of getting to the inspector, especially when I'm interested in a particular element.
JS Fiddle
Sometimes you just want to try some code, without having to create files and such. Enter jsfiddle.net, a website where you can type in some HTML, CSS and JS (in separate panes), click "run" and see what the result looks like. It's an excellent tool for
- experimentation
- demonstrating some coding idea to others
- posting questions to Stack Overflow and other sites
- lots more
We'll use it as needed.
Example Web Pages
It can be helpful to have real examples to think about. We'll consider some real-world examples, a simple example, and then we'll look at Ottergram, which we will spend several weeks on.
Wikipedia
Here's a screenshot of this Wikipedia page about web design.
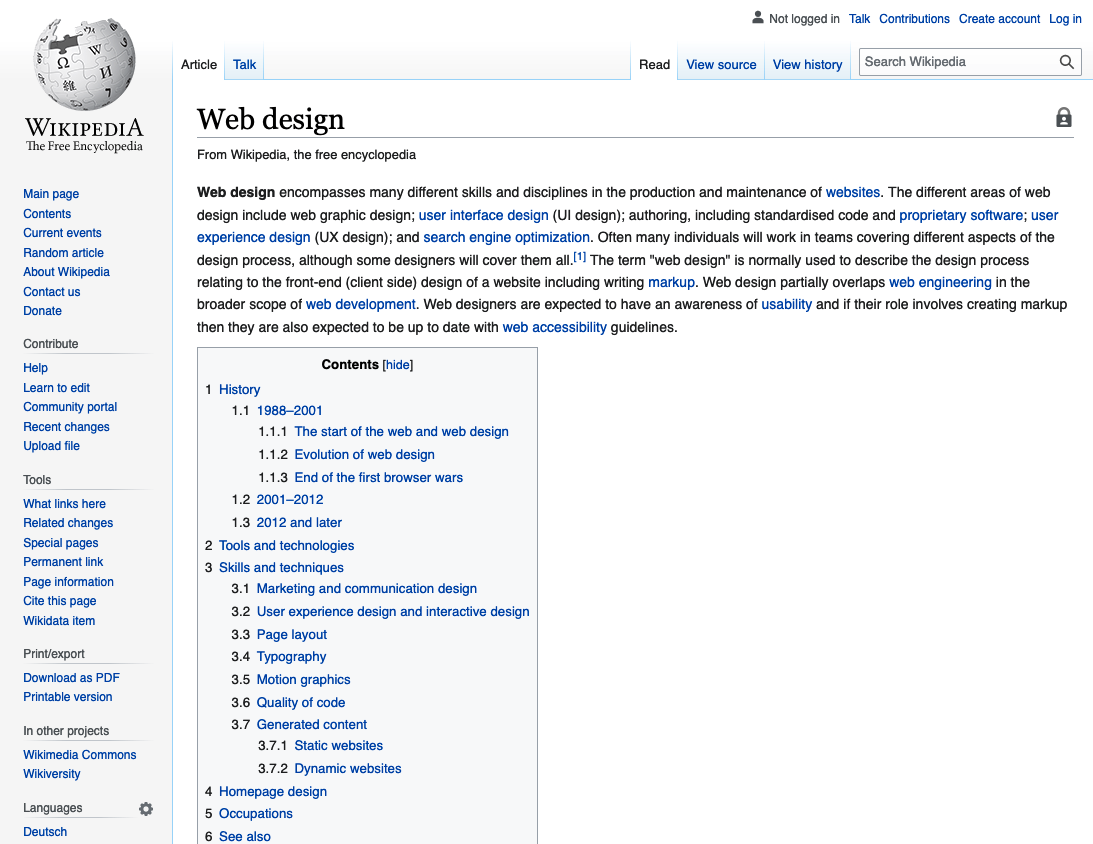
It doesn't really matter what the page is about, because all Wikipedia pages look pretty similar:
- Along the left hand side, is a narrow ribbon of links, with the logo image at the top
- The main part of the page has
- a title at the top,
- a paragraph of introduction
- a table of contents in a box
- sections of information
(Yes, there are many details we're overlooking, but this is a good start). Notice, that much of this description is about content and structure and only part of it is about layout or appearance.
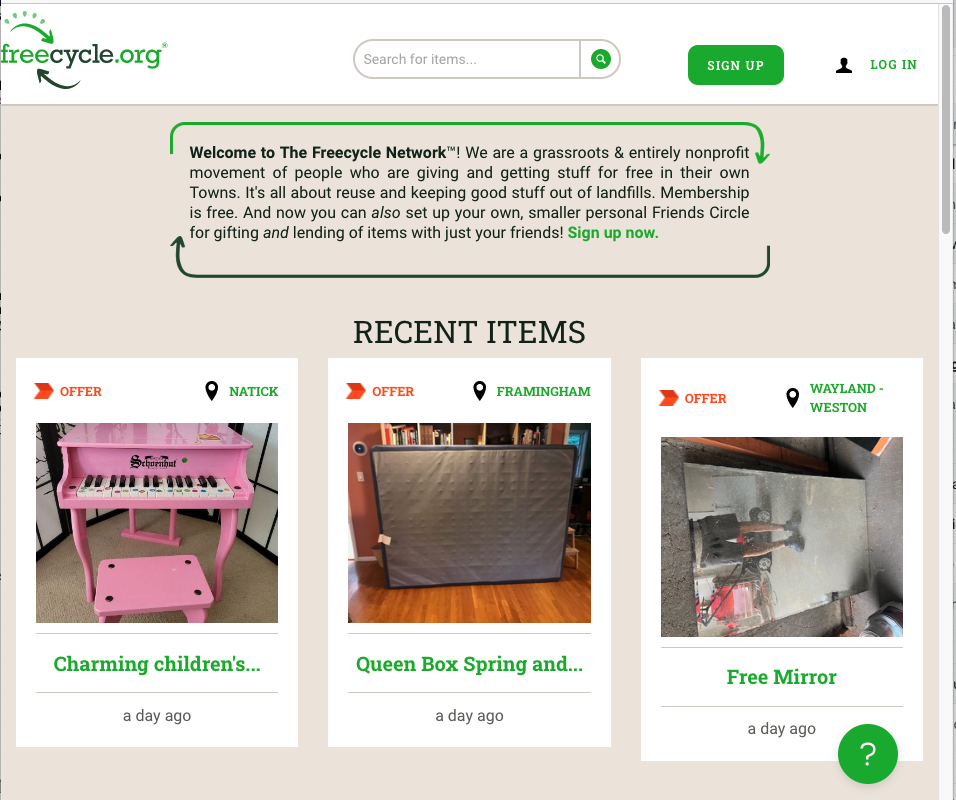
Freecycle
Here's a screenshot of FreeCycle.org. It has some administrative stuff at the top (logo, search box, buttons to sign up and log in), then a box with an explanation and some recent items, and more information below. The layout is fairly vertical, which is a common pattern, to avoid the dreaded horizontal scrolling.
CS Fun
Here's a simple site to get us started, namely csfun
Ottergram
Ottergram is intermediate. The HTML is not nearly as complex as Wikipedia and Freecycle, but it's not as simple as CS Fun. We'll spend quite some time learning how to build it, going through several versions:
- HTML a simple list of thumbnails
- CSS1 adds some nice styling
- CSS2 adds a little more styling
- Flex adds a detail picture and more styling
- Adaptive adapts to different size viewports
- Interactive allows the user to click on a thumbnail to see a larger version
This will take us a long time, so don't be intimidated. I just wanted to show you where we are going.
Substance
Now, let's start that journey. The following sections will dig into the nuts and bolts of how to put a web page together.
HTML, CSS and JavaScript
In this course, you will learn three languages, which play different roles in the implementation of a web page:
- HTML (HyperText Markup Language). This language specifies the structure and content of a web page. You can think of it as the flesh and bones of a site.
- CSS (Cascading Style Sheets). This language specifies the
appearance, presentation or style of a web page. You can
think of it as the clothes, though sometimes the metaphor of
skin
is used. (I'm not particularly fond of either of these metaphors, but they are common.) - JavaScript. This language specifies the behavior of a web page. If the page is dynamic or interactive, it's JavaScript that supplies the magic.
We will begin with HTML, but rather than start with a bunch of rules, let's start by looking at some HTML code and gaining some intuition. Don't expect to understand all of the following code (or any of it), but get a general picture and start thinking about what your questions are:
CS Fun Code
Here's the code from the CS fun page:
<!doctype html>
<!-- created by Ellen -->
<html lang="en">

    <!-- A simple web page illustrating some basic HTML tags -->

    <head>
        <meta charset="utf-8">
        <title>Fun CS events</title>
    </head>

    <body>
        <h1>Join us for some fun CS department events!</h1>
        <ul>
            <li>Spring Cirque du CS
            <li>Holiday cookie party
            <li>Faculty-student frisbee game
        </ul>

        <h2>Spring Cirque du CS</h2>
        <p>A celebration of student accomplishments in Computer Science!
           <strong>Demonstrate your CS110 project!</strong>
        </p>
        <p>
            <img src="cirque1.jpg" alt="circus treats" height="200">
            <img src="cirque2.jpg" alt="student demos" height="200">
        </p>

        <h2>Holiday Cookie Party</h2>
        <p>Take a break from the end-of-semester crunch and join us for some cookie baking,
           great food and fun crafts!
        </p>
        <p>As they say, <q>you are what you eat</q>!
           <img src="cookieparty.jpg" alt="gingerbread houses">
        </p>

        <h2>Outdoor Fun</h2>
        <h3>Faculty-student Frisbee game</h3>
        <p>All levels of skill and experience are welcome!</p>
        <p><img src="frisbee.jpg" alt="frisbee game" title="CS faculty rule!" ></p>
        <blockquote>
              <p>The faculty have always beaten us in the past, but never again! We have
              some Wellesley Whiptails on our team and we've been practicing hard,
              so we're gonna kick the faculty's butt this year!
              <em>-- anonymous CS student</em>
              </p>
         </blockquote>

        <hr>
        <p>See more photos of our fun CS events
            <a href="https://cs.wellesley.edu/~cs/Events/fun.html">here</a>
        </p>

    </body>

</html>
HTML Elements and Tags
As you can see, there's a common pattern: something in angle brackets
(shown in maroon font in the code above), some other stuff, and then a
matching something in angle brackets to close (again in maroon). This
thing is called an element and the beginning and end markers are
called tags. An HTML document is composed out of elements that
begin and end with tags. For example, the H2 tag was used to
create the title of this section, like this:
<h2>HTML Elements and Tags</h2><h2> |
HTML Elements and Tags | </h2> |
|---|---|---|
| start tag | contents | end tag |
(In practice, the words element and tag are almost interchangeable. Elements are created by tags. We won't be pedantic about the difference.)
The following are some HTML tags that you can see in the CS Fun code above. If you forget what a tag does or are looking for a new tag, you can look up tags in an HTML Reference. (Note that we will not be learning all the tags in that reference; we'll learn a useful subset.) Some of the tags we've seen are:
- Structural tags like
<doctype>just says this is an HTML document<html>a container for the entire page, both HEAD and BODY<meta>used to say what character set the page uses; we will *always* use utf-8<head>a container for the information about the page, like charset and title<title>a container for the title of the page<body>a container for the contents of the page
- Header tags are
<h1>–<h6> - Text tags like
<p>for paragraphs<em>for emphasis<strong>for strong emphasis
- List tags:
<ul>an unordered list (bullet list)<ol>an ordered list (numbered items)<li>each list item
<hr>which is a thematic break between paragraphs, usually drawn as a horizontal rule (a straight line), hence the name.
There are several other tags that you have seen, but still need to learn more about.
- The all-important anchor (hyperlink) tag:
<a> - The image tag:
<img> - Odd tags like
<meta>
We'll learn more about these in this reading.
Most elements have an end tag that matches the start tag. In a few
special cases, particularly <p> and <li>, the end tag is optional
and may be omitted because the browser can determine it from
context. (The paragraph ends at the next paragraph and the list item
(LI) ends at the next list item or the end of the list.)
Some elements (such as <img> and <hr>) consist only of a start tag
and do not have corresponding end tags or contents. These are called
empty elements.
Tags serve as instructions telling the browser the structure and content of the document. Each tag has a default way that browsers display the element, but we will learn to control and modify that using CSS.
Nesting
Multiple tags can be nested: one fits inside the other like
measuring cups or Russian dolls. If we have two tags, fred and
barney, they can be nested like this:
<fred>
    region A
    <barney>
        region B
    </barney>
    region C
</fred>
The fred tag applies to all three regions, Region A, Region
B and Region C, while barney applies only to Region B that
it surrounds. The Region A and Region C only have the fred
tag apply to them.
When nesting two tags, the inner tag must be closed before the outer tag is closed. Your browser may not enforce this; it may be forgiving of errors, but you can't be sure that every browser will be so forgiving, so always follow this syntactic rule.
Not every tag can be nested. For example, a paragraph can't be inside another paragraph, and a hyperlink can't be inside another hyperlink.
Tag Syntax
We learned that tags always begin with a left angle bracket < and
close with a right angle bracket >. (Remember that the browser
doesn't care whether the tag's name is upper or lower case.) You can
provide additional information within the tag to further specify what
it does, using attributes. Here's a general syntax:
<tag attr="val">stuff</tag>Here there's just one attribute/value pair; in general, a tag can have
more than one attribute. Notice the <img> tags in the CS Fun
code example code. We'll learn more below.
Structural Tags
Web pages have a required structure, and so there are required
structural tags to mark the different parts. Each page has a HEAD
and a BODY, enclosed by tags with those names. These two parts are
contained within an HTML element. The HEAD contains information
about the page, such as its TITLE, so the HEAD requires the
<title> element. We'll learn more of these
structural tags later.
Title
The content of the <title> tag doesn't appear on the body of the
web page (though it often appears at the top of the window in the
title bar). It is, however, very important for two reasons:
- It tells search engines what stuff is on the page.
- It appears in menus when someone bookmarks a page or looks in their history.
For both those reasons, a page title like about us
or
contact
is often not helpful. It's a good idea to put something
more descriptive in the title, such as About CS 204
or CS
204 staff contact information.
Header Tags
Headers are just what you think they are: they're just like headings for chapters, sections, subsections and so forth in books, papers and other documents that you're used to. H1 is for things like chapters, H2 for sections, H3 for subsections, and so forth.
Text Tags
Text tags are used for textual elements, such as creating
paragraphs using the <P> tag, or emphasizing
some text using the <EM> tag, and so forth.
List Tags
If we want to create a bullet list, we can use the
<UL> tag, which stands for unordered
list
. This tag is just a container: it encloses a set
of list items, each created by the <LI>
tag. Thus, the following creates a list:
  <ul>
    <li>apples</li>
    <li>bananas</li>
    <li>coconuts</li>
  </ul>
If you want the list items to be numbered automatically, you
want an ordered list, which you can get with the
<OL> tag.
Hyperlinks
A good example of the use of attributes is seen with the anchor tag,
<A>. To use it as a hyperlink, you have to specify where the link
goes. For example, to have a link that says Google
and
takes us to https://www.google.com/, we say:
<a href="https://www.google.com/">Google</a>The href part is the attribute. Hyperlinks almost always have an
href; other attributes are optional. Later, we'll see other
attributes for the <a> tag.
Here Links
Once, it was very popular on the web to have links like this:
It seemed so clever and intuitive, making the clickable text be the word "here." There are two big problems with this, though:
- Accessibility: Screen-reading software for the blind often will read the text of the links on a page so that the user can easily navigate to other pages. Links like those above read as "here," "here," "here" — useless.
- Indexing: Search engines pay special attention to the click text on a page, since those are often an important clue about the content of the destination page. The links above don't show what the important words are.
So what do you do instead? Just wrap the link tags around important words:
- Here are some apple pie recipes.
- Click here for peach pie recipes.
- Yo, check out the prune pie recipes.
Accessibility is very important in CS 204, so keep that in mind.
Using Images
One thing that we all want to do with our web pages is add
pictures. Because the picture file is a separate file, we have to link
to it, just like the href attribute of the anchor (<a>) tag.
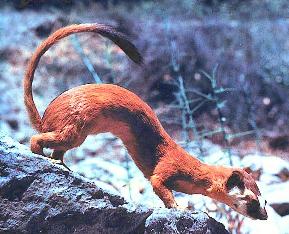
Once you have an image file, say small_weasel.jpg you can use it
on your web page like this:
<img src="small_weasel.jpg" alt="a small weasel">with the following result:
Of course, this only works if the server can find the image file. The
src attribute must be the URL of the image file. We'll
talk about URLs in a companion reading.
When the browser reads our HTML and sees the img tag, it requests
the image file from the server using the URL. If the server doesn't
find the file (or the file is corrupted in some way), the browser will
show this:

Depending on your browser, you may see a broken-image icon above, the
alt text, or possibly nothing at all.
The ALT Attribute
An IMG tag looks like this:
<img src="url/of/picture.jpeg" alt="picture of something">You noticed that we added an ALT attribute to the IMG tag that is a
small piece of text that can be used in place of the image in certain
circumstances. The ALT attribute is an important part of the HTML
standard. Perhaps its most important use supports
accessibility. Unfortunately, not everyone has good enough
vision to see the images that we use in our websites, but that doesn't
mean they can't and don't use the Web. Instead, they (typically) have
software that reads a web page to them, including links. When the
software gets to an IMG tag, it reads the ALT text. If there is no
ALT text, it may read the SRC attribute, hoping there's a hint there,
but all too often the SRC attribute is something like
"../images/DCN87372.jpg" (a picture from someone's phone)
and the visually impaired web user is left to guess.
Therefore, you should always include a brief, useful value for the ALT attribute. If your page is an image gallery, then your ALT text could be a brief description of the image.
You should avoid having critical information on your website conveyed only in images. There may be times when it is unavoidable, but to the extent that it is possible, we want our websites to be easily usable by all people, including the blind and visually impaired.
Accessibility is important in modern society. We build ramps as well as stairs, we put cutouts in curbs, and we allocate parking spaces for the people with disabilities. Indeed, most federal and state government websites are legally required to be accessible, and ALT attributes are just one part of that. We'll talk more about accessibility later in the course.
In this class, we expect you to always use the ALT attribute. If you find an image or an example where we've forgotten to use one, please bring it to our attention.
Figures
Now that we know about the img tag, it's useful to know about a semantic
tag that can be used with it. We can use figure to surround an img
tag, paired with figcaption for the caption text:
<figure>
    <img src="hermione-granger-256.jpeg" alt="Hermione Granger">
    <figcaption>Hermione Granger as played by Emma Watson</figcaption>
</figure>
Here's what it would look like:

Note that images can be used without figure; a figure is often used as
in a book, where the text refers to a figure to provide additional
information. Also, the use of figcaption doesn't remove the obligation
to provide alt text. Still, this can be a useful tag to know about.
Comments
From the very first computer program, programmers have needed to
leave notes
in the code to help themselves and others understand
what's going on or what the code's purpose is. These notes are called
comments. Comments are a part of the program text (they're
not written separately, because then, well, they'd get separated),
but they are ignored by the computer. Comments aren't about what someone
can discover by reading the code, but should cover the background context
of the code, or its goal.
Because it's important to get in the habit of putting comments in your HTML code, we will require comments in this course. At this point, you won't have a lot to say, and that's fine. You will start by labeling each file with its name, your name, the date, and any sources you consulted (such as the source code of other web pages). Think of this as signing your work. Later, when you're designing a website with many coordinated pages, you can use comments on a page to talk about how it fits into the overall plan.
Comment Syntax
The HTML comment syntax is a little odd-looking. Here's an example:
<!-- I can say anything I want in a comment. -->The syntax starts with a left angle bracket < then an
exclamation point and two hyphens, then the comment (anything you want)
and ends with two hyphens and a right angle bracket >.
Frankly, I find this a little ugly, but it is what it is.
Block Elements versus Inline Elements for Layout
Let's jump up a level and ignore (temporarily) the details of the various tags, and think about layout. For this, I want you to imagine you are working at a newspaper or magazine in the pre-computer era. Layout means arranging the stories and articles, along with big boxy advertisements, on a page. You might even have to get out actual scissors and glue to cut-and-paste the stuff onto the page.
For the most part, you'll be working with rectangles. The advertisements will be rectangles, the stories will be rectangles (probably in column format, but whatever), and so forth.
Now consider another job, the typesetter. The typesetter needs to worry about things that happen in lines of text, like "this text needs to be in italics" and "this other text is in bold" and issues like that, which apply to the text within a story. Those issues are not rectangles. The italics (say) starts someplace (some word) and ends someplace else (some other word). It's unlikely that the italicized part of the page would be a rectangle, particularly if the italicizing starts at the end of one line and finishes at the beginning of another line.
The web browser has to do both jobs: it has to do the page layout, which involves rectangles, and to the typesetting of stuff in lines of text, including things like font changes, but also marking hyperlinks (typically with a blue font and underlined) and stuff like that.
For it's purposes, each tag goes into one of two broad categories:
- block elements (rectangles)
- inline elements (for stuff in lines of text)
Here are some of the tags we've learned and the categories they fall into:
block elements:
<p>for paragraphs<ul>and<ol>for lists<li>for list items<h1>...<h6>for headers<body>for the page as a whole<figure>for a figure<figcaption>for a figure caption
inline elements
<em>for emphasis (usually italics)<strong>for strong emphasis (usually bold)<a>for hyperlinks<img>for images (this is surprising at first, but images are treated like big words)
For every new tag you learn, it's useful to put it in one of these categories. But it's also interesting that these are not immutable: they can be changed with CSS. Nevertheless, each tag is by default either a block element or an inline element.
We'll return to this after we learn a few more tags.
Tags as Containers
You've seen that elements such as a list item have a beginning tag
(like <li>) and an ending tag (like </li>) and that they have to
be properly nested (such as list items inside a list). Thus, elements
are a kind of container.
In the beginning of this reading, we looked at four examples (Wikipedia, FreeCycle, CSFun, and Ottergram), and we focussed on the big picture. For example, the Wikipedia page has a region to the left where there are links to other parts of Wikipedia and the FreeCycle page has big rectangular elements for each item on offer. What kind of a container might be used for those?
Historically, the answer was the DIV tag, which is a generic
container. DIV elements can be nested as deeply as you want (divs
inside divs inside divs...). The name derives from division
,
some big chunk of content. The DIV tag is, unsurprisingly, a
block element. Unlike p, ul, ol, li and the other block
elements we learned, the div tag has no intrinsic meaning. It's just
a block.
The need for meaningful tags
The div tag solved the structuring problem, but at a price. HTML
code became divs nested inside divs to great depths, which is
difficult to understand. Furthermore, other computer programs
(e.g. search engines) couldn't make sense of all divs in a page, if
they wanted to use the organization of the page for inferring the
meaning of the content.
HTML5 introduced a series of new tags that have meaningful names and can be used universally to express what the content is about, beyond the existing simple tags. Additionally, to make the pages more alive with different kinds of content, several new tags that allow content to be embedded in a page were also added. In the following, we will give a short summary of some of these tags. Try to make use of them in your pages. They will make your code better and more readable to the programs of the future.
Semantic Tags
Here is a list of new HTML5 tags that are known as semantic tags, because their names have specific meaning. All of these are block elements.
| Tag Name | Short Description |
|---|---|
<header> |
Specifies a header for a document or section. |
<footer> |
Specifies a footer for a document or section. |
<section> |
Defines sections in a document (e.g. chapters). |
<nav> |
Defines a set of navigation links. |
<aside> |
Defines content which is relevant but not central (e.g. callouts, sidebars). |
<main> |
Defines the main content of a page. |
<article> |
Defines independent, self-contained content (e.g., blog post, news story). |
<figure> |
Indicates a figure or other graphical content |
<figcaption> |
A caption inside a figure element |
Which Tag to Use?
Given all the tags listed above, along with DIV, you might feel bewildered as to which one to use. Here is a helpful HTML5 sectioning flowchart from html5doctor.com . Click on the image to see a larger version:
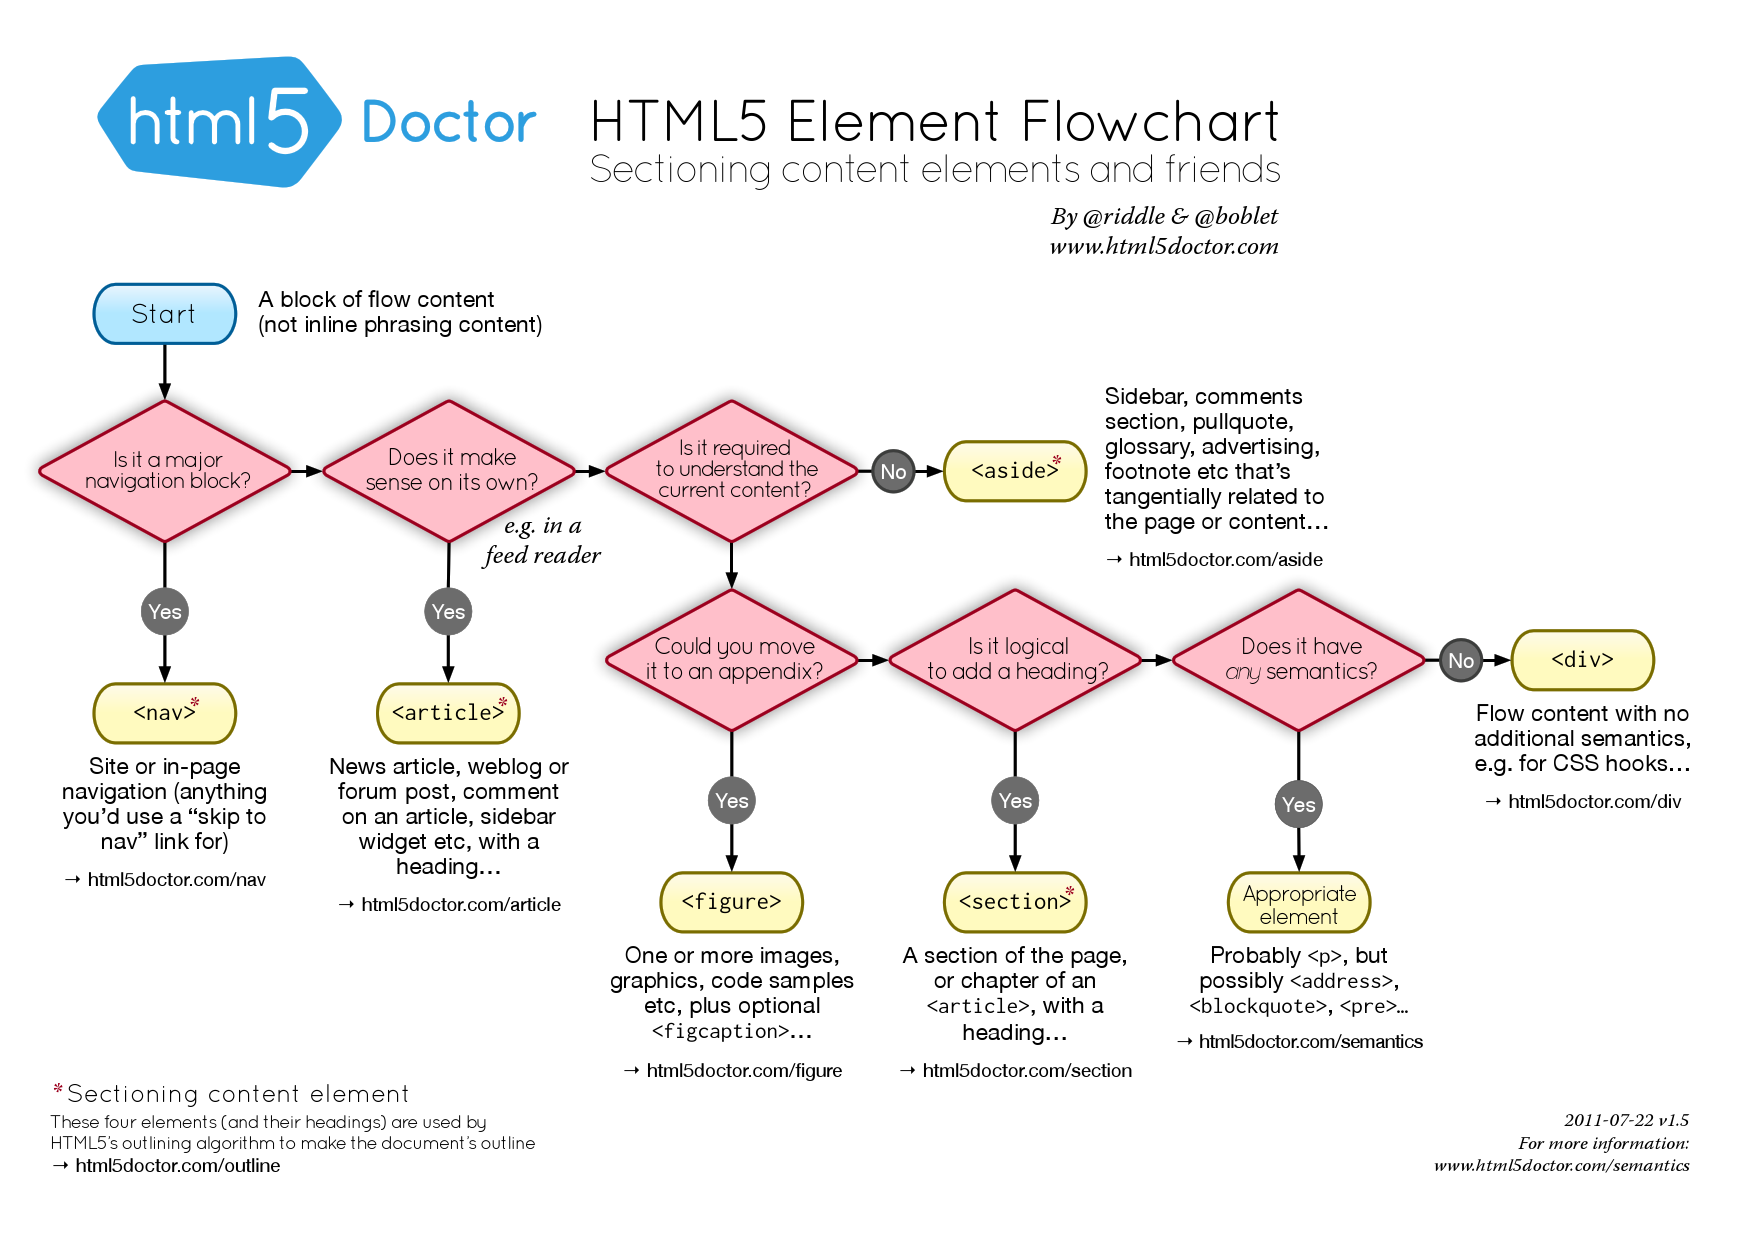
Click on the image to see a larger version
Ottergram
Let's be more concrete by looking at a particular web page, namely Ottergram. Our first version of Ottergram is the following:
<!DOCTYPE html>
<html>
  <head>
    <meta charset="utf-8">
    <title>ottergram</title>
  </head>
  <body>
    <header>
      <h1>ottergram</h1>
    </header>
    <main>
      <ul>
        <li>
          <a href="imgs/otter1.jpg">
            <img src="imgs/otter1.jpg" alt="Barry the Otter">
            <span>Barry</span>
          </a>
        </li>
        <li>
          <a href="imgs/otter2.jpg">
            <img src="imgs/otter2.jpg" alt="Robin the Otter">
            <span>Robin</span>
          </a>
        </li>
        <li>
          <a href="imgs/otter3.jpg">
            <img src="imgs/otter3.jpg" alt="Maurice the Otter">
            <span>Maurice</span>
          </a>
        </li>
        <li>
          <a href="imgs/otter4.jpg">
            <img src="imgs/otter4.jpg" alt="Lesley the Otter">
            <span>Lesley</span>
          </a>
        </li>
        <li>
          <a href="imgs/otter5.jpg">
            <img src="imgs/otter5.jpg" alt="Barbara the Otter">
            <span>Barbara</span>
          </a>
        </li>
      </ul>
    </main>
  </body>
</html>
You can view that initial version of ottergram html-only in your browser.
Let's take a moment to read the HTML. The structure is fairly repetitive, so you won't need to read every character to get the basic idea.
- The bulk of the page is a list. Most web pages will not be like that, and indeed, neither will the finished Ottergram. We've already seen examples like Wikipedia and FreeCycle that aren't just a bullet list of images.
- Each hyperlink (
atag) is wrapped around animgand aspan. The span is essentially the caption of the image. Better semantic markup might have usedfigureandfigcaption. - Each hyperlink and the
imgboth use relative URLs to specify the location of the image file. We'll learn about URLs in a companion reading.
Span
The span tag is new. What is it? It's similar to div, in that it's
a generic container, without any pre-assigned meaning. The difference
is that span is used for stretches of content inside a paragraph, like
the em (emphasis) or strong (heavy emphasis) tags. The a
(hyperlink) tag is similar. In other words, span is an inline
element.
Here's a paragraph with examples of all of them. (Later we will learn how to modify the background color; that's not important here.)
The span tag is for a span of text, usually inside a paragraph, but possibly not. The beginning and end can flow back and forth depending on the size of the container. Try making this window wider or narrower. Notice how the span-like elements change. You can read more about span at this link if you are curious.
Notice that the span, em, strong and a are not necessarily
rectangles. That's characteristic of inline elements. That is,
span is the generic inline element.
Here's the HTML code, without the CSS code that modifies the color.
<p>The <em>span</em> tag is for a <span>span of text, usually inside a
paragraph, but possibly not</span>. The beginning and end can flow
back and forth depending on the size of the container. <strong>Try
making this window wider or narrower</strong>. Notice how the
span-like elements change. You can read <a
href="https://developer.mozilla.org/en-US/docs/Web/HTML/Element/span">more
about span at this link</a> if you are curious.
</p>
Validation of HTML Code
How can you be sure you've followed every nit-picky rule that the HTML
standards committee devised? (The standards committee is the World Wide Web Consortium
or W3C.)
Even if you have memorized all the rules, checking a page would be tedious
and error-prone – perfect for a computer! Fortunately, the W3C
created an HTML validator. You can
validate by supplying a URL, by uploading a file, or even copy/pasting in
some HTML. An HTML validator is an excellent tool to help you debug your
HTML code.
Validation also helps with accessibility. One important aspect of accessibility is having the proper HTML syntax for each page in your site. Visitors with accessibility needs will use the alternative browsers and screen readers, and that software will be aided by syntactically correct HTML. Read the following for a longer discussion of why to validate your HTML pages.
Throughout the semester, if you need to validate a web page, you can find the HTML validator and others in the reference page.
There's a video about validation on the videos page.
Summary
We learned
- The idea of three languages on the web: HTML, CSS, and JavaScript
- The purpose of HTML is to describe the structure and content of the page. Appearance is handled by CSS, and behavior by JavaScript
- The basic tag syntax:
<tag attr1="val1" attr2="val2">contents</tag> - How to use the following tags:
- DOCTYPE
- HTML, HEAD, BODY, and TITLE
- H1, H2 etc for headers
- OL, UL and LI
- P for paragraphs
- EM and STRONG for emphasis and greater emphasis
- A for hyperlinks
- IMG for images
- FIGURE and FIGCAPTION for displayed images
- Alt text for images
- Comments
- Validation
- Meaningful (Semantic) tags
The End
This is just the beginning of HTML. There's a lot more you could learn, but this will do for now.