
Course Appliance
The csenv course appliance provides a self-contained CS 240 computing environment as a virtual machine that you can run alongside other applications on most personal computers. It is isolated from the rest of your computer and independent from the CS workstations. The csenv appliance is an alternative for those who wish to work on their own computers rather working on the CS GNU/Linux workstations in the lab or remotely via SSH.
Regardless of what physical or virtual machine you use, working in the lab is great for community and often yields useful tips from classmates and course staff.
Contents
- Requirements
- Installation
- Use the Appliance
- Startup and Shutdown
- Pause and Resume
- Troubleshooting
- Software and Licenses
Requirements
Most computers from the last 5 years or so should suffice. You need a computer with:
- a fairly recent 64-bit Intel or AMD x86 processor;
- 4GB or more of RAM (2GB could work, but it would be tight);
- one of these operating system versions
- 8GB of available storage space
You are responsible for backing up any data of importance stored on your appliance. This happens naturally if you employ good version control practice on your work.
Installation
Standard Installation
Use these directions to install the course appliance on your computer. CS 240 staff will provide support if you have issues.
- Download
csenv-s19.ova[~3.25GB] to your computer. This will take a while. Do it on the campus network. - While you are waiting, download and install the latest version of VirtualBox 6. (Do not install the “extension pack.”)
- Once
csenv-s19.ovahas finished downloading, start VirtualBox and choose the menu item File > Import Appliance…. - Click the folder icon and browse to select
csenv-s19.ova, then click Continue. - Click Import to accept the default machine parameters. Importing will take a few minutes.
- In the VirtualBox manager application, select the appliance on the left and click the Start button (green arrow) to start up the appliance.
- When the appliance has started, you should see its desktop environment.
- If text/icons in the appliance window are too tiny: In the VirtualBox manager application, select the appliance and click the Settings button (orange gear). Select Display and raise the Scaling Factor, perhaps to 200%.
- Optionally, remove the
csenv-s19.ovafile from your computer to save space. - Read about how VirtualBox captures your mouse and keyboard input and how to release them with the host key.
Advanced Alternatives
If you definitely know what you are doing and you prefer to install or configure your own CS 240 environment without any support from CS 240 staff instead of using the standard installation, you may try these alternatives:
- If you wish to reproduce the environment on your own GNU/Linux
system, the full appliance recipe is available. The file
csenv.rbincludes lists of FedoraPACKAGESto install, GitREPOSto clone, and otherDOWNLOADS.
Use the Appliance
The appliance automatically logs in as the user u. This
account is local to your appliance. It does not share storage or
preferences with your CS account. Use version control or
scp to transfer files between them.
The appliance presents a fairly minimal interface, focused on a few relevant programming tools.

From left to right, the top panel holds:
- Upper left: application menu, file browser, terminal, Emacs
- Upper right: network status, clock, logout/shutdown
Startup and Shutdown
Start up the appliance: open VirtualBox, select the appliance in the list on the left, and click the Start button. This launches a separate application running the appliance.
Shut down the appliance: click the icon in the far upper right corner of the appliance screen and then click Shut down.
Do NOT use Power Off Machine or Reset!
These options are equivalent to yanking out the battery or power cord while the computer is running or holding down the power button to hard reset. These tend to result in corrupted files. It is OK to Send the shutdown signal, which asks the appliance operating system to shut itself down gracefully.

Pause and Resume
Pausing and resuming the appliance is convenient if you want to keep some windows open in the appliance but you want to free up resources on your computer while you work on something else.
Pause the appliance: click to close the VirtualBox VM window that contains the appliance display. Choose Save the machine state and click OK.
VirtualBox VM will take a few seconds to save the appliance’s current state, then it will close the appliance. The listing for the appliance in the VirtualBox manager will now show it as Saved (vs. Powered Off).

Resume the appliance: select the appliance in the list on the left and click the Start button.
Troubleshooting
If the following suggestions do not help, please report issues to your instructor. Detailed descriptions and any troubleshooting you have tried (or solutions you have found) are useful.
Network Trouble: “Could not resolve hostname”
Symptoms: Trouble connecting to network services (e.g., with version control operations), typically including “could not resolve hostname.”
Cause: The appliance has likely lost its network connection. This can happen when your physical computer temporarily loses and then regains its wireless network connection (a common occurence at Wellesley). Sometimes the appliance does not notice that the network has returned.
Confirmation:
- Check that your physical computer has network access (can you access the web)?
- Check that the appliance does not have network access.
- The appliance screen shows a “two screens” icon in the upper
right when connected:

- The icon includes a red X when disconnected:

- The appliance screen shows a “two screens” icon in the upper
right when connected:
Solution: In the VirtualBox VM application (the frame around the appliance display), disconnect then reconnect the virtual network adapter to make the appliance notice the connection.
There are two ways to disconnect/reconnect the network adapter:
-
Click the tiny “two screens” icon in the lower right status bar of the VirtualBox VM window (in the frame around the appliance display, not the icon you just examined in the upper right).
-
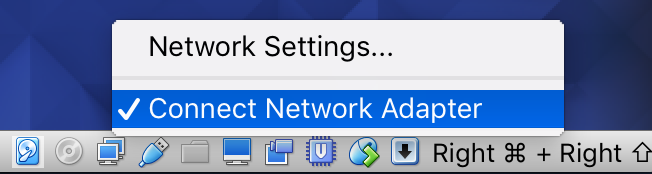
OR: Choose the Devices > Network Adapter menu in the VirtualBox VM menu bar.
Uncheck, then re-check the Connect Network Adapter option. After a few seconds, the appliance should reconnect to the network.
On Windows: “VT-x” or “AMD-V” Unavailable/Disabled or “kernel requires an x86_64 cpu, but only detected an i686 cpu”
Symptoms: When trying to start your appliance from VirtualBox, some Windows computers may give an error about “VT-x” or “AMD-V” being unavailable or disabled.
Cause: “VT-x” and “AMD-V” are Intel and AMD’s special hardware support for efficient virtual workstations. If you have a relatively recent computer (last few years), it is likely you have these features, but they may be disabled on some Windows computers.
Solution: You will need to change a low-level setting outside the operating system to enable hardware support for virtualization. It requires changing a low-level setting, but is fairly straightforward.
To enable virtualization support on a computer with UEFI (newer computers):
- Hold the
shiftkey while pressing restart to reboot your computer and access the UEFI settings. You should see an interface other than the usual Windows startup. If you do not, try the BIOS directions below. - Select Troubleshoot, then Advanced Settings, then UEFI Firmware Settings.
- Find Security or Virtualization Settings (or something similar).
- Enable hardware support for virtualization.
- Select something to the effect of “save and reset” to save the settings changes and reboot the computer.
To enable virtualization support on a computer with BIOS:
- Reboot your computer and hold the F2 or F10 key as it is starting up. This will cause it to enter a mode (known as BIOS or firmware settings) allowing you to set low-level hardware options. (If the first of F2/F10 that you try doesn’t work, try the other. The screen probably tells you which.)
- Use the arrow keys to find the Security or Virtualization Settings (or similary named) section, possibly within a Processor or CPU section.
- Enable hardware support for virtualization.
- Select something to the effect “save and reset” to save the settings changes and reboot the computer.
You may need to delete the virtual machine you created in the
VirtualBox manager and reimport csenv-s19.ova for it to
recognize the virtualization support.
Kernel driver not installed (rc=-1908)
This error may arise if there was a transient issue while installing VirtualBox itself. Try the VirtualBox installer again.
Software and Licenses
The course appliance is built from free and open-source software.
The appliance is based on the fedora-28 image produced by the Bento Project and contains installations of:
- the Fedora distribution of the GNU/Linux operating system
- the LXDE desktop environment
- the VirtualBox Guest Additions
- CodeTub
- several programming tools
The contents of the appliance image are distributed under the licenses for the Fedora Project and the individual component packages. Licenses and source for the Fedora Project are available here.
The appliance is packaged and run using:
- the VirtualBox virtualization platform (documentation)
- the Vagrant virtual machine manager
The definition used to prepare the appliance image is also available.