Mercurial (hg)
CS 251 uses Mercurial and Bitbucket to manage all programming projects. This document introduces these tools as used in CS 251. Quick reference material and an introduction to Mercurial and Bitbucket are followed by a tutorial that covers setup for this course and basic skills for solo and team use. The document assumes a Unix, Linux, or Max OS X environment with Mercurial installed and very basic familiarity with the shell. Windows will require minor translation of non-hg commands. As you outgrow this document and seek more general information, consult documentation elsewhere.
The tutorial assumes Mercurial is installed. CS Linux machines and the wx appliance have Mercurial installed. If you want to install it elsewhere start at http://mercurial.selenic.com (or in your favorite package manager).
To start the tutorial, skip to Mercurial (hg) and Bitbucket.
Contents
- Quick Reference
- Mercurial (hg) and Bitbucket
- Setup for CS 251
- Mercurial Solo Basics
- Mercurial Team Basics
- Other Resources
Quick Reference
For reference once you know the basics. To start the tutorial, skip to Mercurial (hg) and Bitbucket.
CS 251 Solo Workflow
Single Bitbucket repository, single local repository.
Once per assignment:
- Bitbucket: fork
wellesleycs251 / assignmentto createwendyw / assignment - Bitbucket: grant Admin permission on
wendyw / assignmentto fturbak. - local:
hg clone ssh://hg@bitbucket.org/wendyw/assignment
Then, multiple times per assignment as needed:
hg addnew fileshg commitcohesive changes oftenhg pushchanges to Bitbucket often enough- check submission in local repository:
hg statusempty,hg outgoingfinds no changes
Edicts:
CS 251 Team Workflow
Single Bitbucket repository, multiple local repositories.
Once per assignment:
- Bitbucket: fork
wellesleycs251 / assignmentto createwendyw / assignment - Bitbucket: grant Admin permission on
wendyw / assignmentto fturbak and your partner - local:
hg clone ssh://hg@bitbucket.org/wendyw/assignment
Then, multiple times per assignment as needed:
hg addnew fileshg commitcohesive changes oftenhg pulland eitherhg updateorhg merge; hg commitothers’ changeshg pushchanges to Bitbucket often enough- check submission in all local repositories:
hg statusempty,hg outgoingfinds no changes
Edicts:
- Add early, commit often, and push often enough.
- Commit cohesive changes.
- Commit before trying to update or merge.
- Commit immediately after merging.
- Coordinate work to avoid conflicts.
- Use
hg help.
Mercurial (hg) and Bitbucket
This section introduces basics of the Mercurial version control system, the hg tool, and the Bitbucket hosting service.
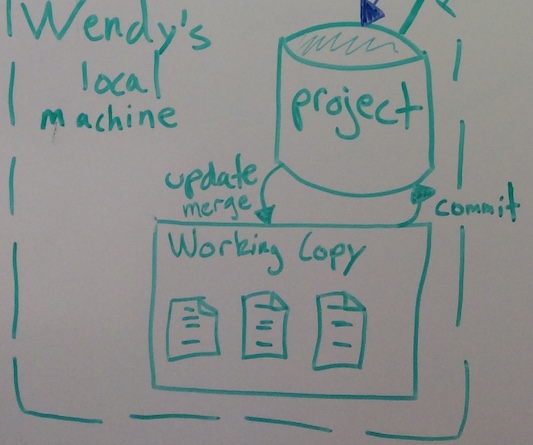
Repository and working copy
A Mercurial repository is a structured record of the evolution of a project through multiple revisions in the form of a detailed revision history of its files.1 Mercurial also calls revisions changesets. Every Mercurial repository is paired with a distinct working copy, a directory containing a snapshot of the project, where the user can prepare new revisions.2 The repository itself is hidden away (in a hidden directory .hg inside the working copy’s base directory). The user can make direct changes to the working copy, but interacts with the repository (e.g., to record a new revision) only through the interface provided by the Mercurial tool, hg. Mercurial supports several useful repository tasks, including:
- Record a new revision, along with timestamp, creator, and description.
- Reconstruct an arbitrary past revision.
- Compute the difference of two revisions.
- Clone a repository, record independent revisions in separate clones, and share revisions to bring clones up-to-date with each others’ revisions.
Benefits
By allowing interaction with the repository only through its interface, a system like Mercurial abstracts tedious representation and maintenance details away from the error-prone user. The version control software is responsible for principled maintenance of revision history (principles being a great strength of computers) while users are responsible for deciding what versions of a project are appropriate and meaningful to record in the revision history or share revisions with other users.
This model supports a wealth of development tasks such as: quick, reliable, easily recoverable backups; structured collaborative development and sharing of code; structured documentation of project evolution; finding the revision where bug was introduced into the project. Being forced to learn to use principled version control helps you:
- Stop losing hours of work because making backups was just too much work to bother with… until you realize the past 7 hours of untested coding entirely breaks everything.
- Stop sharing code through email. It has a funny habit of multiplying, shifting around, breaking, and disappearing, especially in office hours.
-
Stop the scourge of unstructured, unintelligible code-copy litter:

- Stop partners from interfering while simultaneously editing on Dropbox or Drive.
- Stop sharing passwords or committing file permissions faux pas in the name of collaboration.
- Start keeping a structured history of development to simplify future debugging tasks.
- Start sharing code easily.
- Start trying out risky new features without losing that precious working version.
- Start learning a fascinating application of data structures and algorithms (particularly DAGs).
- Start getting employed.
A version control system accomplishes none of these improvements on its own, but it helps make the right choice the path of least resistance for you.
hg
Mercurial is driven by a command-line tool called hg,3 with commands of the form hg command.
Driving a command-line tool for the first time can be unsettling, since it is difficult to see the controls. Once you become familiar, however, you may find it easier, quicker, and more expressive than a modern mouse-based GUI. To keep you company on the journey, Mercurial has a friendly help and documentation system built in. Just run the command hg to see the controls.
*Note: in this, and all command line transcripts shown in this document, we use $ to represent the command prompt. Following lines are output from commands entered at the prompt.
$ hg
... output omitted here ...
Take note of what it shows (omitted here) and the fact that you can summon this at any time.
hg help shows a longer list of help topics. hg help topic shows help about a specific topic. The most common kind of topic is a command. Try running hg help help to see if hg help can help you learn how to use the hg help command.
Alas, hg help cannot help with everything…
$ hg help fly
abort: no such help topic: fly
(try "hg help --keyword fly")
… but it can help with most anything actually hg-related.
Bitbucket
Bitbucket is a hosting service for Mercurial and git repositories. Although we could store repositories entirely locally on CS machines, using a hosting service allows flexible management of access to hosted repositories through a web interface and frees us from fiddling with file permissions for shared repositories (a notoriously difficult task). Bitbucket accounts are free. With a .edu email address, they allow unlimited repositories and unlimited collaborators for free.
Repositories hosted on Bitbucket are exactly the same as your local Mercurial repositories except that their working copy is inaccessible (and unused). They also happen to have a flashy web interface.
Setup for CS 251
Bitbucket account
Do this once per student.
- Create a Bitbucket account using your @wellesley.edu address or add your @wellesley.edu address if you have an account already. (A .edu address allows you essentially unlimited access for free.)
- Click through the setup steps choosing options like “Skip” and “No thanks.”
- Check your email and confirm your email address to activate unlimited academic access.
- Give you instructor your Bitbucket username. We will grant you access to the wellesleycs251 starter code repositories.
- Once we have added you to the team, reload your Bitbucket “Dashboard”. You should now see a list of repositories instead of the “create a repository, there’s nothing here yet” page.
Create an SSH key
Do this once per local account per student. (e.g., once for CS Linux machines, once for Wellesley Macs,4 once for your laptop, once for the wx appliance.)
If you have already created a key for other purposes, you may reuse it, skipping to here
Normal use of the mercurial (hg) tool and Bitbucket will require you to enter your password every time you interact with Bitbucket through hg (which should be pretty often). You can avoid this by configuring and sharing an SSH key with Bitbucket. SSH (or Secure SHell) uses public-key cryptography, a very cool cryptographic device that underlies much of modern “secure” network communication. (It is worth learning about in its own right, but this is not the class for it…) You will generate a public-private key pair, share the public key with Bitbucket, and keep the private key stored in your local account. This allows you to prove your identity to Bitbucket without a password.
Security note: The best option is to protect the key itself with a password, which makes it hard for an adversary who steals your key to impersonate you. Most modern operating systems come configured with convenient password management software (e.g., *Keychain Access on Mac OS X) that handles passwords for SSH keys. This removes the need to enter your key password often.
If your password manager does not seem to be finding your SSH keys later, you could repeat the steps below with an empty key password since access to your repositories for this course is low-consequence.*
- On the Bitbucket site, click the person icon in the upper right corner and choose Manage Account.
- In the left column, near the bottom, click SSH keys.
- Click Add key.
- Enter a label (“cs” would be fine – it’s just a name to distinguish it from other keys you might have on other machines, like your personal laptop).
- Open a shell and run
ssh-keygen -t rsa - At each prompt except the password prompt, accept the default by hitting enter/return.
- When prompted for a password, choose a new one (there is no connection to your Bitbucket password or CS Linux password)
-
You should see something like this when you’re done.
$ ssh-keygen -t rsaGenerating public/private rsa key pair. Enter file in which to save the key (/Users/wendyw/.ssh/id_rsa): Enter passphrase (empty for no passphrase): Enter same passphrase again: Your identification has been saved in /Users/wendyw/.ssh/id_rsa. Your public key has been saved in /Users/wendyw/.ssh/id_rsa.pub. The key fingerprint is: d4:16:46:4e:75:ed:d7:1a:aa:f0:52:91:0f:46:3b:a1 wendyw@wren The key's randomart image is: +--[ RSA 2048]----+ | .=.. .. | | =o. . .| | .o++ ..| | .E.B . +| | S. = . o.| | . . o . | | + . | | . o | | . | +-----------------+ -
This command creates a pair of private key
id_rsaand public keyid_rsa.pubin the hidden directory~/.ssh. When the command has completed, show the contents of your public key with the commandcat .ssh/id_rsa.pubcommand. Be sure you get id_rsa.pub, your public key. Never share your private key. You should see something like this:5$ cat .ssh/id_rsa.pubssh-rsa AAAAB3NzaC1yc2EAAAADAQABAAABAQDXop3G8XgYLfzLIIuhlb9trPUdkaCd6r55unvM2mQfpielbZdoc8xTpslV9uuEKNjdjzjc7iXiAwLK2NtGiPHP0YhGQQYfX//hrabvRclFrO/y1Z4LmTsOHHh3aUCc7snQYfJS5wxOSS37j4uymeQD3/tthgSodpAFTlz2uNGzTZzXjbapwWR7u6oDIkovKD0cQxy+o8lFnkNlPy0RuDryUl267UaLaI6asNXxj4EzayTKfKOYEIxe3m+mLomt5rAnoDuVi2rMWeRhBbY0DOhptithP1im5wwpouBIsu01QhaFHNqvG8jOy9BJd0Jz+63yJJMC1AjizpV5jTBchAfX wendyw@wren - Select and copy the text shown by the
catcommand (but not including the command prompts). (Don’t copy the key from this web page – it won’t work!) - Paste the text in the Key text box back in Bitbucket in your browser, then click add key.
- Bitbucket should now list the key and send you an account security update email.
Configure Mercurial
Do this once per local account per student. (e.g., once for CS Linux machines, once for Wellesley Macs,4 once for your laptop, once for the wx appliance, etc.)
(This probably requires translation if you are trying to do this on Windows.)
To make sure your name appears correctly in your work, use a text editor to create and save the file ~/.hgrc (that ~ is the squiggly tilde character, which refers to your home directory) to add your name and email (not Wendy’s) in the following format:
[ui]
username = Wendy Wellesley <wwellesl@wellesley.edu>
merge = internal:merge
We also added a line to tell Mercurial to do simple merging, but we will not get to that for a while.
Set EDITOR
Do this if you are not on the CS Linux machines or the wx appliance. (Probably requires translation for Windows.)
Unless you have already configured the $EDITOR environment variable in your shell, set it now so that hg will use a text editor you know when it asks for commit messages. Edit/create and save the file ~/.profile (again, that’s a text file .profile in your home directory) to add:
export EDITOR=emacs
(Or replace emacs above with your favorite editor.)
Mercurial Solo Basics
This section introduces Mercurial and explores skills for simple solo use of Mercurial. The next section discusses collaboration and other more advanced issues.
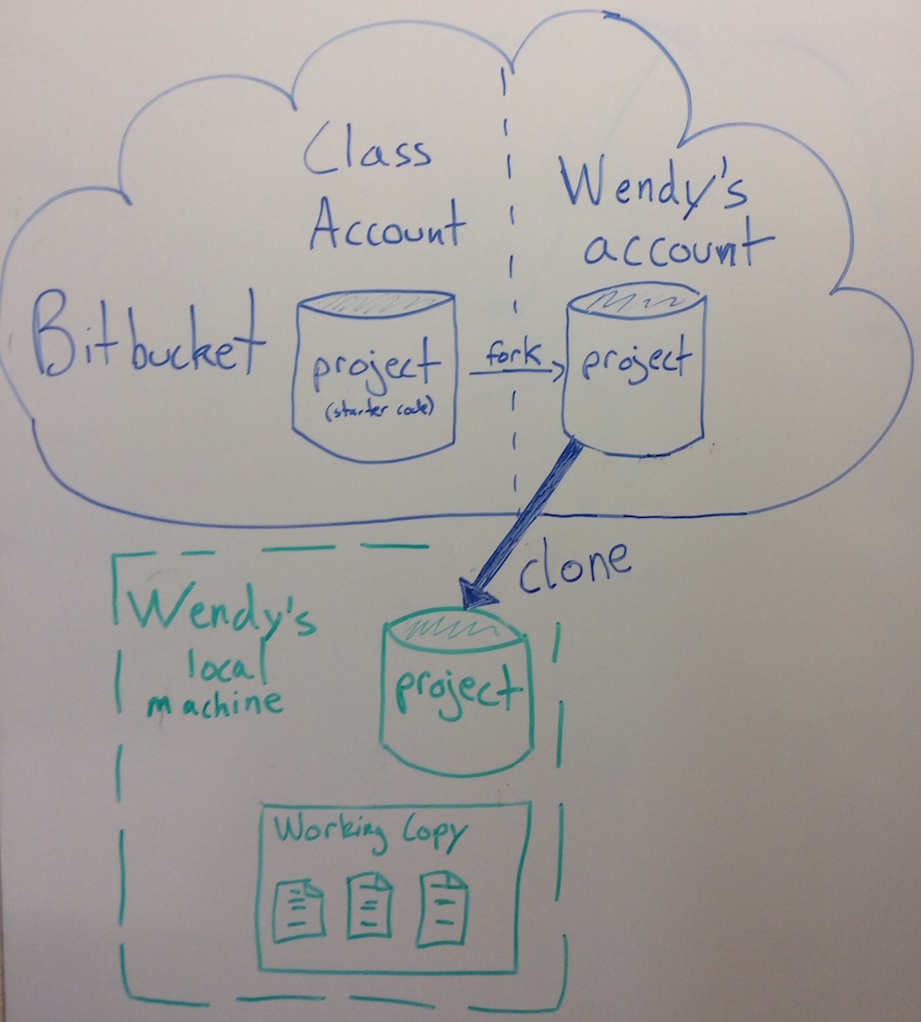
Get a repository
In CS 251 you will set up a repository in two steps:
- Fork the relevant starter code repository to create your own Bitbucket repository for the assignment.
- Clone this repository to get a local copy for work.
(For other purposes outside CS 251 assignments, a new local repository may be created in the current directory with hg init. Do not do this for the purposes of this tutorial.)
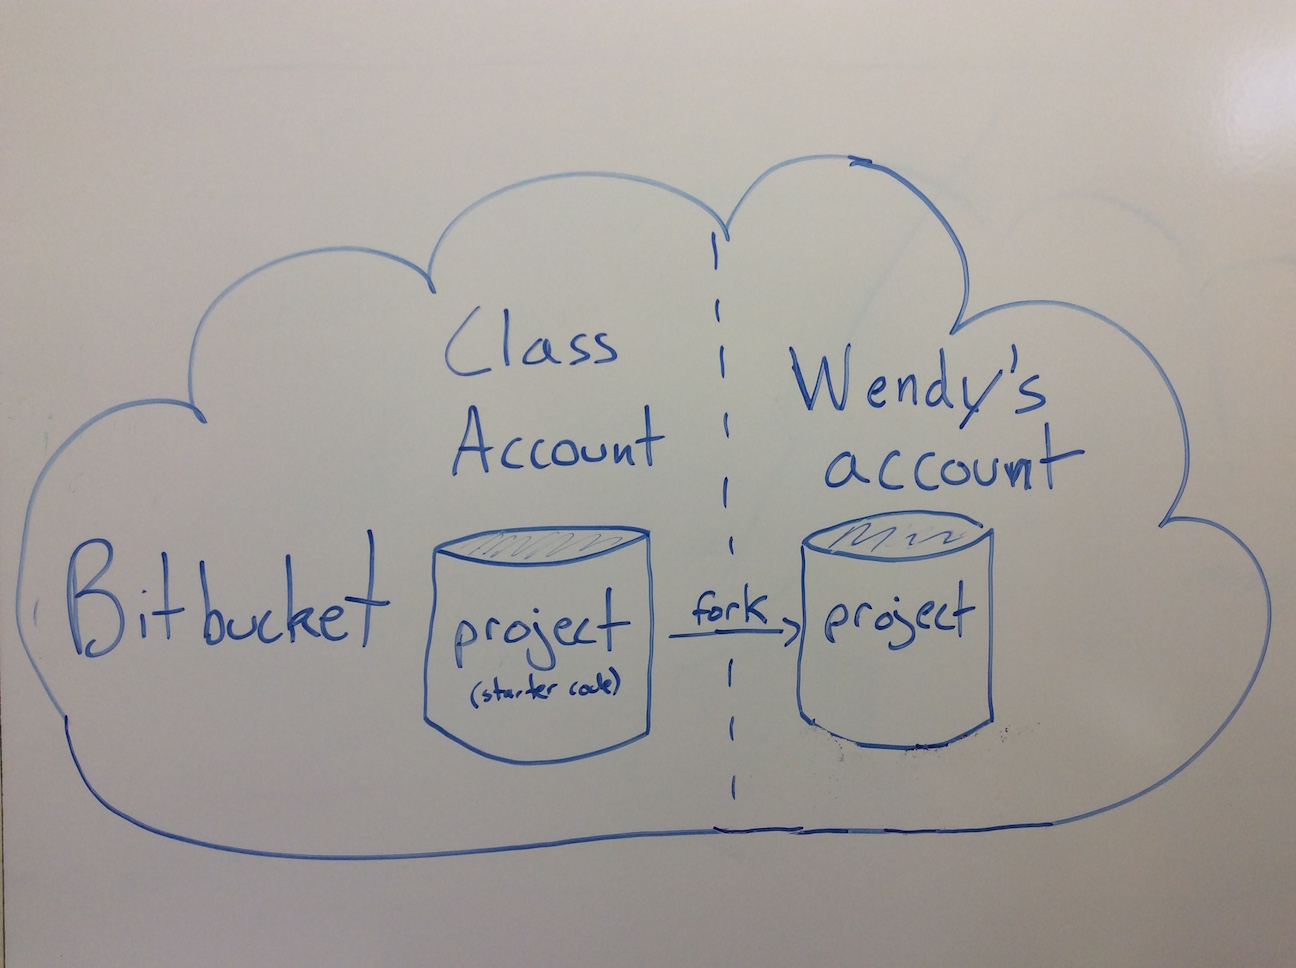
Fork starter code
Do this part once per assignment per team.
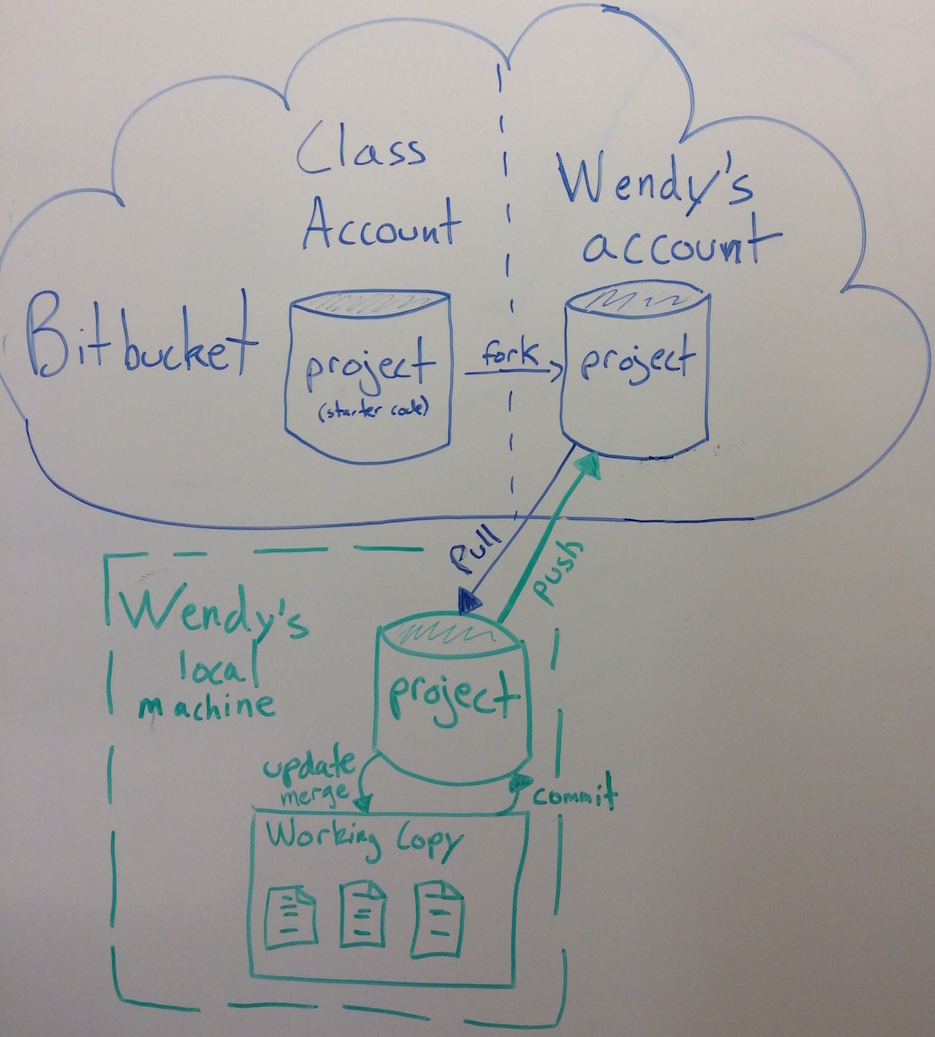
To start an assignment, make your own copy of the starter code repository on Bitbucket. (Bitbucket calls this a fork.6) This “fork” repository will support collaboration with your team (if any) and collection of your work by the course staff. This copy is separate from the original starter code repository, since each student (or team) needs a separate place to store (and submit) their work. It is stored remotely with Bitbucket instead of on your own computer because it will be shared by team members and instructors who may not have access to the same local computer account you use.
This guide follows the cs251-halt repository as an example.
- Click the wellesleycs251 / cs251-halt repository on Bitbucket.
- You should now see a (boring) overview of the repository.
-
Hover over the
...in the upper left or click the>>in the lower right to reveal several actions, and click Fork.As an alternative to these first few steps, just click this link: fork wellesleycs251 / cs251-halt. We plan to put a link like this in each assignment’s description for convenience.
- Click Fork repository to accept all the defaults and create your own copy of the
cs251-haltrepository. Please do not change its name here, dull as it may be. - On your Bitbucket
cs251-haltpage, click the gear in the left sidebar to open settings for the repository, then click Access management. Use the Users section to give the CS 251 staff Admin permission on your repository. Our Bitbucket usernames are: fturbak. - If you are working with a team on this assignment, give your team members Admin permission.
- Do not grant access to anyone other than the course staff and your team (if any).
hg clone
Do this once per assignment per student. This step will make a copy of your repository on your local machine. You will use this copy to make and save changes.
These steps follow an archetypal CS 251 student with Bitbucket username wendyw and the CS 251 cs251-halt starter code repository. $ indicates a command prompt in the shell.
On your local machine, open a shell, create or navigate to a directory where you would like to store CS 251 assignments (~/cs251 is a great choice), and then clone your Bitbucket repository. Replace wendyw with your own Bitbucket username.
$ mkdir cs251
$ cd cs251
$ hg clone ssh://hg@bitbucket.org/wendyw/cs251-halt
requesting all changes
adding changesets
adding manifests
adding file changes
added 2 changesets with 2 changes to 2 files
updating to branch default
2 files updated, 0 files merged, 0 files removed, 0 files unresolved
The hg clone command copies the entire revision history of wendyw’s Bitbucket repository cs251-halt to the local machine and constructs a working copy of the latest revision in a directory of the same name, inside the current directory.
$ ls
cs251-halt
Inspect history
You should now have a clone of the cs251-halt repository along with a working copy on your local machine. The next few parts will use only on your local copy of the repository. We will not interact with your Bitbucket repository again until pushing changes.
Change directory into the working copy base directory and list its contents.
$ cd cs251-halt
$ ls
halt-racket.txt extra.txt
Remember, these files are the working copy, currently a snapshot of the latest revision of the repository, but they tell you nothing about the revision history, which is hidden away.
hg log
Run the command hg log to obtain a summary of the revision history. (Yes, actually run it!) The output is a log of changeset records.
Each changeset has two number identifiers separated by a colon. The large right-hand number in hexadecimal notation is a permanent, unique changeset ID for the changeset. The smaller left hand number is a local revision number in place simply for easier reference than the large hexadecimal changeset ID. The revision number is valid only within this clone of the repository.
Revision history often happens to be a linear (i.e., totally ordered) sequence of changesets, but is a directed acyclic graph (i.e., partially ordered) in general. Each changeset (except for the first) is descended from one or two earlier changesets,7 called its parents, representing the preceding version(s) of the repository. To see the order of changesets more clearly, run the command:
$ hg log --graphThe --graph option (or its shorthand -G) makes hg log draw the topological order of changesets, with parent and child directly connected by line segment. The working copy is the intuitive next changeset in the making, not yet recorded in history, so it does not show up in the log. It does have one or two parents, labeled by @ in the log. All other changesets are labeled by o.
The tag tip labels the changeset most recently added to this repository, though we ignore it for now.
Aside: inspect local repository in browser
Running hg serve and opening http://localhost:8000/ in a browser provides a graphical interface for inspecting revision history. When you’re done, type ^C (control key + C key) in your shell to terminate the hg serve command.
Commit changes
While editing the working copy, it is useful to inspect its differences with the most recent revision in the repository.
hg status
hg status compares the working copy to its parents to determine what files have been changed in the working copy. Try it!
$ hg statusNotice that the command did not show any output. This means the working copy is identical to its parent, the “latest” revision in history: nothing in the working copy has been changed.
Let’s make a change. Add your name in a comment at the top of halt-racket.txt and save it. Now check again to see if Mercurial has noticed your changes.
$ hg status
M halt-racket.txt
M halt-racket.txt indicates that halt-racket.txt has been Modified since the last revision.
hg diff
hg diff shows the exact difference between the current working copy and its parent revision. Lines prefixed by + are additions; lines prefixed by - are deletions. Did Mercurial detect your change?
hg commit
hg commit records the current working copy as the latest revision in the local repository. (It does not affect any other repositories.) It will open an editor (specified by environment variable $EDITOR) to record a commit message describing the revision. Sometimes it is faster to give the message on the command line with --message or its shorthand -m:
$ hg commit --message "Added name to halt-racket.txt"No output means success. hg status should show no changes. The output of hg log --graph confirms that a new changeset with your commit message has been created and marked as the parent (@) of the working copy.
Without extra arguments, hg commit commits all changes to all tracked files in the working copy. hg commit FILE or hg commit -m "message" FILE record revisions including changes to FILE only. (Any number of specific files may be given.) This (and the record extension) are helpful for recorded several distinct commits from a larger set of changes.
When to commit
The Commit Rule: one commit should record one logical, independent change – an atomic unit of work. Learning the right commit granularity is much like learning good code style. It comes with time and practice, and there’s rarely a single unassailable judgment of what constitutes a reasonable commit. A good proxy, for starters, is to try to avoid committing code that does not compile (Especially if working with others!), but to commit often enough that you will not lose signficant work if your working copy suddenly disappears and you need to revert to a previously committed version. For example, don’t commit a half-written function that will cause your program to fail to compile. Wait to commit until you have a compiling (if not fully implemented) function, or at least comment out the syntactically offending piece.
hg revert
Overwrite the file halt-racket.txt with something bogus. Hey, might as well delete it.
$ echo bogus > halt-racket.txt
$ hg status
M halt-racket.txt
$ rm halt-racket.txt
$ hg status
! halt-racket.txt
Well, actually, we need that file for some more examples. Mercurial sees that it is missing (! halt-racket.txt), so just hg revert halt-racket.txt to resurrect it.
$ hg revert halt-racket.txt
$ hg status
hg revert halt-racket.txt reverts halt-racket.txt in the working copy to whatever it looked like in the parent revision (even if you’ve just accidentally deleted it or spent 3 hours rewriting it in a way you now regret). If a modified version exists in the working copy, Mercurial makes a backup of it in halt-racket.txt.orig, just in case you regret the revert. hg revert modifies the working copy only, not the revision history.8
Add and (re)move files
Mercurial repositories track revisions to files only if they are explicitly added to the repository.9
Create a new file, README, with some lucid, insightful note inside, and then try to run hg commit to commit it.
$ hg commit
nothing changed
README is untracked, so hg commit ignores, although hg status does see it, and that it is untracked (?).
$ hg status
? README
hg add
Run hg add README to mark README for addition to the repository on the next commit. This command does not commit anything to the repository now.
$ hg add README
$ hg status
A README
The status A indicates README is marked for addition, which constitutes a change since the last revision. hg diff agrees, showing a difference that is the entire contents of README. Run hg commit to commit a new revision including README.
Mercurial tracks files, not directories, so you cannot add an empty directory, but you can add a non-empty directory, which will add of the files in that directory (and recursively in any subdirectories).
hg forget, hg remove
To complement hg add, hg forget README stops tracking README but leaves it untouched in the working copy. hg remove README (or hg rm README) stops tracking README and immediately removes README from the working copy. Like hg add, the effect of these commands is not recorded in the revision history until the next commit. hg status shows R for files marked for removal. hg forget and hg remove do not remove README from existing revisions, only from the next revision and beyond.
hg rename / hg move / hg mv
hg rename A B (or hg move or hg mv) renames (moves) a tracked file A to be tracked under a new name B. Like hg remove, the effect is not recorded in the revision history until the next commit, but is reflected immediately in the working copy.10 If you move a tracked file yourself, Mercurial notices:
$ mv README README.txt
$ hg status
! README
? README.txt
You could undo your mistake and then do it the right way (mv README.txt README; hg mv README README.txt) or just mention it after the fact: hg mv --after README README.txt or hg mv -A README README.txt
Push changes
So far, we have cloned a remote repository and committed some changes to our local clone. We have not yet modified the Bitbucket repository wendyw / cs251-halt. Even if you don’t have any collaborators sharing your remote repository, it’s good to push your new local revisions to it reasonably often, if only as a backup. (What if your computer hits a meteorite, for example?)
hg push
hg push copies local revisions that are not in a remote repository to that remote repository. hg outgoing lists these revisions without pushing them. By default, both use the remote repository from which the local repository was cloned.11
hg push your changes to your Bitbucket repository now.
When working with others, pushing may require more work first, but works fine alone.
Submit work
To collect your assignment, the course staff simply clone your Bitbucket repository for the assignment. To submit your work, you have nothing more to do beyond pushing your final revision to this repository. Here are three rules to make sure all goes well:
- Make sure you have given the course staff access to the relevant Bitbucket repository, as described above.
-
Make sure you have committed and pushed your latest changes to this repository! Here are two ways to check:
hg statushas empty output andhg outgoingindicates no changes found.- The Bitbucket page for your repository shows the revisions you want to submit. In the left sidebar, click Commits to see the revision history.
Workflow
Review the quick reference for a workflow summary.
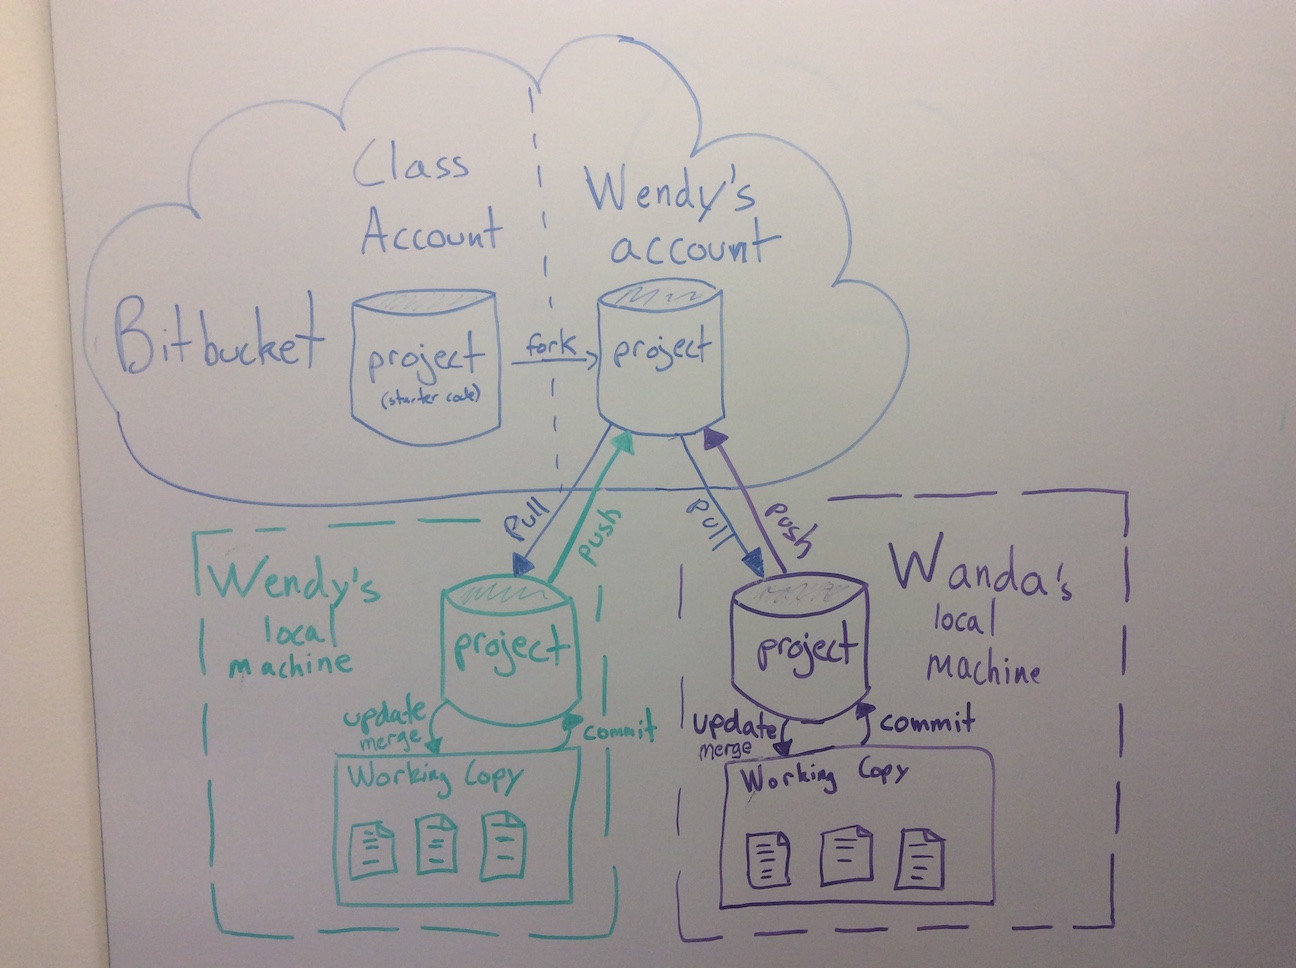
Mercurial Team Basics
To work with a team, each team member clones the Bitbucket repository and pushes and pulls revisions through it.
We need a few more commands to make this work: hg pull acquires new revisions from a remote repository; hg incoming shows them but does not acquire them; hg update or hg merge integrate them with local revisions. As discussed earlier, hg push shares local revisions with a remote repository.
In this section, work with a partner who also has access to your Bitbucket repository. We will call the Bitbucket repository owner Wendy and her partner Wanda. (It’s OK if Wendy and Wanda are the same person.)
To get started, say “Wendy and Wanda” 10 times fast.
Wanda Make a new clone (not a fork) of the Bitbucket repository that is separate from Wendy’s local clone. It’s OK if they’re on the same computer and even if they’re both in Wendy’s local account. They just need to be separate directories.
Get remote changes
hg pull
hg pull brings new revisions into the repository, but does not touch the working copy.
Wendy After Wanda has cloned the repository, commit and push a new change to Bitbucket.
Wanda Run hg pull to get Wendy’s changes.
$ hg pull
pulling from ssh://hg@bitbucket.org/wendyw/cs251-halt
searching for changes
adding changesets
adding manifests
adding file changes
added 1 changesets with 1 changes to 1 files
(run 'hg update' to get a working copy)
Note the last line of output – before acting on this, examine the state of the repository. First, look in your working copy at the file Wendy changed. Do you see the change? Second, run hg log -G and look for the @. (Remember, this marks the revision that is the parent of the working copy.) Note that Wendy’s recent revision comes after the revision that is the working copy parent.
hg pull brings new revisions into the repository, but does not touch the working copy.
hg update
hg update updates the working copy to the most recently added revision.
The Update Rule: commit before updating.
Wanda Make sure all of your working copy changes are committed (check hg status). Then run hg update (or hg up for short) to update your working copy with Wendy’s recent revision as the the hg pull output suggested.
$ hg update
1 files updated, 0 files merged, 0 files removed, 0 files unresolved
Wanda Now check for Wendy’s changes in the working copy and find the working copy parent in hg log -G once more. Which revision is the parent (@) of the working copy?
The Update Rule: commit before updating. hg update changes your working copy. If you have uncommitted changes in your working copy, you might lose them by updating. Committing your changes first means you can definitely restore your current working copy later. More generally, each commit should be a small, distinct unit of work. Updating to include other revisions in the middle of creating a new change breaks this independence.
Merge divergent changes
Wanda Edit the first line of halt-racket.txt and hg commit your change. hg incoming to see if Wendy has pushed any more changes. (She has not.) hg push your change to Bitbucket.
Wendy Edit halt-racket.txt to add a new line of text at the end of the file, then hg commit your change. Next, hg pull to get any changes Wanda has pushed.
$ hg pull
pulling from ssh://hg@bitbucket.org/wendyw/cs251-halt
searching for changes
adding changesets
adding manifests
adding file changes
added 1 changesets with 1 changes to 1 files
(run 'hg heads' to see heads, 'hg merge to merge)
(She has.) Now, try hg update to update your working copy with Wanda’s changes.
$ hg update
abort: crosses branches (use 'hg merge' or 'hg update -C')
hg update refuses because Wanda’s changes do not follow Wendy’s in history; they happened concurrently, in different branches of history, or roughly, “in an unknown order.” If we blindly replace Wendy’s working copy with Wanda’s new revision (that’s what hg update -C would do), we will just start using Wanda’s revision instead of Wendy’s revision, which is not what we want.
Wendy Examine the structure of history with hg log -G and note the following:
- Wendy’s working copy still has a single parent (
@), and it is the same as before pulling Wanda’s changes. One more time:hg pulldoes not touch the working copy (and neither doeshg updateif it fails – you can verify that withhg status). - There are two heads, i.e., revisions with no children. This indicates that history has split into two divergent branches. You can also use
hg headsat any time to see just the heads.
To get both Wendy’s changes and Wanda’s changes at the same time, we must merge them.
hg merge
hg merge merges revisions from another branch of history into the working copy.
The Merge Rule: commit before merging and commit immediately after merging (and resolving any conflicts). The changeset including a merge should include only changes immediately related to merging.
Wendy As hg pull originally suggested, we will (not yet) run hg merge to integrate Wanda’s changes into Wendy’s working copy without losing either set of changes. But first, make sure any outstanding changes are committed. Check hg status for that. All clear? Now merge:
$ hg merge
merging halt-racket.txt
0 files updated, 1 file merged, 0 files removed, 0 files unresolved
(branch merge, don't forget to commit)
Look at the summary: changes to halt-racket.txt were merged. Take a look at halt-racket.txt, then step back and take a moment to think how awesome that is!
Are you back? We have a bit more to do.
To support the merge, the working copy now has two parents, the ends of the two divergent branches of history. Run hg log -G and look for @ to see this. (You can also run hg parents at any time to see just the parents of the working copy or an arbitrary revision.)
Wendy As the output of hg merge helpfully reminds us, Wendy should immediately hg commit this merged revision before making any new changes.12
Wendy Run hg log -G again to see how this merge and commit affected history. We are now back to one head (revision without children) and it is the parent of Wendy’s working copy. History has become a directed acyclic graph, but we have reconverged on a single history containing both Wendy’s and Wanda’s changes.
Perspective
Consider: in a few commands, hg accomplished the entire tedious process of copying Wanda’s files to Wendy’s computer, painstakingly determining which files have been updated by each person, and getting the newest revision of each file in place. In fact, it can merge changes in different files and even in different parts of the same file. Wow!
Excitement aside, it is important to remember that, while highly useful, automated merging is not magic nor is it a license to edit haphazardly without coordinating with your team. Even when a merge succeeds at a textual level, the end result may not be meaningful. This means it’s still important to:
- communicate with your teammates about what everyone is editing so you know what to expect from merges; and
- do some testing or other sanity-checking on the result of a merge.
Resolve conflicts
Note: this part may depend on the merge = internal:merge entry in the Mercurial configuration we did above. Without this configuration option, Mercurial may use merge facilities in other programs on your system not described here. It may or may not be easier to navigate.
Two divergent changes to the same lines in a file constitute a conflict that cannot be merged automatically. Mercurial is good, but it cannot read your team’s collective mind to decide what to do with a conflict, so it asks you. Try it:
Both Wendy and Wanda
Edit the first line in README to hold different text (i.e., Wendy’s revision and Wanda’s revision should differ in the first line). hg commit that change.
Wendy hg push.
Wanda hg pull and hg merge, then observe:
$ hg pull
pulling from ssh://hg@bitbucket.org/wendyw/cs251-halt
searching for changes
adding changesets
adding manifests
adding file changes
added 1 changesets with 1 changes to 1 files (+1 heads)
(run 'hg heads' to see heads, 'hg merge' to merge)
$ hg merge
merging README
warning: conflicts during merge.
merging README incomplete! (edit conflicts, then use 'hg resolve --mark')
0 files updated, 0 files merged, 0 files removed, 1 files unresolved
use 'hg resolve' to retry unresolved file merges or 'hg update -C .' to abandon
Note several cues in the output: Mercurial tried to merge, but Wendy and Wanda made conflicting changes, so there’s no obvious way to merge and preserve both of their changes. Instead of doing something arbitrary, Mercurial did the following:
- Put the pre-existing working copy of
READMEinREADME.orig. - Annotate conflicts in
READMEusing special notation. - Mark
READMEas unresolved, such that we cannot commit until explicitly resolving the conflict.
Opening up README, we see something like this:
<<<<<<< local
This is the read me edited by Wendy and awesomified by Wanda.
=======
This README was created by Wendy.
>>>>>>> other
<<<<<<< local, =======, and >>>>>>> other delineate conflicting revisions. The first is from the local working copy. The second is from the other competing revision.
To resolve the conflict, edit the file to remove these markers and save whatever final contents you wish. Then, run hg resolve --mark README to mark README as resolved. Mercurial will refuse to commit if unresolved conflicts remain, to prevent accidental commits of a file full of unmerged conflicts and <<< === >>>.
Finally, live by the merge rule: commit immediately once you have finished merging (and resolved any conflicts), and before making any unrelated changes. The changeset including a merge should include only changes immediately related to merging.
$ hg resolve --mark README
(no more unresolved files)
$ hg commit -m 'Merged README updates'
The Merge Rule: commit before merging and commit immediately after merging (and resolving any conflicts). The changeset including a merge should include only changes immediately related to merging.
Push changes
To complete the cycle, push your changes (especially if you just merged) to share with your team. If another teammate has pushed changes to your Bitbucket repository since you last pulled, you will need to pull and merge those changes before you can push. Mercurial detects this case.
$ hg push
pushing to ssh://hg@bitbucket.org/wendyw/cs251-halt
searching for changes
remote has heads on branch 'default' that are not known locally: 4fc62a727627
abort: push creates new remote head 985ebfbdedf3!
(pull and merge or see "hg help push" for details about pushing new heads)
Take Mercurial’s first suggestion (pull and merge). Do not try to “push new heads.”13
Once your local repository is up-to-date with the remote repository, the push will succeed.
$ hg push
pushing to ssh://hg@bitbucket.org/wendyw/cs251-halt
searching for changes
adding changesets
adding manifests
adding file changes
added 2 changesets with 2 changes to 1 files
Other merge tools
Mercurial can be connected to many other tools (including modes in Emacs and vi) that allow you to review conflicts one at a time and click or type a keyboard command to select one version or another, or type in a new one. See other resources for more.
Workflow
Review the quick reference for a workflow summary.
Other Resources
Mercurial
hg help(online) orman hg(online)- Learn Mercurial
- Mercurial: The Definitive Guide, especially chapters 2, 3, 5, 9
- Mercurial Tutorial, especially 3, 4, 5, 8, 9
- Mercurial Kick Start
- Hg Init: a Mercurial Tutorial (Uses Windows, but still useful for other platforms if you ignore file path syntax and non-
hgcommands) - The simplified Mercurial FSM in my head
Bitbucket
- Bitbucket Documentation (sometimes with a git focus, but most things are pretty similar)
- Bitbucket repository extras:
GUI Mercurial clients
- SourceTree, installed on CS lab Macs.
- TortoiseHg
- others
Other systems
There are many version control systems available. Some are more widely used (e.g., git); others have more interesting theoretical underpinnings (e.g., darcs). We chose Mercurial for CS 251 since it is widely used and has a relatively simple, predictable, and principled interface that is often considered the easiest among its peers for new users to learn quickly.
-
Mercurial stores history as differences between versions, rather than snapshots of versions. Each can be reconstructed from the other. ↩
-
Mercurial terminology usually refers to this “next changeset in the making” as the working directory, but we use the alternate term working copy to avoid confusion with the notion of working directory in the shell, as in
pwd. ↩ -
The clever Mercurial designers are apparently amateur chemists! ↩
-
Actually this will not work nicely with the way LTS configures their Macs. ↩ ↩2
-
In fact it’s just a special case of the clone operation discussed later, where both the source and destination are on Bitbucket ↩
-
Hence the history DAG has maximum out-degree 2, where edges are directed from child to parent. ↩
-
For more advanced time travel, learn about merging, then consult documentation about hg update. ↩
-
There are many good reasons to track only explicitly added files. One is that compilers and other tools create a lot of automatically generated files that are derived purely from other files in the repository. ↩
-
hg renameis actually justhg copy(hg cp) followed byhg remove. I cannot recall usinghg cp, but I usehg mva lot. ↩ -
Actually you can change that:
hg help paths. ↩ -
More generally, a commit containing a merge should only contain additional edits if those edits are necessary to make the merged revision correct. (Look ahead to conflict resolution to understand this.) ↩
-
There are times when this is desired, but if that time is now, you’re beyond the level of this document anyway. ↩