This reading covers the concepts behind Ajax and JSON, and why they fit together, and then explores a particular example, with code. We won't cover all aspects of Ajax and JSON, but we'll see more later in the course.
What is Ajax? Why should we care?
It can be successfully argued that no single technology shift has transformed the landscape of the web more than Ajax. The ability to make asynchronous requests back to the server without the need to reload entire pages has enabled a whole new set of user-interaction paradigms and made DOM-scripted applications possible.
Bear Bibeault & Yehuda Katz
jQuery in Action, 2nd edition
Ajax is a technique where a user's interaction with the page causes some JavaScript to run, which connects (asynchronously) to a server to retrieve some information, and then the page is updated with the results. It's the essential functionality behind such many nice web applications, such as:
Ajax can be used in two main modes, which also correspond to the methods of an HTML form.
likebutton on Facebook, that information is sent to the back end, updating counters on Facebook's servers.
Of course, these ideas can be combined, so when you like a Facebook post, it not only increments the counters in the back end, but returns the new value (which might include increments from other people), and your browser can update the number of likes that you see.
The difference between a normal form submission to the back-end and a submission via Ajax is that the response from a normal interaction has to be the entire web page, while with an Ajax interaction, the response might be only the relevant information, such as "your message was sent" or "the number of likes is now 25." That smaller payload is quicker to load over a network, and (usually) less of the page needs to be re-renderered.
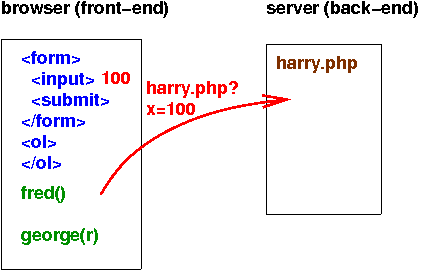
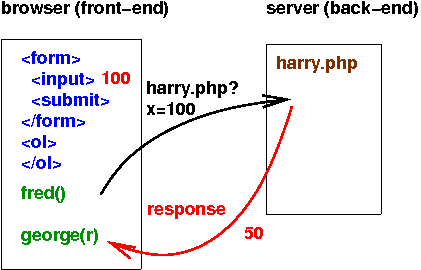
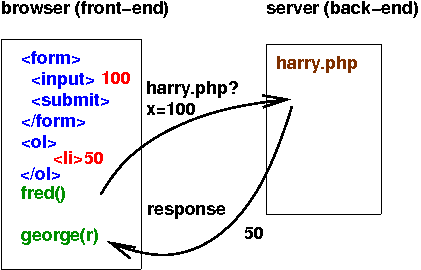
Consider the following slideshow on Ajax interaction. Here, the HTML part of the page is in blue and the JavaScript is in green. Click on the links below to go to that slide. The context of this slideshow is that the back-end is computing some values for us, based on values from the browser. In this example, we are sending the number 100 and getting the number 50 back. (The example uses PHP in the back-end, but it could just as easily be Flask.)
The harry.php script does the computation. The JS function
in the browser that sends the data (the number 100) is
named fred(), and the JS function that receives the
response (the number 50) is
named george(). The george() function
inserts the number 50 into a list on the page.
An alternative explanation that you're welcome to consult is this gentle introduction to Ajax.
There's an important concept depicted in that interaction, namely the
notion of a callback. When the user clicks the button, the
function fred() runs immediately, sending the data to the
server. However, the response from the server is not immediate. It
could take tens of milliseconds or longer for the response to arrive.
We don't want fred() to wait around for the response; that
would lock up the browser, allowing nothing to proceed until the
response arrives. If we did this, which is possible, the interaction
is called synchronous. Normally, however, the processing
is asynchronous. What that means is that fred()
tells the browser:
When the response arrives, invoke the function
george()with the data
The fred() function can then finish, returning to its
caller, and the browser proceeds.
Once the response arrives, whenever that is, george() runs
and does whatever we want done with the response. In this example, we
wanted it added to a list of results on the page.
The response from the back-end can come in many forms. In our example above, it was just a number. In general, it could be snippets of text or HTML to insert onto the page. It could be XML to be processed (this is the X in the acronym AJAX). Nowadays, it's most likely to be JSON. Let's take a detour to talk about this kind of data.
JSON, the JavaScript Object Notation, is a new standard for information interchange between programs, competing in the same market niche as XML. Ajax will allow us to get data from the back end, typically formatted as JSON. So, let's see how JSON works.
JSON is a subset of the JavaScript language, omitting things like function definitions. It's intended to comprise hierarchical data, like arrays and objects, and non-compositional data like numbers, strings, and booleans. Here's an example that we've seen before:
{"title": "Dr. Zhivago",
 "tt": 59113,
 "year": 1965,
 "stars": ["Omar Sharif", "Julie Cristie", "Geraldine Chaplin"],
 "isGreat": true,
 "director": {"name": "David Lean",
              "nm": 180,
              "birth": "1908-03-25"},
 "IMDB rating": 8.0}
Note that values can be scalars or compound; here we have an array literal of strings for the stars and an object for the director.
See JSON.org for more. That site also has a ton of info on packages and modules to process JSON notation in a variety of languages.
JSON notation comprises the following:
Modern JavaScript implementations come with two functions that are useful for working with JSON:
JSON.stringify() function turns a data
structure into a string.JSON.parse() function turns a string back
into a data structure.Thus, if the back-end wanted to send us some complex data, instead of a simple number, sending it as JSON makes it easy to work with.
For the rest of this reading, we'll look at a series of examples using a database of moderately sized text strings. We'll limit them to 140 characters. We'll call these Brief Lexical Emissions And Transmissions or BLEATS. (Any resemblance to tweets is purely intentional.)
There are two main interactions we want:
We'll also add a feature where we can like a bleat, as with Facebook.
The JSON response will be an array of objects, each of which as a few properties:
[{"bid":"1","likes":"63","bleat":"This is the first bleat; it never expires"},
 {"bid":"2","likes":"14","bleat":"More whining and complaining"},
 {"bid":"3","likes":"210","bleat":"That's okay, the sun'll come out tomorrow"}]
As you can see, each bleat has an ID, some text, and a number of likes. The ID will be useful when the user likes a bleat, because the request to the back end will have to specify which bleat the user just liked.
Here are two non-Ajax forms to work with the database. The response is always an entire page.
For practical reasons, we'll set all but three of these bleats to expire one hour from the time they are inserted. You'll be able to insert a bleat, but it won't hang around forever. This keeps the number of bleats fairly small, and also means that random people from around the world reading this page and inserting bleats won't have much incentive to try to abuse the database. (If that happens, I'll have to limit this example to on-campus use only.)
Here's the conventional form to insert a bleat, but changed to use a back-end script suitable for use with Ajax. Later, we'll add some action to that second button.
<form method="post"
      action="https://cs.wellesley.edu/~cs304/php/bleats/insert-bleat-ajax.php">
  <p><label for="bleat_text">bleat text</label>:
  <p><textarea id="bleat_text" name="bleat" rows=3 columns=60></textarea>
  <p><input id="ajax_button" type="button" value="add bleat ajax">
</form>
Try it: form1.html Notice the URL when you submit (the form uses GET) and notice the response.
When we used insert-bleat-ajax.php, we saw that the result
was not at all what we expected. It wasn't a web page, it was some JSON
data.
With Ajax, we have two steps:
Let's do these in order.
The jQuery library makes Ajax much easier. The essential step is using one of the following methods:
Notice that there's no selector here; the functions are used like this:
$.get(url,data,success,datatype);
$.post(url,data,success,datatype);
All arguments except the first are optional. The second argument allows you to send arbitrary form data, encoded as a string (like the URL encoding we saw earlier in the semester when we learned about forms). Let's turn now to that topic.
In computer science, taking a data structure and turning it into a string (typically in an invertible way) suitable for storing or transmitting is called serialization. Here, we're going to take the collection of inputs (name/value pairs) in an HTML form and transmit them to the back end.
In general, a form with inputs named foo
and bar with values 3 and hello
respectively can be URL encoded like
this:
foo=3&bar=helloHowever, there are lots of sticky situations, like what if the names or values contain equal signs or ampersands or other special characters. What about the space character? (URLs should not have spaces.)
Fortunately, the jQuery library includes a method for serializing a form, returning the result as a string:
Unless you are doing something fancy, it's easiest just to serialize the whole form, as the jQuery documentation suggests.
The example below demonstrates
alert() to show that it worked,
Without further ado, here's the code:
  $("#ajax_button").click(function () {
      $.post("https://cs.wellesley.edu/~cs304/php/bleats/insert-bleat.php",
             $("form").serialize() );
      alert("done");
  });
Here's the working example: ajax1.html. Note that you won't be able to tell if the submission has worked, because the Ajax request doesn't cause the page to be replaced. Therefore, we added a link to show the current bleats.
We've used the .get() and .post() methods
with two arguments, the url and the data. It's time to
add a third argument, the success handler, which is a kind
of callback. A callback is a function (often an
anonymous function literal) that is
If you give "json" as the fourth argument to
the .get() or $.post() methods, the response
text will be parsed as JSON for you and the callback will be invoked
with the JavaScript object, rather than a string.
Note that jQuery will sometimes be clever and allow you to omit arguments, so the ordinal numbers may be off. See the examples in the documentation of the methods:
Let's modify our example so that after the response from the server is
received, we insert some text that says that the bleat was
saved. We'll even have the message fade out after some time (like
Google Docs does), using the built-in
JavaScript setTimeOut function, which invokes a function
after some number of milliseconds.
In this solution, I made the callback function a separate named function. This allows me to test it easily without sending lots of bleats. Here's the callback function:
function reportSuccess () {
    var now = new Date();
    console.log('success at '+now);
    $("#response").text('saved at '+now.toLocaleString())
                  .show();
    setTimeout(function () {
                  $("#response").fadeOut('slow');
               },
               3000);
}
Showing the "saved at ..." text is done by the jQuery show() method, and the text is later faded out and hidden by the fadeOut() method.
Next, we modify our .post() method to include
the reportSuccess() function as the success callback:
$("#ajax_button").click(function () {
    $.post("https://cs.wellesley.edu/~cs304/php/bleats/insert-bleat-ajax.php",
          $("form").serialize(),
          reportSuccess); // end of .post args
});  // end of .click call
Here's the working example: ajax2.html Be sure to wait long enough to see the text fade out.
We said that the callback function is invoked with the response from the server, but notice that our callback is ignoring the data. (In JavaScript, you can invoke a function with more arguments than it wants; the extra args are just ignored.) We'll fix that in a moment.
Here's an improved page that automatically displays all the bleats, and also adds the new bleats to the page when they are sent. The form uses a different back-end action, and the Ajax response from that action returns the BID only. (This improved page does not get any bleats that other users have sent since the page was loaded; that's a topic for another time.)
We can also make a page dynamic via event handlers. What we're going to do is add a click handler such that when you click on a bleat (the whole LI that encloses the bleat, which we've drawn a border around using CSS). However, that's a little bit trickier than our earlier event handlers.
We could add a click handler to each bleat on the page, which might be 30 event handlers (or 300). We'd also have to remember to add a click-handler anytime new bleats were added to the list. This is inefficient, error-prone, and can get to be confusing.
An improvement is to add one click-handler to an ancestor of the bleats, and allow the event to bubble up to one of a set of descendants that have delegated their event handling to the ancestor.
The event handler can use the this variable to know which
descendant bleat was clicked on.
We can add additional information to the targets by using new HTML5
data attributes. Any attribute starting with data- is
reserved for the user.
Let's see this in action. Here's a partial view of the DOM for this document:
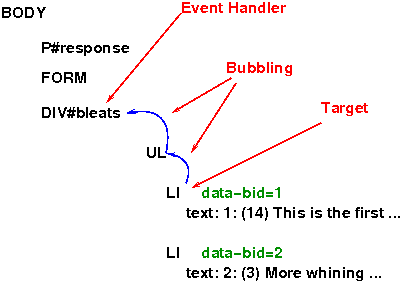
- The user clicks on a bleat (an LI). That's the event target.
- The click bubbles up
- The event handler at the
DIV#bleatshandles it
To implement this, let's work backwards, so before we worry about events and bubbling, let's first be able to like a bleat given its ID. To do that, we need some kind of API (via a GET/POST form) to like a bleat. That's done with the following URL:
https://cs.wellesley.edu/~cs304/php/bleats/like-bleat.php
If we POST a bid=nn pair to that URL, where NN is the
number of the bleat ID, the web app will increment the likes for that
bleat. The response is that complete list of bleats, as a JSON document.
Coding is best and most successful when we can code and test small units, so before we add an event handler to like any of an arbitrary list of bleats, let's first write code to like a particular bleat.
function likeBleat(bid) {
    $.post("https://cs.wellesley.edu/~cs304/php/bleats/like-bleat.php",
           {"bid": bid},
           function (num_likes) {
              console.log(`You liked ${bid} which now has ${num_likes} likes`);
           },
          "json"); // end of .post args
}
Note the JSON object on line 3, which is the second argument of
the .post() method, namely the data. The method will
serialize that JSON object and send it to the back-end for us.
You can invoke this function from the JS console to test it.
You can play with the function here: ajax4.html.
The previous example implemented a function to like a bleat, but it didn't connect that to any clicking. We'll do that now.
As we saw from the picture, earlier, we need to do the following:
data-
attribute. We'll have to modify the showBleats()
function to add that feature.
div#bleats element.
Here's how we will modify the showBleats() function to add
that attribute. The key line is line 8, where the .attr()
method is chained between the .text() method and
the .appendTo() method.
function showBleats(bleats) {
    var i, len = bleats.length;
    var listElt = $("<ul>");
    for( i = 0; i < len; i++ ) {
        var bleat = bleats[i];
        $("<li>")
             .text(bleat.bid+": ("+bleat.likes+") "+bleat.bleat)
             .attr('data-bid',bleat.bid)
             .appendTo(listElt);
    }
    $("#bleats").empty().append(listElt);
}
When we use bubbling to handle events, the element that has the event handler is an ancestor of the list item that the user clicked on. This is the event target.
This idea of letting a static ancestor handle all the clicks for its dynamic descendants is called event delegation in the jQuery library, and there's special support for it. A simple click handler can be done in either of the following two ways:
$("selector").click(function (event) { ... });

$("selector").on("click", function (event) { ... });
We'll use the on method, since it also allows delegation. For example, if I have a DIV whose ID is Fred, and I want to have something silly happen whenever we click on Fred, I can do this:
$("#fred").on("click", function (event) {
      alert("You clicked on Fred; how rude!"); });
A delegated click handler looks similar, but adds another selector, to choose which of the descendants we care about:
$("selector").on("click",
                 "descendant selector",
                  function (event) { ... });
For example, if I want to confine my silliness to just to LI tags that are among Fred's many descendants, I can do the following:
$("#fred").on("click"
              "LI",
              function (event) {
                    alert("You clicked on an LI descendant of Fred!"); });
Note that if I click on some other descendant of Fred, such as P or a DIV or anything at all, those will not trigger this event handler.
However, remember that DOM elements are in a tree structure, and that events bubble up the tree, so clicking on an EM inside a P inside an LI that is inside #Fred, will *also* trigger this event handler. The following DOM tree illustrates the setup.

fred
with some descendants that are LI elements. The LI elements that are
descendants of fred are marked with black outlines and
yellow background. If those elements, or their descendants (marked
with yellow background but no black outline) are clicked on, that will
trigger an event handler. Notice that the LI elements that aren't
descendants of fred are not yellow and won't trigger the
event handler.When the event handler function executes, the
variable this is bound to the DOM element that is the
descendant that triggered the event handler. So, in the example above,
the particular LI that was clicked on would be the value
of this. In the figure above, this would be one
of the circled LI elements.
$("#bleats").on("click",
                "[data-bid]",
                function (event) {
                      var bid = $(this).attr('data-bid');
                      console.log("clicked on BID "+bid);
                      likeBleat(bid);
                    });
The code above means
when there is a click on any descendant of#bleatsthat has adata-bidattribute (the CSS syntax[attr]matches every element that has that attribute), bindthisto the descendant and then run this function.
In the example, the function pulls out the value of
the data-bid attribute and uses it to do the liking. So the
event handler is almost trivial, since we've used modularity to hide the
details of liking, and event delegation to simplify the event
handling.
Here's the solution: ajax5.html. Open up a JS console and you can see the "clicked on BID " messages.
If you want to read more about event delegation, I suggest the jQuery API about the on method.
Ajax is very slick, but you have to have JavaScript in your browser to use it. Most people do, of course, but there are special screen-readers for the blind and other special web browsers for people who need assistive technology, and not all of those unusual web browsers have JavaScript. There may also be people who have chosen to turn JavaScript off for some reason.
You could decide that you just don't care about such people, but you don't have to. The idea of progressive enhancement is to start with a functional but old-fashioned, 1990s-style web application, with no JavaScript, and then use the power of JavaScript to convert the old into the new. Then, people without JavaScript just see the old version, and people with JavaScript see the new version.
How can you do this? One idea is what we saw earlier, where the
old-fashioned submit button was on the page, but now we
hide it using JS/JQ, replacing it with an Ajax-style submit button.
The action attribute in the form points to the
old-fashioned version (insert-bleat.php) while the Ajax
form submission goes to the new PHP code
(insert-bleat-ajax.php). A few little things like this
allow us to serve a wide audience.
Here's the previous example, re-written in the progressive enhancement style: ajax6.html
Here is the JS/JQ/Ajax code that adds the enhancement. The
non-enhanced form has a normal submit button and
an action attribute that goes to a normal response.
<script>
// Create Ajax button, attach function as event handler,
// and add button to form.

$("<input type='button' value='submit via Ajax'>")
    .click(submitFormAjax)
    .appendTo("form");

// Hide the existing non-Ajax button
$("#non-ajax-button").hide();
</script>
All along, we've seen that Ajax can do everything that old-fashioned forms can do, only nicer and more smoothly. However, that wasn't quite true. For security reasons, Ajax is restricted to referencing URLs that are in the same domain as the web page the JS is running in. This is called the same-origin policy.
This policy prevents JS code on a page you visit from pulling in
malware from other places, or sending your data hither and yon. The
policy doesn't apply to plain HTML forms: the ACTION can
specify any server anywhere, but with old-fashioned forms, you know when
you're clicking on a submit button, while Ajax could happen
without your being aware.
Later, we'll learn ways to work within this restriction, such as CORS
(Cross-Origin Resource Sharing), but for now it's sufficient just to be
aware of it. For example, the demos above will not work if you download
the source code and run them in locally or in Cloud 9, because then the
domain will not be https://cs.wellesley.edu/.
We've come a long way! We learned
We also managed to build a little application to submit and
like bleats
.
The following information is interesting and useful, but not essential. Feel free to skip it.
The next step is to process the response from the server, which in this case is a JSON-serialized data structure, namely the updated list of bleats. What we'll do is iterate over that list, inserting each into the document.
There are lots of ways to do this, but I recommend keeping it simple. (Later, we'll learn a technique called templating that will make it easier to use fancier markup.)
The suggestion above results in the page re-rendering up to 30 times, as each bleat is added. An improvement is to append each unattached list item onto an unattached list, and then attach the entire list to the DOM when you're done. Thus, the page is only re-rendered once. We'll do that.
Let's look at this in pieces. First, we'll implement a function that formats a list of bleats:
function showBleats(bleats) {
    var i, len = bleats.length;
    var listElt = $("<ul>");  // unattached
    for( i = 0; i < len; i++ ) {
        var bleat = bleats[i];
        $("<li>")
             .text(bleat.bid+": ("+bleat.likes+") "+bleat.bleat)
             .appendTo(listElt);
    }
    $("#bleats").empty().append(listElt);  // attach and re-render
}
Most of this is a conventional loop over an array of things. The code
creates some local variables, i and len and
then there's a for loop over the array of bleats.
Take note of line 3, though:
var listElt = $("<ul>");
That line uses jQuery to create a new UL element, but the element
is not attached to the document (yet). You can think of it
as being offstage
.
The code in the loop iterates over all the bleats, creating an LI element for each one, and appending it to the offstage UL.
Finally, the last line of code does all the magic: it finds the
container DIV for all the bleats, uses the .empty()
method to remove all its children, and then appends the
offstage UL element to the DIV. At that point, the
browser re-renders the page, and the user can see all the bleats.
Thanks to the argument, we can test that function with any list, rather than tying it to the Ajax call.
Next, we need to ensure that the showBleats() function
gets invoked with the response data. The code below uses a short
anonymous function as the callback. The callback has one argument,
which will be the parsed JSON response. (That is, we don't have to
invoke JSON.parse() ourselves.) The callback invokes our
unchanged reportSuccess() function. The callback also sets a
global variable, just to faciliate playing around with the data. In
production code, we wouldn't do that. Finally, it invokes
the showBleats() function.
Here's the code:
var global_bleats;

$("#ajax_button").click(function () {
    $.post("https://cs.wellesley.edu/~cs304/php/bleats/insert-bleat-ajax.php",
          $("form").serialize(),
          function (data) {
             reportSuccess();
             global_bleats = data;
             showBleats(data);
          },
          "json"); // end of .post args
});  // end of .click call
Now that we have a way to display a list of bleats, we should load and
display them when the page loads. By
implementing loadBleats() as a function, we can easily
test it or re-load the bleats. Then we just invoke the function at
the end of the file:
// Load list of bleats when page loads
function loadBleats() {
    $.post("https://cs.wellesley.edu/~cs304/php/bleats/list-bleats-ajax.php",
           showBleats,"json");
}
loadBleats();
Here's the complete solution: ajax3.html.
In the code for showBleats()
way above, we were just adding very simple things to the document, so
creating an LI and setting the text content is okay, but if you're
putting lots of data and creating a complex chunk of HTML, that coding
technique doesn't scale. Instead, it's better to use templates.
There many ways to do templating in a browser; I'll teach you one simple
way and later point you to some alternative and advanced techniques.
The basic idea is this: have one a master copy of some complex chunk of HTML in the document, then for each item you want to insert, clone the master chunk and insert the data into the clone, then attach the clone to the document.
Imagine we want to insert data like this:
var friends = [
   {name: "Harry Potter",
    address: "4 Privet Drive, Little Whinging, Surrey",
    house: "Gryffindor",
    pet: "Hedwig"},
   {name: "Ron Weasley",
    address: "The Burrow, Ottery St. Catchpole, Devon",
    house: "Gryffindor",
    pet: "Scabbers"},
   {name: "Hermione Granger",
    address: "??",
    house: "Gryffindor",
    pet: "Crookshanks"}]
We might put it in a structure like the following.
<div id="person-template">
  <div class="person">
    <p><span class="name">Name</span> is in <span class="house">house</span>
      house. Has a pet named <span class="pet">pet</span>. Home is
      <span class="address">address</span>
  </div>
</div>
We can debug the CSS rules using the template and the sample input:
.person {
    border: 2px solid green;
    border-radius: 10px;
    margin: 5px 20px;
    padding: 1em;
    background-color: #CCFFDD;
}

.person span {
    font-style: italic;
}
We can hide the template by a simple CSS rule. I didn't in this reading so that you can still see the template.
#person-template {
    display: none;
}
Here's the styled template:
Name is in house house. Has a pet named pet. Home is address
We've surrounded the chunk we want to copy with a DIV whose id is
PERSON-TEMPLATE so that we can (1) easily find it in order to clone it
and (2) use the CSS display:none property setting to make
it not be displayed in the browser.
Given this setup, here's some JS/JQ code to clone the PERSON div once for each person in our list, insert the data, and append it to a container element:
function displayFriends() {
    var i;
    // this element is "off-stage" for now
    var people = $('<div>').addClass('people');
    for( i = 0; i < friends.length; i++ ) {
        var item = friends[i];
        var clone = $('#person-template > .person').clone();
        clone.find('.name').text(item.name);
        clone.find('.house').text(item.house);
        clone.find('.pet').text(item.pet);
        clone.find('.address').text(item.address);
        people.append(clone);
    }
    // finally add everything to the document all at once
    $('#person-container').append(people);
}
The jQuery .clone() method duplicates an
arbitrarily large part of the document tree, producing an off-stagecopy. That copy can then be modified and attached to the document wherever we want. Above, on line 7, the
.person element inside the
template is cloned.
The jQuery .find() method looks down the
tree from the given element, finding every descendant that matches the
given selector. (This is like the Unix find command.) Above,
the code is finding parts of the cloned template. Lines 8-11 insert
different properties from the item into descendants that have
a matching class name. (It has to be a class, not an id,
because we'll have one in each clone, and IDs have to be unique.)
Finally, here's the result:
This idea is called client-side templating. The idea of using a
container element like the person-template div and hiding
it with display:none is only one of several strategies. You
can instead use
the
HTML5 template element. Or, you can use a script
element with a non-standard type attribute. These have
advantages and disadvantages over the technique I've shown you.
Finally, when you are ready for much fancier templating, there are libraries with powerful templating languages. Start with the Wikipedia page on JavaScript templating.
Being able to build structure like this is important because we'll use Ajax to load lists of data from a server and then use JS/JQ code to display it to the user. [an error occurred while processing this directive]
