Class on Forms, JavaScript, jQuery and Ajax
Last week, we learned about MySQL and the database back-end
. We
also learned about ER diagrams.
Today, we'll be learning about the front-end
, and having pages
that
- Use forms to send data to the back-end
- Use Ajax to send data to the back-end
- Use JS and JQ to process a response from the back-end
-

Next week, we'll learn PHP, the first kind of middle-ware
that
we'll be learning, and we'll finally have the entire process complete.
Goal
By the end of today, you will be able to:
- Draw some simple ER diagrams.
- Use a conventional HTML form to collect data from the user and
send it to a back-end script for processing.
- Substitute an Ajax request for that convention form submission
- Add an event handler to the Ajax request to handle the response
Plan
- I'll distribute solutions to the first homework. Please don't take
one if you are turning the assignment in later.
- We'll review ER diagrams and do an exercise on it, so you're
prepared for the next homework.
- We'll do a brief exercise on the conventional form submission
protocol
- I'll answer your questions from the Sakai quiz
- We'll do some exercises with Ajax form submission and response
processing. I expect that we'll complete this next time. If you're new
to JS and JQ, I urge you to partner with someone who is familiar with
them, but then you sit at the keyboard!
ER Diagrams
Remember, ER diagrams
- Allow us to picture the important entities and relationships in
our data
- Each becomes a table in the Data Definition Language
- Syntax:
- Entities are boxes, Relationships are diamonds.
- Attributes are ovals attached to boxes and diamonds.
- Primary key attributes are underlined.
- lines connect Entities to Relationships (like People and Movies)
- arrows go towards the one in a one-many relationship
(like Movies and Directors)
- lines are bold when for
full participation
constraints.
- ISA hierarchies are useful ways to show collections of attributes.
Exercise on Professors and Courses
For the following, assume we have (at least) two tables:
Prof (SSN,Name) Teaches Course(Dept,Number,Title)
Sketch the ER diagram you would want and the corresponding tables.
- Profs can teach the same course in several semesters, and only most
recent offering is recorded
- Profs can teach the same course in several semesters, and each
offering is recorded
- Every Prof teaches something
- Every Prof teaches exactly one course
- Every Prof teaches exactly one course and every course is taught by
someone
- certain courses are team taught.
Here's my solution:

How would you modify this for the other situations?
Forms
Forms are the conventional way to (1) trigger a script by the back end,
and (2) send data to that back end.
- The browser replaces the current page (the page with the form that
was submitted) with the response, so
- the response should be a complete web page.
Old-School versus Ajax
But this is so old fashioned! Why not eschew this with the
modern Ajax methods that are newer and shinier?
- Because not everyone has modern browsers that support JavaScript
and jQuery. Do you care about those people at all?
- You can do both using progressive enhancement,
which means having the old-school form submission and hiding/replacing
it with JS/JQ.
Form Submission Methods
Forms have two submission methods, choses by the METHOD
attribute of the FORM tag. They are
What's the difference? What are the Pros and Cons of GET and POST?
Working with a partner, find 3-4 answers; we'll discuss.
My answers:
- With GET, the data is in the URL as name=value pairs; with POST it
follows the URL in the request.
- GET can be "saved" as a pre-determined request, such as a Google
Maps URL for an address, etc.
- GET has limited length (because URLs are limited in length), while
POST is unbounded.
- GET could be cached in browser history, server logs and such,
which can be security leaks.
- GET has an implication of reading data and so is harmless
to repeat. POST has an implication of updating data, and so
browsers often warn if before allowing you to repeat a POST operation.
Example: Bleats
As our first example, we will have a database of Brief Lexical
Emissions And Transmissions or BLEATS.
Exercise 1: A Form to Submit a Bleat
Create your own form to submit a bleat. It should not use the GET
method. You can make it pretty if you like, but don't spend too much
time on that.
Try
using https://cs.wellesley.edu/~cs304/php/bleats/insert-bleat-ajax.php
as the action. What happens?
Note: You can work locally on your own laptop or classroom
Mac for all the exercises today, because we will be working on the
front-end (browser). In later classes, we'll work on the back-end by
logging into Tempest.
Here's my solution:
form1.html Notice the URL
when you submit (the form uses POST) and notice the response.
Using Ajax Instead
When we used insert-bleat-ajax.php, we saw that the result
was not at all what we expected. It wasn't a web page, it was some JSON
code.
With Ajax, we have two steps:
- Submit the form data using Ajax rather than the conventional way.
- When the response arrives, we can
- ignore it,
- we can notify the user, or
- we can update the page with the response.
Let's do these in order.
Submitting Form Data using jQuery
The jQuery library makes Ajax much easier. The essential is
using one of the following:
The data to send is not necessarily easy to do. You know what it looks
like with the GET method; it looks the same with
the POST method. This is called serializing a
form. Here's a useful method:
Unless you are doing something fancy, it's easiest just to serialize
the whole form, as the jQuery documentation suggests.
jQuery Demo
I'll demonstrate the following for you, using
our add bleat form.
- Loading the jQuery library.
- Serializing the form
- Making an Ajax request (form submission)
- Adding an event handler to a button
Next, you'll put this together as an exercise.
Exercise 2: Bleating via Ajax
Create your own form to submit a bleat via Ajax.
- You can adapt your previous one.
- Remember to add a
script tag to load the jQuery
library. This URL works nicely:
//ajax.googleapis.com/ajax/libs/jquery/1.11.2/jquery.min.js
(Omitting the HTTP/HTTPS allows either.)
- Load jQuery at the end of the body. Put your code after
that.
- Use this link to see the current bleats to see if your code is
working.
Here's my solution:
ajax1.html We'll take a
minute to look at my solution. Does my solution work if there is more
than one form on the page?
Here's a version with progressive enhancement: ajax1a.html
Event Handler for Success Callback
We've used the .get() and .post() methods
with two arguments, the url and the data. It's time to
add a third argument, the success handler, which is a kind
of event handler.
- This is a function (often an anonymous function
literal) that is
- invoked when the server response indicates success, and
- it is given the response text as an argument.
- If you give "json" as the fourth argument, the response
text will be parsed as JSON for you.
Note that jQuery will sometimes be clever and allow you to omit
arguments, so the ordinal numbers may be off. See their examples:
Exercise 3: Ajax Bleating with Acknowledgement
- Modify your previous form to insert or reveal the words "success,"
when the acknowledgement is received from the server.
- I strongly suggest you start with something simple like
a
console.log or alert message. Then work on
the success notice. You can even work on the success notice as a
separate function and debug it without having to do more bleats.
- As before, you can use this link to see the current bleats to see if your code is
working.
- For an extra, optional challenge, cause the words to fade out
after 10 seconds.
Here's my solution:
ajax2.html. We'll take a minute
to look at the reportSuccess function and how to experiment
with it using the JavaScript console.
The Document as a Dynamic Tree
When we write out HTML, we think of the web page as a static
piece of text, just as an HTML file is. However, via JavaScript, a web
page can be dynamic. The API between JavaScript and the
browser, allowing JS to modify the document, is called the Document
Object Model or DOM. The dynamic document itself is also
called the DOM.
The jQuery library makes modifying the DOM easier with a ton
of manipulation
methods.
- We can add nodes using methods like
append
and insertBefore.
- We can modify nodes using
replaceWith
and html
- We can delete nodes using
remove and empty.
- We can create nodes using HTML code as the argument to the jQuery
function.
- We can create more complex structures using cloning,
which you saw in the reading.
This just scratches the surface of what jQuery lets you do quite
easily. My goal is not to teach you all of this, but to get you started
learning it as needed.
Processing a Response
The next step is to process the response from the server, which in this
case we know is:
- a JSON-serialized data structure
- a list of the latest bleats
Therefore, we can iterate over that list, inserting each into the
document.
Exercise 4: Ajax Bleating with Updates
- Modify your previous form to insert the response from our
insertion, namely the latest bleats
- As a debugging technique, I strongly suggest that you save the
bleats to a global variable and then write a function to operate on a
list as its argument. You can use the global variable many times while
debugging the function.
- There are lots of ways to do this, but I recommend keeping it
simple:
- Create an unattached list item
- Set the text of the list item to the concatenation of the
bleat id, the number of likes, and the bleat text
- Append the list item to an OL or UL that is already attached
to the DOM.
- The suggestion above results in the page re-rendering up to 30
times. An improvement is to append each unattached list item onto an
unattached list, and then attach the list to the DOM when you're
done.
- As before, you can use this link to see the current bleats to see if your code is
working.
- For extra credit, use the
list-bleats-ajax.php
script to load a list of current bleats when the page loads.
- If you're really ahead, you can nicely format the bleats using CSS.
Here's my solution:
ajax3.html. We'll take a minute
to look at the showBleats function and how to experiment
with it using the JavaScript console.
Adding Event Handlers
We can also make a page dynamic via event handlers
- An event handler is a function that is invoked when an event
occurs
- Just as we added a click handler to a button to submit a form by
Ajax, we can add a click handler to like a bleat.
- We could add that click handler to each bleat on the page, which
might be 30 event handlers.
- An improvement is to add one click-handler to
an ancestor of the bleats, and allow the event
to bubble up to the event handler.
- The event handler can figure out which bleat was clicked on using
the
target property of the event object. The
event handler is invoked with an event object as its first argument.
- We can add additional information to the targets by using new
HTML5 data attributes. Any attribute starting with
data-
is reserved for the user.
Liking Bleats
Let's see this in action. Here's a partial view of the DOM for this
document:
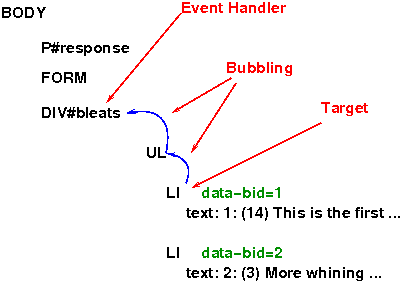
- The user clicks on a bleat (an LI). That's the event target.
- The click bubbles up
- The event handler at the DIV handles it
How to Implement Liking
First, we need some kind of API (via a GET/POST form) to like a
bleat. That's done with the following URL:
https://cs.wellesley.edu/~cs304/php/like-bleat-ajax.php
Supply a bid=nn pair, where NN is the number of the bleat
ID, and the web app will increment the likes for that bleat.
Coding is best and most successful when we can code and test small
units, so before we add an event handler to like any of an arbitrary
list of bleats, let's first write code to like a particular bleat.
Exercise 5: Function to like a Bleat
- Modify your previous web app to implement a function that, when
given a bleat id (bid), sends an Ajax-request to the server to increment
the likes on that bleat.
- You can always use bids 1, 2, and 3; those never expire.
- The response will be a list of bleats, justs like inserting a
bleat does.
- Your function could also insert that onto the page.
- You can test your function
by hand
using the JS console.
- As before, you can use this link to see the current bleats to see if your code is
working.
Here's my solution:
ajax4.html. We'll take a
minute to look at the likeBleat function and how to
experiment with it using the JavaScript console.
How to Implement Liking, Part 2
As we saw from the picture, earlier, we need to do the following:
- Make sure each bleat knows its BID via a
data-
attribute
- Attach an event handler on an ancestor of all the bleats
- The event handler should use the event target to determine the
element that was clicked on, and via that, the BID.
- It then uses our earlier function to like the bleat.
Exercise 6: A Web App that Implements "Likes"
- Modify your previous web app to complete the implementation of
likes, using the steps outlined above.
- Modify your display of the bleats so that each gets
a
data-bid attribute. You can use the
jQuery .attr() method to set/get attributes.
- Use
console.log liberally in order to check what
you're doing.
- As before, you can use this link to see the current bleats to see if your code is
working.
Here's my solution:
ajax5.html. We'll take a
minute to look at the solution.
Summary
We've come a long way! We learned
- how to submit data using forms and GET/POST
- how to do the same thing from JS, even using progressive
enhancement
- how to process JSON response from the back-end
- how to update the DOM
- how to add an event handler and use bubbling to improve our code
We also managed to build a little application to submit and
like bleats
.