SSH Keys
SSH requires authentication: proving who you are to the remote server that you are logging into (or copying to/from using SFTP).
Typically, we authenticate with passwords. But passwords are annoying for many reasons. To be good, they have to be long and (somewhat) complex (though see this wonderful XKCD cartoon about passwords which I have completely adopted).
In this course, we'll be working remotely, so we'll have to SSH and SCP to/from our local machine and the remote server (dix) many times during an editing session, and consequently have to authenticate many times. Visual Studio Code will help with this, but it still requires multiple authentications.
Our goal with this reading is to understand how to streamline this process. We may never have to type our password again!
Concepts of Public Key Cryptography
The technique we will used is based on Public Key Cryptography. If you are curious, you should read more about it in that Wikipedia page. Here are the basic highlights:
- cryptographic keys are generated in pairs
- one is the public key, which is okay to share with others, and
- the other is the private (or secret) key, which should never be shared with anyone.
- each key can decrypt what the other has encrypted, and only that key can decrypt what the other has encrypted.
Public key cryptography can be used for either encryption or for authentication. We will use it for authentication. Later in the course, we may talk about how public key cryptography is used in encryption in the form of HTTPS (secure HTTP).
Authentication Using Public Keys
We're going to understand authentication using a little story about Alice and Bob in which Alice needs to authenticate herself (prove her identity) to Bob.
First, Alice generates an SSH key pair.
Suppose Bob and Alice meet and Alice proves her identity in some other fashion (maybe an ID card). She gives her public SSH key to Bob, who stores it safely.
Later, possibly over a network connection, Alice needs to prove her identity to Bob. She says "I'm Alice and I can prove it". Bob finds Alice's public key that he previously stored, generates a random number (called a nonce), and encrypts it with Alice's public key. He sends the encrypted random number to Alice and dares her to decrypt it and tell him what the number was.
Alice decrypts Bob's message using her private (secret) key, which is the only key capable of decrypting something encrypted with her public key. She tells Bob the random number.
Bob now knows that the person who claims to be Alice has Alice's private key, and therefore must really be Alice.
Public Key for SSH
The story of Alice and Bob is exactly how we will use public key to authenticate ourselves to the CS server. The CS server plays the role of Bob, and our laptop plays the role of Alice, who needs to prove her identity to Bob.
Here are the basic steps:
- We will generate a key pair on our laptop using the command
ssh-keygenThat puts a pair of files in our~/.ssh/directory, namelyid_ed25519andid_ed25519.pub1 - We will copy the the
id_ed25519.pubfile to the server (dix) usingssh-copy-id:ssh-copy-id user@host. We will have to use our server password to authenticate ourselves this time.
The second step saves the public key in the ~/.ssh/authorized_keys file
on the CS server.
Note that the commands are done on your laptop, not on the CS server.
Visualization
In the following figure, we are pretending that Wendy Wellesley has set up SSH keys to the CS server.
- on Wendy's Mac laptop, the account name is
wendyso the home directory is/Users/wendy - on the CS server, the account name is
ww123, so the home directory is/students/ww123 - there is a
.sshdirectory in both home directories. We don't have to create those; they will either exist or be created automatically.
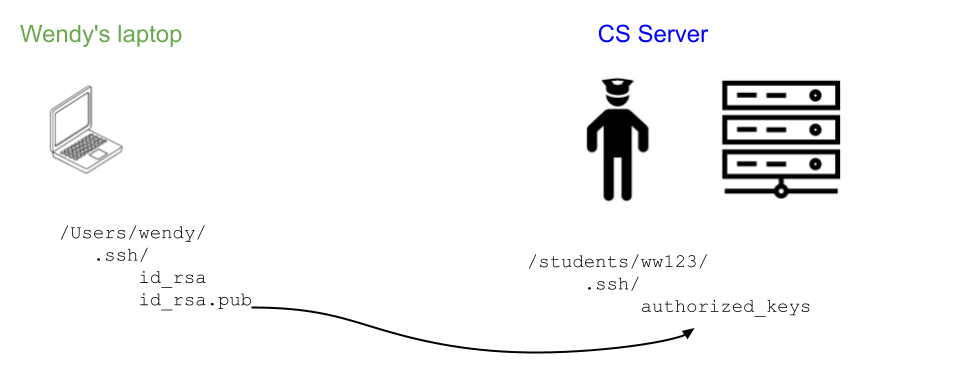
.ssh/authorized_keys file on remote machine- Step 1 (
ssh-keygen) creates the key pair on our laptop. - Step 2 (
ssh-copy-id) appends theid_ed25519.pubfile to theauthorized_keysfile on the remote machine.
Warning
**The most common error is to do these commands on the remote machine. **
Don't do that. Do the commands on your laptop, with just one exception.
Please check your prompt before doing a command, so that you are sure you are doing the command on the correct machine.
I suggest not using VSCode, because VSCode makes it too easy and tempting to start a remote terminal.
Instead, I suggest starting a local terminal (PowerShell on Windows).
Type of Key
SSH keys come in different types, based on the cryptographic algorithm
used. My understanding, as of this writing (2026), is that the
recommended type is ed25519. This may be the default for your
ssh-keygen program (it is on my Mac running Tahoe 26.6.1), but
because I'm writing these directions for everyone, I'll include -t
ed25519 on the command line.
Steps on a Mac
In the earlier section, I accompanied the commands with explanatory
text, but sometimes that makes it harder to see what you have to do
and what the computer's response will look like. Below is a transcript
of my doing these commands on my personal (Mac) laptop using the
terminal application. See ssh if you've forgotten about
the terminal.
I have highlighted in bold four commands. The first two (ssh-keygen
and ssh-copy-id) I described in the last section. (I also
highlighted in bold where I entered my password.) The third command is
suggested by ssh-copy-id to test for success, and using it shows
that we no longer have to give our username/password to login to
cs.wellesley.edu. (Notice the changed prompt, indicating where we
are.) The fourth command logs out of the server, returning us to our
laptop.
One other bit of reassurance: when you type your password, nothing will be printed, not even a dot. That's normal; don't let it bother you.
ScottAndersonMBP:~ scott$ ssh-keygen -t ed25519
Generating public/private ed25519 key pair.
Enter file in which to save the key (/Users/scott/.ssh/id_ed25519):
Created directory '/Users/scott/.ssh'.
Enter passphrase (empty for no passphrase):
Enter same passphrase again:
Your identification has been saved in /Users/scott/.ssh/id_ed25519.
Your public key has been saved in /Users/scott/.ssh/id_ed25519.pub.
The key fingerprint is:
SHA256:f6f+4PgJqef8fDAfBk4Dwn7dIMKAVl6S0gpoA4UFcok scott@ScottAndersonMBP
The key's randomart image is:
+---[ED25519 256]---+
|=B+. ++=.        |
|E+o +.oo= o .    |
|. .o o.. o + o   |
|    .   . . = .  |
|        S. o o   |
|         . .+ o  |
|          + o=.. |
|         o.* =o  |
|        .o++Oo.  |
+----[SHA256]-----+
ScottAndersonMBP:~ scott$ ssh-copy-id anderson@cs.wellesley.edu
/usr/bin/ssh-copy-id: INFO: Source of key(s) to be installed: "/Users/scott/.ssh/id_ed25519.pub"
/usr/bin/ssh-copy-id: INFO: attempting to log in with the new key(s), to filter out any that are already installed
/usr/bin/ssh-copy-id: INFO: 1 key(s) remain to be installed -- if you are prompted now it is to install the new keys
anderson@cs.wellesley.edu's password: .........

Number of key(s) added:        1

Now try logging into the machine, with:   "ssh 'anderson@cs.wellesley.edu'"
and check to make sure that only the key(s) you wanted were added.

ScottAndersonMBP:~ scott$ ssh anderson@cs.wellesley.edu
Last login: Wed Aug 19 10:27:24 2020 from pool-108-20-176-82.bstnma.fios.verizon.net
This is the new virtual server running CentOS 7
[anderson@dix ~]$ logout
Connection to cs.wellesley.edu closed.
ScottAndersonMBP:~ scott$
Steps on Windows
If you have a Windows machine, don't despair. SSH works on Windows. (Though you may have to install it. See SSH Windows 11)
However, Windows lacks the useful ssh-copy-id command, so we'll have
to do the following steps. Note that the ww123@cs below is a
placeholder; you'll replace it with your username.
Also, don't forget the colon at the end of the second argument to the
scp command; that indicates that the file is on another host, but in
the home directory of your account on that host.
ssh-keygen -t ed25519(same as on a Mac)- Copy
id_ed25519.pubto remote machine:- copy the file to the server (remember the colon):
scp .ssh/id_ed25519.pub ww123@cs.wellesley.edu: - login to the server:
ssh ww123@cs.wellesley.edu - append the file:
cat id_ed25519.pub >> .ssh/authorized_keys - delete the pub file:
rm id_ed25519.pub - logout from the server:
logout
- copy the file to the server (remember the colon):
Go Ahead
I encourage you to do this on your own time. Contact me if you have any trouble.
Limitations/Warnings
Protect your private key. Anyone with your private key can log into your account on the server.
Anyone with access to the account that stores your private key will be able to log into the server. Don't allow that to happen!
Presumably, you already protect your personal laptop, so this is just reinforcing your current practice.
Encrypting your Private Key
I have usually avoided encrypting my SSH keys, but lately I've been worrying about security more. For most of you, having your laptop stolen or hacked into or accidentally installing malware on it would be the worst case scenario. However, if you have significant work stored in other places (such as Github or the CS server), the scenario becomes even worse because the bad guys can use your SSH key to login to those other places. That would be the reason to encrypt your SSH key.
Once you have an encrypted key, you then have to give the SSH password to use it, which seems like you have no benefit; you're just giving a different password (your SSH password versus your login password). But, there are two important observations:
- The SSH key that is used to login is very secure — better than most passwords, and
- There's a way to get the decryption to last for a good deal of time.
Let's talk about the second point. Both Macs and Windows machines can supply what is called an SSH authentication agent. You can tell it your SSH password and it will then remember it for you. Or, more precisely, anything that wants to do SSH authentication can ask the agent to do it. But now that the private key file is encrypted, that means:
- If someone steals your (powered off) laptop, they won't be able to SSH as you, and
- If someone gets a copy of your encrypted private key file (the
~/.ssh/id_ed25519file), say from backups, they won't be able to SSH as you.
So, this is an enormous benefit. To use an SSH agent, all you have to do is "ssh-add" your private key to the SSH agent. On a Mac, the command is:
ssh-add ~/.ssh/id_ed25519
The ssh-add command will ask for your SSH password (to decrypt your
private key) and holds the results in memory, allowing you to SSH to
other machines at will, with no friction, for as long as the SSH agent
is around (which will be until you power off your computer).
(On Windows, the basic idea is the same, but there is one extra setup step: Windows provides ssh-agent as a service, and by default that service may be disabled. Microsoft’s current OpenSSH documentation recommends enabling it and setting it to start automatically. See Key-based authentication in OpenSSH for Windows.)
Forgetting the Key
A slight improvement in security for a small decrease in convenience is to have the ssh-agent forget the key after a period of time, rather than keeping it in memory forever. I decided to have the key forgotten after 8 hours (supposedly a full workday, though I often end up giving it twice a day). To do so, I use the following command:
ssh-add -t 8h ~/.ssh/id_ed25519
Because that's tedious to type and I do it once or twice a day, I've created an alias:
alias ssh8='ssh-add -t 8h ~/.ssh/id_ed25519'
The alias is defined in my shell startup file (~/.zshrdc on a Mac),
so that every shell/terminal knows the alias.
So, then I just open a terminal, give the ssh8 command, enter the
SSH password, and I'm good to go for the next eight hours of
frictionless login.
Here's one way to think about the tradeoffs:
| Setup | Convenience | Protection |
|---|---|---|
| Unencrypted SSH key | High | Poor if key file is stolen, such as stolen laptop or stolen backups |
Encrypted key + ssh-add indefinitely |
High | Protects against key-file theft, less useful against compromise of your active session |
Encrypted key + ssh-add -t 8h |
High for 8 hours | Also limits the window for agent use after account compromise |
-
Earlier versions of these directions used the default key type, which is RSA. However, RSA has been deprecated by some servers, so ED25519 will give you additional security for the one-time cost of having to specify a non-default type. However, I haven't updated the pictures and such on this page, so keep that in mind. [note on Feb 2024] ↩