Cookies, Sessions, POST and Flash
The topic is cookies, but not the type you eat (though we may have some). Cookies are a technique for maintaining sessions, which we'll talk more about soon. (There are other techniques, such as hidden inputs and url-rewriting, but we'll focus on cookies.)
Sessions are important because most interesting web applications involve a series of interactions. People visit Facebook and they stay a while. People go to Amazon or eBay and they shop for a while. They build up state such as history or a shopping cart, with or without login.
Along the way, we'll learn about how to handle POST requests.
We'll also learn about flashing, which is a convenient way to display messages to the user.
- Cookies
- Sessions
- POST
- Flashing
- Why do we need Cookies?
- What are Cookies?
- Cookies live on the client
- Google Analytics Cookies
- Security and Privacy
- A Schematic of the Request-Reply Model, with Cookies
- Cookie Attributes
- Sessions versus Cookies
- Session Diagram
- Cookie Values
- Cookies from Code
- Cookies in Express
- POST
- Session Demo
- Main Page
- Login
- Visit
- Logout
- Trusting the Session
- Cookie Demo Video
- Flashing
- Logins with Flashing
- POST-Redirect-GET
- Developing with Cookies
- Using the Chrome Developer Tools
- Video of Dev Tools
- Summary
Why do we need Cookies?
Sessions are a challenge because the underlying HTTP protocol is stateless. Each http request and response is treated as if it's the only one, ever. Even if a user has made 1000 prior requests to a particular application, when that application starts running, it has no prior knowledge of that user. The application has to
- Figure out who this user is, and
- remember what that user was doing.
Cookies are the primary way of remembering something across transactions, including who someone is. They can also be used for many other things, both more and less interesting:
- A movie showtimes application I used to use had a form to specify your zip code and it would show you movie listings for your area. It would remember the zip code in a cookie, so that you didn't have to supply it again when you went to the webpage again. Weather websites could do the same (and it's annoying when they don't).
- A web application could store preference settings, such as myYahoo or iGoogle.
- A web application like Gmail can store identity or authentication information in a cookie, so that you only have to login once per session, instead of with each transaction. (What a pain that would be!)
- To track unique visitors (for bragging or charging advertisers)
- What examples can you think of?
What are Cookies?
Cookies are small bits of text saved with your browser (so Chrome, Firefox and Safari will each have its own set of cookies). You can think of them as key/value pairs. For example "zip=02481" for the movie showtimes application.
Cookies are set in the headers of your HTTP response. This is taken care of for use by the Express middleware, but it's useful to know that it's separate from your web page response (which is in the body of the response), but it's all in one response.
Cookies are the primary means for maintaining state (remembering stuff) from one request to the next.
Along with a reply, server sends some additional information in the header. Here's what the response to an HTTP request might look like:
HTTP/1.0 200 OK
Content-Length: 141
Content-Type: text/html
Set-Cookie: zip=02491;
    domain=cs.wellesley.edu;
    expires=Mon, 23-Apr-2019

... content follows
Let's take a look at that cookie:
- The first name-value pair determines the name of the cookie and a
special value, often used to identify the user. Here the name is
zipand the value is02481. - The domain value determines what sites can access this cookie
(usually only the site that issued it). Here that's
cs.wellesley.edu. That means that the browser will only send this cookie back to cs.wellesley.edu, not to other servers. - Other values determine when the cookie expires, which URLs require this cookies, etc.
Clients have the option of refusing cookies (meaning that they do not store them or do not submit them with requests), though in practice the web relies so much on cookies that it would be difficult to do anything but casual browsing without accepting cookies.
Most browsers will refuse a cookie if it directs them to submit information to a third party (not the site that issued the cookie). You can usually configure this. Hunt around in your browser and you'll find it.
Cookies live on the client
For all page requests (in other words, every time you visit a web page),
your browser (the client) compares the web page's URL to the cookies in
the cookie jar
and sends all the unexpired cookies that match the
domain and path. Here's what a request might look like:
GET /index.html HTTP/1.0
Accept: text/html, image/gif, image/jpeg
Accept-Language: en
Cookie: zip=02481
- The total size of a cookie must be less than 4KB. In practice, it's usually only a few dozen bytes.
- The client may hold up to 20 cookies for a given domain, and up to 300 cookies total.
- A request might carry more than one cookie.
- Your browser can also add cookies to the cookie jar; it doesn't have to come from the server. Your web page can do the same, using JavaScript.
Exercise on Cookie Inspection
What's in your cookie jar? Take a couple of minutes to poke around in your browser to find the cookies. These things move from version to version, but as of this writing, you can find cookies as follows.
- In Firefox, look under Preferences > Privacy & Security > Cookies and Site Data
- Safari look under Preference >
- Chrome look under Preferences and then search for cookies.
If those don't work, a brief web search for "show cookies Edge" or something similar will surely work. Try Wikihow view cookies
Google Analytics Cookies
If you look in your cookie jar, you will almost certainly see these
cookies: _utma, _utmc, _utmz. These are from Google Analytics, a
widely used service to track who uses a website. To learn more, try Google Analytics Cookies Ultimate Guide. They are set
(in my browser), for domain .wellesley.edu, so of course your page
matches.
Security and Privacy
Since cookies live on the client, what does that mean in terms of privacy and security? Here are a few common scenarios:
- The browser is running on your own computer (laptop, desktop, smart phone, whatever). In that case, the cookies are stored on that computer and are therefore as safe/unsafe as any other file on your computer.
- The browser is running on a shared computer, but one with your own
unique login, such as the ones here at Wellesley. In this case, the
cookies are stored in the same folder as your preferences, browser
history, cache, and other personal stuff. On the Macs in L180 and
E101, the general Firefox code, libraries, plug-ins and the like are
in one common folder (
/Applications/Firefox), but my personal stuff and your personal stuff are in folders that belong just to us (/Users/sanderso/versus/Users/ehildret/versus/Users/youracct/). So, this is more vulnerable than a machine you have physical control of, but it is still relatively secure. Someone would have to hack into your account or into that computer to view your cookies. - The browser is running on a shared computer, and there is no login process. For example, the Natick public library has a number of computers for searching the catalog, which is done via a web browser. If I go to a website that sets a cookie, it'll be set in that browser, and if you use the machine after me, you'd be able to view the cookie (unless I or the website clears the cookies when I'm done). In this case, there's barely a fig leaf protecting your privacy.
In general, you should note that cookies are not secure. They have the following vulnerabilities:
- The user can see the values you have set. If you set a cookie
saying
deadbeat-customer=true, they will see that. - The user can modify the values you have set.
- They can do that via a browser, a JavaScript, and custom apps.
- They can change the cookie to
deadbeat-customer=false. - We'll see one way to do that later in this reading.
- We'll also see this in class or in a demo.
- The cookie value is sent along with the HTTP request and response, which are not encrypted, so the cookie value is easily seen by anyone with a network packet sniffer. (Later in the course, we'll see how to use HTTPS so that both directions are encrypted.)
There's a demo of the lack of security in cookies in our videos
When we get to Express's cookie-sessions, we will see how Express introduces some safeguards to protect against some of these insecurities.
A Schematic of the Request-Reply Model, with Cookies
It can be helpful to have a picture of what's happening. Here's a picture of basic scenario involving two request/response pairs and the cookie that the server sets in the first response and receives with the second request.
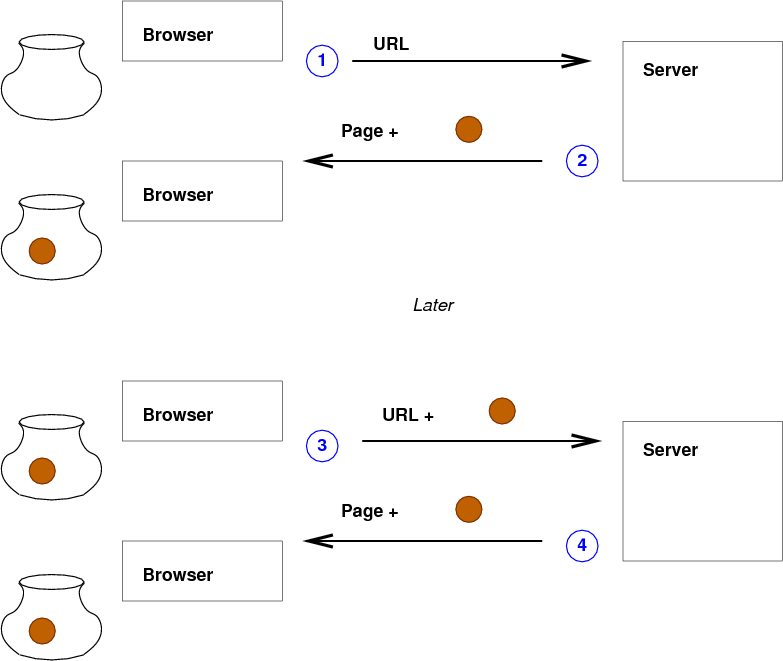
- Browser sends a request to the server. Since the user has never visited that site before, there are no cookies, so none are sent.
- The server notices that there are no cookies, so it assumes that this is a new visitor, and it generates a new ID for the user and includesb that ID as a cookie in the reply. The reply might even be tailored for new visitors.
- The browser later (minutes or months later, but before the cookie expires) makes another request at that site and sends back the cookie it got in step 2.
- The server gets the request with the cookie, realizes this is a returning visitor, and can generate a customized reply.
Cookie Attributes
Web browsers and web servers that support cookies have to handle the following attributes:
- name: anything you want for your web app, within limits
- value: the value your web app wants to get back
- domain: the server to supply them to, typically your own
- expires: the time that the cookie is invalid. If not specified, it expires when the browser exits.
- Max-Age: the number of seconds until the cookie expires; an alternative to the "Expires" attribute.
- path: the browser only returns the cookie for URLs below this
- secure: the browser will only return this cookie using HTTPS
- HttpOnly: the browser won't let JavaScript access this cookie via
document.cookie.
In most cases, cookies are not deleted. It's easier to set the value to an empty value (such as zero or the empty string) and test for that. You can also set its expiration time to the past, which will have the effect of removing the cookie.
Sessions versus Cookies
Sessions are an idea, a way of working with the user with continuity over extended interactions. Cookies are a bit of technological infrastructure that allows us to build sessions. (In principle, there are other ways to build sessions, but we'll use cookies.)
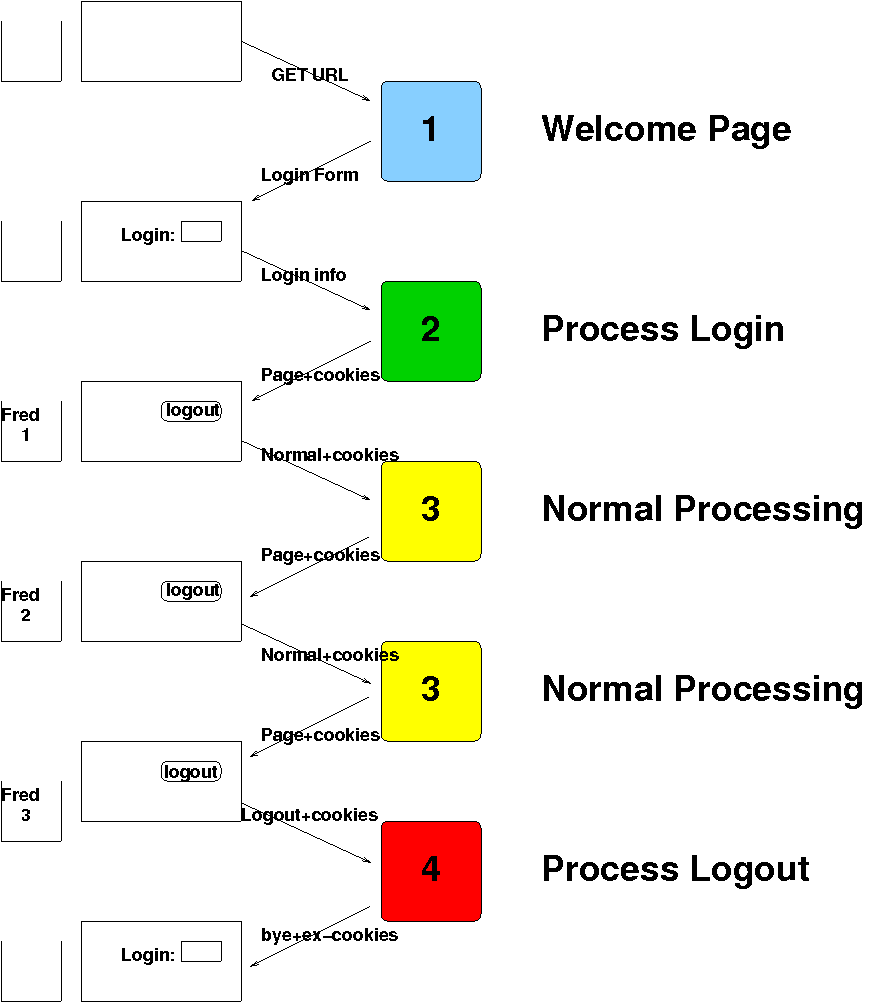
Session Diagram
The following is a diagram of what a somewhat typical session might look like. (Click on the diagram to see a bigger version.) There are four situations that the back end app (on the right) might have to deal with:
- (blue) Very first visit. You can tell because there's no cookie and there's no form being sub mitted; it's just a simple GET request. Respond with a page that includes a login form.
- (green) Login. You can tell because the user is submitting a login form. Respond with a normal page, including a logout button. The response headers will set the cookies for the first time.
- (yellow) normal, logged-in usage. You can tell because the request includes a cookie. There might be lots of different use-cases, differentiated in lots of ways. (E.g. searching for data, submitting a comment, rating a product, adding a tag, uploading a picture, ...). The response will depend on the use-case, but will include headers that set the cookies. Cookies are pretty much always set in a response. They're usually set to the same value, but with a new expiration value. Thus, if the user continues to interact with the system, the cookies never expire. (That is, even if the cookie is set to expire in 5 minutes, the user can stay logged in for hours, as long as they do something every five minutes.)
- (red) logout. You can tell because the request is of a logout form. (You can think of this as being just another use-case of the web app.)
There's a video of a simple blog-like application in our videos for the cookie class.
Cookie Values
What do we set the cookie to? Cookies are limited to 4K, so we have two options:
- Store everything in the cookie, but be conscious of the space limit
- Store a unique identifier in the cookie, and use that identifier as a key into a table kept in the database.
The latter is the most common approach, as you probably saw when you looked in your browser's cookie jar. (What does your gmail cookie look like?). How do we make a unique identifier? Here are some options:
- use the computer's time (say, milliseconds since the epoch), possibly with the process id of our current web app.
- use the
_idgenerated in some document, maybe in a collection of sessions - use a server-supplied session identifier (punt to someone else)
We won't pursue this idea of storing the session information in the database.
Instead, we'll use the technique where we store everything we need in the cookie itself. This turns out to be effective and has some advantages over the alternative of storing session info in the database (namely that there's no need to look up information from the database).
Cookies from Code
In the next sections, we'll look at how to manage cookies using Express. There will be a web page that allows the user to "log in" (identify themself) and thereafter it counts how many visits to the page there are. It also supplies a "logout" button when the person is logged in.
Just for additional detail, the web app will print out the cookie information it got from the browser, and the response will have a button that will run some JavaScript to show you the cookies as the browse sees them.
When you read the code, look for the four use cases:
- No cookie, no form data, so first visit. Give them an empty form. This corresponds to the Welcome (blue) phase in the cookie session figure.
- No cookie, form data is present, so record the person's name. This corresponds to the login (green) phase in the cookie session figure.
- Cookie, but nothing else, so an ordinary visit. This corresponds to the normal (yellow) phase in the cookie session figure.
- Delete cookie. This corresponds to the logout (red) phase in the cookie session figure.
Note that cookies are available to JavaScript running in the browser
(unless the HTTPOnly attribute is set to true, which I have not done),
so all the examples will let you see JavaScript's view of the cookies.
Cookies in Express
We will be using the cookie-session Node.js module. That web page has some brief examples as well.
All our examples are in ~cs304node/apps/cookieSession/
Let's start with a very simple cookie example, based on the idea of
storing the user's zip code. You can see and run the complete code in
zipcode.js.
The following it our main route. It returns a little page (skipping the separate EJS file) that
- reports the current zip-code setting, if any (defaulting to the string
"not set") - has a tiny form to allow the user to set the zip code
- has a link to a route that will un-set the zip code
app.get("/", (req, res) => {
    console.log('cookies', JSON.stringify(req.cookies));
    console.log('signed', JSON.stringify(req.signedCookies));
    let zip = req.cookies.zip || 'not set';
    return res.send(`
Your zip is ${zip}<p>
<form action="/setzip/" method="get">
    <label>zip <input type=text name=zip></label>
</form>
<a href="/unzip/">unzip</a>`);
});
To set the zip code via a form submission, we do this:
// should really be POST but okay for this example
app.get("/setzip/", (req, res) => {
    let zip = req.query.zip;
    console.log('setting zip to ', zip);
    res.cookie('zip', zip);     // set it here on the response
    return res.redirect('/');
});
As the comment says, this really should use POST, because we are modifying the state of the interaction. We don't want requests to be cached or handled by some proxy, etc. So, even though we aren't modifying the state of a database, we still want to use POST. We'll talk about POST and the POST version in a moment.
Finally, to un-set the zip code, we do this:
// should really be POST but okay for this example
app.get("/unzip/", (req, res) => {
    res.clearCookie('zip');
    return res.redirect('/');
});
This could hardly be easier. Note that, in practice, we might not bother allowing the user to un-set a cookie. We can just let it expire or make them clear their cookies. An extraneous cookie is rarely a problem, though there's nothing wrong with allowing the user to clear them.
POST
We use the POST method when the request will be modifying the state of the database, the server, the interaction or anything like that. Using POST means that the browser will warn us if we are about to repeat a POST request (avoiding duplicate entries, or whatever), the results won't be cached, and other useful properties.
Furthermore, forms that send data using the POST method put the data
in the body of the request instead of in the head. (The request
transmission looks a little like a web page, which has a <head> and
a <body> all in one text file; similarly a request is one chunk of
text, but with a HEAD and a BODY.)
Because the form data is in the body, we have to use some extra middleware to parse the body, so our "prelude" section now includes:
const bodyParser = require('body-parser');
...
app.use(bodyParser.urlencoded({ extended: true }));
app.use(bodyParser.json());
The body-parser module parses the body of the request and puts the
data in (yet another) dictionary in the request object (req), this
time called body. So, the POST version of setting the cookie from a
form submission looks like this:
app.post("/setzip-post/", (req, res) => {
    let zip = req.body.zip;     // get value from the body of the request because POST
    console.log('setting zip to ', zip);
    res.cookie('zip', zip);     // set it here on the response
    return res.redirect('/main/');
});
This is nearly identical to the GET version:
// should really be POST but okay for this example
app.get("/setzip/", (req, res) => {
    let zip = req.query.zip;
    console.log('setting zip to ', zip);
    res.cookie('zip', zip);     // set it here on the response
    return res.redirect('/');
});
The only differences being that we say app.post to set up the
handler and req.body instead of req.query.
The POST version of un-setting the cookie is even easier, since we don't have to access any form data. We still use POST, though, because of the semantics (meaning) of the interaction.
app.post("/unzip-post/", (req, res) => {
    res.clearCookie('zip');
    return res.redirect('/main/');
});
Session Demo
Here's a demo of the same ideas as the cookie session figure above. It opens in another tab/window.
There is a video of this demo in our videos.
Remember, the four use cases are:
- A first visit; no cookie is set
- A login: send a username to the server, set session info (uid, name)
- A normal visit; the cookie sends the session info to the server, which is shown in the page
- A logout; the server will log the person out, removing the data from the session.
Note that these are not real logins with usernames and passwords and proper security. We'll learn that a bit later. But I'm using a name and a number of visits as the values of the cookies. In fact, if you have two browsers installed on your laptop, try visiting the CS 304 cookie demo in each browser. You can use different names and different numbers of visits, which shows that the cookie values are specific to your browser.
Below is the code that implements the CS 304 cookie demo. It has these parts:
- a page template that shows the session info
- the JavaScript routes that implement all the behavior.
Page Template
We decided to just have one page. It does double-duty as a page for logged-in visitors and visitors who are not logged in. It uses a conditional to do that. In a more complex app, there will be lots of pages, some solely for logged-in people. Or maybe there's a partial that has the login box.
This is the views/page.ejs file:
<!doctype html>
<html lang='en'>

<head>
  <meta charset='utf-8'>
  <meta name="viewport" content="width=device-width, initial-scale=1">
  <meta name=author content="Olivia Giandrea">
  <title>Cookie/Session Demo</title>
  <link rel='stylesheet' href="/styles.css">
  <script src="/main.js"></script>
</head>

<body>

  <h1>Welcome!</h1>

  <p>You have visited <%= visits %> times this session.</p>

  <% if(!username) { %>

  <p>Please "login" using the form below by entering a staff member's
  UID in the WMDB. Most numbers less than 800 work.</p>

  <p>
    <form action="/login" method="POST">
      <input type="text" name="uid" placeholder="12">
    </form>
  </p>

  <% } else { %>

  <p>
    <form action="/logout" method="POST">
      <button>Logout <%= username %></button>
    </form>
  </p>

  <% } %>

</body>
</html
Main Page
Here's the code to handle requests for the main page:
app.get("/", (req, res) => {
    let visits = req.session.visits || 0;
    visits ++;
    req.session.visits = visits;
    return res.render("page.ejs", {visits, username: null});
});- Here, we assume the user is not logged in, so we pass
username:nullto render. - A person doesn't have to be logged in to visit, so we can still count visits.
- However, if the cookie is missing, we have to handle that. Here, we set the value to 0 if there's no cookie.
Login
To login, we POST to the following route, which sets some values in the session if the login is successful:
app.post("/login", async (req, res) => {
  try {
    let visits = req.session.visits || 0;
    const uid = parseInt(req.body.uid);
    const db = await Connection.open(mongoUri, DBNAME);
    var existingUID = await db.collection(STAFF).findOne({uid: uid});
    if (!existingUID) {
        // eventually, flash an error message and re-render
        return res.send(`No such user ${uid} — please try a different UID`);
    } else {
        let name = existingUID.name;
        req.flash('info', 'successfully logged in as uid#' + uid);
        console.log(existingUID, uid, name);
        req.session.uid = uid;
        req.session.name = name;
        req.session.visits = 1;
        req.session.logged_in = true;
        // eventually, flash and redirect to /visit
        return res.send(`<p>Logged in as ${name} (${uid}). <a href="/visit">visit</a>`);
    }
  } catch (error) {
      return res.send(`Form submission error: ${error}`)
  }
});- In a real app, we would ask for a password as well and check it; we'll talk about that in a later reading.
- In the event of an error, we just return a simple string. Later in this reading, we'll discuss the technique of flashing
- If the login is successful, we store some values in the session (
req.session). - The values in
req.sessionare automatically turned into a cookie that will be sent to the browser as part of our response. - The browser will then send the session cookie back to us, and we can use it in a normal visit.
Visit
A normal visit just maintains the session, but can customize the response based on who is logged in. We could also use the username for authorization: determining what this user is allowed to do. They don't have to give their password again, as long as we can trust the session information. See below.
app.get('/visit', (req,res) => {
  if (!req.session.uid) {
      // eventually, flash and redirect to /
      res.send(`<p>you are not logged in; <a href="/">home</a></p>`);
  }
    let username = req.session.name;
    let uid = req.session.uid;
    let visits = ++ req.session.visits;
    return res.render('page.ejs', {username, visits})
});- If someone is not logged in, send them to the main page, where there will be a login form.
- Pull the data out of the session and render the form with a customized logout button
Logout
To logout, all we have to do is remove the crucial information from
the session. Setting the values to null works fine:
app.post('/logout', (req,res) => {
  if (req.session.uid) {
    req.session.uid = null;
    req.session.name = null;
    req.session.logged_in = false;
      // eventually, flash and redirect to /
      return res.send(`<p>Logged out. <a href="/">home</a></p>`);
  } else {
      // eventually, flash and redirect to /
      return res.send(`<p>You are not logged in; please login: <a href="/">home</a></p>`);
  }
});
Trusting the Session
Using information in the session object as way of authorizing someone works only if we can trust the data. But the data is coming from the browser, which we can't trust. The user could tamper with the data, either with a compromised browser that allows that, or by defeating the security safeguards in an otherwise-trustworthy browser.
Are we opening up a big security hole? No. The Node.js
cookie-session uses
cryptographic algorithms to digitally sign the session
information. If the session that the browser sends us doesn't have the
correct signature, the cookie-session software will ignore the
session and it's as if the cookie was deleted: the person will have to
start all over again. Note that digital signatures are not the same
as encryption. The user can read the data (given widely available
tools) but not modify the data (at least, not successfully).
Do to that, we have to do a little work as part of setting up our app, in the "prelude":
const cookieSession = require('cookie-session');

app.use(cookieSession({
  name: 'session',
  keys: ["onehorsetwohorseredhorsebluehorse"],
  maxAge: 24 * 60 * 60 * 1000 // 24 hours
}))- The
nameproperty is the name of the cookie. You can use any name you want, butsessionis common and intuitive. Some security advice suggests renaming this, to avoid revealing that you are usingcookie-sessionbut that seems mostly pointless to me. - The
keysproperty is an array of keys to use in the digital signature algorithm. Only the first one is necessary, but it is very important. See below. - The
maxAgeproperty is how long a cookie lasts before it expires. Here, we chose 24 hours, just as an example. In a banking app, you might choose 5 minutes.
The keys strings are essentially a kind of master password for your
app, since if an attacker knows your app's key, they can create a fake
session, with an authorized user, and digitally sign the fake session,
which your app would then trust.
Therefore, these keys should be like any password:
- hard to brute-force (long)
- hard to guess (not known to the attacker)
So, to be clear, onehorsetwohorseredhorsebluehorse is long, but it
is no longer a good key because you all know it.
An alternative is to create random string. We've provided a function for you to do that:
app.use(cookieSession({
  name: 'session',
  keys: [cs304.randomString(20)],
  maxAge: 24 * 60 * 60 * 1000 // 24 hours
}))
With that in place, we can trust our cookie sessions.
Cookie Demo Video
Here is a video of the Cookie Demo. It's less than 10 minutes.
I apologize that it starts with a black screen, but there is a voiceover before I share my screen, so I can't clip the black part out.
Flashing
We now turn to a very cool feature of many web application frameworks called flashing. It is built on cookies and sessions, so it naturally fits here, even though it doesn't seem to have anything to do with them. From the point of view of the developer, flashing is just a convenient way to put a message in the response web page.
Let's start with that: wanting to put a message in the response. Suppose that the handler is doing something on behalf of the user, and we want to let them know whether it worked or not. We'd like to have code like this:
// pseudo-code to demo flashing
let val = someOperation(...);
if( val ) {
    req.flash("It worked! Your data has been successfully saved");
} else {
    req.flash("I'm sorry, it failed.  Please try again or contact tech support");
}
By "flash" we mean to squirrel away a message that will be displayed when the page is rendered. The page template can then look something this:
<!-- pseudo-code to demo flashing -->
<%# assumes that msgs is a list of strings, and
    if that list is non-empty,
    creates a div with a paragraph for each message %>

  <% if (msgs) { %>
  <div id="flashes">
    <% msgs.forEach( (msg) => {%>
    <p><%= msg %></p>
    <% }) %>
  </div>
  <%# end of if statement %>
  <% } %>
That's almost exactly what the express-flash module does for us, with a few modifications:
- We can categorize our messages, so we essentially have different lists, like 'errors', 'info', 'warnings' etc.
- The EJS file can format and style each list however we choose
- Because the lists of messages are squirreled away in the session, we can flash a message and it can be rendered after a redirect, which is very cool.
Logins with Flashing
Let's see it in action. I've adapted the login example code above to use flashing. I used two kinds of messages: 'info' and 'error'. The EJS template reports them in separate DIV elements, with different IDs, so that we can style the messages differently. Here's the EJS template:
  <% if (messages.error) { %>
  <div id="errors">
    <% messages.error.forEach( msg => {%>
    <p><%= msg %></p>
    <% }) %>
  </div>
  <% } %>

  <% if (messages.info) { %>
  <div id="info">
    <% messages.info.forEach( msg => {%>
    <p><%= msg %></p>
    <% }) %>
  </div>
  <% } %>
</div>
This is just our regular list-handling code, just using properties of
the messages variable, which is magically available in rendering, so
we don't have to pass it as an argument to res.render.
I actually made that block of code a partial so we plug it into every template very easily. Once you start using flashing, you'll want to use it all the time, so that's worth doing.
The CSS looks like this:
#errors { font-weight: bold;
          font-size: 1.25em;
          color: red;
        }

#info {
    color: green;
}
The routes look very similar. Here's the /login/ route:
app.post("/login", async (req, res) => {
  try {
    let visits = req.session.visits || 0;
    const uid = parseInt(req.body.uid);
    const db = await Connection.open(mongoUri, DBNAME);
    var existingUID = await db.collection(STAFF).findOne({uid: uid});
    if (!existingUID) {
        req.flash('error',
                  `No such user ${uid}; please try a different UID`);
        return res.render("index-flashes.ejs", {visits, username: null})
    } else {
        let name = existingUID.name;
        console.log(existingUID, uid, name);
        req.session.uid = uid;
        req.session.name = name;
        req.session.visits = 1;
        req.session.logged_in = true;
        req.flash('info',
                  `Logged in as ${name} (${uid}).`);
        return res.redirect('/visit');
    }
  } catch (error) {
      return res.send(`Form submission error: ${error}`)
  }
});
So, our error message is just a method call, like req.flash("error",
"message") or req.flash("info", "message"). We can then render our
template as usual. Or, redirect. If we redirect, the message rides
along on the cookie, to the browser, and back again, and when we
finally render a template, it will be displayed then. That's very
clever and convenient.
Logout is pretty similar as well:
app.post('/logout', (req,res) => {
  if (req.session.uid) {
    req.session.uid = null;
    req.session.name = null;
    req.session.logged_in = false;
      req.flash('info',
                `Logged out; please come again!`);
      return res.redirect('/')
  } else {
      req.flash('error',
                `Can't logout; you are not logged in!`);
      return res.redirect('/')
  }
});
POST-Redirect-GET
POST-REDIRECT-GET pattern when handling POST requests.
We'll talk about the Post-Redirect-Get pattern in class.
Developing with Cookies
One of the difficult things about using cookies is that when your re-start your app, it might not restart from "scratch". That is, your prior cookies may still be in the cookie jar. We'll see that in the demo. I will also demonstrate how to delete the old cookies so that you can start over from scratch.
Another option is to run the application in an "incognito mode" browser window or "private window" and close the window when you are done. Those modes don't save cookies.
Using the Chrome Developer Tools
Because cookies are a "hidden" part of the HTTP requests and responses, observing them and debugging them can be harder. Fortunately, the Chrome Developer tools make this easy. (Other developer tools can do this as well, but I'll only teach you how it's done in Chrome). There will be a video demonstration of these tools, but I'll do a brief textual description now.
See Chrome DevTools
In both descriptions below, you enter the Chrome Developer tools in the usual way. I usually use command-option-j on my Mac.
Network Tab
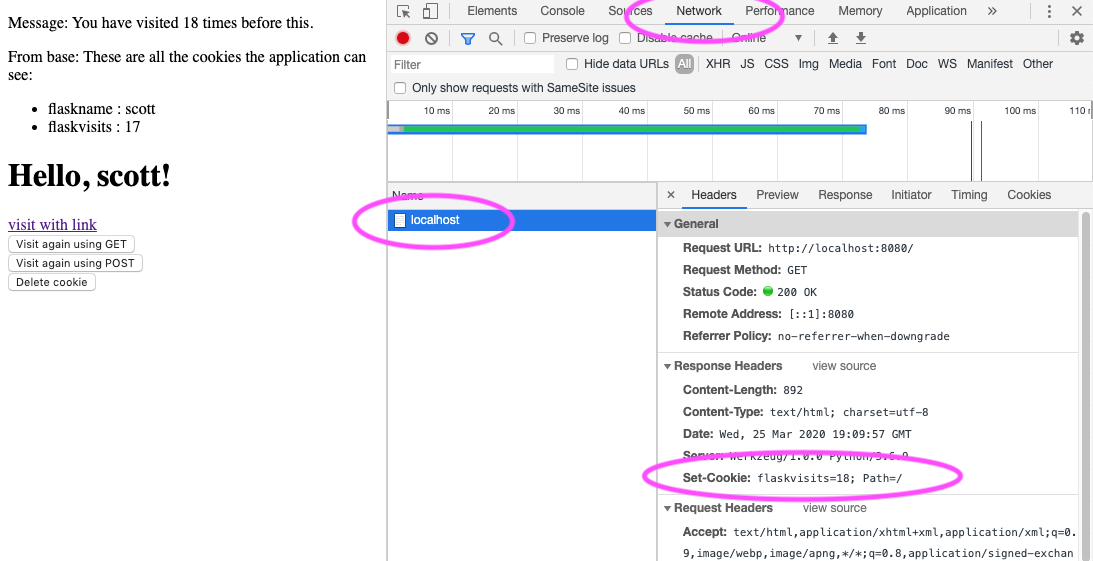
First is the network tab. You'll find that at the top of the devtools window, and if you click on it, it will show you the browsers's requests and the server's response. It will only show you new ones though, so usually you switch to that tab and then issue a request (say by clicking a link or submitting a form). In the screenshot below, I have highlighted (with magenta ovals) the following noteable areas:
- The chosen network tab (note the blue underline)
- The request itself (
localhostin this case) - The
set-cookieheader in the response. Here, theflaskvisitscookie is set to 18.
Application Tab
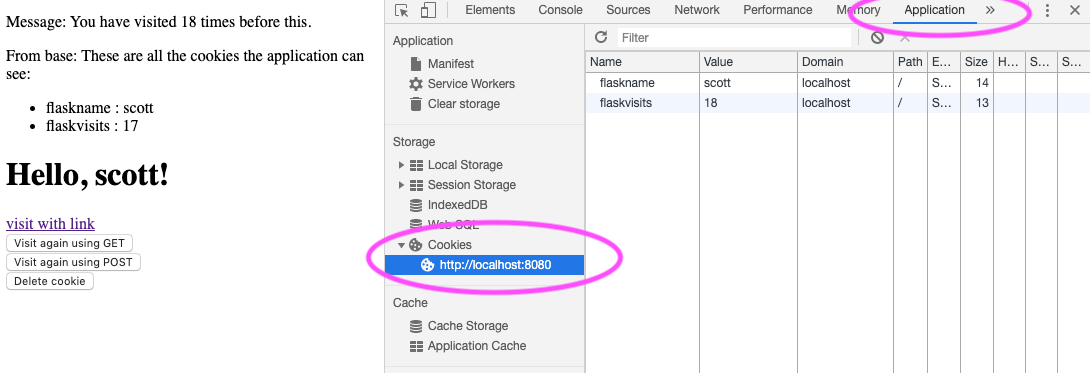
To discover what cookies are set for different applications, you can use
the DevTools applications tab. In the screenshot below, I chose that
tab, then toggled the triangle next to cookies and chose the
http://localhost:8080/ tab. Both are highlighted with magenta ovals. The
devtools then shows the two cookie values.
If you double-click on any of the cookie values, you can modify them. If
you right-click on the value, you'll get a menu of options, including
"delete", so you can delete the value when you are developing and want to
start over. Alternatively, if a line is highlighted, pressing the delete
key will delete it.
Video of Dev Tools
Here is a Video of the Cookies Demo with the Dev Tools
Like the earlier one, this starts with a black screen, but there is a voiceover before I share my screen, so I can't clip the black part out. Sorry.
This is also in our videos, if you prefer YouTube videos.
Summary
- sessions are the notion of providing continuity over a series of web interactions, such as remembering the user's shopping cart or continuing the user's authentication, so the user doesn't have to login repeatedly.
- In our use of Express, sessions are built on top of cookies, so the session information is represented as text that is passed back and forth between the web browser and the Flask server.
- Specifically, there is a cookie called
sessionthat Express creates and maintains for you - To avoid tampering by the user, the session cookie is digitally
signed using an array of
keysthat are part of the configuration - The information in the
sessioncookie is automatically parsed by the middleware and put inreq.sessionthat is available in all your handler functions. - The
req.sessionvalue is a dictionary object, so you can get/set values using the usual JavaScript dictionary syntax.