CS307: Animation
Plan
- Recap and questions: Cross product
- Overview of basic animation
- Spinning cube and rotating stuff in Three.js
- Exercise: Moving & spinning cube — foiling the escape!
- Exercise: Moving parts — kick off!
- Recap and questions: Positional techniques for animation
- Example: Bouncing ball
- Exercise: Moving and decaying bouncing ball
- Brief note about detecting collisions
- Recap and questions: Absolute time
- Exercise: Jack-in-the-box
Recap: Cross Product


Basic Animation
We'll implement basic animation using the following approach:
- invoke the
requestAnimationFrame()function, built into modern browsers - (conceptually)
loop
through frames like this (it's like recursion):function next() { redoScene(); TW.render(); requestAnimationFrame(next); } - stop animation with
cancelAnimationFrame(), providing anidreturned byrequestAnimationFrame(), for example:// stored so that we can cancel the animation var animationId = null; function animate(timestamp) { oneStep(); // updates scene and renders animationId = requestAnimationFrame(animate); } function stopAnimation() { if ( animationId != null ) { cancelAnimationFrame(animationId); } } - keyboard callbacks:
TW.setKeyboardCallback("0", firstState, "reset");
TW.setKeyboardCallback("1", oneStep, "take one step");
TW.setKeyboardCallback("g", animate, "go: start");
TW.setKeyboardCallback(" ", stopAnimation, "stop");
Of course, you don't need to have this interface — most of the Three.js and Dirksen animations just run immediately and forever.
Spinning Cube
Let's review the code for the spinning cube from the reading:
Rotating Stuff in Three.js
There are two things to keep in mind when rotating things around multiple axes:
- the order of rotations around the X, Y, and Z axes matters
- Three.js has two ways to specify these rotations that are not equivalent
Let's explore these two points with the following demo:
- Initially, the leftmost cube (0) and "good" rotation method are selected. Rotate this cube by 90 degrees around the X axis and then 90 degrees around the Y axis (enter xxxxxxxxyyyyyyyyy)
- Select the middle cube (1) and perform the rotations in the opposite order (enter 1 and then yyyyyyyyyxxxxxxxxx). Observe the difference in behavior.
- Now select the rightmost cube (2) and "bad" rotation method (b) and repeat the 90 degree rotations around the X axis and then Y axis (enter 1, b, and xxxxxxxxxyyyyyyyyy) (so far so good...)
- With the rightmost cube and bad method still selected, continue with more rotation around the X axis (enter xxxx...) - is the cube correctly rotating around the "new" position of the X axis?
- Select the leftmost cube (0) and "good" method, and again continue with more rotation around the X axis (enter xxxx...) - how does the behavior compare to the "bad" method?
Here is the key piece of code that shows how the two rotation methods are implemented:
function setCubeRotation(time) {
    var degs = degrees(cubes[curr].rotation);
    console.log("before: " + JSON.stringify(degs));
    if ( rotationMethod == "bad" ) {
        switch(axis) {
        case "x": cubes[curr].rotation.x += TW.degrees2radians(10); break;
        case "y": cubes[curr].rotation.y += TW.degrees2radians(10); break;
        case "z": cubes[curr].rotation.z += TW.degrees2radians(10); break;
        default: throw "no such axis";
        }
    } else if ( rotationMethod == "good" ) {
        switch(axis) {
        case "x": cubes[curr].rotateX( TW.degrees2radians(10) ); break;
        case "y": cubes[curr].rotateY( TW.degrees2radians(10) ); break;
        case "z": cubes[curr].rotateZ( TW.degrees2radians(10) ); break;
        default: throw "no such axis";
        }
    }
    var degs = degrees(cubes[curr].rotation);
    console.log("after: " + JSON.stringify(degs));
}
These seem equivalent, but they are anything but!
Moving & Spinning Cube
In the following exercise, we'll add movement of the spinning cube in the X and Y directions, and stop the animation automatically when the cube leaves a surrounding wireframe "cage."
Exercise: Foiling the escape
The starting point is this moveCube-start.html code file, which builds on the spinning cube example.
The following things have been added to the starting code:
- two parameters
txandtyin the GUI, which allow the user to control the movement of the cube between frames, in the X and Y directions (defined in the scene coordinate frame) - two properties of the
animationState,pxandpy, that store thexandyposition of the cube as the animation progresses
Add code to do the following (see comments in the code):
- add a wireframe cage around the initial position of the cube, which is twice the size of the cube
- update the position of the cube based on the
txandtyparameters set by the user in the GUI — update both theanimationStateand thecube.position - modify the
animate()function to capture the logic outlined in the comments in the skeleton below:function animate(timestamp) { oneStep(); // if the cube's position is outside the cage // stopAnimation(); // otherwise // animationId = requestAnimationFrame(animate); }
Your solution might look like this moveCube.html
Moving Parts
Long ago, we constructed a jointed leg with nested frames. The code demo allowed us to move individual parts of the leg through the GUI controls. In the next exercise, we'll animate the leg, enabling each part to rotate through its full range of motion over the extent of the animation.
Exercise: Kick off!
The starting point is this movingLeg-start.html code file, which we'll examine in detail.
Your goal is to complete the code needed to create this animated leg (please do not peak at the solution!)
There are three parts of the code to complete, described in comments in the code file:
- complete the
updateState()function to update the ankle, knee, and hip rotations, and increment the step (frame) number - complete the
oneStep()function to perform one step of the animation - modify
animate()to stop the animation when a desired total number of steps of the animation is reached
In what ways does this animation differ from a natural leg swing, for example, to kick a ball? How might you modify the code to create a more natural leg kick?
(This page on JQuery easing functions that can be integrated into JavaScript programs, may provide some hint.)
If you finish early, think about how you might improve the animation in other ways, for example:
- swing the leg back and forth
- when the leg reaches its final state, automatically return the leg to the initial state
- currently, you can continue the animation after it reaches its final state (by entering 'g' again), eventually sending it into bizarre contortions where the calf moves through the thigh, among other things. How might you prevent this?
- add a ball on the "ground" that the leg kicks away when the foot reaches the ball
Positional Techniques for Animation
For positional techniques, updating the scene depends explicitly on the current time:
function updateState() {
    time += deltaT;
    updateModel(time);
    TW.render();
}
Bouncing Ball
Let's explore the bouncing ball demo from the reading:
We know from physics that the height of a bouncing ball over time follows a cosine curve.
The following plot shows |cos(t)| for values of t from 0 to 10:

Suppose we want the time period for each bounce to be some desired amount P. How can we use the cosine curve to determine the height of the ball at a particular moment in time?

Here, we want to map
- an input
time
that goes from 0 to P between bounces, to - an output
angle
that goes from 0 to π between peaks of the cosine function.
We also want to know the height of the ball at a particular time, so we want to map
- an input value of the cosine function that ranges from 0 to 1, to
- an output height of the ball that ranges from the radius of the ball to a desired maximum height
The code for the bouncing ball defines a function, linearMap(), to help
with this calculation. Given a value x for a quantity that ranges
from minx to maxx, this function returns the
corresponding value y on a scale that ranges from
miny to maxy.
var y = linearMap(x, minx, maxx, miny, maxy);
linearMap() is used by the setBallPosition()
function to compute the position of the ball from the current time.
Decaying Bouncing
In the real world, balls don't bounce forever, they come to a stop. Typically, the height of each bounce is a bit smaller than the one before, but it's not linear — instead, the height of each bounce is some fraction of the one before, looking something like this:

Exercise: Moving and Decaying Bouncing Ball
In this exercise, you'll simulate a bouncing ball whose height decays over time. The ball will also move to the right over time, with a specified velocity in the X direction.
You'll start with this initial code file, bouncingBall-start.html, which includes code for the original bouncing ball, with the following modifications:
- two global variables have been added,
ballVelocityXandballHeightDecay, both initially set to 0.9 - an attribute has been added to
animationStateto store the current X position of the ball,animationState.ballX - the value of
animationState.ballXis used to set the X position of the ball in themakeBall()function
Your task is to modify the setBallPosition() and
updateState() functions to implement the change in X position
of the ball and decay of ball height over time.
Hints:
- the X position of the ball can be computed from velocity and time:
x = Vx * t, wheretis the time elapsed since the start of the simulation - the
ballHeightDecayparameter captures the rate of decay of ball height over time. LetbHrefer to the height of the ball if there were no decay, letbH'be the adjusted height of the ball with decay, and letDrefer to theballHeightDecayfactor. The adjusted ball height as a function of time is given by the following expression:bH' = bH*(D)tThe
Math.powfunction can be useful here.
Your final simulation might look like this:
bouncingBall-decay.html
(again, please don't peak at the solution code)
nn
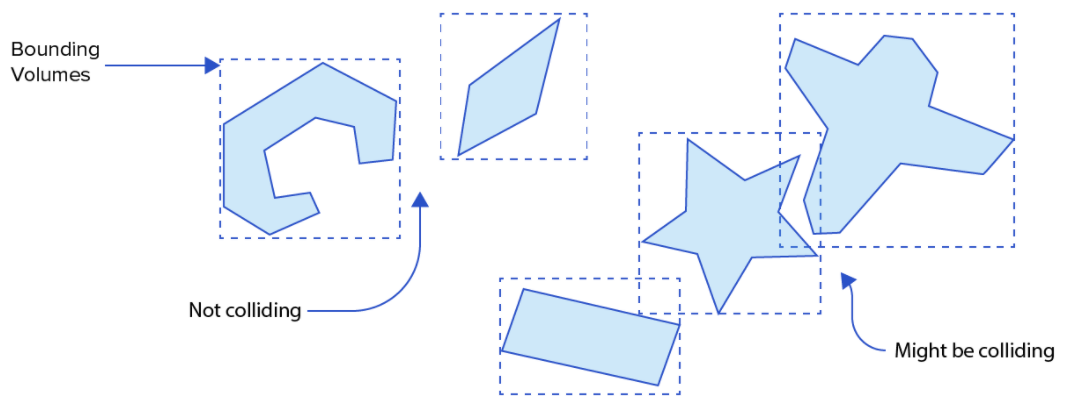
Brief Note About Detecting Collisions
Imagine a set of objects moving in 3D — how can we detect potential collisions in a way that is computationally efficient? Bounding boxes enable a quick check for overlap in the volumes surrounding each object, but for complex shapes, this is a very challenging and computationally expensive task. Collision detection, and the related task of obstacle avoidance, are also important and challenging tasks in robotics.
Absolute Time
The time variable in the above examples is not absolute time. The
JavaScript function setInterval() can be used
to control the timing of an animation more closely, as shown with this
spinning square:
Here is the code, which uses the JS Date
object to view the time of each call to drawSquare():
var square;
var nframes = 0;

function drawSquare () {
     console.log(new Date());      // note the changing seconds
     if (square != null) {
         scene.remove(square);
     }
     square = new THREE.Mesh(new THREE.PlaneGeometry(10,10),
                             new THREE.MeshBasicMaterial({color: 0x009900}) );
     square.rotation.z = nframes*(Math.PI/6);
     scene.add(square);
     nframes += 1;
     if (nframes > 10) {
         clearInterval(clock);     // stop the timer started with setInterval()
         console.log("stopped");
     } else {
         TW.render();
     }
}
var clock = setInterval(drawSquare, 1000);
Exercise: Jack-in-the-Box
The aim of this exercise is to simulate a Jack-in-the-Box. First download the starting code file, jackBox-start.html, and accompanying clown.js.
The starting code creates a simple blue box that's added to the scene, and also creates a clown that's not yet added to the scene.
Using the code for the spinning-square demonstration above as a guide (I'd suggest copy-pasting all the code in the above box), create a simulation in which a clock-hand is rotated on the front of the box for some number of fixed-time frames. When the timer is done, the clown should appear, looking something like this:

Here's a possible solution: jackBox.html
Preparation for Next Time
Next time, we'll talk about advanced geometries, such as Bezier curves and surfaces, and lathe, extrude, and tube geometries. To prepare:
- Reading for Thursday: Bezier Curves and Surfaces
- Submit Sakai Quiz by Wednesday evening at 9:00 pm EST — you'll have an hour to complete the quiz, which is "open book/notes"
Due on Friday at 11:00 pm EST:
HWK 4:
Textured Barn and Creative Scene
(Note: automatic 48-hour extension on this assignment)