CS307: Texture Mapping 1: Simple Image Mappings
Lit Scene Partners
- 2 Ailie+Martha
- 4 Alo+Genevieve
- 6 Amy+Elisha
- 8 Anastacia+Gabby
- 10 Ari+Mulan
- 12 Ariana+Jenny
- 14 Claire M+Hana
- 16 Claire T+Lana
- 18 Emily+Marilyn
- 20 Faith+Rik
- 22 Heidi+Joyce
- 24 Ingrid+Kate
- 26 Lindsay+UGyeong
- 28 solo Hae Rin
Plan
- Overview of texture mapping
- Mapping an image onto a plane
- CORS and setting up a local server
- Exercise: Load image files from your local machine
- Exercise: Create a panoramic view of Wellesley
Texture Mapping Recap
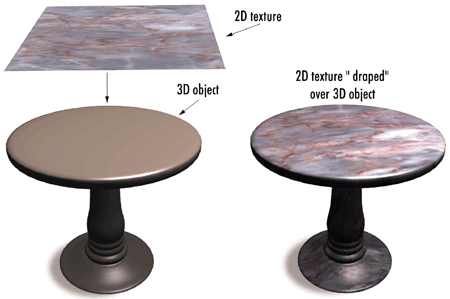
- At its most basic, a texture is an array of pixels. So is an image. A texture can be a synthetically generated pattern of lightness or color, or an image taken from a camera.
- A texture pattern can be mapped or "painted" onto any surface.
A texture pattern is typically a 2D thing, but can be mapped onto
2D or 3D surfaces.
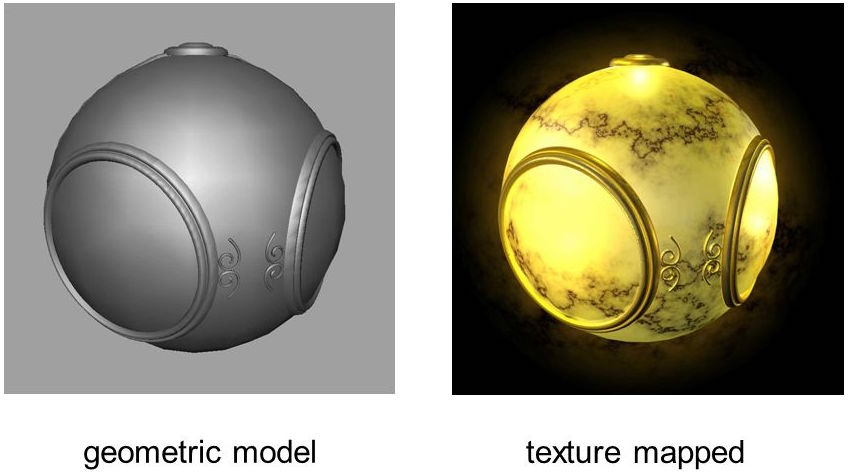

- Each vertex of a triangular face can have texture parameters. Typically, the texture parameters for a whole geometry go from 0-1 (but not always), and the texture parameters for faces are interpolated.
- When loading textures from an image, we need to consider that it takes a non-negligible amount of time for the image to load, so we will need to write event handlers for the after load event.
Mapping an Image onto a Plane
Consider this relaxing floral scene in which a single image is mapped onto three planes.
Three.js has a THREE.TextureLoader class to load an image
to be used for texture mapping, which enables us to provide an event handler
that among other things, can render the scene after the image load is complete.
This is the key code in the floral display example:
var loader = new THREE.TextureLoader();

loader.load("relaxation.jpg",
            function (texture) {
                displayPanels(texture);
            } );
The image is stored in a THREE.Texture object that is passed as
input to an anonymous function (the event handler) that is provided as the second
input to the load() method.
Here is the definition of the displayPanels() function, which
renders the scene at the end:
function displayPanels (texture) {
    // plane geometry with texture-mapped floral image
    var planeGeom = new THREE.PlaneGeometry(10,10);
    var planeMat = new THREE.MeshBasicMaterial(
                           {color: 0xffffff,
                            map: texture} );
    var planeMesh = new THREE.Mesh(planeGeom, planeMat);
    scene.add(planeMesh);

    // repeat texture mapping on right panel
    var planeMeshR = planeMesh.clone();
    var dist = 5*Math.cos(Math.PI/4);
    planeMeshR.position.set(5+dist, 0, dist);
    planeMeshR.rotation.y = -Math.PI/4;
    scene.add(planeMeshR);

    // repeat texture mapping on left panel
    var planeMeshL = planeMesh.clone();
    planeMeshL.position.set(-5-dist, 0, dist);
    planeMeshL.rotation.y = Math.PI/4;
    scene.add(planeMeshL);

    TW.render();    // render the scene
}
Three.js requires that images used for texture mapping have dimensions that are powers of 2. In this example, the image has 256x256 pixels, and it is mapped onto square planes.
Quiz Questions
I'll address your quiz questions now.
CORS and Setting up a Local Server
Before we launch into our first exercise, we need to deal with a bit of unpleasantness called CORS, for Cross-Origin Resource Sharing. The problem arises because, for security reasons, JavaScript is not allowed to do what the browser can do: request resources from another domain.
What this means for us is:
Your images and your html file have to be in the same domain.
This means you can't work with textures on your local machine without setting up a server. Fortunately, this is easy.
There's more about CORS in the
reading, and we'll do an
exercise here to demonstrate the problem and solution. We'll use
the Run Local Server
option, using Python, described in the Three.js
documentation.
Exercise: Loading image files on your local machine
Save the flower-display.html code file on your Desktop (be sure to save it as Webpage, HTML Only). Also save this image into your Desktop (be sure to keep the same filename).
Open your local flower-display.html file in your browser and observe the
error message that appears in the JavaScript Console.
Now follow these steps to run a local server on your Mac or laptop:
- Start a terminal window
-
cdto the directory that has your downloaded HTML file in it, in this casecd ~/Desktop. - Start a web server on port 8000 (by default) using Python:
python -m SimpleHTTPServerOR, even better:
python3 -m http.server(We did this in the first week of class.)
- Go back to your web browser and try the following URL:
http://localhost:8000/flower-display.html
You should now see the display of three panels with the flower scene.
Mapping Multiple Images onto Scene Objects
The TW package provides a helper function, TW.loadTextures()
that takes an array of URLs for multiple image files and a callback function as
inputs, and invokes the function on an array of THREE.Texture objects
that store the multiple images.
Here is some skeleton code:
TW.loadTextures(["image1.jpg", "image2.jpg", ...],
                function (textures) {
                    ...
                } );
You do not need to create a THREE.TextureLoader object in this
case, as TW does this for you.
Exercise: Create a Wellesley Panorama
Save these wells1.png, wells2.png, and wells3.png images on your Desktop.
Create a copy of your flower-display.html code file under a
new name, and modify the new file to load all three Wellesley images
and place them on the three different planes, to create a panorama of campus:
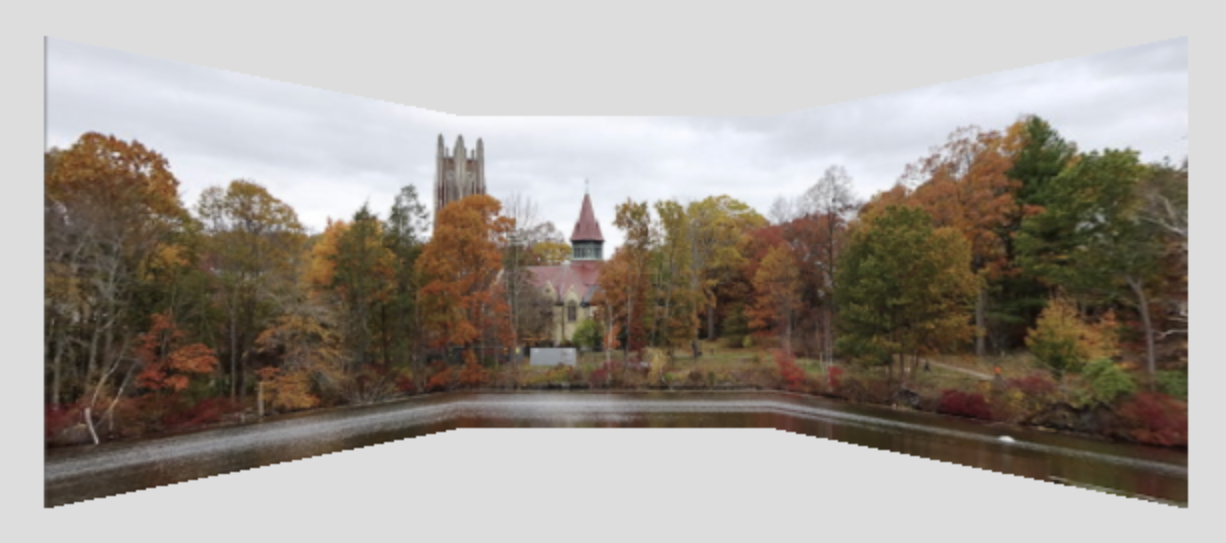
Remember that the texture is part of the material, so you'll need to create three different materials, instead of just cloning the mesh.
Your solution might like like this wellesley3.html