CS307: Introduction to Three.js Programming
Plan
- Recap of reading and questions
- Save and load a copy of the Barn demo
- Exercise: Local library files
- Exercise: Changing width
- Exercise: Two barns
- Exercise: Make a church (add a steeple to the barn)
- Exercise: Add a "hex sign" to the church
- Overview of HW1
Summary
We will use three APIs:
- WebGL, a subset of OpenGL (we won't actually see much of it)
- Three.js, a JavaScript library built on top of WebGL
- TW, a home-grown set of conveniences and shortcuts created by Scott Anderson
Graphics are drawn on a canvas on the webpage
As shown in the skeleton code below for the scene with a box, you need to create:
- a scene object
- stuff to look at, added to the scene object
- a renderer object
- a camera object
var scene = new THREE.Scene();                // scene object
var boxGeom = new THREE.BoxGeometry(4,6,8);   // stuff to look at
var boxMesh = TW.createMesh(boxGeom);
scene.add(boxMesh);
var renderer = new THREE.WebGLRenderer();     // renderer object
TW.mainInit(renderer,scene);
var state = TW.cameraSetup(renderer,          // camera object
                           scene,
                           {minx: -2.5, maxx: 2.5,
                            miny: -3.5, maxy: 3.5,
                            minz: -4.5, maxz: 4.5});
The "stuff to look at" are meshes that consist of geometry and material
- Geometry is comprised of vertices and faces (triangles in Three.js)
- Vertices of triangular faces are specified in counterclockwise order, as viewed from the front
Building a Geometry From Scratch
Step 1: Create a new THREE.Geometry object and
define its vertices:
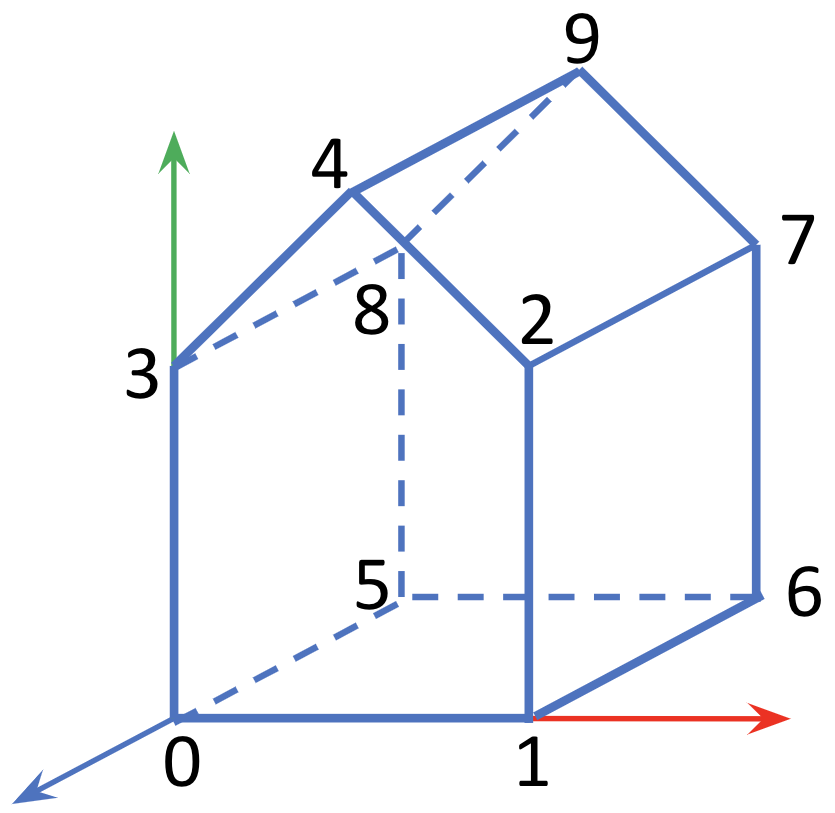
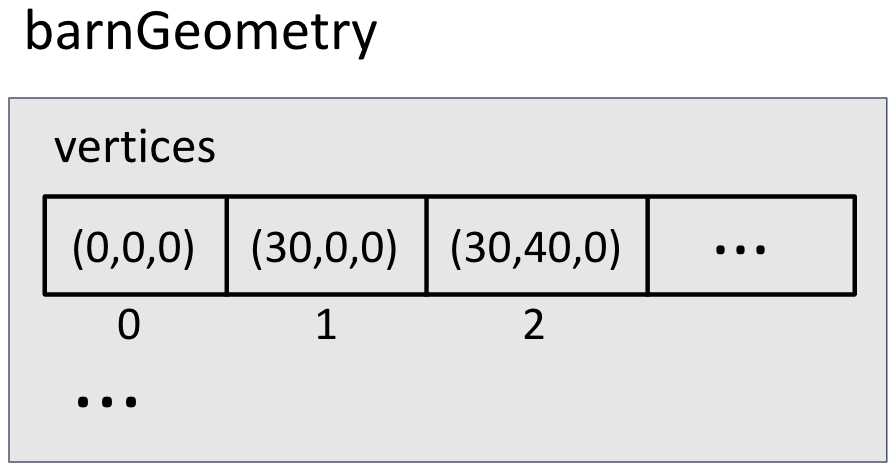
var barnGeometry = new THREE.Geometry();
// add vertices to the barnGeometry.vertices array -
// indices of this array correspond to the above labels
barnGeometry.vertices.push(new THREE.Vector3(0, 0, 0));
barnGeometry.vertices.push(new THREE.Vector3(30, 0, 0));
barnGeometry.vertices.push(new THREE.Vector3(30, 40, 0));
...
Side note: In Three.js, the same class, THREE.Vector3(x,y,z)
is used to specify both a vertex (point) and a vector:


Step 2: Divide each object surface into triangular faces, and
define each face using three vertex labels (indices of the
barnGeometry.vertices array).
Keep in mind:
- each triangular face has a front and back side
- by default, Three.js only renders the front side (the back side is invisible)
So how do you define which side is the front?
- imagine you're looking at the side you want to define as the front side...
- ... and list the three vertices in a counterclockwise order, as viewed from this side
- Three.js will interpret this side as the front side
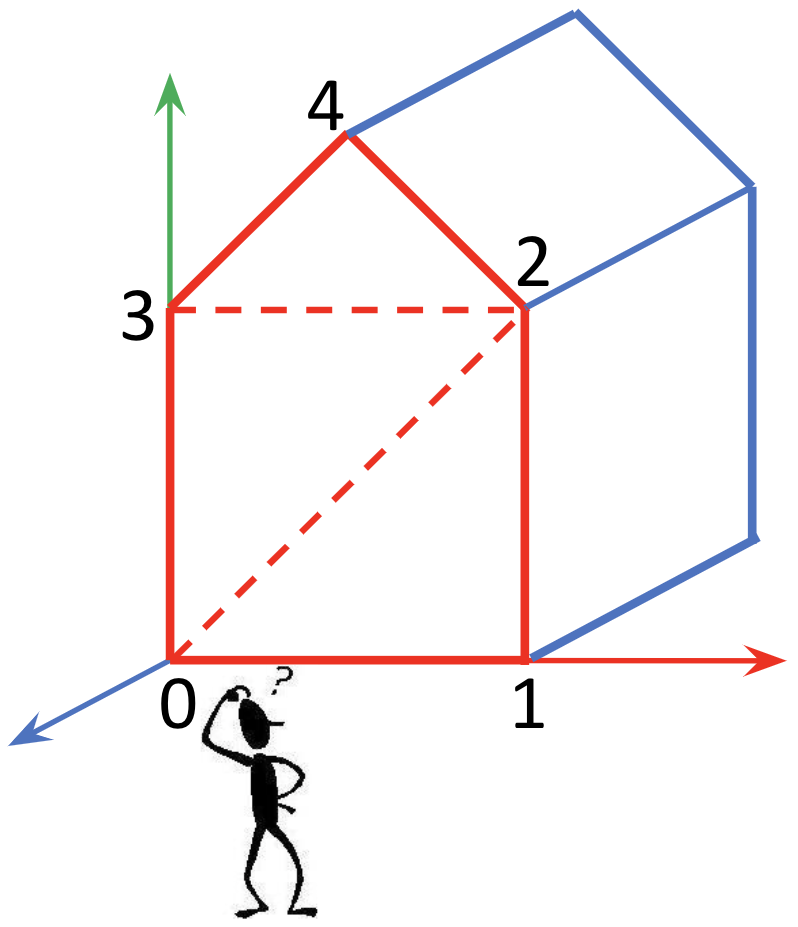
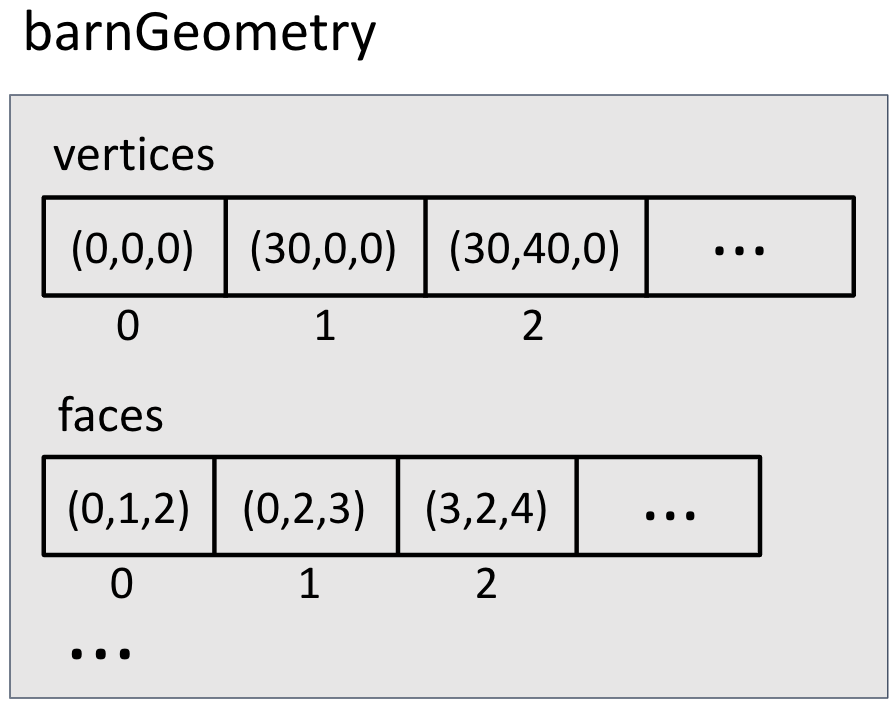
// front side of each of these faces is outside the barn
barnGeometry.faces.push(new THREE.Face3(0, 1, 2));
barnGeometry.faces.push(new THREE.Face3(0, 2, 3));
barnGeometry.faces.push(new THREE.Face3(3, 2, 4));
...
How would you specify the face outlined in red, if you want the outside of the barn to be visible?
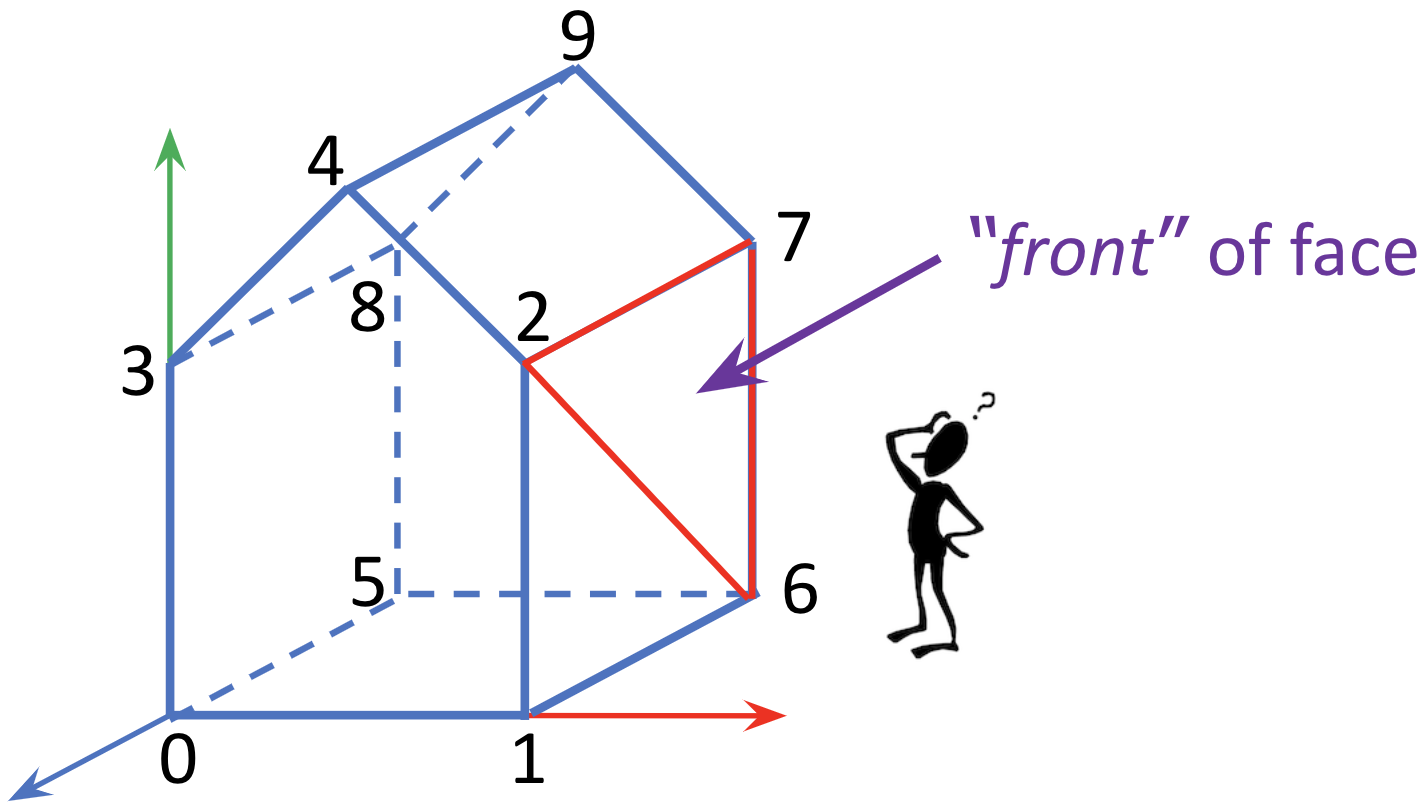
Let's look at the code to create the barn
In case you're wondering how faces look when the vertices are specified in the "wrong" order:


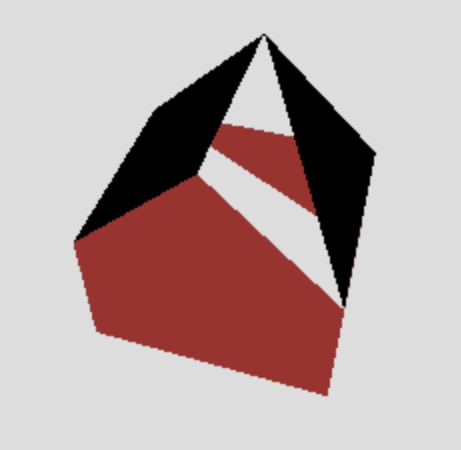
Here is the code that created this unfortunate barn, which also provides a sneak preview on how to create a mesh with desired colors, and how to control which side is rendered.
The WebGL Pipeline
OpenGL/WebGL is a pipeline. Vertices, faces, materials, lights, etc., go in one end, and pixels come out the other end

Set up our Stuff
- Visit the barn and save
the page to your Desktop as
barn.html. You can do this by selecting theFile>Save Page As...menu item and specifying the file name asbarn.htmland Format as "Webpage, HTML Only". - In a new tab, visit the local file from your browser:
File>Open File...- Navigate to Desktop
- Choose
barn.html
The URL will be something like file:///Users/youraccount/Desktop/barn.html
Working Without a Network
View the source of the file you downloaded to your Desktop. Note that it starts by loading three JavaScript files from the web, all from /~cs307/threejs/libs.
three-r95.all.js, version 95 of the Three.js codeOrbitControls-r95.js, which is the extra code for the orbiting cameratw-sp21.js, which is the Spring 2021 version of our TW code. This file contains theTW.createBarn()function.
What if you have a laptop, hiking in the White Mountains on a glorious fall day, far from any internet connection, and you have a sudden inspiration to do some graphics coding? What do you do then?
First, try sitting down to view the beauty of nature, wait for the feeling to pass, and remind yourself that there's more to life than work...
If that doesn't work, you can hope that you had the foresight to have a a local copy of those files. If they're on your laptop, you can make the appropriate changes to your program file, and load the local copies instead.
Exercise: Using Local Library Files
(Do this exercise individually, on your own computer.)
You can "manually" download the necessary library files to your local machine
and modify the source code to use the local files, but here we'll use a shortcut.
Again save the code for the barn using the File>Save Page As...
menu item, but this time save it as "Webpage, Complete" and use a different
name, like barnComplete. You'll see both an HTML file and a folder
(barnComplete_files) on your Desktop. Load the new HTML file into
your browser and view the source. What changed in the code statements that load
the library files?
Warm-up Exercises
Exercise: Changing Width
This is a relatively quick exercise, to get you warmed up.
- Copy the original
barn.htmlto another file, saywide-barn.html. - Edit the new file to change the width of the barn (
barnWidth), say to 50. - View the changed
wide-barn.htmlfile in your browser. Is this what you expected? - The variable name
barnWidthis supplied in the call to theTW.createBarn()function, and is also used to specifymaxxfor the bounding box in the later call toTW.cameraSetup(). In both places, change the variable name (barnWidth) to numeric constants. Use a larger value in the call toTW.createBarn()relative to the value chosen formaxx.What do you notice about the wide barn in this case?
- You might have something like
this wide-barn.html. In this sample
solution, the barn is wide (50) but
maxxfor the camera is only 20, so the camera setup is off. The original code allowed us to change the width of the barn in just one place and the camera setup changed automatically. This is a good reason to use variables instead of numeric constants!
- You might have something like
this wide-barn.html. In this sample
solution, the barn is wide (50) but
- Change the numeric constants back to the variable
barnWidth. The bounding box for the original barn truncates some of the roof of the barn from view. Modify the value formaxyin the bounding box, using an expression with variable names, so that the entire roof is visible. (Hint: In thecreateBarn()function, how is the y coordinate of the roof of the barn defined?)- You might have something like this full-barn.html.
In the last class, you adjusted the position of meshes using position.set():
sphereMesh.position.set(5,0,0); // x,y,z coordinates of the center
In Three.js, an instance of Mesh (actually, an instance of
Object3D, which is the parent class of Mesh) has a property
called position that is a Vector3, which has a method
set(x,y,z) that can be used to set the components of the vector. This
will come in handy for the next exercise.
Exercise: Two Barns
Modify the code from the previous exercise to add a second barn that is
- half the size of the first barn
- shifted to the left of the first barn, leaving a gap between the two barns
Adjust the bounding box so that you can see the two barns in their entirety. Your result might look something like this:
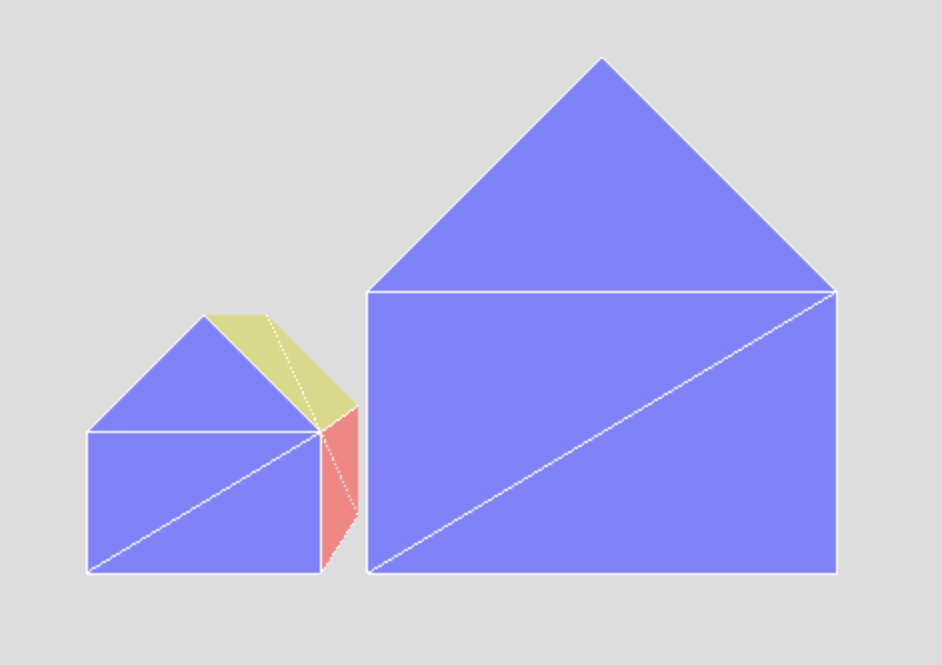
Optional: Add more barns to your scene, with different sizes.
A possible solution: two-barns.html
Object Origins
The code to set the position of the barn is simple, and relies on a key concept,
which is the notion of the position
of the barn. We define this as
the location of the barn's origin
, which in this case, is the lower left
front corner. For built-in geometries, the location of the origin is given, for
example, it's at the center of a THREE.BoxGeometry or
THREE.SphereGeometry. For geometries that we create from scratch,
the choice of where to place the origin is somewhat arbitrary, but some choices
may simplify the specification of vertex coordinates or placement of
the geometry in the scene. We'll see more about this next week.
Adding a Steeple
Now, let's discuss adding a steeple to our barn to convert it into a church. The result will look like this:
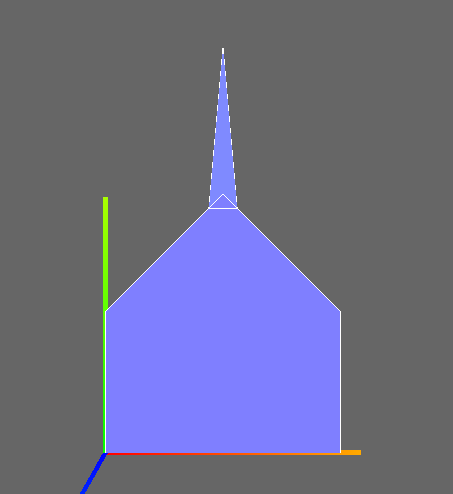
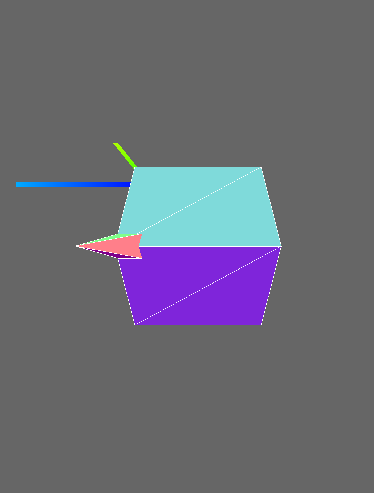
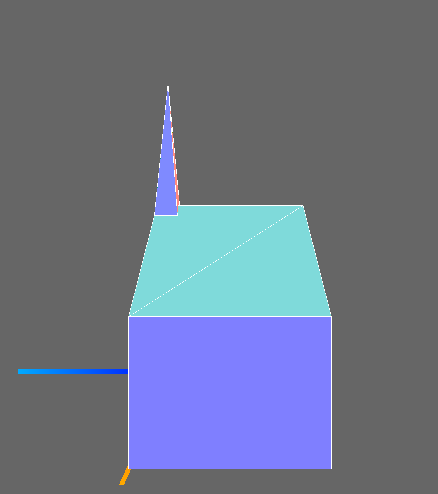
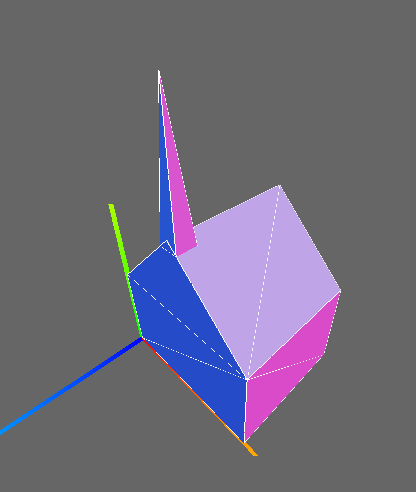
The pictures above were based on the following:
- The barn has width 50, height 30, and depth 40
- The steeple is right in the middle of the ridge
- The steeple's base is a square, 6 units on a side
- The steeple is 36 units high, from base to tip
Here's now the steeple might look in wireframe
from the front and
from above, with the X (red), Y (green), and Z (blue) axes shown. We will create
a steeple geometry with its own origin at the center of its base.
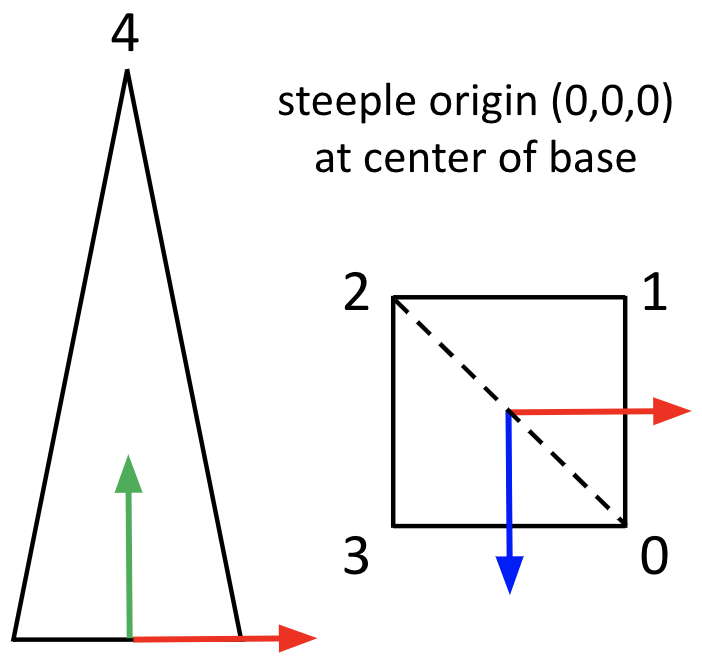
The code that will be the starting point for this exercise has a
partial definition of a function createSteeple() that
creates and returns a geometry for the steeple:
/* Returns a geometry object for a steeple. The origin is
   at the center of the base, so the base vertices are at
   y=0, and x and z at plus or minus half the width */

function createSteeple(width, height) {
    var geom = new THREE.Geometry();
    var w2 = 0.5*width;

    // create the vertices for the base and top
    geom.vertices.push(new THREE.Vector3(+w2, 0, +w2));

    // insert code for the remaining four vertices

    // use the vertices to define the triangle faces

    // base - the front side faces the ground
    geom.faces.push(new THREE.Face3(0, 2, 1));
    geom.faces.push(new THREE.Face3(0, 3, 2));

    // insert code to create the four side faces

    // calculate the normals for surface colors
    geom.computeFaceNormals();

    return geom;
}
Exercise: Make a Church
Using barn-steeple-start.html as a starting point, modify the code to do the following:
- Complete the definition of
createSteeple()by adding code for the remaining four vertices and four faces - Create variables to store the dimensions of the steeple
- Invoke the
createSteeple()function to create the geometry - Make a mesh using
TW.createMesh() - Add the steeple to the scene, positioning it using
position.set() - Adjust the bounding box in the call to
TW.cameraSetup()so that you can see the entire church
Your finished code should should look something like this barn-and-steeple.html
Exercise: Add a Hex Sign
Barns in Pennsylvania Dutch country often have hex signs on them. They usually aren't actually hexagons, but ours will be, as shown in the two pictures below:
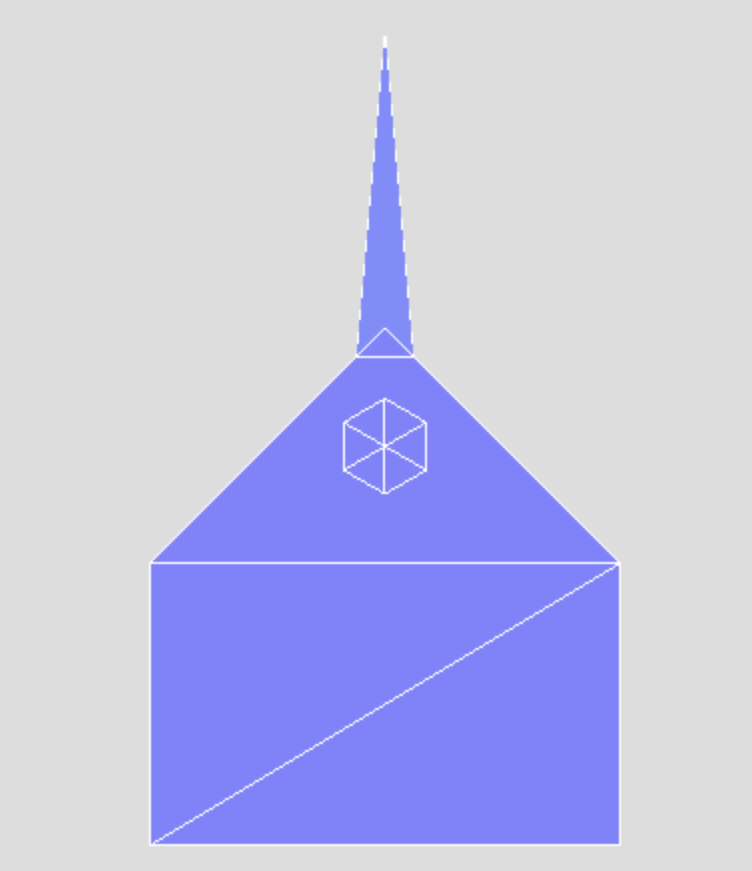
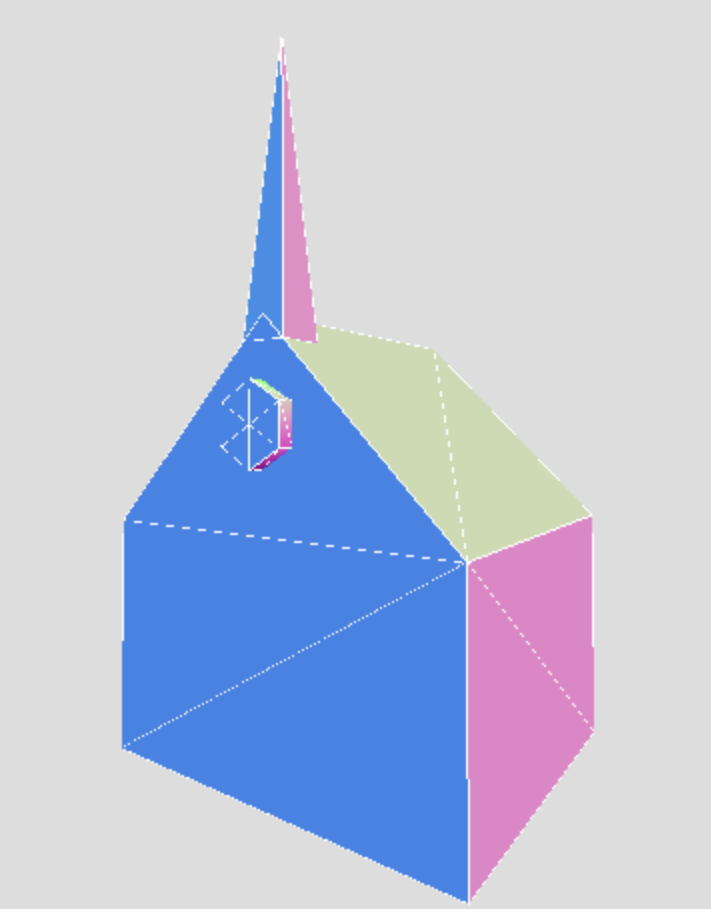
A simple hexagon-shaped sign can be created with the built-in
THREE.CylinderGeometry.
Examine the documentation to see how you can construct a (very
short) cylinder with only six flat sides. (Note that the example
in the documentation assigns a new instance of a
THREE.CylinderGeometry to a constant (const),
but you can create a variable (var) instead.)
Position your "hex sign" on the front of the church, as shown above.
You'll realize that the sign also needs to be rotated.
A THREE.Mesh object can be rotated as follows:
myMesh.rotation.set(xr,yr,zr);
where xr, yr, and zr are
the desired angles of rotation around the x, y, and z axes,
respectively, specifed in radians.
Here is a sample solution
General Coding Tips
- Build and test your code incrementally. Save often!
- Save versions by saving the file to a different filename
(
ex1.html,ex2.html, ...) It will be easier (emotionally) to experiment with things if you know you can go back to an earlier version. - Be willing to create a simple
test
program to see how something works without all the complexity of your larger program. - Be modular, and document as you go. It'll be easier to understand and debug your own code.
To Do for the Next Class
- Reading for Monday: RGB Color and Parametric Lines and Keyboard and GUI Controls
- Submit Sakai Quiz by Sunday evening at 9:00 pm EST — you'll have an hour to complete the quiz, which is "open book/notes"
- Start working on HWK1: Obelisk with your partner