Reading: User Interaction
So far, we've mostly been creating images and animations, rather than interacting with the user. Our interaction has mostly been limited to keyboard callbacks using TW or GUI controls, and even that has been mostly toggling global settings such as lighting or textures, or adjusting parameters. This is fine for producing animations (after all, Pixar movies aren't interactive), but if we want to do games and other kinds of interactive software, we'll need to do better. In this reading, we'll start digging into how to have a more interactive program.
Note that user interaction isn't really part of OpenGL per se. OpenGL is about graphics, not about handling mouse clicks or keyboard input, or tangible user interfaces or any of the many other ways that we can imagine interacting with our devices.
Nevertheless, if you want to build a game or any other software that
combines computer graphics with user interaction (even an
animation might have a pause/resume
feature), we'll want to
confront this.
Interaction in a Web Browser
Web browsers have a reasonably straightforward way of handling keyboard input — until you start looking into it more deeply. Then it becomes a mess. But, let's ignore the mess for now and start with some straightforward elements.
When the keyboard changes state (a key goes up or down ...) the browser
generates an event, which you can add a handler
for. The easiest one to work with
is keyPress. (The
keypress event is deprecated, but may still be
supported by most browsers for the foreseeable future.) Here's how you
bind it:
document.addEventListener('keypress', onKeyPress);

function onKeyPress (event) {
   var key = event.keyCode;
   ...
}
As you can see, you bind the keypress event to a callback
function that is invoked whenever a key is pressed. This callback
function is invoked with an object that represents all the information
about the event. The property we will care about is
the keyCode (which is also deprecated,
but
as of Fall 2018 Google Chrome 69.x provides key, which is
the intended
replacement. Again, we'll proceed as if all is well, which it
probably will be).
The keyCode property returns a numerical code for the key,
which is just the Unicode codepoint for the character (we'll mostly
stick to ASCII), but if you want to
handle a broader range of characters, be my guest.
Working with numerical codes is awkward at best, and a recipe for unreadable code at worse. Computer geeks like myself may have memorized the fact that an upper case 'A' has the numerical code 65, but your code should not have ASCII or Unicode constants like that in it. To convert a Unicode codepoint to a character, you can do this:
function onKeyPress (event) {
   var key = event.keyCode;
   var ch = String.fromCharCode(key);
   alert("You typed a " + ch);
   ...
}
The key attribute of the event object is already a
character, so if you use key, you can skip this
conversion.
What you'll next want to do is figure out what key was pressed and then do something appropriate. For now, let's imagine that what you want to do is something to create a WASD interface to move an avatar around the scene while using a mouse with your right hand:
function onKeyPress (event) {
   var key = event.keyCode;
   var ch = String.fromCharCode(key);
   switch (ch) {
       case 'w': goForward(); break;
       case 's': goBackward(); break;
       case 'a': goLeft(); break;
       case 'd': goRight(); break;
       default:
           console.log("key " + ch + " is not handled");
   }
}
There are, of course, many variations on this kind of code. For example,
several similar blocks might be coalesced. You might
invoke TW.render() after every keypress, in case it changed
the scene, and relieving every keybinding from having to do that.
The most important disadvantage of using keypress is that
it only handles keys that send a Unicode character to the computer. Other keys,
most importantly, the arrow keys and other special keys
like PageUp and Home, do not
generate keypress events. If you want to process those, you
can use the keydown event, but that provides you with
numerical key identifiers, and those are a pain to process. (For
example, both an uppercase and lowercase 'a' are the same key, so they
send the same code. You have to look at the modifier information. Also,
some of the keys send same numbers as certain ASCII codes. Again, see
pages like JavaScript
madness for details.) In this course, we're not going to worry too
much about portability. If it works on your computer and mine, that's
good enough.
For simplicity, we'll stick to keypress.
The event object can also tell whether the shift, control, alt, or meta
keys are down, so you can treat Control-A differently from a
or A.
Mouse Coordinates
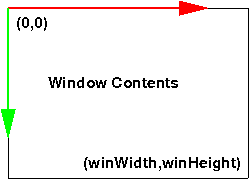
When the monitor redraws the screen, it starts in the upper left corner
and the electron gun sweeps left to right and top to bottom. For that
reason, browsers use a coordinate system where the origin is at the upper
left, the $x$ coordinate increases to the right and the $y$ coordinate
increases going down.
The mouse coordinates are reported in window
coordinates, which is in pixels measured from the upper left. If your
browser is in a 960 by 500 window, those values will be, respectively, the
largest possible $x$ and $y$ coordinates. See this figure:
Suppose you want to process mouse clicks, then the event you want to bind
is, unsurprisingly, click. Thus, the code might look
like this:
document.addEventListener('click', onMouseClick);

function onMouseClick (event) {
    var mx = event.clientX;
    var my = event.clientY;
    console.log("click at (" + mx + "," + my ")");
}
Don't you wish it were that easy? Unfortunately, when we are using a
canvas in a web browser, the absolute mouse coordinates aren't exactly
what we want. Instead, we'd like to have the coordinates specified relative to
where our canvas is (and there might be more than one). See this figure:
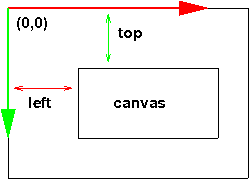
To adjust for the location of the canvas within the window, we need to
find out the target of the click (what element was clicked on),
and then we can find out its offset from the window, using the very
useful
getBoundingClientRect() function. Suppose that we previously saved the
canvas in a variable c1. Our code then becomes:
function onMouseClick (event) {
    var mx = event.clientX;
    var my = event.clientY;
    console.log("click at (" + mx + "," + my + ")");
    var target = event.target;
    if( target == c1 ) {
        console.log("clicked on a canvas");
        var rect = target.getBoundingClientRect();
        var cx = mx - rect.left;
        var cy = my - rect.top;
        console.log("clicked on c1 at (" + cx + "," + cy + ")");
    }
}
If you care about which button was clicked (left, middle, right),
the event object has a button property that
gives the numerical index of the button. Zero is the left button, one is
the middle button, and so forth. It may be hard to capture a
right-click, since the browser usually intercepts that and processes it
specially.
Mouse Movement
After processing mouse clicks, you may want to process mouse movement, say to implement click and drag. For this, we need a few more events:
document.addEventListener('mousemove', onMouseMove);
document.addEventListener('mousedown', onMouseDown);
document.addEventListener('mouseup', onMouseUp);
As before, the event handler is called with an event
object that has the information about the event.
To implement dragging, you will need to notice when the mouse button goes down and up, and when it moves while the mouse is down. Something like this:
var isMouseDown = false;

function onMouseDown (event) {
    isMouseDown = true;
}

function onMouseUp (event) {
    isMouseDown = false;
}

function onMouseMove (event) {
    if( isMouseDown ) {
        console.log("drag to (" + event.clientX + "," + event.clientY + ")";
    }
}
Notice that these functions only give you a snapshot of the mouse motion. It doesn't tell you where the mouse was, how it was moving, or anything like that. In our geometry terminology, it gives you a point, not a vector. Yet you often want to know what direction the mouse was moving. For example, in the GUI for moving the camera viewpoint, if you drag the mouse down, you get a very different effect than if you drag it to the right, even if you end up at the same location. The callback will only get the location, not the direction, so how to do this? The answer is simply to keep track of where the mouse was:
var oldMouse = {x:0, y:0};

function onMouseMove (event) {
    if (isMouseDown) {
        console.log("drag to (" + event.clientX + "," + event.clientY + ")"
                    + "from (" + oldMouse.x + "," + oldMouse.y + ")");
        oldMouse.x = event.clientX;
        oldMouse.y = event.clientY;
    }
}
Here is a demo that puts all of these ideas together. Please take a few minutes to read the source code; it's less than 100 lines of code.
Unit Camera Movement
Suppose that we are using the mouse and keyboard callbacks (we'll
combine the two soon). When the mouse is in the left half of the window,
a key press or mouse click means move to the left,
and similarly if
the mouse is in the right half of the window. (In the gaming community,
this sort of movement is known
as strafing.)
Also, if the mouse is in the upper half of the window, a key press or
mouse click means move up,
and similarly an action in the lower
half means move down.
Assuming (for the sake of simplicity), that
the camera is facing down the $-Z$ axis, how can we implement this sort of
movement?
First, we need to know how big the window is, so that we can know where the middle is. Let's set up global variables to record this. These could be constants, but if we want to allow the user to reshape the window, we would set up a reshape event handler (another DOM event; we'll leave that aside for now) that would modify these values if the window changes size.
var winWidth = 400;
var winHeight = 200;
Assume that the camera is set up using at
and eye points, as we did back when we learned that API.
var eye = THREE.Vector3(...);
var at  = THREE.Vector3(...);
Our callback function can then operate as shown below. Note how this enforces our assumption that the camera is always facing parallel to $-Z$.
function onMouseClick (event) {
    ... // compute (cx,cy)
    var x = cx - winWidth/2
    var y = winHeight/2 - cy;
    moveX( x > 0 ? +1 : - 1);
    moveY( y > 0 ? +1 : - 1);
    TW.render();
}

function moveX (amount) {
     eye.translateX(amount);
     at.translateX(amount);
}

function moveZ (amount) {
     eye.translateZ(amount);
     at.translateZ(amount);
}
Let's focus on the first two lines of the callback function.
Essentially what we're doing is mapping to a coordinate system where (0,0)
is in the center of the window, $x$ increases to the right and $y$
increases up (whew!). This easily divides the window into the four signed
quadrants that we're used to. See this figure:
We can map the mouse coordinates to a coordinate system where
the center is (0,0) and the $x$ coordinate can range from negative
half the window width (-WW/2) to positive half the window width (WW/2),
and similarly the $y$ coordinate ranges from negative half the window
height (-WH/2) to positive half the window height (WH/2).

The rest of the callback is straightforward.
Proportional Camera Movement
In the previous section, we're throwing away a lot of information when we just use the sign of the mouse coordinates. Why not move the camera a lot if the mouse click is far from the center, but only a little if it is close to the center? That is, we could make the amount of movement proportional to the distance from the center. Now our mouse is becoming useful. Building on the ideas from the previous section, our coding is fairly straightforward.
Recall that the maximum absolute value of the mouse coordinates is half
the window width or height. If someone clicks at the extreme edge and we
want that to result in, say, the camera moving by maxX
or maxY units, we can arrange for that with a straightforward
mathematical mapping. We first map the $x$ and $y$ coordinates onto the
range [-1,1] by dividing by their maximum value. Then, multiply that by
the largest amount we would want to move. (Call that the xSpeed and
ySpeed.)
The JavaScript code is as follows:
var xSpeed = 3.0;   // just an example
var ySpeed = 4.0;   // just an example

function onMouseClick (event) {
    ... // compute (cx,cy)
    var x = cx - winWidth/2
    var y = winHeight/2 - cy;

    moveX(xSpeed * x/(winWidth/2));
    moveY(ySpeed * y/(winHeight/2));
Oh, that's so much better! We even avoid the ternary operator.
Thus, if the user clicks in the middle of the lower right quadrant (the
$+-$ quadrant), $x$ will have a value of $+0.5$ and $y$ will have a value
of $-0.5$, and so moveX will be invoked with 1.5
and moveY with -2.0.
Of course, we're not limited to a linear proportionality function. If, for example, we used a quadratic function of the distance, mouse clicks near the center could result in slow, fine movements, while clicks far from the center could result in quick, big movements. This could be useful in some applications.
Picking and Projection
So far, our interaction has been only to move the camera, but suppose
we want to interact with the objects in the scene. For example, we want
to click on a vertex and operate on it (move, delete, inspect, or
copy it, or whatever). The notion of clicking
on a vertex is the
crucial part, and is technically known as picking, because we
must pick one vertex out of the many vertices in our scene. Once a vertex
is picked, we can then operate on it. We can also imagine picking line
segments, polygons, whole objects or whatever. For now, let's imagine we
want to pick a vertex.
Picking is hard because the mouse location is given in window coordinates, which are in a 2D coordinate system, no matter how we translate and scale the coordinate system. The objects we want to pick are in our scene, in world coordinates. What connects these two coordinate systems? Projection. The 3D scene is projected to 2D window coordinates when it is rendered.
Actually, the projection is first to normalized device coordinates or NDC. NDC has the x, y, and z coordinates range over [-1,1].
You might wonder about the existence of the z coordinate. Since we've projected from 3D to 2D, aren't all the z values the same? Actually, the projection process retains the information about how far the point is by retaining the z coordinate. The view plane (the near plane) corresponds to an NDC z coordinate of -1, and the far plane to an NDC z coordinate of +1.
The NDC coordinates are important because OpenGL will allow us to unproject a location. To unproject is the reverse of the projection operation. Since projecting takes a point in 3D and determines the 2D point (on the image plane) it projects to, the unproject operation goes from 2D to 3D, finding a point in the view volume that projects to that 2D point.
Obviously, unprojecting an (x,y) location (say, the location of a mouse click) is an under-determined problem, since every point along a whole line from the near plane to the far plane projects to that point. However, we can unproject an (x,y,z) location on the image plane to a point in the view volume. That z value is one we can specify in our code, rather than derive it from the mouse click location.
Suppose we take our mouse click, (mx,my), and unproject two points, one using z=0, corresponding to the near plane, and one using z=1, corresponding to the far plane. (At some point, the API changed from NDC to something similar but with z in [0,1].)
var projector = new THREE.Projector();
var camera = new THREE.PerspectiveCamera(...);

function pick (mx,my) {
    var clickPositionNear = new THREE.Vector3( mx, my, 0 );
    var clickPositionFar  = new THREE.Vector3( mx, my, 1 );
    projector.unprojectVector(clickPositionNear, camera);
    projector.unprojectVector(clickPositionFar, camera);
    ...
}
What this does is take the mouse click location, (mx,my), and find one
point on the near plane and another on the far plane. The
Three.js Projector object's unprojectVector()
method modifies the first argument to unproject it using the
given camera.
Thought question: If we drew a line between those two unprojected points, what would we see? Here's a demo that does exactly that:
Ray Intersection
Our next step in picking is to take the line between those two points,
and intersect that line with all the objects in the scene. The
Three.js library has a Raycaster object that has a method
that will take a point and a vector and intersect it with a set of
objects. It returns a list of all the objects that the ray intersects,
sorted in order of distance from the given point, so the first element
of the returned list is, presumably, the object we want to pick.
The (old) Three.js library comes with an example that demonstrates this very nicely:
You're encouraged to look at the code for that example.
The example that allows you to click to create points and click-and-drag to move them employs all of these techniques:
draw moveable points with shift+click
Event Bubbling
In this reading, we've always bound the listeners to
the document, but if your graphics application is running
in a canvas on a larger page that has other things going on, you might
bind the listener to some parent of the canvas instead. An issue
that can arise is that the other applications may also bind
the document and then both event handlers might
get invoked. This is called event bubbling. If you want to
learn more, you might start with
the Quirk Mode
page on Event Bubbling. There are, of course, other explanations on
the web as well.