Reading on Accumulation: Anti-Aliasing
Again, Three.js can do anti-aliasing for us, automatically, so read this for understanding rather than coding.
In Three.js anti-aliasing is a feature of the renderer. See this excellent side-by-side demonstration of antialiasing in three.js. Then, read the information below to understand what the code has done and how it did it.
The Accumulation Buffer
There are a number of effects that can be achieved if you can draw a scene more than once. You can do this by using the accumulation buffer. We will focus on anti-aliasing.
In OpenGL, you can request an accumulation buffer with
glutInitDisplayMode(... | GLUT_ACCUM);
Conceptually, we're computing an image as a weighted sum (the summing is done in the accumulation buffer) of a series of frames: \[ \fbox{I} = f_1\fbox{frame 1}+f_2\fbox{frame 1}+\ldots+f_n\fbox{frame n}\]
That is, the final image, $I$, is a weighted sum of $n$ frames, where the fractional contribution of frame $i$ is $f_i$.
We initialize the accumulation buffer to zero, then add in each frame, with an associated constant, and then copy the result to the frame buffer. This is accomplished by the following sequence of steps:
- Clear the accumulation buffer with
glClearAccum(r, g, b, a); // fill in the numbers you want, often zero
glClear(GL_ACCUM_BUFFER_BIT);
This is just like clearing the color buffer or the depth buffer. The accumulation buffer is like a running sum, though, so you will usually initialize it to zero.
- Add a frame into the accumulation buffer with:
glAccum(GL_ACCUM, fi)
This function allows other values (see the man page), but we'll use this today.
- Copy the accumulation buffer to the frame buffer:
glAccum(GL_RETURN, 1.0);
The second argument is a multiplicative factor for the whole buffer. We'll always use 1.0.
Anti-Aliasing
An important use of the accumulation buffer is
in anti-aliasing. Aliasing is the technical term
for jaggies
. It comes about because of the imposition of an
arbitrary pixelation (rasterization) over a real world. For example,
suppose we draw a roughly 2-pixel thick blue line at about a 30 degree
angle to the horizontal. If we think about the rasterizing of that line,
the situation might look like this:
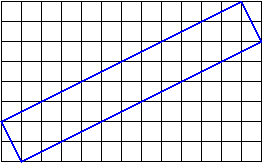
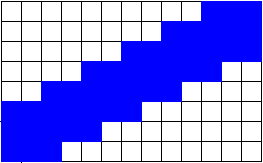
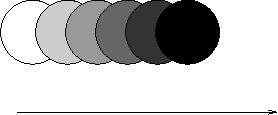
What's wrong with that? The problem comes with assigning colors to
pixels. If we only make blue the pixels that are entirely covered by the
line, we get something like this:
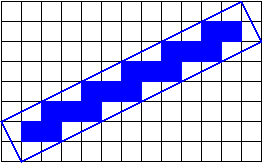
The line looks very jaggy
and also very thin. It doesn't get
better if we make blue the pixels that are covered by any part of
the line:
What we want is to color the pixels that are partially covered by the line with a mixture of the line color and the background color, proportional to the amount that the line covers the pixel.
So, how can we do that? The idea of anti-aliasing using the accumulation buffer is:
- The scene gets drawn multiple times with slight perturbations
(called
jittering
), so that - Each pixel is a local average of the images that intersect it.
Generally speaking, you have to jitter by less than one pixel.
Here are two pictures; the one on the left lacks anti-aliasing, and the
one on the right uses anti-aliasing.
The trouble with anti-aliasing by jittering the objects is that, because of the mathematics of projection,
- objects that are too far (from the camera) jitter too little, and
- objects that are too close jitter too much.
Better Anti-Aliasing
A better technique than jittering the objects is to jitter the camera, or more precisely, to modify the frustum just a little so that the pixels that images fall on are just slightly different. Again, we jitter by less than one pixel.
Here's a figure that may help:
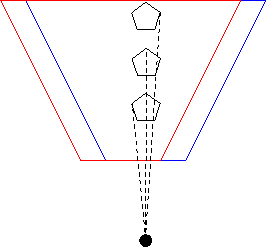
The red and blue cameras differ only by an adjustment to the location of the frustum. The center of projection (the big black dot) hasn't changed, so all the rays still project to that point. The projection rays intersect the two frustums at different pixel values, though, so by averaging these images, we can anti-alias these projections.
How much should the two frustums differ, though? By less than one pixel. How can we move them by that amount? We only have control over left, right, top and bottom, and these are measured in world coordinates, not pixels. We need a conversion factor.
We can find an conversion factor in a simple way: the width of the frustum in pixels is just the width of the window (more precisely, the viewport or canvas), while the width of the frustum in world coordinates is just $\mathit{right}-\mathit{left}$. Therefore, the adjustment is: \[ \Delta x_\mathit{units} = \Delta x_\mathit{pixels} \frac{\mathit{right}-\mathit{left}}{\mathit{window~width}} \]
Here's the C code, adapted from the OpenGL Programming Guide. We won't need to do this in Three.js, so there's no need to convert to JavaScript.
void accCamera(GLfloat pixdx, GLfloat pixdy) {
    GLfloat dx, dy;
    GLint viewport[4];
    glGetIntegerv(GL_VIEWPORT, viewport);

    GLfloat windowWidth=viewport[2];
    GLfloat windowHeight=viewport[3];
    GLfloat frustumWidth=right-left;
    GLfloat frustumHeight=top-bottom;

    glMatrixMode(GL_PROJECTION);
    glLoadIdentity();
    dx = pixdx * frustumWidth/windowWidth;
    dy = pixdy * frustumHeight/windowHeight;
    printf("world delta = %f %f\n",dx,dy);
    glFrustum(left+dx, right+dx, bottom+dy, top+dy, near, far);
    glMatrixMode(GL_MODELVIEW);
    glLoadIdentity();
}
The important things to notice about that code are
- The
pixdxandpixdyvalues are the jitter amounts (distances) in pixels (sub-pixels, actually). - The frustum is altered in world coordinates
- Therefore,
dxanddyare computed in world coordinates corresponding to the desired distance in pixels.
Here's how we might use that. Again, this is C code; we won't need to do this in JavaScript because Three.js will take care of this for us.
void smoothDisplay() {
    int jitter;
    int numJitters = 8;
    glClear(GL_ACCUM_BUFFER_BIT);
    for(jitter=0; jitter < numJitters; jitter++) {
      accCamera(jitterTable[jitter][0],
                jitterTable[jitter][1]);
      glClear(GL_COLOR_BUFFER_BIT | GL_DEPTH_BUFFER_BIT);
      drawObject();
      glAccum(GL_ACCUM, 1.0/numJitters);
    }
    glAccum(GL_RETURN, 1.0);
    glFlush();
    glutSwapBuffers();
}
This does just what you think:
- We draw the image 8 times, each time adjusting the pixel jitter.
- Each drawing has equal weight of 1/8.
There are lots of ways to imagine how the pixel jitter distances are
computed. The domino pattern seems like a good idea for 8.
![]()
However, a paper on the subject argues for the following, which I have used in the past. One possible explanation is that we want to avoid regular patterns.
// From the OpenGL Programming Guide, first edition, table 10-5
var jitterTable = [
    [0.5625, 0.4375],
    [0.0625, 0.9375],
    [0.3125, 0.6875],
    [0.6875, 0.8124],
    [0.8125, 0.1875],
    [0.9375, 0.5625],
    [0.4375, 0.0625],
    [0.1875, 0.3125]
];
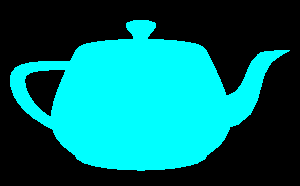
Here's a red teapot, with and without that kind of anti-aliasing, from
an earlier version of this course:
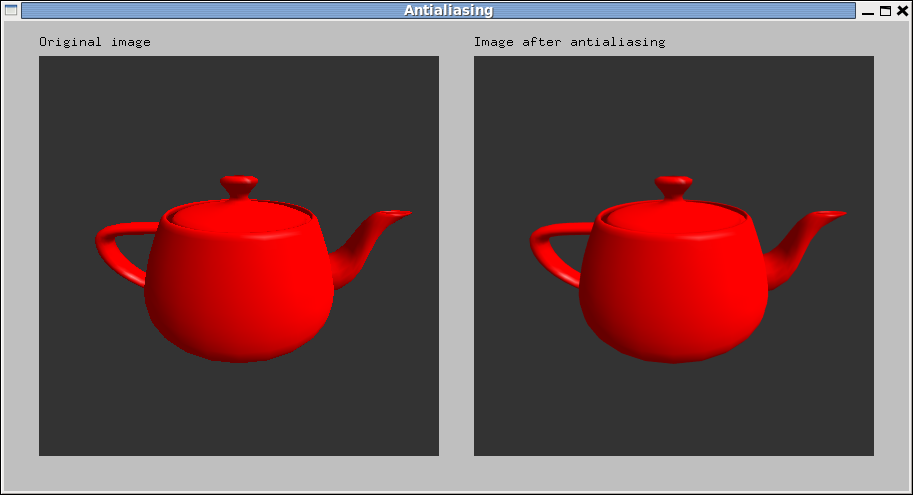
- Notice the difference in quality between the two images
This better approach to anti-aliasing works regardless of how far the object is from the center of projection, unlike the object-jitter we did before. Furthermore, we have a well-founded procedure for choosing the jitter amount, not just trial and error.
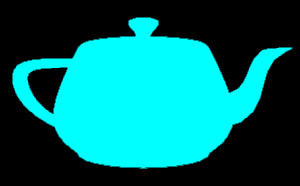
Motion Blur
Another use of the accumulation buffer is to sum a series of images in
which an object is moving. This can simulate the blur that occurs with
moving objects:
You can fade the images by using smaller coefficients on those images.
Here's an example of the output from an OpenGL program done like this:
The problem with using the accumulation buffer for large-motion motion blur is that we really want to turn all of the coefficients up, so that the first image doesn't fade away and the last isn't too pale, yet that's mathematically nonsense and also doesn't work (the table turns blue!). Nevertheless, for small-motion blur, it works pretty well.