Reading on Interaction
So far, we've mostly been creating images and animations, rather than interacting with the user. Our interaction has mostly been limited to keyboard callbacks using TW or GUI controls, and even that has been mostly toggling global settings such as lighting or textures, or adjusting parameters. This is fine for producing animations (after all, Pixar movies aren't interactive), but if we want to do games and other kinds of interactive software, we'll need to do better. In this reading, we'll start digging into how to have a more interactive program.
Note that user interaction isn't really part of OpenGL per se. OpenGL is about graphics, not about handling mouse clicks or keyboard input, or tangible user interfaces or any of the many other ways that we can imagine interacting with our devices.
Nevertheless, if you want to build a game or any other software that
combines computer graphics with user interaction (even an
animation might have a pause/resume
feature), we'll want to
confront this.
Interaction in a Web Browser
Web browsers have a reasonably straightforward way of handling keyboard input — until you start looking into it more deeply. Then it becomes a mess. But, let's ignore the mess for now and start with some straightforward elements.
When the keyboard changes state (a key goes up or down ...) the browser
generates an event, which you can add a handler
for. The easiest one to work with
is keyPress. (The
keypress event is deprecated, but may still be
supported by most browsers for the foreseeable future.) Here's how you
bind it:
document.addEventListener('keypress', onKeyPress);

function onKeyPress (event) {
   var key = event.keyCode;
   ...
}
As you can see, you bind the keypress event to a callback
function that is invoked whenever a key is pressed. This callback
function is invoked with an object that represents all the information
about the event. The property we will care about is
the keyCode (which is also deprecated,
but, Google Chrome doesn't provide as of
Fall 2018 Chrome 69.x provides keykey, which is
the intended
replacement. Again, we'll proceed as if all is well, which it
probably will be).
The keyCode property returns a numerical code for the key,
which is just the Unicode codepoint for the character (we'll mostly
stick to ASCII), but if you want to
handle a broader range of characters, be my guest.
Working with numerical codes is awkward at best, and a recipe for unreadable code at worse. Computer geeks like myself may have memorized the fact that an upper case 'A' has the numerical code 65, but your code should not have ASCII or Unicode constants like that in it. To convert a Unicode codepoint to a character, you can do this:
function onKeyPress (event) {
   var key = event.keyCode;
   var ch = String.fromCharCode(key);
   alert("You typed a " + ch);
   ...
}
The key attribute of the event object is already a
character, so if you use key, you can skip this
conversion.
What you'll next want to do is figure out what key was pressed and then do something appropriate. For now, let's imagine that what you want to do is something to create a WASD interface to move an avatar around the scene while using a mouse with your right hand:
function onKeyPress (event) {
   var key = event.keyCode;
   var ch = String.fromCharCode(key);
   switch (ch) {
       case 'w': goForward(); break;
       case 's': goBackward(); break;
       case 'a': goLeft(); break;
       case 'd': goRight(); break;
       default:
           console.log("key " + ch + " is not handled");
   }
}
There are, of course, many variations on this kind of code. For example,
several similar blocks might be coalesced. You might
invoke TW.render() after every keypress, in case it changed
the scene, and relieving every keybinding from having to do that.
The most important disadvantage of using keypress is that
it only handles keys that send a Unicode character to the computer. Other keys,
most importantly, the arrow keys and other special keys
like PageUp and Home, do not
generate keypress events. If you want to process those, you
can use the keydown event, but that provides you with
numerical key identifiers, and those are a pain to process. (For
example, both an uppercase and lowercase 'a' are the same key, so they
send the same code. You have to look at the modifier information. Also,
some of the keys send same numbers as certain ASCII codes. Again, see
pages like JavaScript
madness for details.) In this course, we're not going to worry too
much about portability. If it works on your computer and mine, that's
good enough.
For simplicity, we'll stick to keypress.
The event object can also tell whether the shift, control, alt, or meta
keys are down, so you can treat Control-A differently from a
or A.
Mouse Coordinates
When the monitor redraws the screen, it starts in the upper left corner
and the electron gun sweeps left to right and top to bottom. For that
reason, browsers use a coordinate system where the origin is at the upper
left, the $x$ coordinate increases to the right and the $y$ coordinate
increases going down.
The mouse coordinates are reported in window
coordinates, which is in pixels measured from the upper left. If your
browser is in a 960 by 500 window, those values will be, respectively, the
largest possible $x$ and $y$ coordinates. See this figure:

Suppose you want to process mouse clicks, then the event you want to bind
is, unsurprisingly, mouseclick. Thus, the code might look
like this:
document.addEventListener('click', onMouseClick);

function onMouseClick (event) {
    var mx = event.clientX;
    var my = event.clientY;
    console.log("click at (" + mx + "," + my ")");
}
Don't you wish it were that easy? Unfortunately, when we are using a
canvas in a web browser, the absolute mouse coordinates aren't exactly
what we want. Instead, we'd like to have the coordinates specified relative to
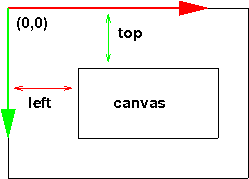
where our canvas is (and there might be more than one). See this figure:
To adjust for the location of the canvas within the window, we need to
find out the target of the click (what element was clicked on),
and then we can find out its offset from the window, using the very
useful
getBoundingClientRect() function. Suppose that we previously saved the
canvas in a variable c1. Our code then becomes:
function onMouseClick (event) {
    var mx = event.clientX;
    var my = event.clientY;
    console.log("click at (" + mx + "," + my + ")");
    var target = event.target;
    if( target == c1 ) {
        console.log("clicked on a canvas");
        var rect = target.getBoundingClientRect();
        var cx = mx - rect.left;
        var cy = my - rect.top;
        console.log("clicked on c1 at (" + cx + "," + cy + ")");
    }
}
If you care about which button was clicked (left, middle, right),
the event object has a button property that
gives the numerical index of the button. Zero is the left button, one is
the middle button, and so forth. It may be hard to capture a
right-click, since the browser usually intercepts that and processes it
specially.
Mouse Movement
After processing mouse clicks, you may want to process mouse movement, say to implement click and drag. For this, we need a few more events:
document.addEventListener('mousemove', onMouseMove);
document.addEventListener('mousedown', onMouseDown);
document.addEventListener('mouseup', onMouseUp);
As before, the event handler is called with an event
object that has the information about the event.
To implement dragging, you will need to notice when the mouse button goes down and up, and when it moves while the mouse is down. Something like this:
var isMouseDown = false;

function onMouseDown (event) {
    isMouseDown = true;
}

function onMouseUp (event) {
    isMouseDown = false;
}

function onMouseMove (event) {
    if( isMouseDown ) {
        console.log("drag to (" + event.clientX + "," + event.clientY + ")";
    }
}
Notice that these functions only give you a snapshot of the mouse motion. It doesn't tell you where the mouse was, how it was moving, or anything like that. In our geometry terminology, it gives you a point, not a vector. Yet you often want to know what direction the mouse was moving. For example, in the GUI for moving the camera viewpoint, if you drag the mouse down, you get a very different effect than if you drag it to the right, even if you end up at the same location. The callback will only get the location, not the direction, so how to do this? The answer is simply to keep track of where the mouse was:
var oldMouse = {x:0, y:0};

function onMouseMove (event) {
    if (isMouseDown) {
        console.log("drag to (" + event.clientX + "," + event.clientY + ")"
                    + "from (" + oldMouse.x + "," + oldMouse.y + ")");
        oldMouse.x = event.clientX;
        oldMouse.y = event.clientY;
    }
}
Here is a demo that puts all of these ideas together. Please take a few minutes to read the source code; it's less than 100 lines of code.