Welcome!
Everything is fine.
Dynamic DOM
Today we will learn how to use jQuery to dynamically update the document (sometimes called the DOM, somewhat confusingly).
Plan
- Announcements
- Reading Recap:
- Creating Elements
- Searching the Tree up/down
- Event Delegation
- Your questions
- Discuss Coffeerun
- input values
- Breakout
- Cloning (if there is time)
Announcements
- Grading status
- Quizzes Partners Assigned
A9 Quizzes Partners
- 2 Claire+Isabella
- 4 Merci+Yitzel
- 6 Erin+Suzanne
- 8 Ari+Sofia
- 10 Caia+Cynthia
- 12 Nina+Shirley
- 14 Abby+Maggie
- 16 Gwen+Nessa
- 18 Eliza+Mako
- 20 Emily+Rebecca
- 22 Maha+Sandy
Since I can't print the overlap, I'll ask you to look it up overlap
I'll demo.
You are welcome to look at the JS code, but I warn you that you aren't yet ready to understand all of it. Some of it, yes. Feel free to challenge yourself and ask questions!
Election Remarks
I'll just say a few things about the election
- Emotions are, understandably, high. People are stressed and anxious
- Take care of yourself and others.
- Attend class if you can, but I will be extra-understanding
- If you will miss a lot of class, seek help from the Stone Center, etc.
Reminder
Adding a Click Handler != Handling a Click
I'm sometimes seeing click handler functions that have
$(something).click(something else) in them.
For example, if we think of adding a click handler as adding an ornament to our christmas tree, and the ornament is supposed to twinkle when it is clicked, the bad code might look like this:
// here, twinkle means to briefly grow and then
// return to normal size.
function twinkle() {
    $(this)
        .animate({'font-size': '+=20px'})
        .animate({'font-size': '-=20px'})
    $(this).click(twinkle);  // WRONG. Why is this here?
}
In the example, growing and shrinking is what the thing does when it is clicked. But it does not add itself to the tree. Somebody else needs to add it to the tree. Maybe like this:
function twinkle() {
    $(this)
        .animate({'font-size': '+=20px'})
        .animate({'font-size': '-=20px'})
}
$("#reminder").click(twinkle);  // RIGHT. This is OUTSIDE the twinkle function
You can try this example on the header to this section.
Most of the time, we add our click handlers at "top level" in a file, not inside a function.
- Zodiac:
$("#update-page-button").click(update_page); - RPS:
$("#player-throws-rock").click( () => { playerTurn('rock') }); - Tiles:
$('#down-button').click(...);
Concentration will be the first time our code to add all the click handers is complicated enough to need a function. We'll do it like they did in interactive Ottergram:
function initializeEvents() {
    $(thumbLinks)
        .some()
        .each(function (index, elt) {
            addThumbClickHandler(elt);
        });
}

initializeEvents();
but even that code could eliminate a function and just do the following (at top level):
$(thumbLinks)
    .some()
    .each(function (index, elt) {
        addThumbClickHandler(elt);
    });
So, don't confuse handling the event with adding the event handler. An event might be handled many times, while a handler is attached once.
Demo
Remember that the main ideas, demonstrated here, are
- form submission handlers: doing stuff when a form is submitted
- building structure dynamically
- handling clicks with a delegated click handler
Here's what to do:
- Fill out the order form
- A checkbox is created
- Fill out another order
- Click on one of the checkboxes -- it is removed
Now, let's walk through the code execution using the DevTools
- Set a breakpoint on line 51 of
main-module.js, which is the first step in the coffee order form submission handler: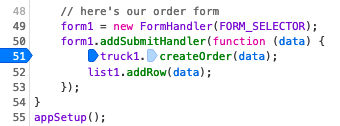
add breakpoint to line 51 of main-module.js - create a coffee order and watch it be processed
by clicking on the step in icon
 step over
  icons. (The first for our code, which we want to step through; the
second for 3rd party code like jQuery, which we'll treat as a black
box.)
icons. (The first for our code, which we want to step through; the
second for 3rd party code like jQuery, which we'll treat as a black
box.)
- store the order in the
db - delete any prior orders from that email, and
- create a checkbox for this order
- store the order in the
- Now, set a breakpoint in
checklist-module.jsat the first step in the (delegated) click handler for the checklist: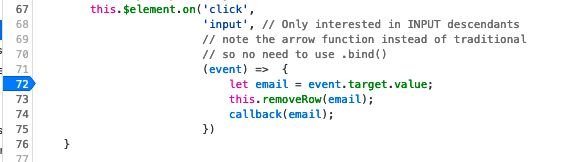
set breakpoint click handler - Finally, click the checkbox and step through its execution.
Reading Recap
This reading covers the following ideas and techniques:
- Creating branches of structure (HTML elements with attributes) and adding them to the document. Coffeerun does this to add checkboxes for pending orders
- Adding an event handler for elements that finds the appropriate node by searching up/down the tree. CoffeeRun adds a click handler to indicate that a coffee order is complete; the click handler removes it from the tree.
- delegating the event handler to a static ancestor. They add the click handler to a container DIV.
- Some complicated modularity. Note that there is a
makeRowEltfunction that is entirely private to theCheckListmodule, which is global. We only export it for debugging.
We'll look at the code in checklist.js
Creating elements
We can build a simple node like this:
$("<input>")
jQuery is smart enough to do the right thing, so the closing tag is optional. Note that the argument must be just a single tag, without any extra stuff.
To build a node with attributes, supply a JS object literal with the attribute names and values as the second argument.
$("<input>", {'type': 'checkbox', 'value': 'anchovies'})
You could put the attributes into the same string with the tag, but then you have to worry about embedded quotation marks and such. There are also some subtle bugs that can happen. It's usually better to let jQuery construct the element for you, especially if any of the attributes or their values are dynamic (in variables), like this:
var val = ...;
$("<input>", {'type': 'checkbox', 'value': val})
We put these together using jQuery's .append() method:
var $form = $("<form>",
               {'method':'post', 'action': url});
var $input = $("<input>",
               {'type': 'checkbox',
                'value': 'anchovies'});
$form.append($input);
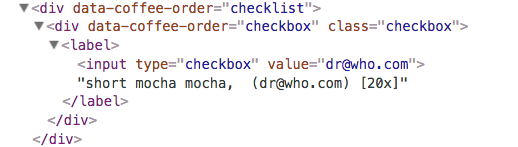
Here's the CoffeeRun code for building a row containing a checklist. Note that the value of the checkbox is dynamic (not known at the time the code is written).
// This function takes an order (represented as a
// JS object literal) and returns a DIV containing
// a checkbox for that order.
// The DIV is not attached to the page.

function makeRowElt(order) {
    let $div = $('<div>', {
        'data-coffee-order': 'checkbox',
        'class': 'checkbox'
    });

    let $label = $('<label>');

    let $checkbox = $('<input>', {
        type: 'checkbox',
        value: order.emailAddress
    });

    $label.append($checkbox);
    $label.append(makeDescription(order));
    $div.append($label);
    return $div;
  }
It uses the following helper function:
// This function takes an order (represented
// as a JS object literal)
// and returns a string describing it.

function makeDescription(order) {
    let description = order.size + ' ';
    if (order.flavor) {
        description += order.flavor + ' ';
    }
    description += order.coffee + ', ';
    description += ' (' + order.emailAddress + ')';
    description += ' [' + order.strength + 'x]';
    return description;
}
You can send an arbitrary string of HTML to jQuery to build into structure, but I don't recommend this. Using a more structured approach avoids difficult-to-find bugs.
Here's what is built:
Searching Down and Up the Tree:
CoffeeRun code to remove a row:
    // Remove existing orders using that email address, if any.
    removeRow(email) {
        let sel = '[value="'+email+'"]';
        this.$element
            .find(sel)
            .closest('[data-coffee-order="checkbox"]')
            .remove();
    }
This example also shows the power of jQuery. But if that makes you uncomfortable, it's okay to do it in a more verbose way, where you can check each step:
    let checkbox = this.$element.find(sel);
    console.log(checkbox);
    let ancestor = checkbox.closest('[data-coffee-order="checkbox"]');
    console.log(ancestor);
    ancestor.remove();
Event Delegation
Event delegation is designed for dynamically changing lists.
Let's start with the groceries example.
Also, we should talk about event.target and this. I added another
example to the appendix
Put an event handler on a static ancestor and delegate all the event handling to it.
This works because events bubble up the tree of a document.
See this demo of bubbling
In the CoffeeRun example, the event will bubble up from the checkbox to the checklist container:
<div data-coffee-order="checklist">
</div>
CoffeeRun code uses event delegation and arrow functions, so the
this in the event handler is a CheckList object. The code uses
event.target to know which checkbox was checked.
    addClickHandler(callback) {
        // Use jQuery's delegated handler mechanism
        this.$element.on('click',
                         'input', // Only interested in INPUT descendants
                         // note the arrow function instead of traditional
                         // so no need to use .bind()
                         (event) =>  {
                             let email = event.target.value;
                             this.removeRow(email);
                             callback(email);
                         })
    }
Questions
I'll answer your questions
HTML for Radio Buttons
Here's an alternate version of the pizza form that includes radio buttons. Here's the key part of the HTML:
  <p><strong>crust</strong>:</p>
  <p><label><input type="radio" name="crust" value="thin">cracker-like thin crust</label></p>
  <p><label><input type="radio" name="crust" value="thick">bagel-like thick crust</label></p>
Important points:
- the two buttons share the same name
- the two buttons have different values
- The label text is what the user sees, not the value
- the
labelelement wraps both the label text and the input - clicking on the label text counts as clicking on the radio button!
Input Values
jQuery's .val() method can retrieve the value of an input.
To get the value:
$(selector).val()
For example:
$("[name=zip_code]").val()
$("[name=pizza_size]").val()
Note the syntax of the selector; the square brackets are for
attribute selectors (see MDN on attribute
selectors). Here
we are looking for elements with a name attribute that has the
specified value.
The .val() method works on text input elements, select
(drop-down menus), and textarea elements.
For radio buttons and checkboxes, you can use the :checked
pseudo-class to get the value of the one input that was checked, if
any:
$('input[type=radio][name=size]:checked').val();
Let's try it on the pizza form.
You can also try:
$('input[type=radio]:checked').val();
Does that work? Why or why not? Are there situations where it would not?
You'll need to use .val() for the next assignment (Quizzes)
Breakout
- You can work on Concentration OR
- the exercise below, which will help prepare you for the Quizzes assignment
Exercise
The following exercise is a simplification of what you'll do in the Quiz assignment. You'll dynamically build a question with a yes/no answer, implemented as radio buttons. You'll have a regular button that says "final answer". Clicking that checks whether the user answered it correctly. (Choose a question where the correct answer is 'yes'.)
- Copy the
pub/downloads/yesno/folder (see below) - Edit the
start.htmlfile - Write a function,
builderthat builds the necessary structure: a. a paragraph with a question a. two radio buttons, properly labelled a. a "final answer" button a. attach adivcontaining all the above to#stuff - Write a function called
graderto check whether the user clicked "yes" - Attach
graderto the button
This is easier than A9 Quizzes because you can "hard-code" a lot of it, and you won't have to worry about a delegated handler.
Details:
- The
builderfunction is the harder one. Write out the HTML first, and then figure out how to build it dynamically. - You'll use
.append()a lot to attach children to their parents - The
graderfunction is pretty straightforward - Attaching
graderis tricky until you realize that there is only onebuttonon the page, so you can attach it to that.
In A9 Quizzes, you'll use delegated handlers instead of attaching a grader to each button.
Mechanics
You can copy the ~cs204/pub/downloads/yesno/ directory to your own
directory. It has a copy of the template and a copy of my solution.
cd ~/public_html/cs204/
cp -r ~cs204/pub/downloads/yesno yesno
Here's the solution in action. We'll go over the solution in class next time.