CS230
Introduction to BlueJ and Java
Task 1: Meet BlueJ
In this class, we will use BlueJ to develop, test and run Java programs.
Do the following:
- Download the BlueJ application to your own computer for free. BlueJ site for information and downloads. At a later time, please visit this BlueJ documentation page, which contains pointers to reference material as well as some nice tutorials.

-
BlueJ is an environment where we write our Java programs, compile, debug and run them. Compiling a Java program converts Java source code into something called bytecodes which can then be understood by the computer.
-
To find BlueJ on a mac, type "bluej" in the Mac spotlight in the upper right hand corner of your screen.
-
Once you start the application, a window should open:
-
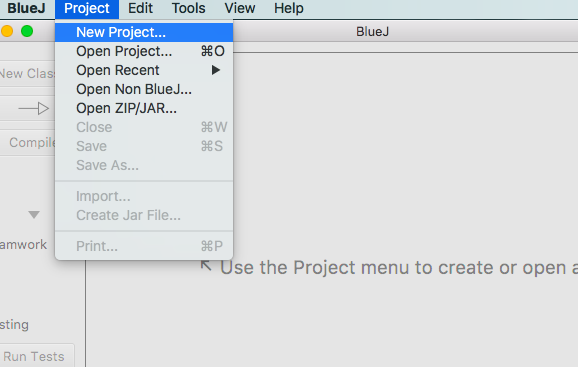
In BlueJ, Java code is organized in Projects. Let's create our first new Project in BlueJ:
- Name it lab0Project, and save it into the lab0_yourname folder on the Desktop.
This project will contain all the java files we will write today. At this point, your first java Project has been created:

Programming in java
Task 2A: Create your first Java class
In the BlueJ project window, click on the New Class... button. Name the new class Intro and click ok. An "Intro" icon should appear in the project window. Note the diagonal lines decorating the "Intro" icon; it means the class has not been compiled yet:

To see the code associated with the Intro.java class, control-click on the "Intro" icon, and from the pop-up menu select the option "Open Editor" (or simply double-click on the "Intro" icon). A new Editor Window will open, showing the class's source code.
Examine the source code. Notice the "anatomy" of a java class:
- top-of-the-file comments (fill them in now)
- body of the class definition, which contains:
- instance variable(s)
- constructor(s)
- method(s)
Task 2B: Add the main() method
When running a java class, execution always start from the main() method of that class. At the bottom of the Intro.java file add the definition of the main() method, exactly as you see it right below:

You do not need to remove the provided template code (though you can), because only the main() method (as shown above) will be executed.
Task 2C: Compile a class
To compile the Intro class just click on the "Compile" button, at the top-left of the Editor window. Alternatively, you can go back to the lab0Project window, control-click on the class icon, and from the pop-up window, select "Compile". If all goes well, and your compilation is successful (i.e no compilation/syntax errors), you should see that the icon of the class is no longer decorated with diagonal lines. That's what you want! If not, you need to fix any syntax errors your code contains, before you are ready to move on.
Task 2D: Run a class
In the lab0Project window, control-click on the class's icon, and select to run the main() method:
.png)
A new window, the Terminal Window should open up, and the greeting should be printed in there!
That's it! You now know how to create a new java class, how to compile it and run it, all within the BlueJ environment!