Bitbucket Account
Do this once per student.1. Create a Bitbucket account using your .edu email address or add your .edu address if you have an account already. Click through the setup steps choosing default options like “Skip” and “No thanks.”
2. Check your email to confirm your Bitbucket account has unlimited academic access activated.
3. Fill out this form with your name and Bitbucket username.
- Your Bitbucket username is not your email address, even though you may log in by email address.
- To check your Bitbucket username, select the person icon in the upper right corner (old layout) or lower left corner (new layout) and choose “Bitbucket settings”. Look for “Username.”
Local Account
Do this once per local computing account. (e.g., your CS Linux account, your wx appliance, etc.)- If you are using a CS Linux machine, run
/home/bpw/public/bin/hg-setup.pyin a terminal.- Run exactly this command.
- Do not add python in front.
- Follow the directions the script prints.
- If you are using the wx appliance, this script runs automatically when you first start the appliance.
- Follow the directions printed in a terminal the first time you start up the appliance.
- CS 240 does not support other platforms
Infrastructure described in this document is still a bit experimental. If your wx appliance stops working, you can replace it easily with a new one, but you might lose all the files you stored on the old one. That means you should backup anything of importance stored on your appliance. Luckily, this is pretty easy if you are using version control to manage your work as we do in this course.
Requirements
Most computers from the last 5 years or so should suffice. You need a computer with:- a fairly recent 64-bit Intel or AMD x86 processor;
- 4GB or more of RAM (as little as 2GB may work with some tweaking);
- Mac OS X 10.8 or later, Windows Vista SP1 or later, or any recent major distribution of GNU/Linux; and
- 5-6GB of free disk space
Installation
- Download wx-s17.ova [~1.9 GB] to your computer. This will take a while. Do it on the campus network.
Alternatively, usescpto get the file if you have a CS account andscpinstalled (allows access from anywhere, not just campus):
$ scp your_username@cs.wellesley.edu:~bpw/public_html/wx/s17/appliance/wx-s17.ova . - While you are waiting, download and install the latest version of VirtualBox 5.
- Once
wx-s17.ovahas finished downloading, start VirtualBox and choose the menu item File > Import Appliance…. - Click the folder icon and browse to select
wx-s17.ova, then click Continue. - Click Import to accept the default machine parameters. This will take a few minutes.
- In the VirtualBox manager application, select the appliance on the left and click the Start button (green arrow) to start up the appliance.
- Once you are sure the VM started successfully, you can remove the downloaded
wx-s17.ovafile to save space. - Continue to the next section.
User and Initial Setup
The appliance has one user, named wx, that is logged in automatically on startup. The first time the appliance is started, it will automatically run a script that asks you a few questions to get you setup for remote CS access, Bitbucket accesses, and specific courses.The wx user’s password is wx. When the setup script is done, change the password for security: Open a new terminal and run the command passwd. (We removed fancy GUIs for these sorts of things to save space since you won’t need them much.)
If you have successfully installed and started using your copy of the wx appliance, you can safely delete the wx-s17.ova file that you downloaded.
Startup and Shutdown
The wx appliance can be started and shut down much like a physical computer. It can also be paused. Read the VirtualBox manual to learn how to control it and how it interacts with your mouse and keyboard.Start up the appliance: open VirtualBox, select wx in the list on the left, and click the Start button. This launches a separate application running the appliance.
Shut down the appliance by clicking the wx menu in the upper right corner of the appliance screen and choosing Shut down.
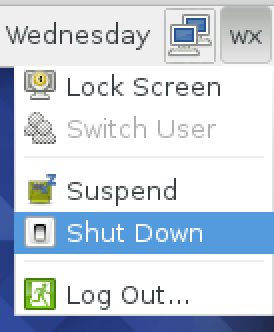
Do NOT choose Power Off Machine or Reset from the VirtualBox VM Application! These options are equivalent to yanking out the battery or power cord while the computer is running or holding down the power button to hard reset. (Notice the lightning bolt next to that option!) Students who do this end up with corrupted Mercurial repositories. The Send the shutdown signal option is OK. This asks the wx appliance to shut itself down.
Pause and Resume
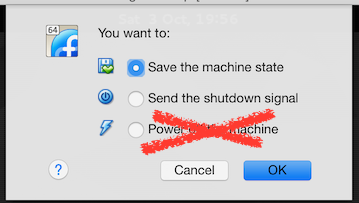
Pausing and resuming the appliance is convenient if you want to keep some windows open in the appliance but you want to free up resources on your computer while you work on something else.Pause the appliance by clicking to close the VirtualBox VM window holding the wx screen. Choose Save the machine state and click OK. VirtualBox VM will take a few seconds to save the wx appliance’s current state, then it will close the wx appliance. The listing for the wx appliance in the VirtualBox manager will now show it as Saved (vs. Powered Off). This is like stopping time, and is similar to sleeping/hibernating.
Resume an appliance whose state has been saved the same way you start an appliance.
Software and Licenses
The wx appliance is currently available only to students, faculty, and staff within Wellesley College.The wx appliance uses a mix of free software and open-source software, plus a couple management tools of our own design that will eventually be released under such licenses.
This section introduces basics of the Mercurial version control system, the hg tool, and the Bitbucket hosting service.
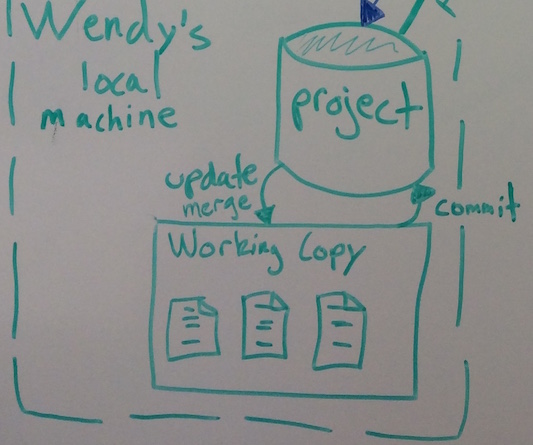
Repository and working copy
A Mercurial repository is a structured record of the evolution of a project through multiple revisions in the form of a detailed revision history of its files.[1] Mercurial also calls revisions changesets. Every Mercurial repository is paired with a distinct working copy, a directory containing a snapshot of the project, where the user can prepare new revisions.[2] The repository itself is hidden away (in a hidden directory .hg inside the working copy’s base directory). The user can make direct changes to the working copy, but interacts with the repository (e.g., to record a new revision) only through the interface provided by the Mercurial tool, hg. Mercurial supports several useful repository tasks, including:
- Record a new revision, along with timestamp, creator, and description.
- Reconstruct an arbitrary past revision.
- Compute the difference of two revisions.
- Clone a repository, record independent revisions in separate clones, and share revisions to bring clones up-to-date with each others’ revisions.
Benefits
By allowing interaction with the repository only through its interface, a system like Mercurial abstracts tedious representation and maintenance details away from the error-prone user. The version control software is responsible for principled maintenance of revision history (principles being a great strength of computers) while users are responsible for deciding what versions of a project are appropriate and meaningful to record in the revision history or share revisions with other users.
This model supports a wealth of development tasks such as: quick, reliable, easily recoverable backups; structured collaborative development and sharing of code; structured documentation of project evolution; finding the revision where bug was introduced into the project. Being forced to learn to use principled version control helps you:
-
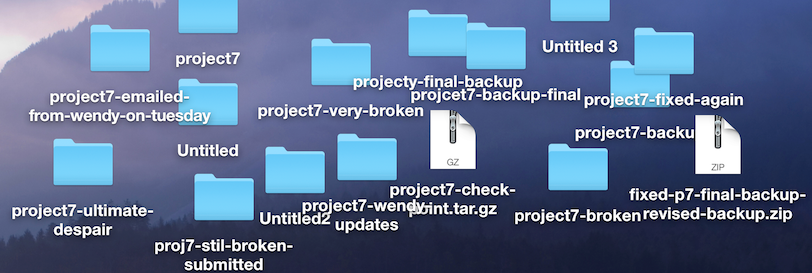
Stop losing hours of work because making backups was just too much work to bother with… until you realize the past 7 hours of untested coding entirely breaks everything.
-
Stop sharing code through email. It has a funny habit of multiplying, shifting around, breaking, and disappearing, especially in office hours.
-
Stop the scourge of unstructured, unintelligible code-copy litter:
-
Stop partners from interfering while simultaneously editing on Dropbox or Drive.
-
Stop sharing passwords or committing file permissions faux pas in the name of collaboration.
-
Start keeping a structured history of development to simplify future debugging tasks.
-
Start sharing code easily.
-
Start trying out risky new features without losing that precious working version.
-
Start learning a fascinating application of data structures and algorithms (particularly DAGs).
-
Start getting employed.
A version control system accomplishes none of these improvements on its own, but it helps make the right choice the path of least resistance for you.
Using hg
Mercurial is driven by a command-line tool called hg,[3] with commands of the form <code>hg <em>command</em></code>.
Driving a command-line tool for the first time can be unsettling, since it is difficult to see the controls. Once you become familiar, however, you may find it easier, quicker, and more expressive than a modern mouse-based GUI. To keep you company on the journey, Mercurial has a friendly help and documentation system built in. Just run the command hg to see the controls.
*Note: in this, and all command line transcripts shown in this document, we use $ to represent the command prompt. Following lines are output from commands entered at the prompt.
			$ hg

			… output omitted here …
Take note of what it shows (omitted here) and the fact that you can summon this at any time.
hg help shows a longer list of help topics. <code>hg help <em>topic</em></code> shows help about a specific topic. The most common kind of topic is a command. Try running hg help help to see if hg help can help you learn how to use the hg help command.
Bitbucket
Bitbucket is a hosting service for Mercurial and git repositories. We could host repositories the CS server, but the Bitbucket web interface allows flexible permissions. Bitbucket accounts are free; a .edu email address allows unlimited repositories and unlimited collaborators.
Why not git and GitHub?
If you have used or heard of a version control system before, it is
probably git (likely with GitHub hosting), the most widely known
such tool as of 2017. There are many version control systems
available. We use Mercurial for CS240 since it is widely
used and has a relatively simple, predictable, and principled
interface that is often considered the easiest among its peers for new
users to learn quickly. Concepts in git and hg are similar;
commands differ.
Mercurial stores history as differences between versions, rather than snapshots of versions. Each can be reconstructed from the other. ↩
Mercurial terminology usually refers to this “next changeset in the making” as the working directory, but we use the alternate term working copy to avoid confusion with the notion of working directory in the shell, as in
pwd. ↩The clever Mercurial designers are apparently amateur chemists! ↩
Quick Reference
For each assignment you are provided a Bitbucket repository calledassignment-username.Do this once per assignment:
(Using Bit Transiguration (bits) assignment and student bitbucket username wendy as an example...)
				hg clone ssh://hg@bitbucket.org/cs240fall2017/bits-wendy bits

				cd bits
Do this multiple times per assignment, as needed:
hg addnew fileshg commitcohesive changes often (got something working/towards working, etc.)hg addchanges to Bitbucket "often enough" (done working for a little while, etc.)hg statusis empty andhg outgoingfinds no changes - submission successful
Full Solo Workflow
This section introduces Mercurial and explores skills for simple solo use of Mercurial.
Get your assignment repository
The CS240Fall2017 “Code Tub” hosts one repository per student per assignment on Bitbucket. For a student with Bitbucket username wendy, the repository for a given assignment is called assignment-wendyw. This repository provides starter code and is the place where you will submit work for instructors to collect and grade.To begin work, you must clone this Bitbucket-hosted repository to get a copy on your local computer account.
hg clone
Do this once per assignment/repository. This step will make a copy of your repository on your local machine. You will use this copy to make and save changes.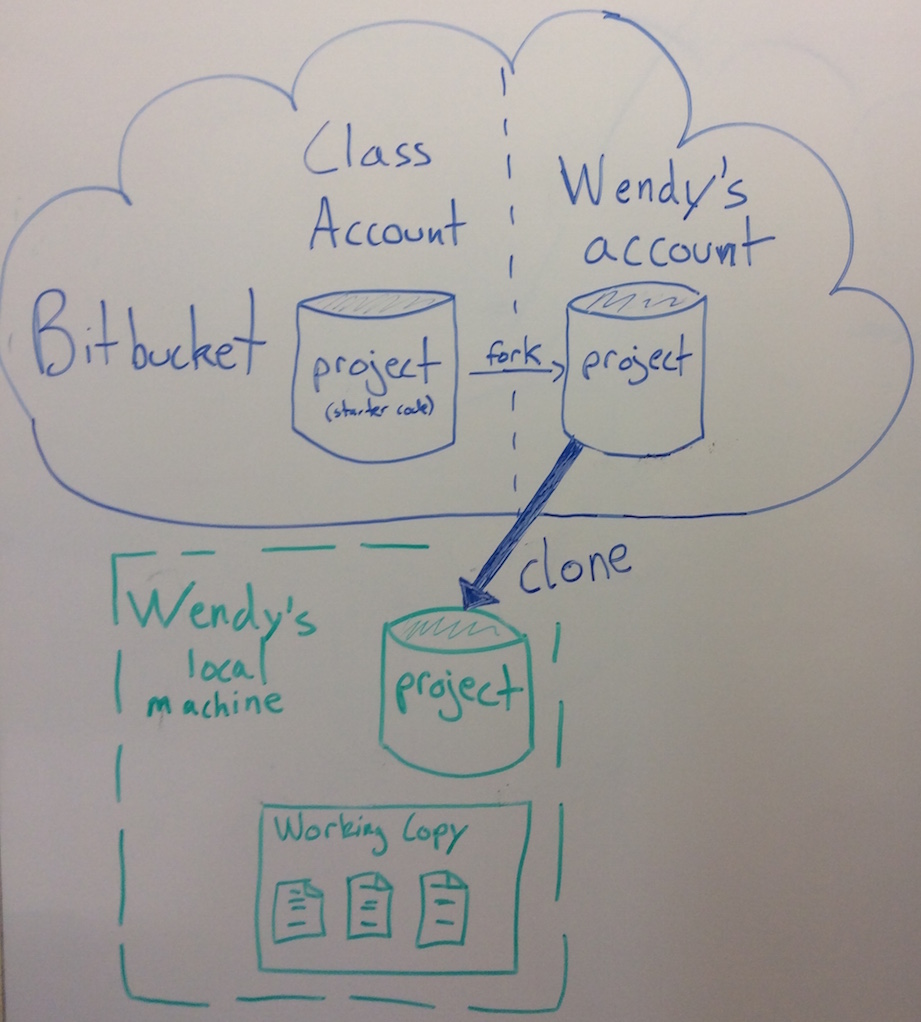
These steps follow an archetypal CS 240 student with Bitbucket username
wendy and their Bitbucket repository for the bits assignment. $ indicates a command prompt in the shell.On your local machine, open a shell, create or navigate to a directory where you would like to store CS 240 assignments (~/cs240 is a great choice), and then clone your Bitbucket repository. Replace
wendy with your own Bitbucket username.
						$ mkdir cs240

						$ cd cs240

						$ hg clone ssh://hg@bitbucket.org/cs240fall2017/bits-wendy bits
requesting all changes
adding changesets
adding manifests
adding file changes
added 6 changesets with 19 changes to 15 files
updating to branch default
15 files updated, 0 files merged, 0 files removed, 0 files unresolved
The hg clone command copies the entire revision history of wendy’s Bitbucket repository bits-wendy to the local machine and constructs a working copy of the latest revision in a directory called bits.
$ ls
bits
For future assignments, you will not need to recreate the cs240 directory, simply cd into again to clone the next assignment repository.
bits repository along with a working copy on your local machine. The next few parts will use only your local copy of the repository. We will not interact with your Bitbucket repository again until pushing changes.
Change directory into the working copy base directory and list its contents.
					  $ cd bits

					  $ ls
bits.c Makefile ... [other files omitted for space]
Remember, these files are the working copy, currently a snapshot of the latest revision of the repository, but they tell you nothing about the revision history, which is hidden away.hg log
Run the commandhg log to obtain a summary of the revision history. (Yes, try it now!) The output is a log of changeset records.Each changeset has two number identifiers separated by a colon. The large right-hand number in hexadecimal notation is a permanent, unique changeset ID for the changeset. The smaller left hand number is a local revision number in place simply for easier reference than the large hexadecimal changeset ID. The revision number is valid only within this clone of the repository.
Revision history often happens to be a linear (i.e., totally ordered) sequence of changesets, but is a directed acyclic graph (i.e., partially ordered) in general. Each changeset (except for the first) is descended from one or two earlier changesets,4 called its parents, representing the preceding version(s) of the repository. To see the order of changesets more clearly, run the command:
$ hg log --graph
The
--graph option (or its shorthand -G) makes hg log draw the topological order of changesets, with parent and child directly connected by line segment. The tag tip labels the changeset most recently added to this repository, though we ignore it for now.
Commit changes
While editing the working copy, it is useful to inspect its differences with the most recent revision in the repository.hg statuscompares the working copy to its parents to determine what files have been changed in the working copy. Try it now!
Notice that the command did not show any output. This means the working copy is identical to its parent, the “latest” revision in history: nothing in the working copy has been changed.
Add a comment with your name to the top of the bits.c file and rerun hg status.
When you update a file, Mercurial will give output like this:
$ hg status
M bits.c
which indicates that bits.c has been Modified since the last revision.
hg diffshows the exact difference between the current working copy and its parent revision. Lines prefixed by + are additions; lines prefixed by - are deletions. (Do you see your addition to bits.c?)
hg commitrecords the current working copy as the latest revision in the local repository. (It does not affect any other repositories.) It will open an editor to record a commit message describing the revision. Sometimes it is faster to give the message on the command line with --message or its shorthand -m:
$ hg commit --message "Added name to bits.c"
No output means success.hg statusshould show no changes. The output ofhg log --graphconfirms that a new changeset with your commit message has been created and marked as the parent (@) of the working copy. Without extra arguments,hg commitcommits all changes to all tracked files in the working copy. hg commit FILE or hg commit -m "message" FILE record revisions including changes to FILE only. (Any number of specific files may be given.) This (and the record extension) are helpful for recording several distinct commits from a larger set of changes.
WHEN TO COMMIT
The Commit Rule: one commit should record one logical, independent change – an atomic unit of work. Learning the right commit granularity is much like learning good code style. It comes with time and practice, and there’s rarely a single unassailable judgment of what constitutes a reasonable commit. A good proxy, for starters, is to try to avoid committing code that does not compile (Especially if working with others!), but to commit often enough that you will not lose signficant work if your working copy suddenly disappears and you need to revert to a previously committed version. For example, don’t commit a half-written function that will cause your program to fail to compile. Wait to commit until you have a compiling (if not fully implemented) function, or at least comment out the syntactically offending piece.
hg revertreturns a given file to whatever it looked like in the parent revision (even if you’ve just accidentally deleted it or spent 3 hours rewriting it in a way you now regret). If a modified version exists in the working copy, Mercurial makes a backup of it in filename.c.orig, just in case you regret the revert. hg revert modifies the working copy only, not the revision history. (Try it now! Delete bits.c and use hg revert to bring it back).hg addmarks a given file for addition to the repository on the next commit. This command does not commit anything to the repository now. Mercurial repositories track revisions to files only if they are explicitly added to the repository.hg rename A Brenames (moves) a tracked fileAto be tracked under a new nameB. Like hg remove, the effect is not recorded in the revision history until the next commit, but is reflected immediately in the working copy. If you move a tracked file yourself using a linux command, Mercurial notices (and is unhappy)!
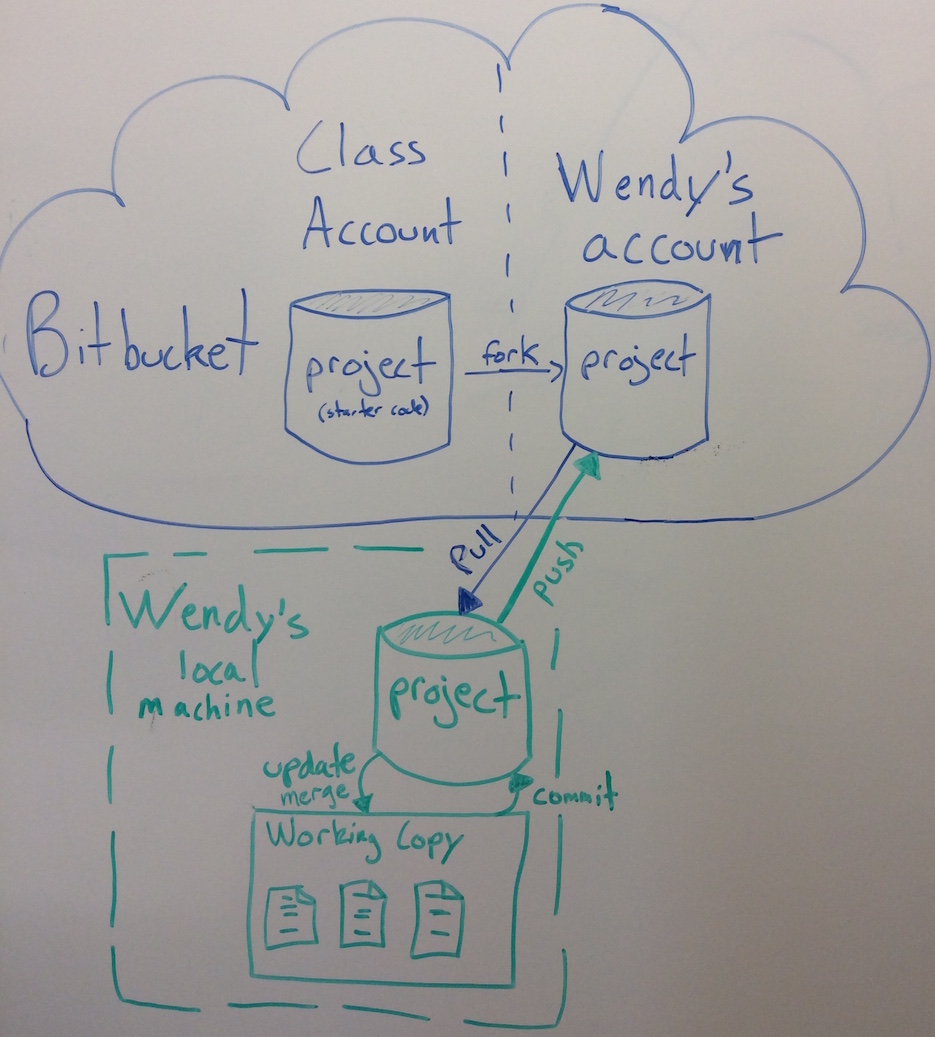
hg push copies local revisions that are not in a remote repository to that remote repository. hg outgoing lists these revisions without pushing them. By default, both use the remote repository from which the local repository was cloned.
hg push your changes to your Bitbucket repository now. When working with others, pushing may require more work first, but works fine alone.
- If you created any new files beyond the starter files (this is rare),
hg addthem to the repository. -
hg commitand hg push your latest changes to the repository.
- Your work is submitted if
hg statushas empty output andhg outgoingindicates no changes found. - Your work is submitted if the Bitbucket page for your repository shows the revisions you want to submit. In the left sidebar, click Commits to see the revision history. For the repository bits-wendy, visit: https://bitbucket.org/cs240fall2017/bits-wendy
We need a few more commands to make this work:
hg pullacquires new revisions from a remote repository;- brings new revisions into the repository, but does not touch the working copy.
hg incomingshows them but does not acquire them;hg updateorhg mergeintegrate them with local revisions.hg updateupdates the working copy to the most recently added revision.- The Update Rule: commit before updating.
hg mergemerges revisions from another branch of history into the working copy.- The Merge Rule: commit before merging and commit immediately after merging (and resolving any conflicts).
- As discussed earlier,
hg pushshares local revisions with a remote repository.
Resolving Conflicts (in code)
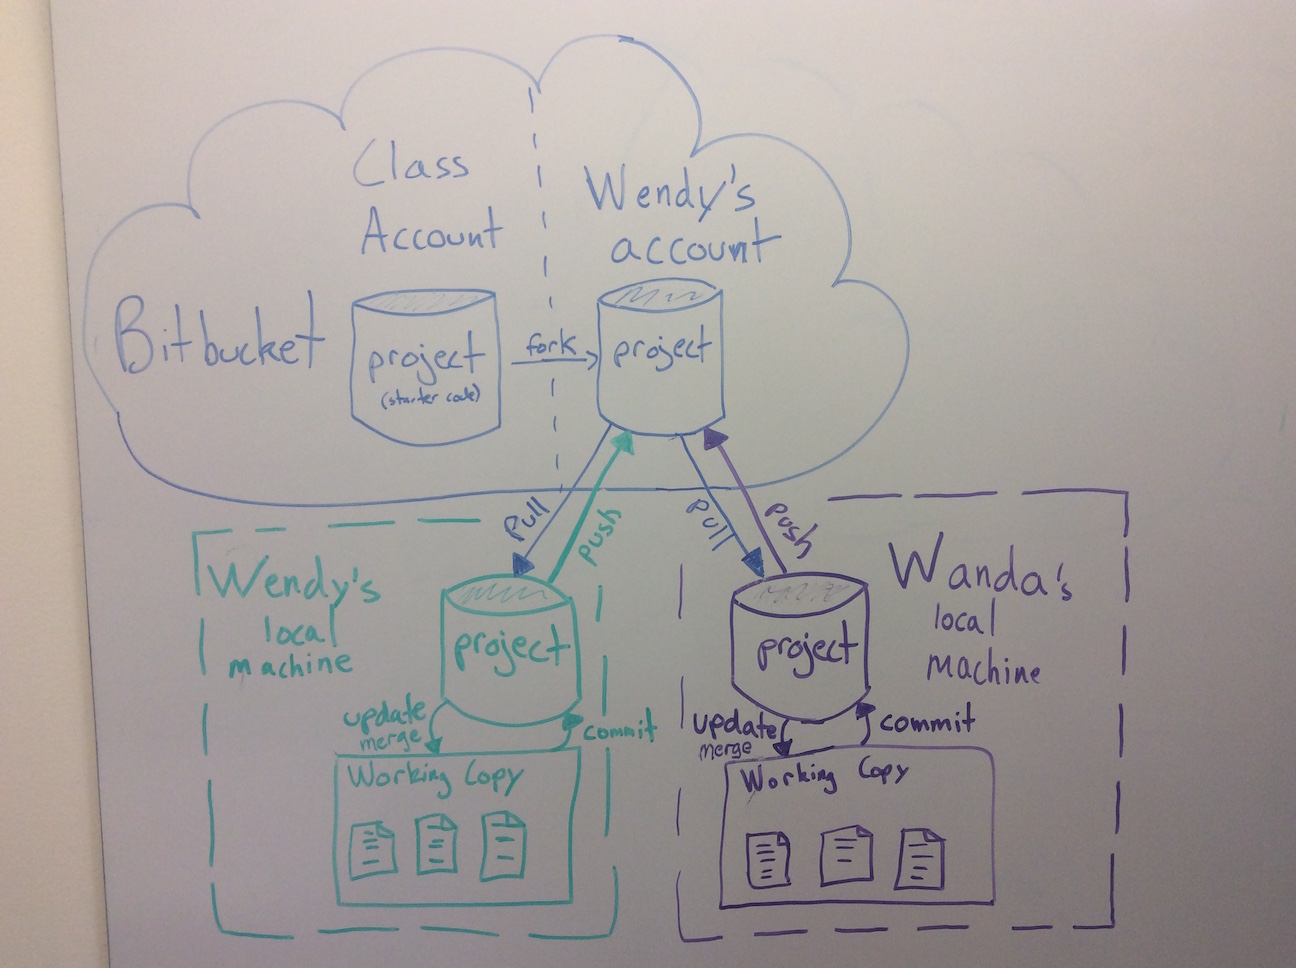
Two divergent changes to the same lines in a file constitute a conflict that cannot be merged automatically. Mercurial is good, but it cannot read your team’s collective mind to decide what to do with a conflict, so it asks you.For example, imagine both Wendy and Wanda edit the first line in a file, README, to hold different text (i.e., Wendy’s revision and Wanda’s revision should differ in the first line). Both
hg commit that change.Wendy then does a
hg push.Wanda does a
hg pull and hg merge, and then observes:pulling from ssh://hg@bitbucket.org/cs240fall2017/pointers-wendyw
searching for changes
adding changesets
adding manifests
adding file changes
added 1 changesets with 1 changes to 1 files (+1 heads)
(run 'hg heads' to see heads, 'hg merge' to merge)
$ hg merge
merging README
warning: conflicts during merge.
merging README incomplete! (edit conflicts, then use 'hg resolve --mark')
0 files updated, 0 files merged, 0 files removed, 1 files unresolved
use 'hg resolve' to retry unresolved file merges or 'hg update -C .' to abandon
Note several cues in the output: Mercurial tried to merge, but Wendy and Wanda made conflicting changes, so there’s no obvious way to merge and preserve both of their changes. Instead of doing something arbitrary, Mercurial did the following:
- Put the pre-existing working copy of README in README.orig.
- Annotate conflicts in README using special notation.
- Mark README as unresolved, such that we cannot commit until explicitly resolving the conflict.
This is the read me edited by Wendy and awesomified by Wanda.
=======
This README was created by Wendy.
>>>>>>> other
<<<<<<< local, =======, and >>>>>>> other delineate conflicting revisions. The first is from the local working copy. The second is from the other competing revision.
To resolve the conflict, edit the file to remove these markers and save whatever final contents you wish. Then, run
hg resolve --mark README to mark README as resolved. Mercurial will refuse to commit if unresolved conflicts remain, to prevent accidental commits of a file full of unmerged conflicts and <<< === >>>.Finally, live by the merge rule: commit immediately once you have finished merging (and resolved any conflicts), and before making any unrelated changes. The changeset including a merge should include only changes immediately related to merging.
		 $ hg resolve --mark README

		 (no more unresolved files)

		 $ hg commit -m 'Merged README updates'
The Merge Rule: commit before merging and commit immediately after merging (and resolving any conflicts). The changeset including a merge should include only changes immediately related to merging.