wx appliance
The wx appliance is a virtual machine that provides all the software tools for Ben’s 200- and 300-level courses. You can run the appliance as an application alongside others on your own computer with minimal fuss.
Contents
- Purpose
- Caveats
- Requirements
- Installation
- User and Initial Setup
- Startup and Shutdown
- Pause and Resume
- Performance and Memory Usage
- Updates
- Use the Appliance
- Under the Hood: Software and Licenses
- Troubleshooting
Purpose
The wx appliance is provided for those who wish to work on their own computers without installation headaches, low-level system incompatibliity, or trouble with remote access. Using the appliance is not required. Physical CS Linux machines are always available in the microfocus or S173.
The wx appliance has all the tools you need and is isolated from the rest of your computer. No need to mess around with temperamental installers, find that things don’t work, or possibly break things directly on your computer. Plus you have a GNU/Linux environment and virtual machine available on your laptop any time you want to tinker or learn more.
Regardless of what machine you use, working in the microfocus or S173 labs is great for class camaraderie! (And you might even get some great tips from peers, or your instructor, whose office happens to be close by.)
Caveats
Infrastructure described in this document is still a bit experimental. If your wx appliance stops working, you can replace it easily with a new one, but you might lose all the files you stored on the old one. That means you should backup anything of importance stored on your appliance. Luckily, this is pretty easy if you are using version control to manage your work as we do in this course.
Requirements
Most computers from the last 5 years or so should suffice. You need a computer with:
- a fairly recent 64-bit Intel or AMD processor;
- 4GB or more of RAM (as little as 2GB may work with some tweaking);
- Mac OS X 10.8 or later, Windows Vista SP1 or later, or any recent major distribution of GNU/Linux; and
- 5-6GB of free disk space
Installation
-
Download
wx-s16.ova[~1.9 GB] to your computer. This will take a while. Do it on the campus network.Alternatively, use
scpto get the file if you have a CS account andscpinstalled (allows access from anywhere, not just campus):$ scp your_username@cs.wellesley.edu:~bpw/public_html/wx/s16/appliance/wx-s16.ova . - While you are waiting, download and install the latest version of VirtualBox 5.
- Once
wx-s16.ovahas finished downloading, start VirtualBox and choose the menu item File > Import Appliance…. - Click the folder icon and browse to select
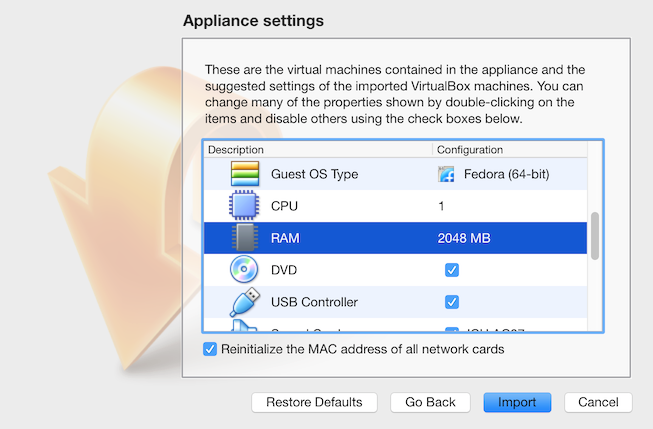
wx-s16.ova, then click Continue. - If you will use Eclipse (Java/Scala IDE), increase the amount of RAM allocated to the appliance (see instructions here). CS 240 students should ignore this; CS 301 students should do it.
- Click Import to accept the default machine parameters. This will take a few minutes.
- In the VirtualBox manager application, select the appliance on the left and click the Start button (green arrow) to start up the appliance.
- Continue to the next section.
User and Initial Setup
The appliance has one user, named wx, that is logged in automatically on startup.
The first time the appliance is started, it will automatically run a script that asks you a few questions to get you setup for remote CS access, Bitbucket accesses, and specific courses.
The wx user’s password is wx. When the setup script is done, change the password for security: Open a new terminal and run the command passwd. (We removed fancy GUIs for these sorts of things to save space since you won’t need them much.)
If you have successfully installed and started using your copy of the wx appliance, you can safely delete the wx-s16.ova file that you downloaded.
Startup and Shutdown
The wx appliance can be started and shut down much like a physical computer. It can also be paused. Read the VirtualBox manual to learn how to control it and how it interacts with your mouse and keyboard.
Start up the appliance: open VirtualBox, select wx in the list on the left, and click the Start button. This launches a separate application running the appliance.
Shut down the appliance by clicking the wx menu in the upper right corner of the appliance screen and choosing Shut down.
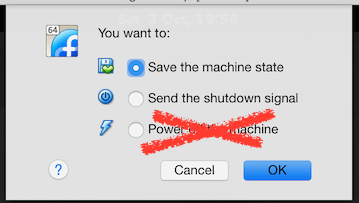
This is equivalent to yanking out the battery or power cord while the computer is running. (Notice the lightning bolt next to that option!) Students who do this end up with corrupted Mercurial repositories. The Send the shutdown signal option is OK. This asks the wx appliance to shut itself down.
Pause and Resume
Pausing and resuming the appliance is convenient if you want to keep some windows open in the appliance but you want to free up resources on your computer while you work on something else.
Pause the appliance by clicking to close the VirtualBox window holding the wx screen. Choose Save the machine state and click OK. VirtualBox will take a few seconds to save the wx appliance’s current state, then it will close the wx appliance. The listing for the wx appliance in VirtualBox will now show it as Saved (vs. Powered Off). This is like stopping time, and is similar to sleeping/hibernating.
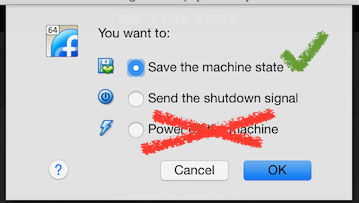
Resume an appliance whose state has been saved the same way you start an appliance.
Performance and Memory Usage
By default, the wx appliance will use 768MB of your computer’s RAM. If you are using memory intensive applications like Eclipse or if you find that the appliance is sluggish, you will need to give the appliance more RAM.
- For CS 240, 768MB (the default, or maybe even 512MB) will probably suffice.
- For CS 301, try 2048MB. (Eclipse may be sluggish otherwise.)
If you need to adjust the appliance RAM at installation time, scroll down in the Appliance settings window to find the RAM entry and double-click to edit it.
If you need to adjust the appliance RAM after installation is complete:
- Shutdown the wx appliance.
- In the VirtualBox manager application, click the Settings button and choose the System tab.
- Change the Base Memory:
- Click OK to save the change.
- Start the wx appliance again.
If your adjustment causes performance problems on your computer (or the VM itself is still sluggish) please seek assistance from you instructor.
Updates
If your appliance prompts you to install updates, do so. (You may need to enter wx’s password.)
From time to time, we may also need to install new software or make changes to your copy of the wx appliance. We will let you know when this is needed. To get updates, run sudo dnf update in a terminal. This may prompt for your wx password.
Use the Appliance
Common applications appear in the upper left corner. The leftmost icon is a menu providing access to all GUI applications.
More documentation: The wx appliance uses the Fedora Xfce spin distribution of the GNU/Linux operating system, including the XFCE destop environment. We have removed some non-essential software packages from the default distribution and installed programming-related packages.
Host-Guest Integration
The wx appliance comes with extensions installed in the guest operating system to support some useful features such as:
- a clipboard that is shared between the host (the software on your personal machine) and the guest (the software running in the wx appliance)
- shared folders that appear in both the host and guest
- drap-and-drop may also be supported in some cases.
Check the Devices menu in the running VirtualBox VM application to enable or disable these features.
Read the VirtualBox manual for more information.
Under the Hood: Software and Licenses
The wx appliance is currently available only to students, faculty, and staff within Wellesley College.
The wx appliance uses a mix of free software and open-source software, plus a couple management tools of our own design that will eventually be released under such licenses.
We use VirtualBox (manual) to package and execute the wx appliance.
The wx appliance is based on the Fedora 23 GNU/Linux distribution with the XFCE desktop environment. We have removed some non-essential software packages from the default distribution and installed several programming-related packages.
Troubleshooting
Please report issues to Ben Wood. Detailed descriptions and any troubleshooting you have tried (or solutions you have found) are very useful.
“VT-x” or “AMD-V” Unavailable or Disabled
When trying to start your wx appliance from VirtualBox, some Windows machines may give an error about “VT-x” or AMD-V” being unavailable or disabled. These two features are Intel and AMD’s special hardware support for faster virtual machines. If you have a relatively recent computer (last few years), it is likely you have these features, but they are disabled.
To enable virtualization support:
- Reboot your computer and hold the F2 or F10 key as it is starting up. This will cause it to enter a mode (known as BIOS or firmware settings) allowing you to set low-level hardware options. (If the first of F2/F10 that you try doesn’t work, try the other. The screen probably tells you which.)
- Use the arrow keys to navigate to the Security or Virtualization Settings (or similary named) tab.
- Enable hardware support for virtualization.
This allows VirtualBox (or other virtualization applications) to use hardware support to run the wx appliance.
You may need to delete the virtual machine you created in VirtualBox and reimport wx-s16.ova for it to recognize the virtualization support.