Answers for AM1
Here is the list of the answers for the questions in the AM1 description.
Part 1: Questions about Data
- Searching with the phrase "books API" on Google, returns as the first result, Google Books API. In fact, that is the API used in our app. Because Google has digitized almost every book that was ever published, it has the largest archive of books on the Internet, which can all be searched through its Books API. There are other APIs, but they don't have old books, only books that are for sale.
- Reading the documentation for Google Books API
reveals that the URL needed to send a
search query for books is:
https://www.googleapis.com/books/v1/volumes?q=search+terms. We then can supply different values for the search terms. (Note: The plus sign is used to concatenate multiple words, so that no space is used in the URL). For example, if you click on this link: https://www.googleapis.com/books/v1/volumes?q=wellesley+college we will get the results for Wellesley College. - If you click on the link above, you'll see the returned results in the JSON format.
JSON (Javascript Object Notation) is easy to read by humans and also easy to process
by many programming languages (e.g. Javascript or Python). A format is a way to structure
complex data. JSON does this through objects of objects, nesting objects as deep as needed.
If you install the JSON Formatter extension for the Chrome browser, you can see the JSON data
nicely formatted and nested. This is how this will look like:
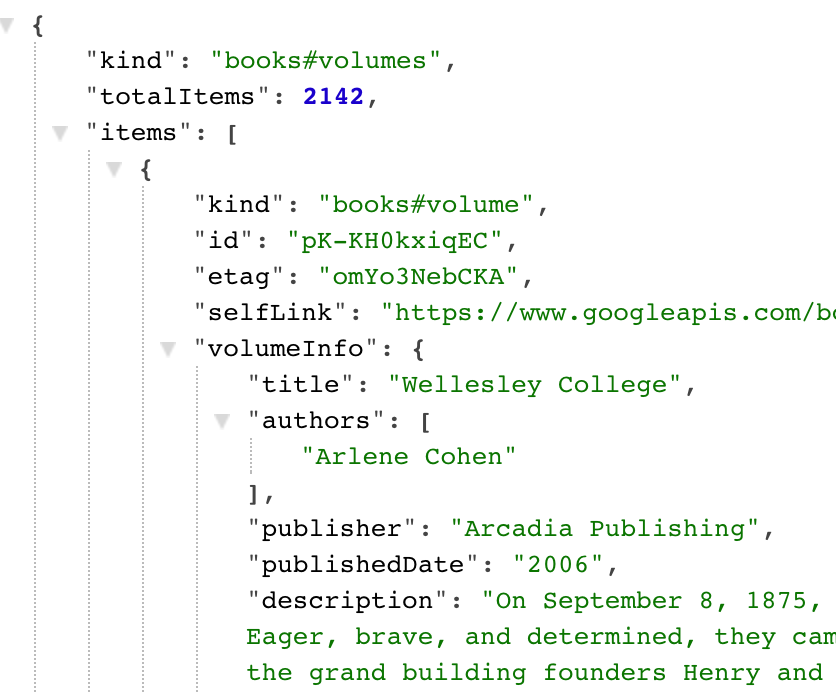
- The returned result is an object with three properties, one of them,
totalItemswill be used in our page. In addition, we will be looking at the objects in the list for the propertyitems. Each item in this list is itself an object with several properties. The properties we need are all in thevolumeInfoobject, such astitle, authors, publishedDate, description, and imageLinks.smallThumbnails. - If we store the results from the link above in a file named
wc.js, then we can link to this file from a html page using the<script>tag. You can see this by looking the source code for this HTML page. If you already installed the JSON Formatter plugin, the parsed view of the JS file will not show the variableresults. If you switch the button to "Raw", you can see it at the top of the file. - You can access the Console of Chrome in multiple ways, for example by going to View | Developer | Javascript Console (or learning the keyboard shortcut for your computer). Since the variable
resultswas declared in our Javascript file, by typing it in the console, we get back everything is stored in it. See how this looks in the screenshot below. The statements in blue were entered by me, the rest is the output in the console.
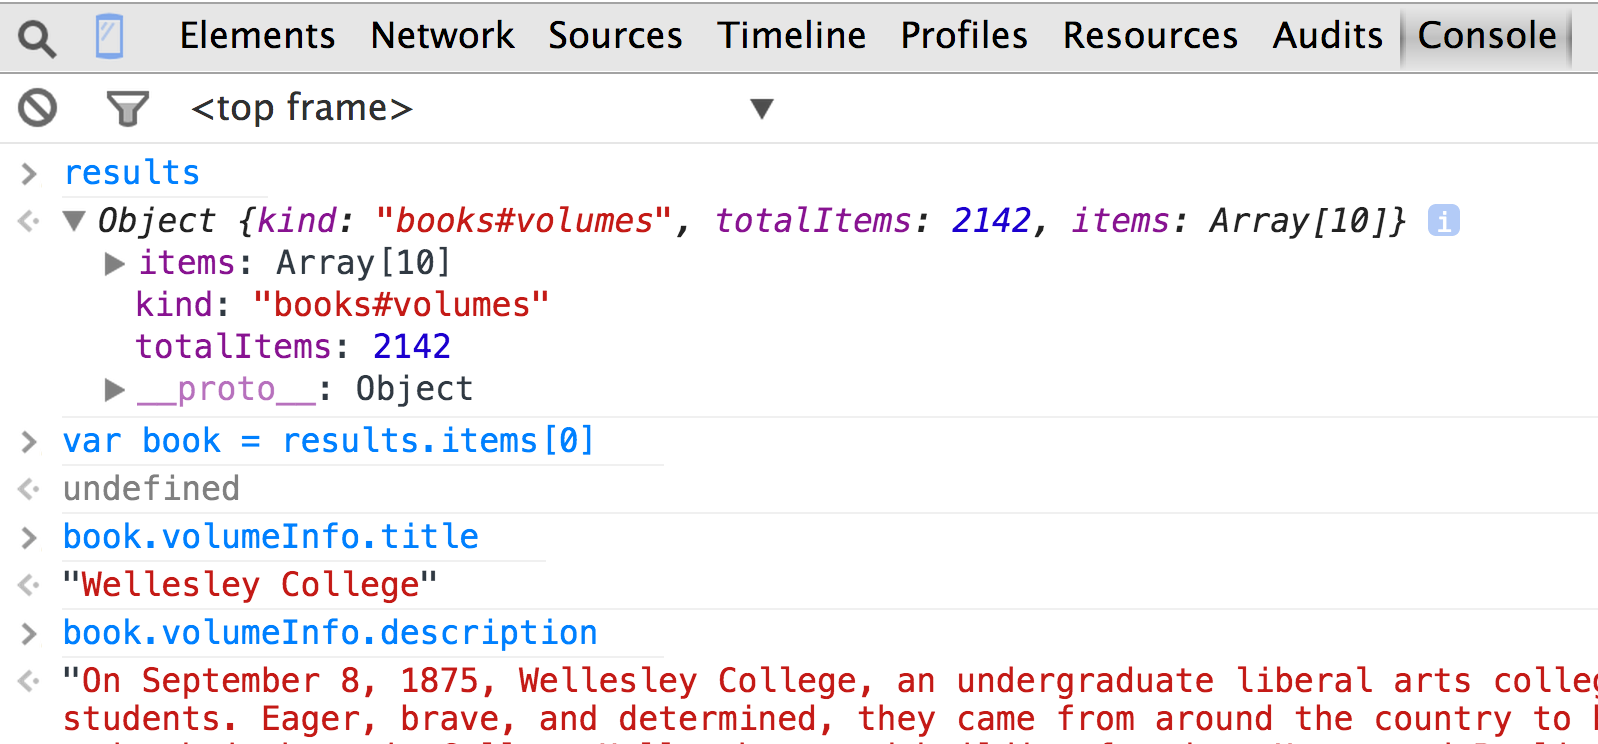
To access only one book, we create a new variablevar book = results.items[0], then, we use the dot notation to access the desired properties. - Javascript has two different ways for writing loops, one is identical to the Java's loop,
one is similar (but not identical) to Python's loop. In the example below, I'm showing the
Java version, we'll discuss the Python-like version another time.

The functionconsole.logis used to print results in the console. Notice that it can take an unlimited number of arguments, this way we can concatenate many things together to have an idea of how our code is behaving or what is in our data.
Part 2: Questions about Presentation
- Given the you wrote the skeleton of the empty page using Brackets (see videocast),
you can add the title of the page (needs to be a header tag, such as
h1orh2, an input text field, using the taginputand a button using the tagbutton. Here is how the completed code looks like (this code goes within thebodypair of tags.<h1>Searching Books</h1> <input> <button>Search books</button> - We first need to decide how we will structure the content we will display. We'll need
a header to show the book title (let's say
h2), then another header to show the author name (e.g.h3), animgtag to show the cover, and aptag to show the book description. In order for all these elements to stay together, we will nest them in adivtag. Here is the markup for one book:<div> <h2>First Book Title</h2> <h3>First Author</h3> <img src="aFileName.png" alt="book cover"> <p>Here is a book description. This can be long with several sentences, but for the moment we will just have a long list of blah, blah, blah, blah, blah, blah, blah, blah, blah, blah, blah, blah, blah, blah, blah, blah, blah, blah, blah, blah, blah, blah, blah, blah blah, blah, blah, blah, blah, blah, blah, blah, blah, blah, blah, blah blah, blah, blah, blah, blah, blah, blah, blah, blah, blah, blah, blah </p> </div>If we copy this for three times and use some real images, our page so far will look like this one here. - Most HTML elements are displayed in the page as blocks that
stack on top of each other (though there are a few elements, such as
aandimg, which display inline). To change this default layout, we can use different CSS techniques, the most powerful being the propertyfloat. An element can float either left or right (never top, bottom, center, etc.) Read more about float in our book (Head First HTML), Chapter 11, pages 471-480. -
In order to change the appearance of the page to show the books next to each other,
we'll do three things:
- Assign a
classattribute to thedivelement that we used to wrap the content for each book. This will looks like this:<div class="book"> <h2>First Book Title</h2> ... </div>
- We will create a CSS file and include a CSS rule for the class
.book. This will look like this:.book { border: 1px solid gray; width: 300px; height: 300px; margin: 5px; /* set some space to other elements */ padding: 5px; /* set space between content and border */ float: left; } - Use the
linktag to refer to the newly created CSS file from within the HTML file. This instruction will be put in theheadelement. It will look like this, given you named the filestyle.css<head> <link href="style.css" rel="stylesheet"> </head>
overflowto fix this problem. - Assign a
- To write CSS that applies to the elements nested within each div of the class "book",
we use selector names that show the relationship in the DOM tree,
especially descendance. Thus, if an element is nested within another
element, it can be said that it is a descendant. If we want to style only
h2elements within the "book" class, we will write:.book h2 { color: blue; }For our app, we will need to write such rules forh2, h3, p, since they are all descendant of "book". A descendant selector like this makes the style specific to apply only to these elements and not other elements of the same kind in the page.
The CSS properties you will need to provide arecolor,font-size,font-style, andtext-align. You can find different values for these properties in the CSS Reference. - Showing the publication date diagonally, requires that we use a CSS property known as
transform. This performs different transformation using functions (instead of values). There is a function rotate, translate, skew, scale, etc. To learn about the transform property, you can read its documentation. To see how the rule for our case was written, consult this jsFiddle example I created. -
There are several ways to center a page, depending on its content. The text and images can
be aligned using the style
text-align: center;in thebodyelement. Our page will look like here if we do that. As you can notice, most things have been centered, but not the div elements.
To center everything in the page, we will use a CSS trick known as "fixed-width layout". It consists of two pieces: we set the width of thebodyto a certain value in pixels (or %), and then specify the margin for the left and right as "auto". This does the following: finds the width of the browser window, subtracts the width we used for body and then divides in two the difference and assigns it to the left and right margin. We can set the margin for all four sides of an element, by writing:body { width: 800px; margin: 10px auto; }This will set the top and bottom margin to 10 pixels and the right and left margin to auto. You can see the result of this in this last version of our page. Can we figure out what we did to change the font? It consist of one change in the HTML file and one in the CSS file.