Meteor - A First Tutorial
What is Meteor?
Meteor is an platform/framework/environment for building modern websites that differs from other solutions such as Ruby on Rails, Django, or PHP (in LAMP - Linux, Apache, MySQL, PHP). Instead of generating a page on the server and then send it to the client, a Meteor application sends data not HTML content over the internet. This is called data on the wire. Such a strategie allows webpages to update immediately (similarly to the client-side pages we have been building so far in this course). Meteor applications are written in one single language, Javascript, which runs both on the server side (within Node.js) and of course on the client side (the browser). This allows developers with knowledge of client-side technologies to write a full-stack application. In the solutions mentioned above, one needs to learn a language for the server-side (Ruby, Python, PHP), and of course HTML/CSS/Javascript for the client side. This is what makes Meteor a good solution for this class, to allow us to build more sophisticated web applications.
What we will build?
Today, we will follow the official Meteor tutorial to build the app shown below.
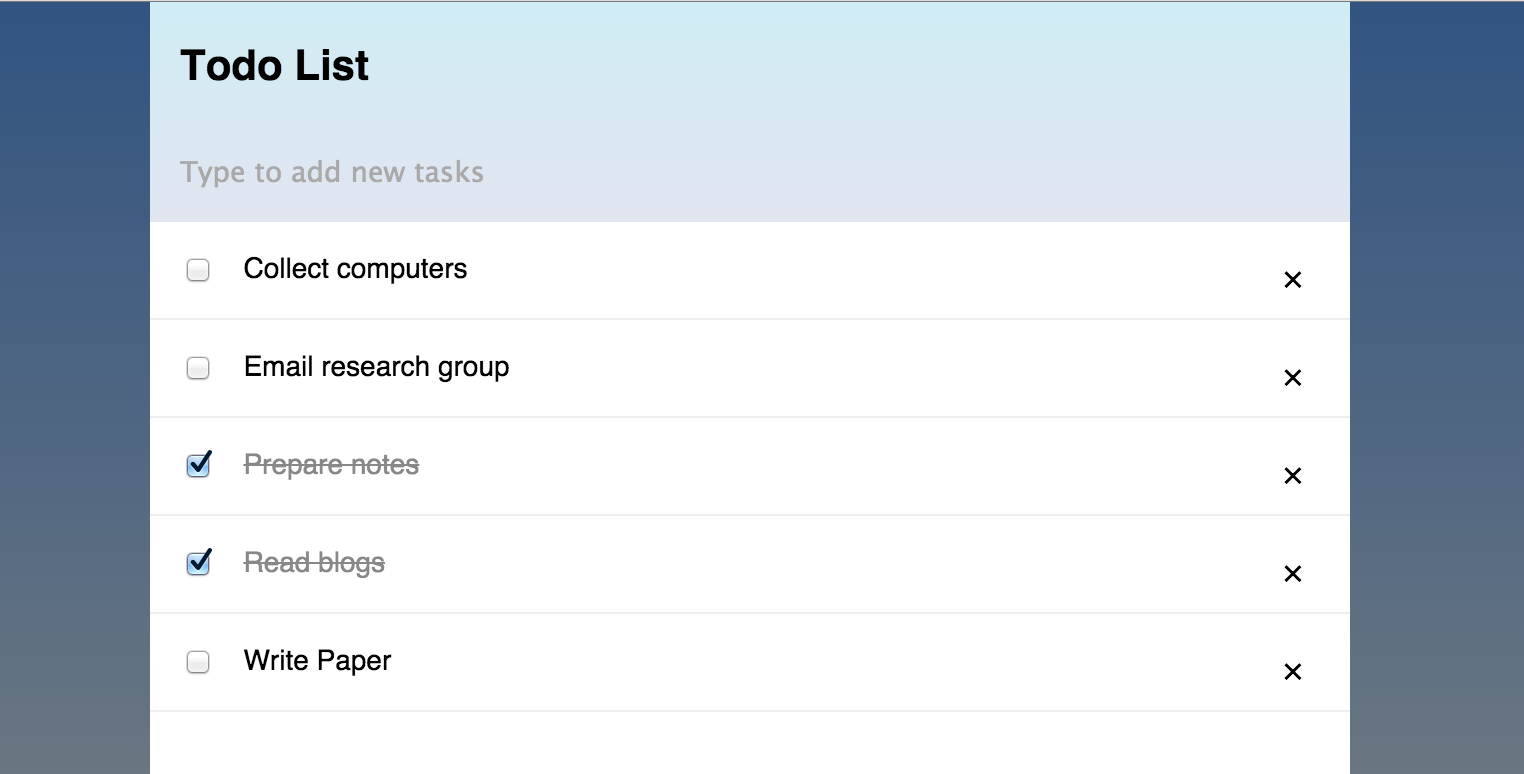
This app can be found live at http://eni_todo.meteor.com/.
A user can perform the following operations:
- Enter a new to-do item (text input at the top)
- Check off a completed item
- Delete an item from the list
Play some with app to see the changes being made by everyone.
Meteor Installation
Meteor is already installed in the Mac machines in SCI 257. However, the first time you'll try to use meteor it will make a copy of it inside your home directory, a process that might last a few minutes.
If you have a personal Mac machine, installing Meteor is very easy, you'll type the following in the command line (i.e. terminal):
curl https://install.meteor.com/ | sh
The first command, curl, is a program that retrieves pages from the Web. If you
remove the part | sh, you'll see the text of the file in your console. The pipe
operator, |, will take the result of the first command and pass it as an input to the
second command, sh which stands for shell. A shell manages the user–system
interaction by prompting users for input, interpreting their input, and then handling
an output from the underlying operating system. In this case, it will
take the file of code provided by curl and execute its instructions that
install all Meteor packages in the machine.
If your personal machine is Windows, use the Installation Link for Windows to download the exe file that will perform the installation.
Create a Meteor app
- If you are on a Mac, open a terminal window. In Windows you can open the command prompt.
- By using the command
cdfor change directory, you can navigate to a folder where you want to create the meteor app. In a Mac/Linux, you can go to a desired folder in the users' directory by typing:cd ~/Documents, where tilde refers to the home folder (e.g., /Users/wendy). In Windows, you need to write the complete path, e.g.,C:\Users\wendy\Documents. - Once in the desired folder, we'll create a new Meteor app with the command:
meteor create wendy_todo
, where wendy_todo is the name of your app. Try to find a unique name, because you cannot upload online something that has a common name, because the URL to that webpage will be already taken (you can check it out, but URLs such as simple-todo.meteor.com, simple_todo.meteor.com, or simpletodo.meteor.com are all taken). - Now that you created the app, type
cd wendy_todo(use your folder name) in the terminal and thenmeteor. This will start the web server that by default listen to port 3000.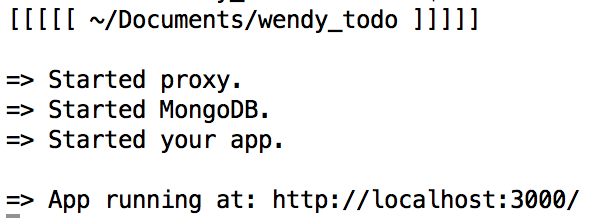
- Open a browser and go to the address: http://localhost:3000/. We will explain in class what this means.
- You should see a simple application that was generated automatically.
- Let's go back to the terminal and open a new terminal window (or tab). Then, list the
content of the app folder with
ls -la. This would reveal three files and a hidden folder.meteor. Inside this folder, all the Meteor packages responsible for the app are stored. - Open the HTML file in your editor (e.g. Brackets) to look at the HTML code and then JS code. Then, go and look at the View Source of the page on the browser. What do you think that is happening?
Building Blocks
When we'll write Meteor applications, we will be doing mostly two things:
- Writing templates in the HTML file(s). Templates are a mix of HTML code
and Javascript variables or object names and their fields (as stored in MongodDB), combined
through the template language Handlebars.
However, Meteor uses a more specific version, known as Spacebars.
Let's open the Spacebars link and look at some examples of templates written in Spacebars. Once the templates
have been written, we have to include them within the
body(or some other HTML element), via the syntax{{> template_name }}. Additionally, templates can include other templates. Finally, Spacebars expression can be entered everywhere in the HTML code, not only within the<template>blocks. Here is a summary of the Spacebars syntax that we'll be most frequently using:
// 1. Inserting templates {{> template_name }} // 2. Statement blocks {{#block}} ... {{/block}} // block can be: each, if, with, unless // 3. Inserting text {{someName}} // somename can be a variable, function, etc. that is evaluated by a helper function - Writing Javascript code in the form of template helpers, template events, and other Meteor methods that deal with the MongoDB operations: insert, find, update, and remove. The code will be structured as an object with property names referring to either object/property names, event names, or function names with their values being functions that retun the calculated value for these properties. Below is the generic syntax:
Template.template_name.helpers({
  variable_name_1: function() {...},

  variable_name_2: function() {...},

  variable_name_3: function() {...},

  ...
});
Template.template_name.events({
  event_name_1: function(event) {...},

  event_name_2: function(event) {...},

  event_name_3: function(event) {...},

  ...
});
Meteor.methods({
  function_name_1: function(parameters) {...},

  function_name_2: function(parameters) {...},

  function_name_3: function(parameters) {...},

  ...
});
The To-Do app
Now that we have a general idea of how a Meteor app is built, we will follow the steps in the official Meteor tutorial to build the To-Do app shown at the beginning of the notes.
In today's lecture we will try to cover the steps 1 to 6 (deployment). After class, I recommend that you go back and read all the text and explanations in the pages that we will skip over during class.
Developer account
In order to deploy your apps on the Meteor server (for example, I deployed mine so that it can be accessed at http://eni_todo.meteor.com, you need to have a developer account. This is easily created on this page: https://www.meteor.com/account-settings. Remember your password, because you'll need it everytime you want to deploy your app on the Meteor server.
Summary of Steps
Here is a list of steps that summarizes the process of creating and deploying an Meteor app:
- Create an app with:
meteor create app_namefrom a terminal window. - Start an app by first
cd app_name, and thenmeteor. - View an app locally by opening a browser tab to the URL:
http://localhost:3000/. - Add HTML, JS, and CSS code in the respective files within the
app_namefolder. - Open a new terminal window to work on the MongoDB console. First cd to the app folder, then
type
meteor mongoto access the client console. You can create MongoDB operations from this console. - Deploy an app with
meteor deploy appName.meteor.com - Visit your app at
http://appName.meteor.com. - Stop the meteor local server on the terminal window with
Ctrl+C.