
| The Game |
| Design Mechanics |
| Programming |
| Team Bios |
| Acknowledgements |
| Development Timeline |
 Jan. 9-19 Jan. 9-19  Jan. 20-23 Jan. 20-23  Jan. 24-27 Jan. 24-27
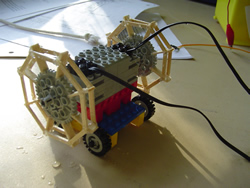
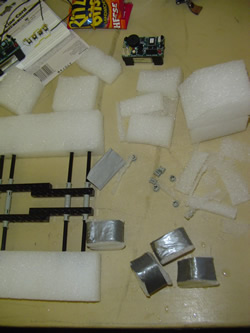
Thursday, January 20, 2005  Waterwheel In the end we built all of our waterwheels with hot glue because it is a lot sturdier than the wood glue (the spokes that were attached to the 40-tooth gear with wood glue fell off when we touched them). We also painted the basswood waterwheel with clear nail polish to make them waterproof. The water wheels may fall apart after sitting in the water for too long and they have to be robust enough to withstand multiple trials. This was a very stinky process and drew some strange looks from professors passing by. While waiting for the waterwheels to dry (so that we can test them) we worked on other things. Catapult Since we have already fine tuned our first catapult all we have to do is build a second one identical to the first following the instructions at http://www.pienetwork.org/a2z/m/modules/. Oh no! We just realized that we changed the rubber bands on the original catapult to a smaller one because we couldn't find a similar size rubber band for the second catapult. We are going to have to check to see if the range is still about the same. (Tighter rubber band (bigger spring constant) = more force!) Floatation We never found any rubber ducks, so we have to build our own floatation devices to hold the 2 motors. Styrofoam seems like a good floatation device and it is readily available in the Science Center, so we gave that a try. We tried various shapes of Styrofoam, but none of them worked. We even tried embedding the motors into the Styrofoam and hot gluing the motors on! (Lesson learned . . . hot glue and Styrofoam is not a good mix because the hot glue melts the Styrofoam and it gets very stinky!) The problem with the Styrofoam is that the motors kept flipping over and it is very difficult to find the center of balance. It may be a better idea to build a car with wheels, but powered by the waterwheels. This way we don't have to worry about the vehicle flipping over and drowning the Crickets. Vehicle (a.k.a. ducks) Next we built a small car out of LEGO pieces that was just big enough to hold 2 motors and to keep them dry. The car has 4 small wheels on the bottom. Programming of remotes Before we can get any further, we need to program our remote control for the waterwheels. While trying to program this remote, we realized that the crickets read a different resistance values than the HandyBoard (it must have something to do with the internal resistance of each of the devices). Basically, the Cricket on the ducks will send out a different IR signal for each of the buttons (a.k.a. switches) pressed because they have different resistances. To avoid cross signaling with our remotes we assigned different IR signals for the two remotes, even though they have the same configuration (same resistors). We will eventually build 2 of everything, but for now we only have one set. At the moment all the buttons are lined up vertically (forward, left, right, and backward respectively). To go forward, both motors will rotate forwards; to go backwards, both motors will reverse directions; to turn left or right, the motors will operate in opposite directions (the idea to turn the wheels in opposite directions is credited to our fellow classmate, Anita Yip . . . more on this later). Testing of Remote and Vehicle The waterwheels work really well. The car can move forwards and backwards in the water with ease, but it can't turn left or right. We realized that the car was never going to turn left or right because the car has 4 wheels and no steering! The car needs to look more like the SciBorg and have a revolving wheel for the front wheel. Since we don’t have a small SciBorg wheel, Robbie suggested that we use axle as a "wheel". What a genius idea! However the car was still unable to turn. =( Ah ha! We found our mistake! We made the silly mistake of putting both of the rear wheels on the same axle. There's no point in having two motors if one motor is always going to be controlling both wheels! So we exchanged the back axle for two shorter ones connected by a connector, now the wheels can move independently of one another. We originally had only one of the motors on to turn the duck, but the waterwheel doesn't seem to have enough power to turn the duck. Anita recommended that we have the waterwheels move in opposite directions! Yay! Now our duck turns! =) 
Floatation We demonstrated our remote control ducks to Robbie and Lyn and they suggested that we go back to the floatation idea because it would improve our duck's turning ability due to the fact that that we wouldn't have to worry about friction with the ground. We told Robbie about the problem with finding the center of balance and he informed us that the floatation would work best if the base was a really wide. So our next design will be something similar to an outrigger-canoe, with the Styrofoam extending past our motors. However, for this to work we had to re-design the part that was carrying the motors. Gray versus red motors We decided to try out the red motors because they are significantly smaller and less bulky. However, they had less power and it took a really long time for the duck to move. Way too slow, so back to the gray motors. Our ducks work really well with the gray motors. 
After 8 hours we finally got the ducks to work as we had envisioned them to work! The price was the lost of some brain cells due to the nail polish fumes and the death of one Cricket, but getting the duck to work was priceless! =) Somehow the cricket aboard the duck got wet and doesn't work anymore. =( We will have to find a way of keeping the Cricket dry in the splash zone . . . no more killing Crickets! (Update: the Cricket didn't really die; itc ame back to life the next day. We guess it just needs to dry out.) Wow what a productive day! Friday, January 21, 2005   Smaller ducks Given the dimensions of our current pool (a under bed storage container: 18 inches by 26 inches) our ducks are going to be way too big. It is going to be too easy for the ducks to defend their goals. We will have to make the ducks a lot smaller. First, we shorten the axle that connects the waterwheel to the motor, and then we also exchanged the 2 big Styrofoam for 4 smaller pieces. This design seems to be pretty stable. Carbon Copy Now that we have successfully built our first duck we need to build a duplicate. This was very a very time consuming process, but nevertheless tons of fun! =) 
Re-configuration of Remote The current configuration of our remote is kind of confusing, so we want to change the position of the buttons, so that it would resemble a regular remote control. So we have to rewire the whole remote again. Hmm . . . our remote doesn't seem to work. Oh no! We had our left and right switches facing the wrong way, so the circuit was open even without the switches being pressed. Thanks to Robbie for catching this mistake! After we fixed this mistake, we rewired the remote once more for aesthetic reasons. =) Re-testing of catapult range Since we changed the rubber bands on our original catapult we had to retest the range of our catapults. Changing the rubber bands reduced the firing range of our catapults by half! Yikes! The rubber bands are not really reliable and we have to find 2 rubber bands of nearly identical spring constants for them to perform the same. It is amazing how much difference a rubber band can make. We swapped the pulley system on the side with an 8-40 tooth gears to reduce the number of rubber bands involved. Now we are down to one rubber band on each of the catapult. We also changed the size of the container holding the ping pong ball on the catapult. Instead of having a paper box, we swapped it for a larger cardboard box. This way it will be more stable and flop around a lot less. The back of the box was also cut out so that it can scoop up the ping pong balls later. We shall figure out the ball re-loading mechanism later and retest the range of the catapult again tomorrow. Saturday, January 22, 2005 - Blizzard!!! The blizzard arrived tonight! Postponement of work... time to go play in the snow! Sunday, January 23, 2005 - Snow Day!!! Wow the blizzard dumped about 2 feet of snow! Time for more sledding down Severance Hill! Back to work on Monday. |