
Git for Code Assignments
This document introduces basic workflows for managing code assignments with Git and CodeTub in the CS 240 Fall 2019 computing environment.
To start the tutorial, skip to Concepts.
Contents
- Quick Reference
- Concepts
- First Steps
- Solo Basics
- Team Basics
- Occasional Tasks
- Other Resources
- License
Quick Reference
To start the tutorial, skip to Concepts. This section is for reference once you know the basics.
Solo Workflow
To start the assignment:
cs240 start assignment --soloto create your hosted submission repository and clone it locally.
As you work:
git addandgit commitcohesive changes oftengit pushcommits often
To submit your work:
git addandgit commityour final changescs240 signyour respository to sign your work and respond to any assignment survey questions.git pushall commits to your hosted submission repository.git statusshould show both:Your branch is up to date with 'origin/master'.nothing to commit
Team Workflow
To start the assignment:
cs240 start assignmentand enter the team’s usernames to create (or connect) your team’s hosted submission repository and clone it locally.
As you work:
- Coordinate with teammates before making changes to avoid conflicts.
git addandgit commitcohesive changes oftengit pullchanges by your teammates and:- if prompted then enter a merge commit message; or
- if there are conflicts then resolve them,
git add, andgit commit
git pushchanges often
To submit your work:
git addandgit commityour final changescs240 signyour respository to sign your work and respond to any assignment survey questions.git pushall commits to your hosted submission repository.git statusshould show both:Your branch is up to date with 'origin/master'.nothing to commit
Concepts
Git is a version control system. Version control systems are designed to help structure and automate the otherwise tedious task of recording the way a project changes through several distinct versions over time, created by one or more users contributing separate changes to the project.
CodeTub is a system for managing code assignments with version control.
Git
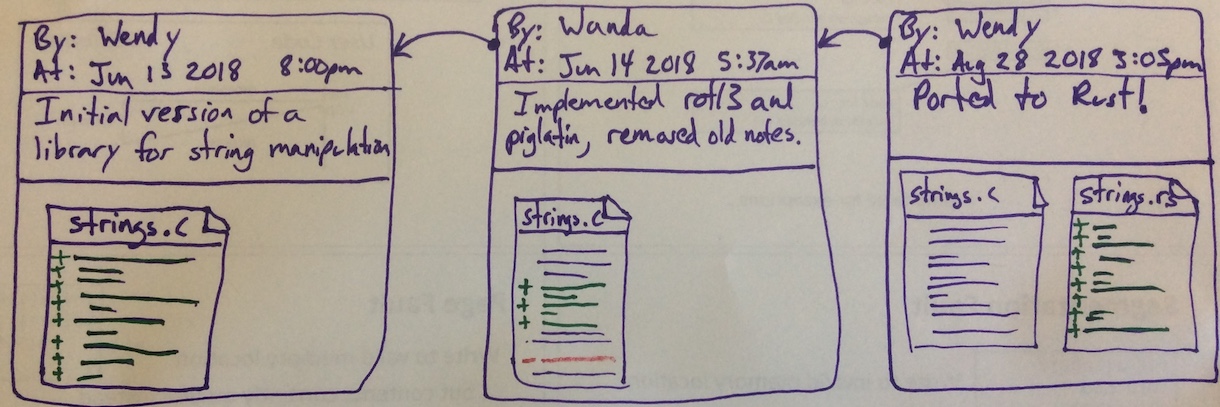
A Git repository is a structured history of a project’s files through multiple explicitly recorded snapshots or versions.1 Each snapshot is called a commit (noun) or a revision. Each commit is accompanied by metadata describing which earlier commits it follows, who created it and when, plus a description of the important changes since the last commit.
A local Git repository is paired with a working
copy2 of the project files in a directory where
the user can prepare and commit changes.3 The git tool lets
users inspect the repository history as well as the status of the
working copy. Each time the user edits the working copy to create a
meaningful new version of the project, they run git commands to
record new commits in the repository.
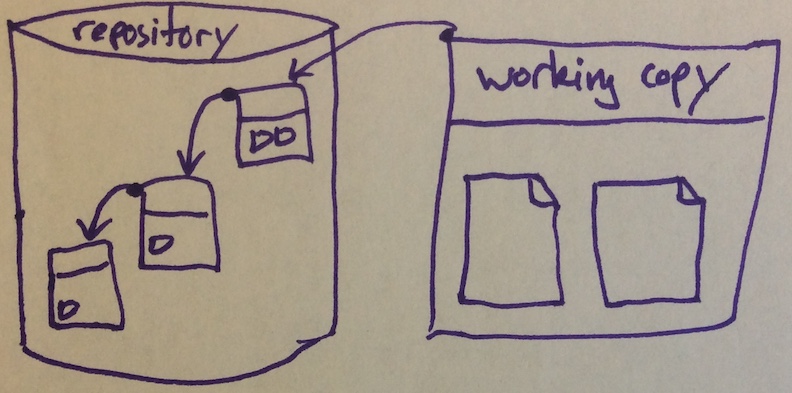
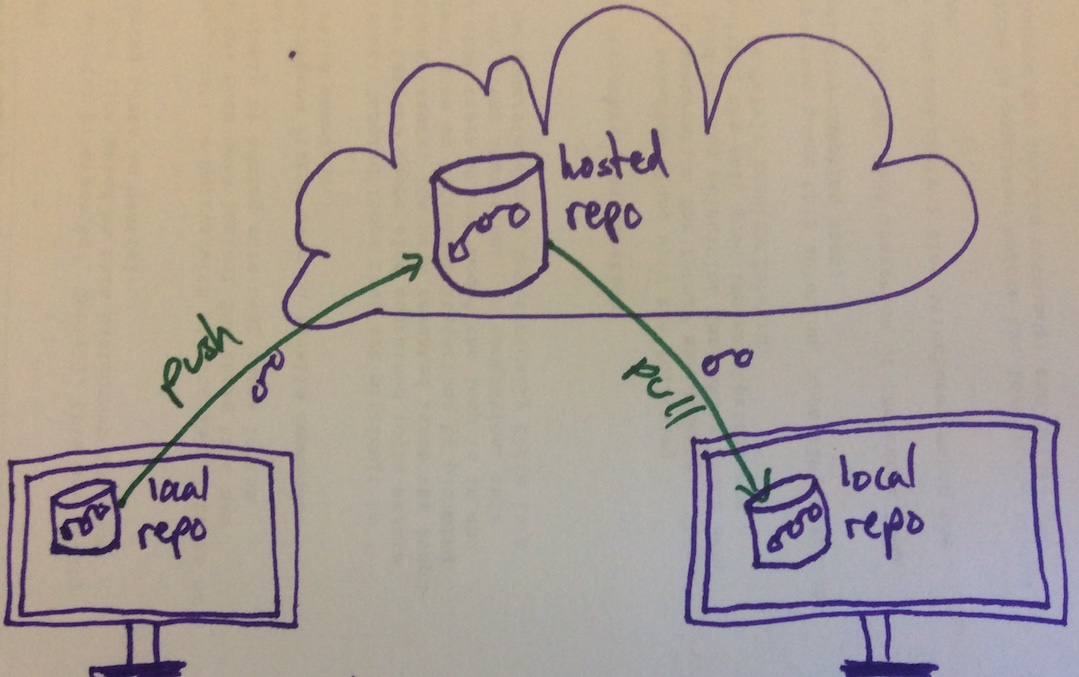
Repositories can be cloned to create a new repository with the same history. New commits can be created in separate clones, then shared by pushing and pulling commit history between related repository clones to bring them up to date with each other.
git command-line tool
Type along.
To learn your way around these tools, you need to follow along and execute commands in this tutorial yourself. This tutorial provides a sample assignment repository that you will use to run your own commands. Fire up a terminal and type along!
Operations on Git repositories are accomplished by running commands
of the form git command in the working copy.
Run git with no command to get a summary of available commands.
Take note of what it shows (omitted here) and the fact that you can
summon this at any time. The command git help topic summons help
about a topic such as a command. Try git help help to get help
with git help!
CodeTub
CS 240 uses CodeTub to distribute, collect, and grade assignments using Git repositories.
For each assignment, the CodeTub repository host stores a private submission repository for each team (or individual).4 This repository is where you will save and submit (i.e., commit and push) intermediate and final versions of your work. When you are done, the instructors will collect the latest version of your work directly from this hosted submission repository for grading. It is accessible only by you, your teammates, and the instructors.
To create and work with hosted submission repositories, you will use
the command-line CodeTub client tool (cs240) and the
command-line git tool as described in the rest of this document.
First Steps
This tutorial assumes that Wendy (username wendy)
is logged in and will work with Wanda (username wanda) as a
pair. Work with a partner and replace these two throughout the
tutorial with your own names and usernames.
We use the example assignment/lab repository tutorial to demonstrate
necessary tasks working with repositories in CS 240. Please
type along through this tutorial to try all of the steps yourself.
Authenticate your account
$ is the command prompt
Command line transcripts shown in this document use $ to represent
the command prompt. Do not type it.
Do these steps once per user per computing environment in your own account.
For now, Wendy (representing the user who is logged in) should do these steps.
(If Wanda can log in separately and complete the account setup now, great, but later is fine too. Wanda must do this when logged in as Wanda, not as Wendy!)
-
If you have not done so already, run the general setup and installation steps for the computing environment you are using.
-
Once your account is configured to use the CS 240 environment, authenticate your account with CodeTub for access to hosted repositories by running the command:
$ cs240 auth -i f19This command will prompt for your human name, CS username, and password. It may take a moment to complete.
-
Create a directory where you will store CS 240 assignments:
cs240-reposis a great choice.$ mkdir cs240-repos
List hosted repositories
To see a list of your repositories stored remotely on the CS 240 CodeTub repository host, run the command:
$ cs240 listEven though you have not created any submission repositories yet, you
should see output like the following, showing that you have Read
access to the
courses/cs240/f19/starters/tutorial
repository, which holds starter code for the tutorial
exercises, including this tutorial.
wendy's repositories hosted by git@cs.wellesley.edu:
R courses/cs240/f19/starters/tutorialAs you create submission repositories, they will also appear in this list.
Now it’s time to start your first assignment and clone your first repository.
Start an assignment (create a submission repository): cs240 start
Optional Extra: git clone
Under the hood, cs240 start uses the git clone command
to clone the entire history of your hosted CodeTub repository to the
local machine and check out a working copy of the latest commit.
You do not need to use git clone directly in CS 240,
since start does it for you. If you are curious, after you have
created your hosted repository with cs240 start, you can
try it out directly: git clone the repository using the URL listed by
cs240 start.
$ cd cs240-repos
$ git clone ssh://git@cs.wellesley.edu/courses/cs240/s19/submissions/wanda-wendy/tutorial another-tutorialNote the extra argument another-tutorial which gives an
explicit name for the local clone.
Do this once per team per assignment.
First cd into your directory for CS 240 assignments.
$ cd cs240-reposTo start work on an assignment or lab activity named, e.g.,
tutorial, use the command:
$ cs240 start tutorialThis command does a few things:
- Prompts for the usernames of the teammates (if any) with whom you
will work on this assignment or lab activity.
- For this tutorial, you should be working in pairs, so enter your partner’s username when prompted.
- If you have no teammates, just hit enter without typing anything at the teammate prompt.
- Creates a hosted submission repository for your team on the CS 240 CodeTub repository host.
- Initializes this repository with the relevant starter code.
- Clones your hosted repository to your local computer and
creates a working copy in a directory,
tutorialin this case, where you can make changes.
After running the start command, take a look around
the working copy directory that was created and inspect the starter code.
$ ls
tutorial
$ ls tutorial
...If you ever accidentally delete your local working copy or just forget
that you already started an assignment, it is OK to run
cs240 start again (with the same teammates). It will
reuse the hosted repository you created earlier.
Solo Basics
This section introduces the basic CodeTub and Git tasks necessary to work with CS 240 assignment repositories for individual assignments by stepping through a sample assignment. The Team Basics section covers CodeTub and Git tasks for collaboration on team assignments as well as other more advanced issues.
Inspect history: git log
You should now have a clone of the tutorial repository
along with a working copy on your local machine. The next few parts
will use only on your local copy of the repository. We will not
interact with your hosted repository again until pushing
changes.
Change directory into the working copy base directory and list its contents.
$ cd tutorial
$ ls
hello.c MakefileRemember, these files are a working copy of the latest commit in the repository, but they tell you nothing about the history.
Run the command git log to obtain a summary of the revision history.
(Yes, actually run it!) The output is a log of commit records. (You
might see something slightly different in your repository.)
$ git log
commit cc2bb091418a2b3333905303ac06bee5b0e92de5 (HEAD -> master, origin/master)
Author: wendy <wendy@tutorial.wellesley.edu>
Date: Mon Sep 17 10:23:09 2018 -0400
wendy started team wanda-wendy
commit d6ef986bb3e1b360aeffb23c3892dee969a7f9f2 (starter/master)
Author: Dorothy Vaughn <dvaughn@acd.nasa.gov>
Date: Fri Aug 31 15:08:26 1962 -0400
Add survey.
commit 303fab4b27829954fee87979fee4df654a78ee23
Author: Dorothy Vaughn <dvaughn@acd.nasa.gov>
Date: Fri Aug 31 15:07:19 1962 -0400
Add a .gitignore file.
commit 382f18c3b561594cd3437b6e4940ed15be6def99
Author: Dorothy Vaughn <dvaughn@acd.nasa.gov>
Date: Fri Aug 31 14:40:10 1962 -0400
Add explanation of the Makefile
commit 45359e0c1deb1f3c66ce930f6bba06e3c0d376f9
Author: Dorothy Vaughn <dvaughn@acd.nasa.gov>
Date: Fri Aug 31 14:39:04 1962 -0400
Starter code for Git and CodeTub TutorialPaged Output
If the output of git log or other git commands is longer than the
terminal window, it will be shown using a pager (less). You can
tell by whether you get another command prompt or if the output ends
with a colon on its own line. If the output is paged, you can use the
space bar to scroll forwards a page at a time (and b to scroll
back), just like with less. When you are done, type q to quit the
pager and return to the command prompt.
Each commit is identified by a large hexadecimal number that permanently identifies this commit in this repository’s history.
The latest commit was made automatically to record your team membership
when you ran cs240 start tutorial. The earlier
commits were made by course staff in preparing the starter code repository.
Notice that two commit are labeled with some references in parentheses.
- The reference
HEADindicates the “most recent” commit on which the working copy is based. - The reference
masterrefers to the main branch of development. In CS 240, we will use only this branch. - The reference
origin/masterdescribes state of your hosted submission repository;starter/mastershows the last of the commits you got from the starter repository. For now, we will ignore these references.
History often happens to be a linear (i.e., totally ordered)
sequence of commits, but is a directed acyclic
graph (i.e.,
partially ordered) in general. Each commit (except for the first) is
descended from one or more earlier commits, called its parents,
representing the preceding version(s) of the repository. To see the
topological order
of commits more clearly, run git log with the --graph option:
$ git log --graphThe working copy is the intuitive next commit in the making, not yet recorded in history, so it does not show up in the log.
Inspect changes: git status, git diff
While editing the working copy, it is useful to inspect its differences with the most recent revision in the repository.
Summarize changes: git status
Ignore most (hints) from git status.
The parenthesized hints in the output of git commands like git
status or a failing git commit include a mix of useful and less
useful options. CS 240 students are probably best
served by ignoring most of git’s hints for now.
git status compares the working copy to its parents to determine
what files have been changed in the working copy. Try it!
$ git status
On branch master
Your branch is up to date with 'origin/master'.
nothing to commit, working tree cleanIndeed Git sees we have made no changes.
Let’s make a change. Add your name in a comment at the top of
hello.c and save it. Now check again to see if
Git has noticed your changes.
$ git status
On branch master
Your branch is up to date with 'origin/master'.
Changes not staged for commit:
(use "git add <file>..." to update what will be committed)
(use "git checkout -- <file>..." to discard changes in working directory)
modified: hello.c
no changes added to commit (use "git add" and/or "git commit -a")Git gives us a lot of information here, including several hints about actions we could take. The key information is on these two lines:
Changes not staged for commit:
...
modified: hello.c
These indicate that the file hello.c has been
modified since the last commit but has not (yet) been marked for
inclusion in the next commit. Ignore the parenthesized hints in this
output for now.
Let’s explore more before returning to interpret the other lines.
Examine detailed changes: git diff HEAD
git diff HEAD shows the exact difference between the current
working copy and the last commit, also known as HEAD. Lines prefixed by - are deletions; lines prefixed by + are additions. Did
Git detect your change? As with git log, the output of git diff
may be paged.
Prepare and record a commit: git add and git commit
The process of committing (recording) new changes to the repository history involves two steps:
- Select (or stage) the changes in the working copy to record with
git add; and - Create a new commit from those selected (staged) changes with
git commit.
Let’s try it out. Run git add hello.c to select all of
your changes to hello.c for inclusion in your pending
commit.
The Commit Rule: commit cohesive changes.
One commit should record one logical, independent, working change – an atomic unit of work. As with code style, this sense can take time and practice to develop. Good rules of thumb:
- Keep unrelated changes in separate commits; keep small mutually dependent changes in a single commit.
- Avoid committing code that does not compile, especially if working with others. If you need to commit partial or broken changes, consider commenting out the incomplete pieces.
- Commit often enough that you will not lose much work if your working copy suddenly disappears and you need to recover a previously committed version.
$ git add hello.cNo output means success. To confirm that Git has staged our changes
hello.c in preparation for commit, run git status.
$ git status
On branch master
Your branch is up to date with 'origin/master'.
Changes to be committed:
(use "git reset HEAD <file>..." to unstage)
modified: hello.cNotice that, compared to the earlier git status output, something
has changed. Specifically, where git status previously reported
hello.c in the section:
Changes not staged for commit:
It now shows hello.c under a section:
Changes to be committed.
Excellent! We can now use git commit to record this change to
hello.c in the local repository history. (It
does not affect any other repositories.) We use the --message or
shorthand -m flag to specify a commit message describing these
changes. (If we omit the message on the command line, git will open
an editor5 to record the commit message describing the
commit.)
$ git commit -m "Added name to hello.c"
[master af51490] Added name to hello.c
1 file changed, 2 insertions(+), 1 deletion(-)The output summarizes the commit that was recorded into the repository history.
Review: git add and git commit
To record changes, do both of these steps together:
git addall files with changes you wish to commit.git committo record these changes in a commit.
Shortcut: git commit -a -m "..." or git commit -am "..."
You can often replace the two-step git add-git commit dance by the
single command git commit -a. The --all or -a flags tell git
commit to automatically git add all the changes to existing
files and then commit. If you wish to commit a new file for the
first time, use git add.
In case you forget to git add
A common mistake when learning Git is to forget to git add changes
in preparation for a commit. In this case, git will give a reminder
message that you have no changes added to commit. The message also
acknowledges that you have made changes in the working copy, but that
they were not staged for commit by git add:
$ git commit -m "Added name to hello.c"
On branch master
Your branch is up to date with 'origin/master'.
Changes not staged for commit:
modified: hello.c
no changes added to commitIf this happens, just go ahead and git add the changes and git
commit again.
Push changes: git push
So far, we have cloned your hosted submission repository to create a local repository and committed some changes to the local repository. We have not yet modified the hosted submission repository.
Now that we have committed a change, let’s check git status again.
$ git status
On branch master
Your branch is ahead of 'origin/master' by 1 commit.
(use "git push" to publish your local commits)
nothing to commit, working tree cleanThe Push Rule: push often.
Push your new local commits to the remote repository reasonably often (at least every time you leave the computer), even if only as a backup. (What if your computer hits a meteorite while you are out?)
When sharing a repository, pushing often allows your teammates to stay more up to date on your work.
Notice that the status indicates that there is nothing to
commit. It also indicates that Your branch is ahead of
'origin/master' by 1 commit, meaning that there is one commit in our
local repository that is not in the remote (origin) repository.
Indeed, we just made that commit!
git push copies local commits to a remote repository. By default,
git pushes to the same remote repository from which the local
repository was cloned (in this, case your hosted submission
repository, which is exactly what we want).
git push your changes to your hosted repository now. When working
with others, pushing may require more work first, but it
should succeed without any coordination when working alone on one
account (as in this tutorial so far).
$ git push
Enumerating objects: 5, done.
Counting objects: 100% (5/5), done.
Delta compression using up to 24 threads.
Compressing objects: 100% (3/3), done.
Writing objects: 100% (3/3), 309 bytes | 309.00 KiB/s, done.
Total 3 (delta 2), reused 0 (delta 0)
To ssh://cs.wellesley.edu/courses/cs240/s19/submissions/wanda-wendy/tutorial
cc2bb09..e928079 master -> masterSubmit work: cs240 sign and push
Submit: The course staff will collect your work directly from your hosted repository as of the deadline. To submit your work:
-
Make sure you have committed your latest changes.
$ git add ... $ git commit ... -
Run the command
cs240 signto sign your work and respond to any assignment survey questions.$ cs240 sign -
Push your signature and your latest local commits to the hosted repository.
$ git push
Confirm: After pushing, all local changes have been submitted if the output of
git status shows both:
Your branch is up to date with 'origin/master', meaning all local commits have been pushednothing to commit, meaning all local changes have been committed
Resubmit: If you realize you need to change something later, just repeat this process.
Summary
Review the Solo Workflow section for a workflow summary.
Team Basics
This section assumes familiarity with the Solo Basics. To work with a team, each team member clones their shared CodeTub repository, then pushes and pulls revisions through it.
We need a new command to make this work: git pull acquires new
revisions from a remote repository and attempts to merge them into the
local repository. As discussed earlier, git push shares local
revisions with a remote repository.
In this section, lab partners will now split up to play the separate roles of Wendy (the student who is logged in right now) and their partner Wanda. It is OK if Wendy and Wanda both work in the same CS account as Wendy, but you can also log in separately if another workstation is available. We assume all parties involved are working in accounts where the course setup has been done.
Wanda Make a new clone of the same CodeTub repository that Wendy cloned.
- If you can work on a separate computer nextdoor, great!
-
If another computer is not available, it is OK if they are on the same computer and even if they are both in Wendy’s local account (though all commits will appear to come from Wendy). The two clones just need to be separate directories. For example, working in the same account as Wendy for this tutorial, Wanda could create a clone called
tutorial-wandaby running:$ cs240 start tutorial tutorial-wandaNote the extra argument declaring the directory to create when cloning. Make sure to enter the same team that you did before to ensure you get the same hosted repository. To be 100% sure, type the usernames of all teammates (both
wendyandwanda), even if the prompt says, e.g., “exceptwendy”.
Incorporate remote changes: git pull
git pull brings new revisions into the local repository from a
remote repository and attempts to merge with the latest commit and
update the working copy.
Fast-forward ordered changes
Wendy After Wanda has cloned the repository, commit and push a new change to the hosted repository.
Wanda Run git pull to get Wendy’s changes.
$ git pull
remote: Counting objects: 3, done.
remote: Compressing objects: 100% (2/2), done.
remote: Total 3 (delta 0), reused 0 (delta 0)
Unpacking objects: 100% (3/3), done.
From ssh://git@cs.wellesley.edu/courses/cs240/s19/submissions/wanda-wendy/tutorial
cc8aaa3..f71eeb3 master -> origin/master
Updating cc8aaa3..f71eeb3
Fast-forward
hello.c | 2 +-
1 file changed, 1 insertion(+), 1 deletion(-)The Pull Rule: commit before pulling.
git pull attempts to change your your working copy if it finds new
commits remotely. If you have uncommitted changes in your working
copy, it could be confusing to get those mixed up with new remote
changes. Committing your changes first means you can restore your
current working copy later if needed.
Note the line of output that says Fast-forward. This is Git’s way
of saying that:
- All of the new commits it pulled follow the current commit on which Wanda’s local working copy is based…
- So it went ahead and updated the repository and the working copy with the results of those new commits.
Wanda Now check for Wendy’s changes in the working copy. Also,
run git log --graph to take a look at the history and confirm that
the new commits appeared.
Both partners now have the save version of all files. That was easy! It out worked so easily because at the time we pulled, the history in Wanda’s repository was strictly a prefix of the history in the CodeTub repository, that had been updated most recently by Wendy. This is not always the case, as we will see.
Merge divergent changes: git pull
Wanda Edit the first line of hello.c then
git add and git commit your change. Run git pull to see if Wendy has pushed
any more changes. (She has not.) git push your change to the remote
repository.
Wendy Edit hello.c to add a new line of
text at the end of the file, then git add and git commit your change. Next, git
pull to get any changes Wanda has pushed.
Whoa! It looks like your editor has just popped up. Before doing
anything with that, flip back over to the shell and examine git’s
output so far.
$ git pull
remote: Counting objects: 3, done.
remote: Compressing objects: 100% (3/3), done.
remote: Total 3 (delta 2), reused 0 (delta 0)
Unpacking objects: 100% (3/3), done.
From cs.wellesley.edu/courses/cs240/s19/submissions/wanda-wendy/tutorial
d87c14e..c78ade8 master -> origin/master
Auto-merging hello.c
Merge made by the 'recursive' strategy.
hello.c | 1 +
1 file changed, 1 insertion(+)Notice the line Auto-merging hello.c. git has
figured out how merge Wendy’s and Wanda’s changes in this file
automatically! Because it was successful in auto-merging all changed
files, git has just popped up your editor asking for a commit
message to describe the merge. Flip back to the editor, write a
message, save, and then close the editor.
Take a look at hello.c with less or emacs.
Did git do the right thing? How long would it have taken you to do
this manually? Step back and take a moment to think how awesome this
is!
Are you back? We have a bit more to do.
Wendy Run git log --graph to see how this merge and commit
affected history. We are now back to one head (revision without
children) and it is the parent of Wendy’s working copy. History has
become a directed acyclic
graph, but we
have reconverged on a single history containing both Wendy’s and
Wanda’s changes.
Perspective
Consider: in a few commands, git accomplished the entire tedious
process of copying Wanda’s files to Wendy’s computer, painstakingly
determining which files have been updated by each person, and getting
the newest revision of each file in place. In fact, it can merge
changes in different files and even in different parts of the same
file. Wow!
Excitement aside, automated merging is not magic nor is it a license to edit haphazardly without coordinating with your team. Even when a merge succeeds at a textual level, the end result may not be meaningful. This means it is still important to:
- communicate with your teammates about what everyone is editing so you know what to expect from merges; and
- do some testing or other sanity-checking on the result of a merge.
If you do not, you might still run into trouble…
Resolve conflicts
Two divergent changes to the same lines in a file constitute a conflict that cannot be merged automatically. Git is good, but it cannot read your team’s collective mind to decide what to do with a conflict, so it asks you. Try it:
Wendy Wanda Both users should now edit the first line of
hello.c in your respective local repositories to
replace the comment text on that line with something more interesting.
Make sure that all three of the previous version, Wendy’s version, and
Wanda’s version of `` differ in the first
line. Both of you should now git add and git commit your change in
your respective local repositories.
Wendy git push.
Wanda git pull, then observe:
$ git pull
remote: Counting objects: 3, done.
remote: Compressing objects: 100% (2/2), done.
remote: Total 3 (delta 0), reused 0 (delta 0)
Unpacking objects: 100% (3/3), done.
From cs.wellesley.edu/courses/cs240/s19/submissions/wanda-wendy/tutorial
f71eeb3..d87c14e master -> origin/master
Auto-merging hello.c
CONFLICT (content): Merge conflict in hello.c
Automatic merge failed; fix conflicts and then commit the result.Wanda Note several cues in the output: Git tried, but
Auto-merging hello.c failed with CONFLICT
(content): Merge conflicts in hello.c. Finally
it reports exactly what we need to do now: Automatic merge failed;
fix conflicts and then commit the result.
Wanda Run git status to get some extra information.
$ git status
On branch master
You have unmerged paths.
(fix conflicts and run "git commit")
Unmerged paths:
(use "git add <file>..." to mark resolution)
both modified: hello.c
no changes added to commit (use "git add" and/or "git commit -a")Notice the mentions of unmerged paths.
Git tried to merge everything automatically, but Wendy and Wanda made conflicting changes to the same line(s) of a file, so there is no obvious way to merge and preserve both of their changes. Instead of doing something arbitrary, Git did the following:
- It did not prepare
hello.cas part of a pending commit of the merge, instead instructing you to fix the conflicts and commit yourself. - It marked the conflicts in
hello.cusing special notation to help you do a manual merge.
Let’s do that!
Wanda
Opening up hello.c, we see something like this:
<<<<<<< HEAD /* CS 240: A simple first C program awesomified by Wanda. */ ======= /* CS 240: A simple first C program by Wendy "I seize C's seas" Wellesley. */ >>>>>>> d87c14eb957db15267cf516c1e86a72a095f0aed
If you really want to discard one person’s changes entirely:
git checkout --ours -- hello.ckeeps your version ofhello.cand discard your teammate’s changes to it.git checkout --theirs -- hello.cdoes the opposite.git checkout --merge -- hello.cprovides the (un)merged version with conflicts.- To apply these commands to the entire working copy, omit the
arguments
-- hello.c.
Just like when you edit the conflicts directly, you must continue to commit your resolved version.
The conflict markers <<<<<<< HEAD, =======, and >>>>>>> d87c14...
delineate conflicting changes to the same line(s):
- The first part, between
<<<<<<< HEADand=======, is the recent local changes to this line by Wanda. RememberHEADrefers to the latest commit in the local repository, the one on which the working copy is based. - The second part, between
=======and>>>>>>> d87c14..., is from the other competing changes to this line, commitd87c14...by Wendy.
Git has left it up to us to decide how to resolve these conflicting changes.
Wanda To resolve the conflict, edit the file to remove these markers and save whatever final contents you wish. It is wise to take your time and do this carefully.
Once you have resolved the conflicts to your liking, run git add
hello.c to mark hello.c as
resolved and then git commit to commit the merged version with all
conflicts resolved.
$ git commit -m "Merged conflicting changes to header of hello.c"
Recorded resolution for hello.c.
[master e45bf94] Added name to hello.cThe Merge Rule: isolate merge commits.
Merge commits should include only changes immediately related to merging.
- Commit before pulling.
- If pulling results in conflicts, resolve any conflicts and commit before making any other changes.
Wanda Note that we have followed the merge rule: if Git is unable to auto-merge, you should commit immediately once you have finished merging resolving any conflicts, before making any unrelated changes. The commit including a merge should include only changes immediately related to merging.
Other merge tools
Git can be connected to many other tools (including modes in Emacs and vi) that allow you to review conflicts one at a time and click or type a keyboard command to select one version or another, or type in a new one. See other resources for more.
Push changes: git push
Wanda To complete the cycle, push your changes (especially if there was just a merge) to share with your team. If there are no more new remote changes that came in since your last pull, the push should succeed. (That should be the case in this example.)
If another teammate has pushed changes to your hosted repository since you last pulled, you will need to pull and merge those changes before you can push. (Git detects that case.)
$ git push
To cs.wellesley.edu/courses/cs240/s19/submissions/wanda-wendy/tutorial
! [rejected] master -> master (fetch first)
error: failed to push some refs to 'cs.wellesley.edu/courses/cs240/s19/submissions/wanda-wendy/tutorial'
hint: Updates were rejected because the remote contains work that you do
hint: not have locally. This is usually caused by another repository pushing
hint: to the same ref. You may want to first integrate the remote changes
hint: (e.g., 'git pull ...') before pushing again.
hint: See the 'Note about fast-forwards' in 'git push --help' for details.Git gives good advice here: pull and try again. Once your local repository is up-to-date with the hosted repository, the push should succeed.
$ git push
Counting objects: 4, done.
Delta compression using up to 4 threads.
Compressing objects: 100% (3/3), done.
Writing objects: 100% (4/4), 214 bytes | 814.00 KiB/s, done.
Total 4 (delta 3), reused 0 (delta 0)
To cs.wellesley.edu/courses/cs240/s19/submissions/wanda-wendy/tutorial
f0ae678..e45bf94 master -> masterSubmit work
Use the solo submission process, but be sure to check these criteria for all teammates who have clones of the repository.
Summary
Review the Team Workflow section for a workflow summary.
Occasional Tasks
These tasks are common in general software development, but rare in CS 240 assignments.
Organize files: git add, git rm, git mv
Git repositories track revisions to files only if they are explicitly added to the repository in some commit.6
Create a new file, README, with some lucid, insightful note inside.
$ git status
On branch master
Untracked files:
(use "git add <file>..." to include in what will be committed)
README
nothing added to commit but untracked files present (use "git add" to track)As git status reports, README is untracked – it is not present in
the latest commit. git commit (even git commit -a) will ignore it.
As the git status message helpfull indicates, we can use git add
to include it in a commit, just as with changes to an existing file.
Git tracks files, not directories, so you cannot add an empty directory, but you can add a non-empty directory, which will add of the files in that directory (and recursively in any subdirectories).
The git rm command removes a file from the working copy immediately
(just like the standard rm command) and also marks the file as
deleted in the next commit.
git mv A renames (moves) a tracked file A to be tracked under a
new name B. Like git rm, the effect is not recorded in the
history until the next commit, but is reflected immediately in the
working copy.7 If you move a tracked file yourself, Git
notices:
Recover from mistakes
One benefit of version control is the ability to recover from mistakes (often easily) that would be time-consuming to reverse or downright disastrous in a world without version control. This section just scratches the surface of possibilities. If something goes wrong, talk to your instructor (or check documentation but act with care). It is possible to recover from a wide variety of mistakes as long as you have committed and pushed often.
Restore the committed version of a file
Overwrite the file hello.c with something bogus.
$ echo bogus > hello.c
$ git status
On branch master
Changes not staged for commit:
(use "git add <file>..." to update what will be committed)
(use "git checkout -- <file>..." to discard changes in working directory)
modified: hello.c
no changes added to commit (use "git add" and/or "git commit -a")Hey, might as well delete it.
$ rm hello.c
$ git status
On branch master
Changes not staged for commit:
(use "git add/rm <file>..." to update what will be committed)
(use "git checkout -- <file>..." to discard changes in working directory)
deleted: hello.c
no changes added to commit (use "git add" and/or "git commit -a")Actually, we need that file for some more examples! Git sees that it
is deleted from the working copy, but after all, we do have the
entire repository history available. We can check out a fresh copy
the file from the repository. We want the latest committed version
(HEAD, if you recall from before), so we use the following command:
$ git checkout HEAD -- hello.c
$ git status
On branch master
nothing to commit, working tree cleanCaution: wield git checkout with care
While we were able to recover the earlier version of
hello.c by checking it out again, git checkout
itself does not make any backups of the working copy before checking
out and old version of a file. That means that if we have important
changes in the working copy of Makefile and we accidentally run git
checkout HEAD -- Makefile, Git happily replaces our changed
Makefile with the Makefile from the last commit and all those
important uncommitted changes are permanently gone.
Be careful out there.
Other Resources
As you outgrow this context, consult the wealth of general Git documentation elsewhere.
- Git Reference – manuals, tutorial, books
- Pro Git – excellent reference book
- Git: How to Do Things if you are a logical thinker
- Magit – version control transcendence in Emacs
License
![]()
Git for Code Assignments
by Benjamin P. Wood at Wellesley College is licensed under a
Creative Commons Attribution-ShareAlike 4.0 International License.
This document is based on an earlier version for Mercurial with third-party hosting.
-
Git stores history as snapshots of versions, rather than differences between versions. Each can be reconstructed from the other. ↩
-
Git terminology often refers to this area for preparing new changes as the working directory, but we use the alternative term working copy to avoid confusion with the notion of working directory in the shell, as in
pwd, and reinforce that it is indeed a copy. ↩ -
The repository itself is hidden away in the
.gitdirectory. ↩ -
Since “hosted submission repository” is a bit of a mouthful, you could also refer to this as a “hosted repository”, “CodeTub repo”, etc. ↩
-
This editor is Emacs on CS 240 environments, and in general is specified by environment variable
EDITOR. ↩ -
There are many good reasons to track only explicitly added files. One is that compilers and other tools create a lot of automatically generated files that are derived purely from other files in the repository. ↩
-
git mv A Bis actually justmv A B; git rm A; git add B. ↩