
Front End
Roost Compiler Front End
Roost Compiler Front End
- Assign: Tuesday, 20 Apr
- Checkpoint: Lexing complete by end of Tuesday, 27 Apr
- Checkpoint: Parsing complete by end of Friday, 30 Apr
- Checkpoint: ASTs complete by end of Tuesday, 4 May
- Checkpoint: Building Scopes and Resolving Names complete by end of Friday, 7 May
- Due: Type Checking and all Front End components complete by end of Tuesday, 11 May
- Submit:
git add,git commit, andgit pushyour completed code. - Reference:
Contents
Plan
In this project stage, you will implement the lexical, syntax, and semantic analysis components (the “front end”) of the Roost compiler. You will write the lexer, the parser, the AST, the scope builder/name resolver, and the type checker. This is the longest project stage for the course. There are frequent checkpoints to ensure continued forward progress.
First Steps
Before working on code:
- Read the Roost Compiler Implementation Project document, which describes setup, tools, processes, and requirements that you need for this and all project stages.
- Skim the Roost Language Specification, which defines the Roost programming language.
Setup and Package Structure
Complete the Getting Started steps on the main project page. Those steps will get you setup with Git, GitHub, IntelliJ, building your compiler, and running your compiler.
Once you have setup everything there, review the code structure of the
project. All of the code you write should be under the package
roost, which initially contains:
roost.Compiler: the main entrypointroost.Util: utility coderoost.error.CompilerError: code for representing and reporting errorsroost.lexpackage: lexer definitionroost.flex: JFlex lexer specification- running JFlex will generate
Lexer.java, the lexer implementation
roost.parse: parser definition
You will soon add:
roost.ast: AST definitionroost.scope: scope, symbol table, and name buildingroost.typecheck: type checking
Core Language and Standard Extensions
The Roost Language Specification defines a core language and standard extensions. For the implementation project, you are expected to implement support for the core language. If things are going well, your implementation for the core language is complete (up to the current checkpoint), and you are ahead of schedule with time to spare, feel free to include support for one or more of the standard extensions. The extensions are not required and you should not spend time on them unless you have a comfortable working core implementation. One exception to this ordering is in the lexer: I suggest including keywords and tokens used by all standard extensions in your lexer implementation. It is hardly any additional work and, if you later wish to add the extensions, you will not run into the issue of tests that used to parse, but no longer even lex when you add more features.
Testing the Front End
The importance of testing in this project cannot be understated. Extensive testing will be crucial to help detect and fix subtle incorrect behavior in your Roost compiler. Compiler bugs are the most pernicious of all bugs, so find them early and stamp them out! As with all stages, you should develop a set of several dozen test inputs to the compiler to test each compiler feature you add in the frontend.
Note that many tests that should be accepted by your lexer should be rejected by your parser; many tests that should be accepted by the parser should be rejected during name resolution; many tests that should be accepted during name resolution should be rejected during type checking. A provided testing script can help organize your tests for each substage of the frontend as follows:
test/:lex: tests for lexingall: tests for the core language and standard extensions (see here)accept: test programs that the lexer should acceptreject: test programs that the lexer should reject
parse: tests for parsing and AST buildingcore: tests for the core languageaccept,reject
generics: tests for the generic types extensionaccept,reject
modules: tests for modules and abstract typesaccept,reject
scope: tests for scope building, name resolution, and checking- Same structure. All
parsetests are reusable here, but scope checking should reject some programs that parsing accepts.
- Same structure. All
typecheck: tests for type checking- Same structure. All
scopetests are reusable here, but type checking should reject some programs that scope checking accepts.
- Same structure. All
Organizing by compiler feature and language extension will make it
easier to track what tests are relevant at what stages of your
implementation. The provided testing
script allows running specific
sets of tests in this hierarchy. For example, test-roostc-status.py
parse/* runs all parse tests for use during parser development;
test-roostc-status.py scope/core scope/generics runs only the scope
tests for the core language plus the generics extension for use
during that stage.
Schedule Checkpoints
The Front End project stage includes several intermediate checkpoints when individual features are due. The dates are listed at the top of the page.
- Lexer: Tuesday, 27 Apr
- Parser: Friday, 30 Apr
-
Parsing complete: Your compiler must accept syntactically valid Roost programs and reject syntactically invalid Roost programs with a syntax error. Your
README.mdmust contain a brief section on design of the parser specification, including any non-obvious elements in the grammar, and an indication of which language level you support. -
Submit using the
parserbranch.
-
-
AST: Tuesday, 4 May
-
Scope: Friday, 7 May
-
Building scopes and resolving names complete: Your compiler must build symbol tables for all scopes and resolve all name references that do not depend on type checking. Your compiler must support the
--dump-scopescommand-line option. YourREAMDE.mdmust contain a finalized overview of your symbol table and name resolution design and an indication of which language level you support. -
Submit using the
scopebranch.
-
-
Typecheck: Tuesday, 11 May
-
Type checking and full front end complete:, including all of the above plus the type checker, the
--dump-typescommand-line option, and all documentation of all parts inREADME.md, with an indication of which language level you support. -
Submit using the
typecheckbranch.
-
Get Ahead
Treat the above schedule as a starting point, but aim to get ahead of this schedule. Scope and type checking will be more involved than the earlier parts.
Lexing
For the first stage of the compiler implementation project, you will implement the scanner (a.k.a. lexer) for your Roost compiler. The Roost language specification describes the full syntax for Roost. For the lexer, you must implement all lexical tokens for the core language.
You will implement the lexical analyzer for your Roost compiler by writing a lexical specification for JFlex (skip the installation instructions), a lexical analyzer generator tool that translates your specification to a Java implementation of DFAs to recognize the lexical tokens you specify. You will also apply your lexer impelementation as the first stage in your compiler pipeline and use it to scan tokens from Roost source files.
The most interesting part of the JFlex specification consists of rules pairing a regular expression with a corresponding value generation rule for each kind of token in the source language.
Scala and Java are designed to be interoperable and used together. Most of the code you write will be in Scala, but some of the auto-generated lexer and parser code will be in Java. The JFlex Java output and Scala should interoperate without problem.
Lexical Tokens: roost.cup
Before implementing the lexical specification itself, you will need to
define the names used to represent each individual token in the
compiler after lexical analysis. Since we are planning ahead to link
your lexer with a parser very soon, and the two need a
shared definition of the types of tokens, you will define names for
kinds of tokens in the file roostc/src/roost/parse/roost.cup. That
file is the specification for a parser generator. For now, we will not
be using the generated parser, only the set of tokens it defines.
In the roost.cup file, you will fill out additional terminal
definitions in this section:
/* Declare Terminals (Lexer Token IDs) here. */
terminal LPAREN;
Each terminal in the grammar corresponds to a kind of token to be produced by the lexer. We define these abstract kinds of tokens here, but it will be up to the JFlex lexer specification to describe how to identify and produce them from Roost source code input.
When the lexer runs, it will describe each token it encounters with an
object of type java_cup.runtime.Symbol, which has four parts:
sym, an identifier for the kind of token matched (theterminaldeclarations inroost.cupdefine the options);line, the (1-indexed) line number where the token occurs in the input file (this is actually stored in the instance variableleft);col, the (1-indexed) column number where the token occurs within that line (this is actually stored in the instance variableright); andvalue, the specific value of the token. Each kind of token may have an arbitrary kind ofObjectvalue, e.g. the character string, or the numeric value. Many tokens will have none.
The parser generator (Java CUP) reads roost.cup and produces a few
things, including a file a Java enumeration, sym, which will include
all the kinds of terminals/tokens defined in roost.cup:
public enum sym {
  LPAREN,
  ...
}
Do not edit sym.java directly! It’s auto-generated. You will edit
roost.cup to define the kinds of terminals/tokens.
Lexer Specification: roost.flex
You will construct the JFlex lexer specification in
roost.flex by writing a regular expression and rule for
each keyword or other atomic lexical symbol in the Roost
Language Specification. (See
especially the discussion of Lexical Considerations and Syntax to
enumerate the set of all such symbols or tokens.) Each regular
expression for a token will be paired with a rule for what value to
produce for matching tokens. Consult the JFlex documentation (skip
the installation instructions) to understand the syntax of the
.flex specification file itself. Compiling this specification with
the JFlex lexical analyzer generator will produce the Lexer.java
file that contains the lexical analyzer for Roost. Your lexer
should produce Symbol objects in most rules. Edit only roost.flex;
do not edit Lexer.java.
Using the Lexer to Scan Source Code
The roost.Compiler will be the main entrypoint of your
Roost compiler, orchestrating the pipeline of compilation
stages. The compiler should take a path to a .roost
source code file as a required command-line argument. As we progress
through stages of the project, it will acquire more
functionality. Since it is useful to test different stages of the
compiler independently, the compiler’s command-line interface will
support different options for reporting internal steps.
Normally, when the full compiler is working, the parser will be
responsible for calling next_token on the Lexer whenever it needs
the next token. For this early checkpoint, before the parser is
implemented, you will implement logic for an extra “debugging” or
“side” feature in the compiler: accept the optional command-line flag
--dump-tokens=FILE, where FILE is replaced with any file name,
such as tokens.json.
If and only if the --dump-tokens=FILE option is given, the compiler
must:
- Open the
.roostsource file. (Provided code does this!) - Break it into tokens by successive calls to the
next_tokenmethod of the generatedLexer. (Implement this.) - Write JSON to the given
FILErepresenting a list of records about the successfully scanned tokens, in the order they appeared in the source file. Logic is set up to provide the token-dumping file to you at the relevant point in the starter code ofCompiler.scala. You will add logic to produce a token record in the file for each token. (Implement this.) - Accept the source file if there are no lexical errors in the file or reject with an informative error message otherwise. If the compiler encounters a lexical error, it should report the error by printing an error message. Error messages should be printed as standard output, not included in the tokens file. (Implement this.)
Note that the provided starter code for main already accepts the
--dump-tokens command-line option. All command-line option values
are summarized in the Config value passed to compile. You need to
add a little code to work with the lexer.
For now, the compiler will just do nothing (not even scanning) and
accept the program unless it is given the --dump-tokens option.
That will change in the next checkpoint.
Token Dump Format
Overall, the list of records begins with [, ends with ], and
separates each record by a comma (,), without a trailing comma after
the final record.
Each record has this format:
  {
    "line": <token-line-number>,
    "col": <token-column-number>,
    "id": <token-id>,
    "value": <token-value>
  }
Note that lines and columns are traditionally 1-indexed.
For example, given this Roost source code as the file csid.roost:
fn csid() -> i64 {
  301
}
Invoking the compiler with roostc --dump-tokens=tokens.json csid.roost should produce the following JSON output in a file called tokens.json.
[
  {
    "line": 1,
    "col": 1,
    "id": "FN",
    "value": null
  },
  {
    "line": 1,
    "col": 4,
    "id": "ID",
    "value": "csid"
  },
  {
    "line": 1,
    "col": 8,
    "id": "LPAREN",
    "value": null
  },
  {
    "line": 1,
    "col": 9,
    "id": "RPAREN",
    "value": null
  },
  {
    "line": 1,
    "col": 11,
    "id": "ARROW",
    "value": null
  },
  {
    "line": 1,
    "col": 14,
    "id": "I64",
    "value": null
  },
  {
    "line": 1,
    "col": 18,
    "id": "LBRACE",
    "value": null
  },
  {
    "line": 2,
    "col": 3,
    "id": "NUM",
    "value": 301
  },
  {
    "line": 3,
    "col": 1,
    "id": "RBRACE",
    "value": null
  }
]
In this JSON-formatted output, you may choose:
- The names for the
ids of tokens. (These should match the names of the correspondingenumvariants that you define insym.java. The arraysym.terminalNamesprovides a way to take thesyminteger from ajava_cup.runtime.Symboland get back the string describing exactly this name.) - The spacing you prefer.
The rest of the structure must be as shown.
Testing the Lexer
Write two kinds of test Roost files:
test/lex/all/accept: Lexically valid programs that the lexer should accepttest/lex/all/reject: Lexically invalid programs that the lexer should reject
Run tests on the lexer with the command: test-roostc-status.py
lex/all
Parsing
To generate the parser, you will use Java CUP, an LALR(1)
parser generator for Java, included in provided code. LALR(1) parsers
are essentially LR(1) parsers, except that they typically have a much
smaller automaton because they merge states containing the same items
when possible. All components of the parser should be implemented in
the roost.parse package.
Invoking the Parser
In the compile method of Compiler.scala, add code like the
following to invoke your parser, perhaps in a helper method.
val programParser = new roost.parse.parser(new Lexer(new BufferedReader(new FileReader(config.sourceFile))))
val parseResult = programParser.parse().value
Note that this code should follow and be completely separate from the
existing config.dumpTokens match {...} code that operates your lexer
independently for token stream dumping. Do not try to merge them. Look
for this comment in the provided code to place parsing and all
subsequent compiler stages.
// FIXME: Code invoking additional stages of your compiler (starting with the parser) will go here.Parser Specification
Implement a Java CUP parser specification in the file
roostc/src/roost/parse/roost.cup. Use the grammar from the Roost
Language Specification as a
starting point. Modify this grammar to make it LALR(1) and free of
conflicts when you run it through Java CUP. The operator precedence
and associativity must be as indicated in the Roost specification. You
are encouraged to use Java CUP precedence and associativity
declarations where the grammar does not enforce precedence or
associativity structurally.
Initially, your compiler will use the parser only to check the syntax of source programs. For now this means that you do not need grammar actions. In the next step, you will use the parser only to build the AST. Separate passes over the AST will do all semantic analysis (including building scopes, resolving names, and type checking in this stage) as well as translation to an intermediate representation (in the next stage).
The code snippet above and the earlier
preparation you have done is enough to integrate the parser and the
lexer. As you develop the grammar in roost.cup, you
should not need to change the roost.flex specification
(unless you discover bugs or poor token choices). You will need to
make a few changes to some terminal declarations you have already
written in roost.cup to indicate the type of value carried along
with a few of the tokens. Refer to the Java CUP
documentation and the Tiny compiler Java CUP
exercises.
For more details on how Java CUP and JFlex integrate, you can refer to the Working Together section of the JFlex documentation, and Section 5 (Scanner Interface) of the Java CUP documentation.
Syntax Errors
Your parser must detect and report the first syntax error it
encounters during parsing, if any. You are free to explore some of the
techniques considered by
exercises for error-correcting
or providing information about more than one syntax error, but this is
not required. When encountering a syntax error, your parser should
raise a SyntaxError exception carrying an informative message about
the error (or errors if you
choose to go further). The top-level compiler pipeline will catch
this exception as a CompilerError, print its
message, and terminate
with appropriate status. The exact
message is up to you, but it should include a line and column number
of the position in the input program source code where the error
arises. This will help you test and debug your compiler efficiently.
Debugging Your Grammar
While debugging you parser, you may find it useful to examine the
automaton and parse table that CUP produces from your
specification. This can be useful to understand ambiguity or
precedence problems, for example. To view the automaton and parser
table, run the following command in the top-level project directory to
capture the output to the file src/roost/parse/roost.cup.dump.txt:
./mill roostc.dump
Fair warning, the output can be large, which is why it is captured in a file instead of printed to the screen. For my grammar of the complete Roost language (core plus all standard extensions), CUP produces a couple hundred or more LALR states. The full automaton/table dump generates several thousand lines of output. It is, however, well organized and searchable based on the CUP error messages about conflicts.
Abstract Syntax Trees
Design a hierarchy of Scala case
classes for the
various types of nodes in abstract syntax trees (ASTs) for the Roost
language. When the input program is syntactically correct, your parser
should produce a corresponding AST for the program. The abstract
syntax tree is the interface between the syntax and semantic analysis,
so designing it carefully is important for the subsequent stages in
the compiler. Note that your AST classes will not necessarily
correspond to the non-terminals of the Roost grammar. Use the grammar
from the language specification only as a rough guideline for
designing the AST. The AST should be defined in the roost.ast package.
Using Scala’s case classes will support pattern-matching over the AST data structure, which is a massive benefit in programming the remaining passes that inspect the AST. I advise defining all these classes (They’re usually tiny) in a single shared file.
AST Construction with Grammar Actions
Once you have designed the AST hierarchy, extend your parser specification to construct AST nodes in its actions.
CUP reads in the roost.cup file and generates parser.java and
sym.java. Actions for grammar productions in the roost.cup must be
written in Java, but your AST nodes and other supporting code will be
written in Scala. Creating a Scala object from Java code is typically
routine — just use new as usual. However, creating useful
standard Scala types like Seq and Option can be trickier since
there is no analog to those concepts in Java. The provided
roost.parse.ParseUtil (ParseUtil.scala) contains some small helper
methods to construct Seq and Option values. These methods can be
invoked from your Java action code to create and manipulate Seq and
Option values in the actions in your roost.cup specification. For
example: ParseUtil.cons(p, params). The ParseUtil methods
should be used only in roost.cup. Use normal Scala code for
manipulating these types outside roost.cup. Feel free to add any
other methods here if they are helpful in bridging the CUP
specification and your Scala code. After finishing AST construction,
we will be done with the Java/Scala gap and will work solely in Scala
for the remainder of the project.
Show ASTs
When given the --dump-ast=FILE command line option, your compiler
must print a human-readable text representation of the AST data
structure that your parser has generated to the give FILE. To
recognize the --dump-ast option from the command line arguments in
main and record its value in the compiler Config, use the code
that handles the --dump-tokens command line option in main as an
example. Refer to the scopt
documentation for additional
examples.
The exact text format of your output is up to you, but it must show all structural details of the AST. It need not include line/column numbers.
One option that can be useful is to create an AST pretty-printer
that prints out your AST using Roost syntax. You may also find it
useful to add another option that saves the pretty-printed AST to a
given .roost file. A decent extra test of your parser and AST
construction is to parse an original.roost file, pretty-print its
AST to a pretty.roost file, then parse that pretty.roost file and
pretty print it as pretty-pretty.roost. pretty.roost and
pretty-pretty.roost should be identical!
Visualizing ASTs with DOT (Optional but Recommended)
You may find it helpful to use the graph visualization tools in the
GraphViz suite of tools for printing out
information about the AST. (Downloads/installation)
The most useful tool is dot, which reads a textual specification for
a graph and outputs an image (PDF, PNG, JPEG, etc.). For instance, the
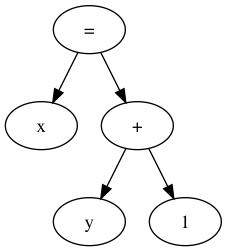
dot specification and output below describe the AST of the expression
x = y + 1. After generating such a .dot file in
dot-example.dot, run dot -Tpng < dot-example.dot >
dot-example.png to create a PNG visualization in
dot-example.png.
dot
output.// Example dot input.
digraph G {
expr[label="="];
lhs [label="x"];
rhs [label="+"];
leftop [label="y"];
rightop [label="1"];
expr -> lhs;
expr -> rhs;
rhs -> leftop;
rhs -> rightop;
}
Using dot is recommended but not required. If you decide to use
it, I recommend creating a --dot-ast=FILE command line option that
enables dot generation for the AST and accepts a name of a .dot file
where it is to dump the source code. For example: roostc
--dot-ast=program.roost.ast.dot program.roost. See the scopt
documentation or other options as needed.
Building Scopes and Resolving Names
Design a symbol table data structure to represent scope information
and any additional structures you wish to use for representing program
types. Your design should allow each AST node to access the symbol
table for its current scope (block, function, structure, enumeration)
and should relate nested scopes appropriately. Support for scopes,
symbol tables, and name resolution should be implemented in the
roost.scope package.
Your constructed symbol tables should be available to all remaining compilation stages. I recommend that all subsequent stages refer to program symbols (e.g., variables, methods, class names, etc.) using references to their symbol table entries, and not using their string names. There are many ways to represent this name resolution reference. Perhaps the most straightforward is to create the symbol table structure as a mapping from each string name in scope to the AST node corresponding to the declaration of that name. Declaration AST nodes naturally carry all necessary metadata for using their declared name, such as type, etc. Given this recommended structure, you can simply augment each AST node that uses a name to carry a second reference to the AST node for that name’s declaration, and fill that reference later.
For example, if you have a VarDecl class to represent a local
variable declaration and a Var class to represent a use of a
variable in an expression, then Var should have an instance variable
decl of type Option[VarDecl] that initially holds None when the
AST is constructed, but is later filled by name resolution. This
approach, along with alternatives, is described briefly in EC 5.7.
Stages of Name Resolution
Some uses of names can be resolved unambiguously without type information and should be resolved at this stage:
- variable/parameter/function names
- structure type names
- enumeration type and variant names
Resolution of references to field names in field access expressions
depends on the type of the target expression, so their resolution must
wait until type checking. For example, the meaning of
count in e.count depends on the type of expression e.
Scope Errors
As with syntax errors, your scope-building and name
resolution code for this part should raise errors (likely as
exceptions using one or more newly defined subtypes of
CompilerError) that provide an informative error message about the
scope or name problem encountered in the input program. These semantic
errors should be labeled clearly to be distinguishable from other
kinds of errors.
If you have time, you may wish to use an alternative error delivery scheme that gathers errors and attempts to keep going and finish running the particular semantic check over the full program, rather than reporting only the first error. This is optional, but can greatly speed up your work as you debug your semantic checks.
Show Scopes
When given the --dump-scopes=FILE command line option, your compiler
must print a text AST representation to the given
FILE, where each resolved name reference is annotated so as to
associate it explicitly with its declaration. The format is up to
you. As with ASTs, you may also find it helpful to generate dot
output for ASTs annotated with symbol table
information. (Create a --dot-scopes option in this case.) It is
acceptable for your --dump-ast=FILE option to provide the scope
information as well at this checkpoint. (In other words, if you would
prefer to simply extend your AST dumping code, without creating a
separate option to dump AST with or without scope information, that is
fine.)
Design Hints
Decorating ASTs with Traits
For this part and type checking, you will need to “decorate” your AST nodes with extra information such as a symbol table reference, a resolved name-to-declaration reference, type information, etc. One possible approach is to augment classes in your AST class hierarchy with additional instance variables and methods for accessing these items. This works best if the decoration support can be added in the abstract classes within your AST hierarchy for easy reuse in subclasses.
However, it is frequently the case that there are cross-cutting AST decoration concerns that do not map cleanly to a single-inheritance hierarchy. Scala traits are quite handy for these cases: you can define decorations in traits and then “mix in” those traits wherever those decorations are needed across the AST hierarchy.
Source File Locations
To report semantic errors with information about where they appeared
in the source code, it will be necessary to attach that information to
your AST nodes. Note that, for every named symbol x in a production
(e.g., IDENTIFIER:x), CUP also introduces two variables xleft
and xright that capture the two numbers associated with the
Symbol. Likely your lexer provided these as a line number (left) and
a column number (right). Even though CUP thinks they are character
offsets in the file, you can still use them however you like. Rather
than painstakingly changing all of your AST nodes to support extra
arguments, one option is to define a method for setting a source
location on an AST node. Then you can simply update each grammar
action call this method on RESULT (after constructing the relevant
AST node as it does now) with the relevant arguments taken from left
and right variables in the current production. For example:
ExprCompute ::= ExprCompute:e1 PLUS ExprCompute:e2 {: RESULT = new BinaryExpression(new Plus(), e1, e2); :}
...
might be updated to:
ExprCompute ::= ExprCompute:e1 PLUS:plus ExprCompute:e2 {: RESULT = new BinaryExpression(new Plus(), e1, e2);
                                                           RESULT.setSource(plusleft, plusright); :}
...
This approach can save you the trouble of going back to update every AST node class constructor with additional arguments to be passed through to the super class.
Separate Passes for Separate Jobs
It may be tempting to try and combine multiple semantic analysis tasks into a single pass over the AST. Don’t do it; it’s usually easier to keep it separate and simple. This is especially relevant for symbol table building and name resolution: build the scopes and tables and decorate the AST with those. Then do a separate pass to resolve non-type-dependent names using the fully installed symbol tables.
Embrace Case Classes, Pattern Matching, and Options
Pattern matching with AST case classes is ideally suited to the style of recursive AST algorithms that will support most semantic checks in the Roost compiler. Get comfortable with Scala case classes and pattern matching and use them extensively.
Avoid the use of null in your compiler implementation at nearly any
cost. Wherever null invades, infuriating NullPointerExceptions
tend to follow. When your impulse is to use a null value to show the
lack of an actual value of type T, replace T with Option[T] to
make this possibility explicit. Use None for lack of a thing and
Some(thing) when you have one. When inspecting such a value, use
pattern matching. This helps force you to consider whether the thing
may be present or absent using Scala’s match. It may initially feel
verbose to have many of these matches throughout your code, but there
is great value in their explicitness. (The Scala compiler will even
help you remember if you forgot to deal with one case.)
val maybeThing: Option[Thing] = ...

...

maybeThing match {
  case Some(thing) => use(thing)
  case None => thereIsNoThing()
}
Sample Symbol Table Design
Here is a sketch of a single unified symbol table design for use in all kinds of scopes. There are many design options, such as using different kinds of symbol tables for different kinds of scopes (e.g., top-level, function body/block, struct/enum definition).
package roost.scope

import scala.collection.mutable
import roost.ast._
import roost.IndentingPrintStream
import roost.error.Errors

class SymbolTable(owner: Scoped, val parent: Option[SymbolTable]) {
  /** Map struct names to definition nodes. */
  val structs:  mutable.Map[String,StructDef]  = mutable.Map()
  /** Map enum names to definition nodes. */
  val enums:    mutable.Map[String,EnumDef]    = mutable.Map()
  /** Map enum variant names to definition nodes. */
  val variants: mutable.Map[String,VariantDef] = mutable.Map()
  /** Map variable (including function) names to definition nodes. */
  val vars:     mutable.Map[String,Binding]    = mutable.Map()

  /** Declare various elements. */
  def declare(id: String, d: StructDef) : Boolean = { /* ... */ }
  def declare(id: String, d: EnumDef)   : Boolean = { /* ... */ }
  def declare(id: String, d: VariantDef): Boolean = { /* ... */ }
  def declare(id: String, f: FunDef)    : Boolean = { /* ... */ }
  def declare(id: String, v: VarDef)    : Boolean = { /* ... */ }

  /** Lookup various elements. */
  def lookupType(id: String)    : Option[TypeDef]    = { /* ... */ }
  def lookupStruct(id: String)  : Option[StructDef]  = { /* ... */ }
  def lookupVariant(id: String) : Option[VariantDef] = { /* ... */ }
  def lookupVariable(id: String): Option[Binding]    = { /* ... */ }

  /* ... more added for type checking, loop checking, etc. ... */
}
Core Library Functions
The Roost core library provides a small set of functions for I/O operations, basic type conversions, and other system-level functionality. These functions are in scope for all programs.
Thus the symbol tables must capture the names and types of the core
library to make them available to the programs processed by your
compiler. A simple way to do this is to parse an AST from the core
library extern headers and build initial symbol tables from this AST
before doing so for the program source file. The following code will
parse roostc/resources/roost/core.roost (which includes the extern
declarations for the core library functions) to create an AST of the
library headers:
val libraryAST = new roost.parse.parser(new roost.lex.Lexer(new java.io.BufferedReader(new java.io.InputStreamReader(ClassLoader.getSystemResourceAsStream("roost/core.roost"))))).parse().valueThen, you can build scopes for this libraryAST. Use the resulting
top-level symbol table from the libraryAST as the initial top-level
symbol table as you begin building scopes in the program AST.
Type Checking
After constructing the AST and symbol tables, your compiler will
analyze the AST and perform semantic checks. These semantic checks
include type-checking (according to the type system in the Roost
Language Specifciation) and any scoping rules that could not be
enforced while building the symbol tables, plus all of the other
requirements for semantic checks described in the language
specification. Support for type checking should be implemented in the
roost.typecheck package.
Type Errors
As with syntax and scope errors, your type checker should raise type errors that provide an informative error message about the type error encountered in the input program. These type errors should be labeled clearly to be distinguishable from other kinds of errors.
Show Types
When given the --dump-types=FILE command line option, your compiler
must print a text AST representation to the given
FILE, where all let variable declarations (including those that
did not explicitly give a type) are annotated to show the types that
have been inferred. (For example, x would be inferred to have type
i64 in let x = 4; ...) It is suggested, but not required, that you
also support showing types for all expressions. The format is up to
you. As with ASTs and scopes, you may also find it helpful to
generate dot output for ASTs annotated with symbol
table information. (Create a --dot-types option in this case.)
Design Hints
Type Checking of Expressions
There are two common approaches to design the type checking code for expressions. In one style you could write a type-checking function that runs in a top-down style, where a prescriptive type-checking function takes a pair of arguments – an expression to check (an AST node) and the type it should have – and returns a boolean judgment on whether the expression can be attributed that type.
An alternative is somewhat more bottom-up and inference-based: it takes a single argument – an expression to check (an AST node) – and returns the inferred type (if any) that this expression can take based in its structure and any subexpressions. Then at the current level of type checking, the inferred types of any subexpressions can be compared to the types required by the current context.
Each approach has its own benefits, but the latter approach is likely
the best fit for your implementation. There are a handful of cases
where the necessary type of an expression is not known from
context. Field accesses fall in this category. Roost also does
requires limited local type inference for variable definitions in
let declarations, which may omit an explicit type if they supply an
initial expression (from which the type can be inferred).
Optional Feature: Exhaustive Match Checking
As an optional additional pass grouped with the type checker, you may
wish to implement a pattern matching exhaustiveness checker. This
analysis will examine each match expression and issue a warning if
there exist values that could arise as targets of that match that
will not match the patterns for any of its cases. In other words, the
checker will warn if it is possible for a match expression to result
in a run-time error.