Photoshop and InDesign - Working in the Adobe Suite:
Click either of the following links to jump to the tutorial content following the introduction below: Adobe Photoshop and Adobe Indesign. Please do skim the introduction, though, as it discusses how Adobe can be used to create your Zines.
For the next two weeks, we'll be focusing on the Adobe Suite, specifically Adobe Photoshop and Adobe InDesign. This digital tutorial will be divided into two parts, and the second part will be posted at the beginning of the second week.
Adobe Photoshop is a design and imaging program that you can use to edit or combine images, as well as to generate new graphic content. Adobe InDesign is a publishing software application that you can use to create pamphlets, brochures, magazines, and more. The publications you create using InDesign can be designed specifically for web or for print, depending on your needs.
Because both Photoshop and InDesign are part of the Adobe Creative Cloud Suite, the controls and tools that you'll find in the applications are similar. Once you've learned how to work in Photoshop, you'll be able to transfer that knowledge to InDesign. You'll also be able to use any content created in Photoshop in your InDesign publications, alongside your written content. In InDesign, you can arrange your text in columns, or in textboxes of a size and shape that suit your design.
As you begin to design you final Zines, you may choose to use Photoshop and InDesign together to aid in the publication design process. I like to think of InDesign as the digital version of collaging images and text together. As with its analog "cut and paste" counterpart, using InDesign you can piece together images and text however you choose. By learning how to use Photoshop first, though, you'll be able to personalize and enhance images for your publication that you've manipulated, designed, or edited. For example, you could add comic style speech bubbles to images with inserted text, isolate figures from movie stills, or layer multiple images together to create unique content, then place these images into you InDesign publication. To recreate a rough, "cut and paste effect" in a digital publication, you could scan crumpled or torn images and pages, then modify these scans in Photoshop.
For the first week of our work with Adobe, the topic of focus will be Photoshop. In the tutorial below, I am linking several great tutorials available on YouTube that will be accompanied by notes about the skills being introduced. The first three videos will be more essential for working in Photoshop, while the latter three introduce more complicated but visually exciting skills.
I believe that watching these videos, then experimenting with the techniques you will learn about is the best way to learn how to work in Adobe - that being said, if you prefer to learn by reading or through practicing in person, please send me an email or come to my office hours. In the coming weeks, my office hours will still be open to go over any topics, but the skills of focus will be the Adobe Suite. The computers in the lab already have the Adobe Suite available, and you can save your work in Google Drive so that it can be accessed on different computers.
Adobe Photoshop:
Below, you'll find several video tutorials each introducing some essential tools for working in Photoshop. The first video is a great, comprehensive introduction that explains how to create a new Photoshop project, crop photos, select and modify specific regions of photos, work with layers, add shapes, and save your project, among other topics. This video is about 15 minutes long.
As you watch the video above, pay special attention to the Marquee selection tools, Lasso selection tools, Quick Selection tool, and Magic Wand Tool. To reveal the drop-down options for each tool in Photoshop, click and hold the small triangle in the bottom right corner in Photoshop. Also, play attention to the discussion of Layers. It's important to always be aware of which layer you are working with so that any changes you make affect the correct layer.
Although this video does provide a good introduction to creating a Photoshop project, it does not discuss either non-destructive photo editing with Image Adjustments or Blend Modes. The next two videos, which are about 4 and 25 minutes long respectively, focus on these topics.
Although the third video is longer, it will be particularly useful if you want to create your own graphics for the Zine project by combining several photos. For example, the images attached below are the front and back covers from my own Zine - to create the covers, I used several photo layers cropped and combined with different opacities and the contrast blend modes (particularly Vivid Light and Hard Mix):

The second video introduces non-destructive photo editing, and explains how the Adjustments panel can be used to edit your photos (as opposed to the Image Adjustments drop down menu). After introducing the Adjustments panel, the video shows how to apply a Black and White Adjustment layer to an image, as well as how to vary that layer with a gradient mask. After watching the video, visit the link below to read about what each of the 16 Adjustments can do. I recommend you pay attention to the Brightness/Contrast, Vibrance, Hue/Saturation, and Black & White Adjustments.
Click here to read about the 16 different Adjustments in a blog post called "How to Use Adjustment Layers in Photoshop CS6".
The third video will show you how each blend mode will affect pictures in Photoshop. The tutorial will show how the modes affect a photo placed on top of gray tones ranging from white to black, as well as against a color gradient. As the tutorial progresses, you'll see how much blending power you have in Photoshop, and how you could use these blend modes to combine two images, rather than just an image and a solid colored background (although you can explore these blend modes yourself by experimenting with two images and varying opacities as well):
To learn more about layer masks, which can be used to mask particular regions of photos, or, to vary the opacity of different parts of the photo, check out the video and article below. Layer masks can be used to smoothly blend two photos together when the images don't overlap completely. By applying a "foreground color", often white, to the regions where an adjustment should be applied and a "background color", often black, to the regions that shouldn't be adjusted, you'll be able to selectively edit images. Watch the video below to see two photos being combined with layer masks, and check out this link to an Adobe article about some great styling tricks using layer masks and clipping masks, among others:
Finally, to learn how layer masks can be used in conjunction with other effects to create a Double Exposure Effect, check out the two videos below:
Now give it a try!
Adobe InDesign:
This week, we'll be looking at a couple of videos that introduce Adobe InDesign. These videos will should you how to create a document, use a number of the tools available to in in the program, and print your document as a booklet ready to be stapled together.
InDesign is an amazingly powerful program - it's interface makes it fairly easy to place text and images into your document, and, for those of you who intend to scan full pages of a handcrafted Zine and to place them into an InDesign document for online publishing, you'll be able to place those full page images in the same way. To shift back and for between an editing mode and a preview mode, click the drop-down menu "View', scroll down to "Screen Mode", then select either "Normal" or "Preview".
The first video, below, is a comprehensive introduction to InDesign - in about 13 minutes, the video creator demonstrates how you can create a simple, three-page magazine in InDesign. Although the pace of the video is fast, this tutorial covers creating a document, placing pictures, adding shapes, adding text, and formatting/recoloring those images or text.
When you watch the video, pay attention to the discussion of placing pictures. After drawing a place-holding box, you can either drag a file in from Finder (as shown in the video), or select "Place" from the drop-down file menu. Once a photo has been placed, you can either edit the place box/image by clicking once - this will show a blue box around your photo window - or you can edit the photo's placement or size in the place-holder box by double clicking - this will show a yellow/orange box around the full size of the photo. It's important to always work with photos that are saved in the same folder that you linked, or added them to you InDesign document, from on your computer. To check whether your links are active, you can select "Links" from the Window drop down menu.
The next video (about 9 minutes long) introduces each of the tools available in the Tools panel, typically located on the far left of your screen. The video's creator describes each tool, then demonstrates how they are used; this video will be a helpful tutorial for understanding how make basic changes to your document. Pay attention to the tools used to create shapes, gradients, and text - these will all be helfpul when you're styling your Zines.
When you are adding text to your InDesign document, you may choose to create linked columns of text, or to link textboxes on separate pages. Linking textboxes means that any overset text will be "poured" over into the next linked textbox - if you are creating a long document with continuous text, a 2500 word essay, for example, then you could set up your document so that the text will move smoothly from one page to another as you run out of space in each textbox. The video below (about 4 minutes long) shows you can link textboxes by clicking and dragging the overset text indicator - a small red crossed box - to create a new textbox. It also shows how you can divide one textbox into multiple columns to divide you text, although I would recommend that you still practice linking textboxes, as this method is essential when you want to transition from page to page.
You can also add overset text to a textbox that you have already drawn by clicking the overset indicator with the partial selector (the second arrow in the tools menu), then clicking again in the box you're linking too when you see that the selector is carrying your overset text.
The final video in this tutorial shows how to print your InDesign documents as a booklet (or a Zine!) that is meant to be stapled together. This video will be added as soon as I confirm with the library what the best way to do this is.
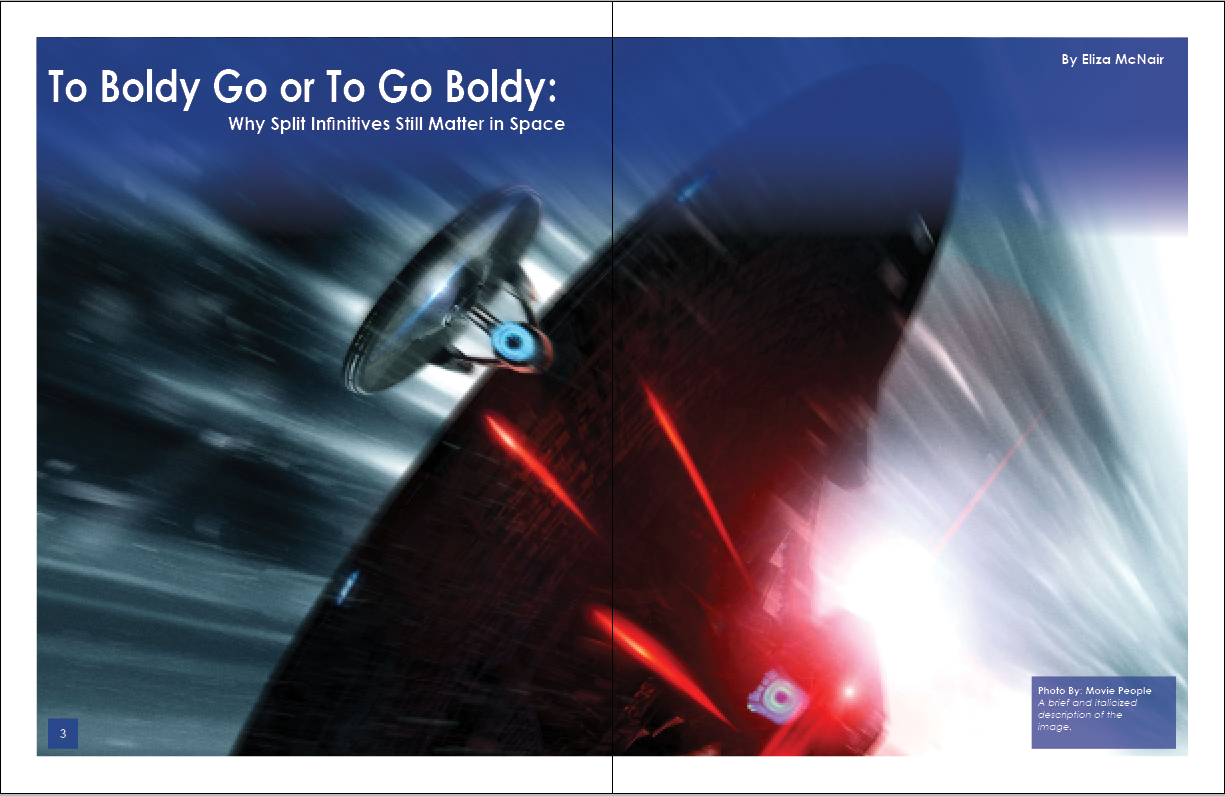
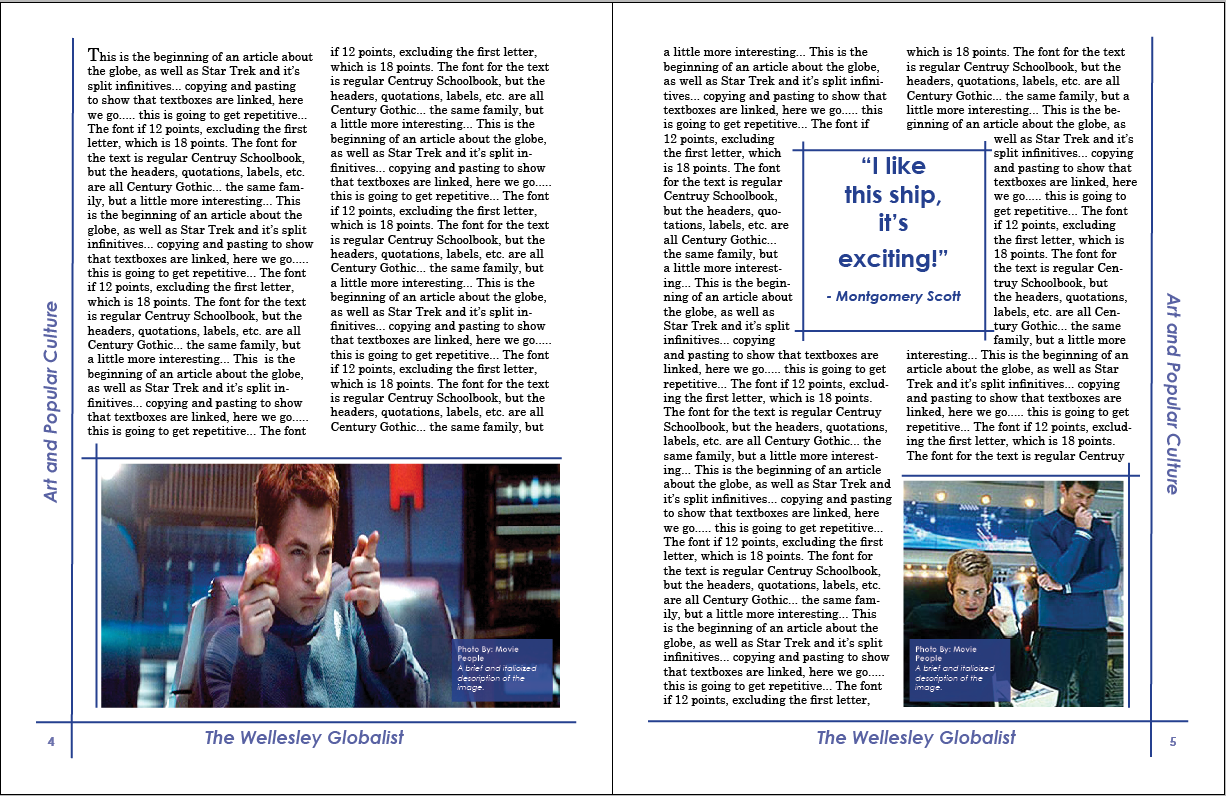
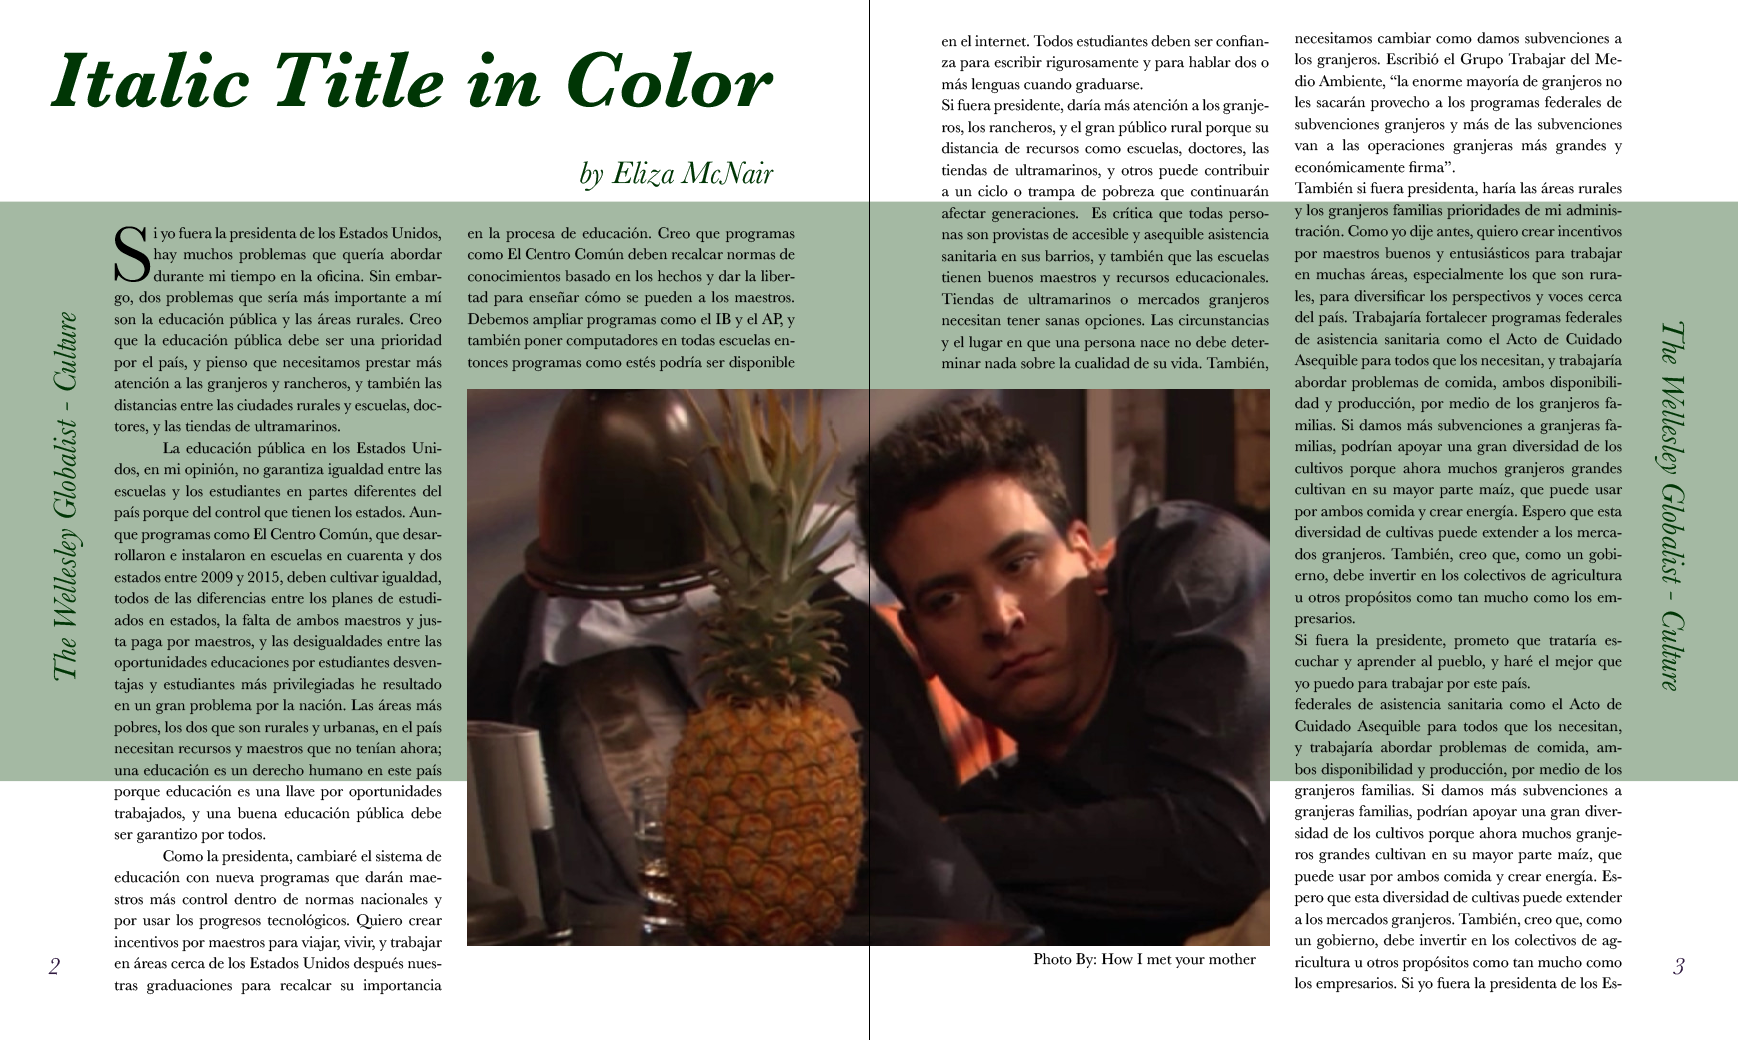
The possibilities for what you can create in InDesign are extensive, but I'll attach a few images below with sample spreads for magazine articles: