Cyberduck, Brackets, and Basic HTML
Downloading and Using Cyerduck:
Note: The Cyberduck instructions are courtesy of the CS111 course website.
Cyberduck is an application that supports a SSH (Secure SHell) File Transfer Protocol (SFTP) that, once installed on your computer, can be used to transfer and files from your computer to your CS server account. Once your files have been added to the server, they can be accessed and, in the case of HTML documents, displayed to visitors. In addition to submitting your WRIT 135 work over Google Drive this semester, you will also need to post your work as HTML documents to your server account using Cyberduck. First, though, you need to download the application:
Cyberduck is already installed on the lab computers, and you can download it here when on your home computer.
Open Cyberduck:
On your computer click the Spotlight tool (magnify glass on the top right of the screen), and search for Cyberduck to locate it on your computer.
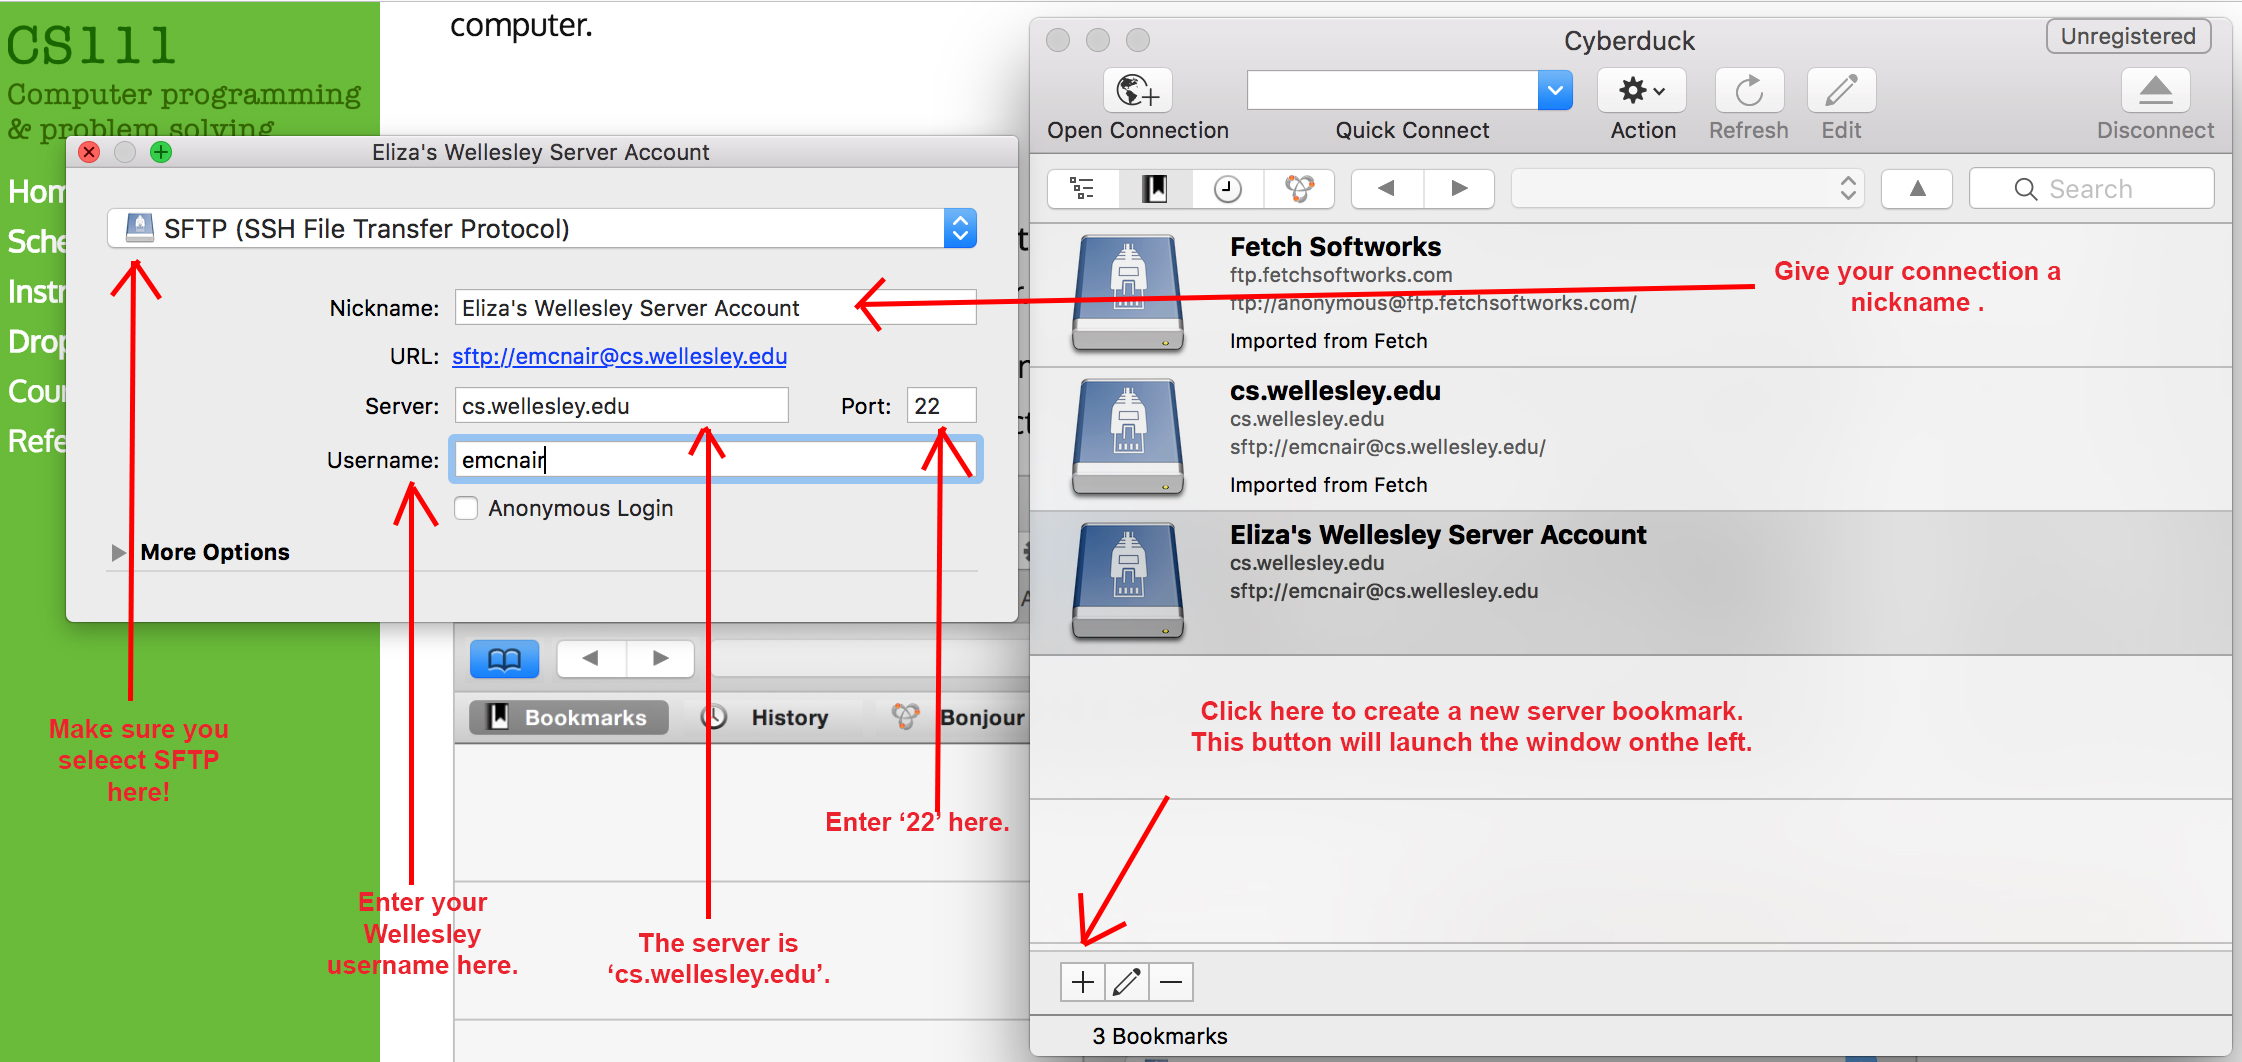
Once Cyberduck is loaded, on the bottom left of the window, click the plus sign (+) to initiate a new bookmark where you'll enter and save your connection details, following the instructions in this screenshot:
Once your bookmark is created, you can use it to connect to the server... If you double click on your new connection, you'll be prompted to enter your password. If you want to save your username/password, check the "Add to Keychain" box in the bottom left corner of the Cyberduck window.
If your login is successful, you will see something like this:
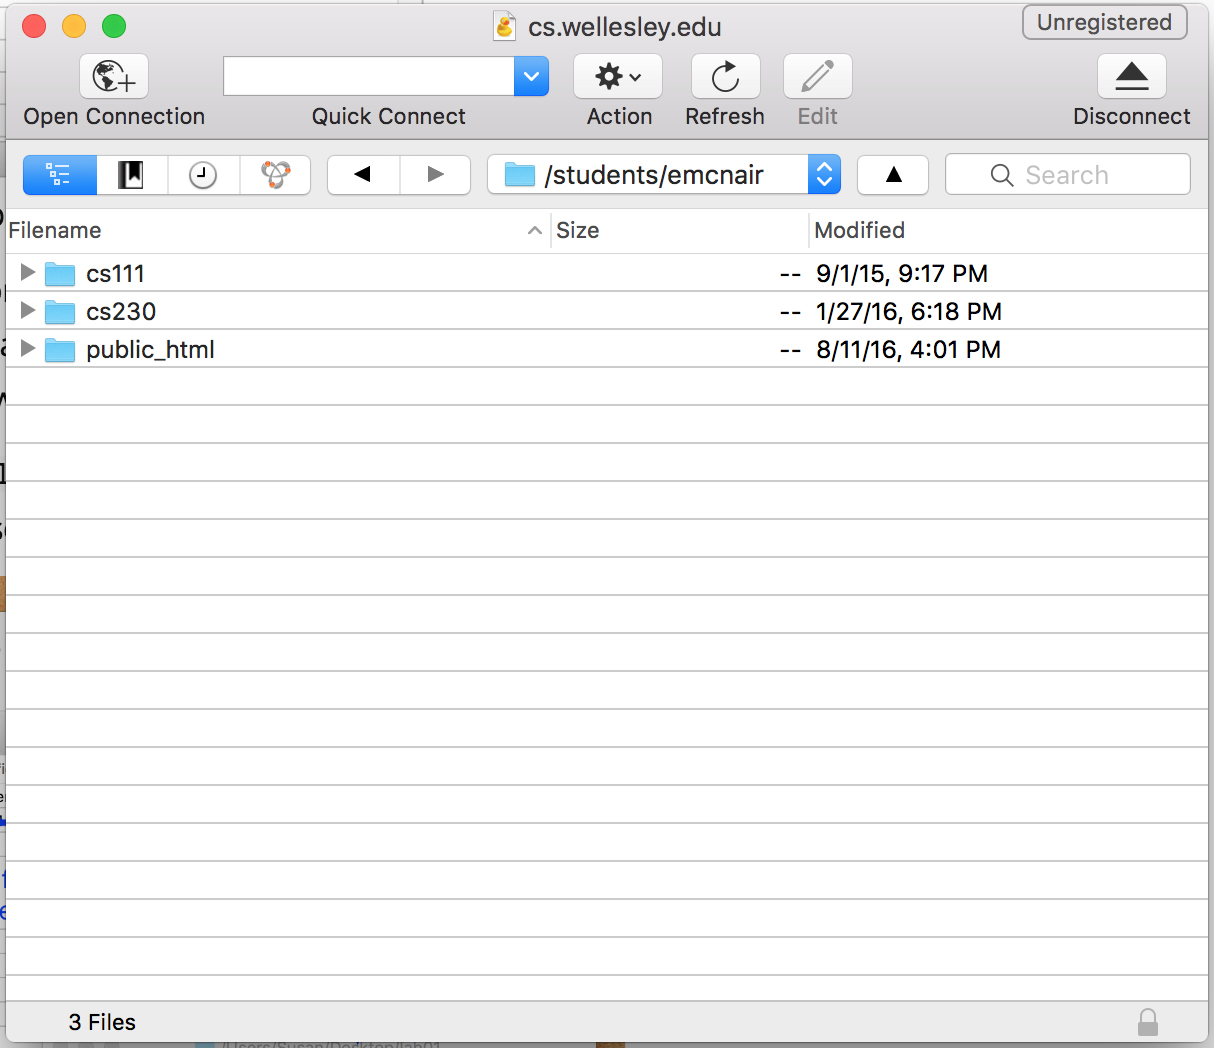
Navigate into the public_html folder (by double clicking it), and then continue to familiarize yourself with Cyberduck's layout.
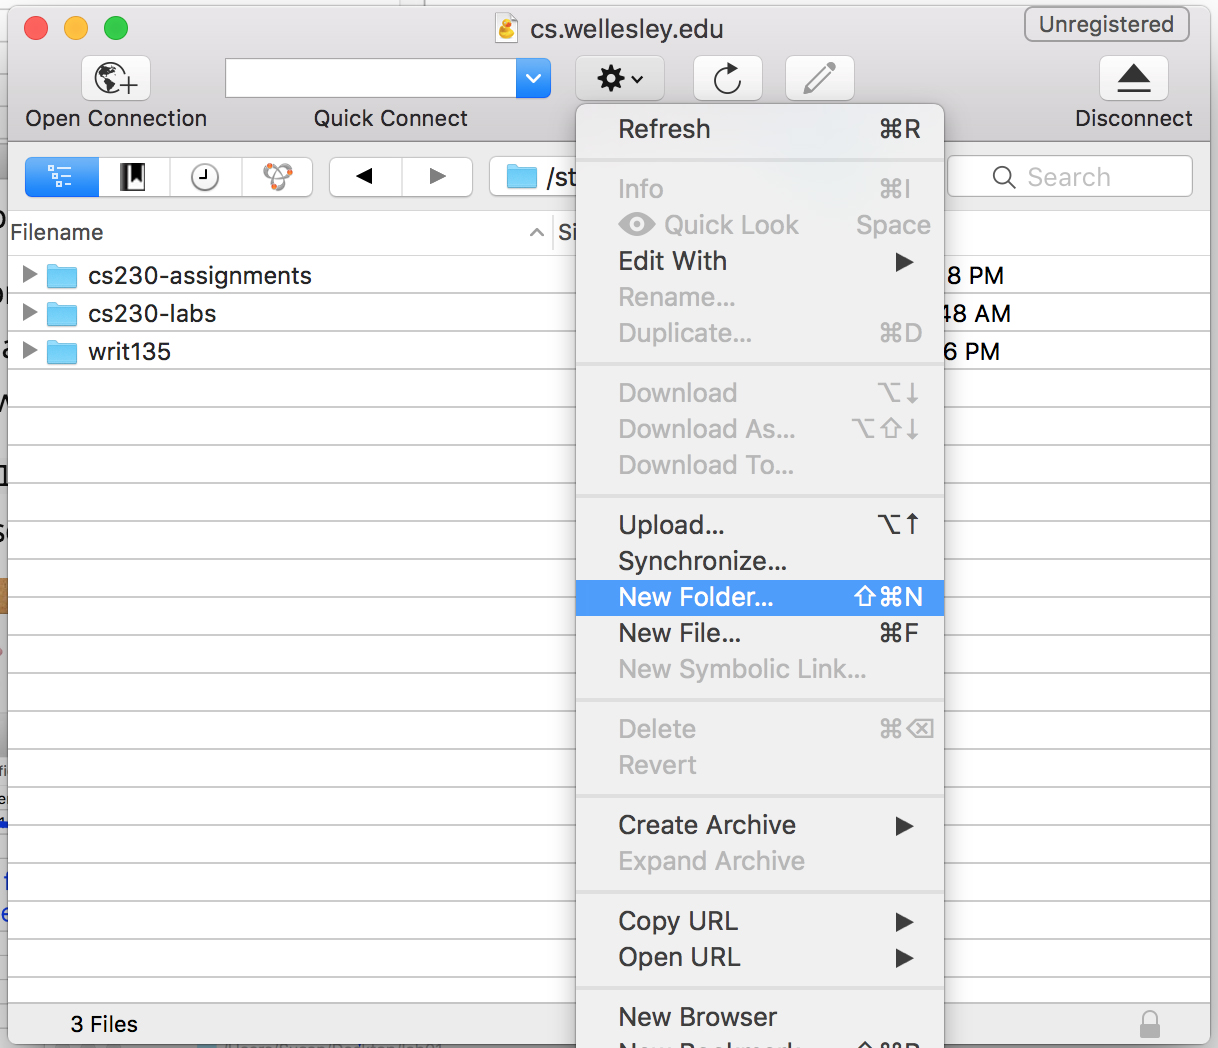
Assignment: Create a new folder in your public_html folder using Cyberduck.
Now that you have navigated into your public_html folder in Cyberduck you must create a new folder for your "writ135" work. Look at the following image, then duplicate the process on your computer.
You'll revisit this new folder later in the tutorial to complete this week's introductory HTML assignment!
Downloading and Using Brackets:
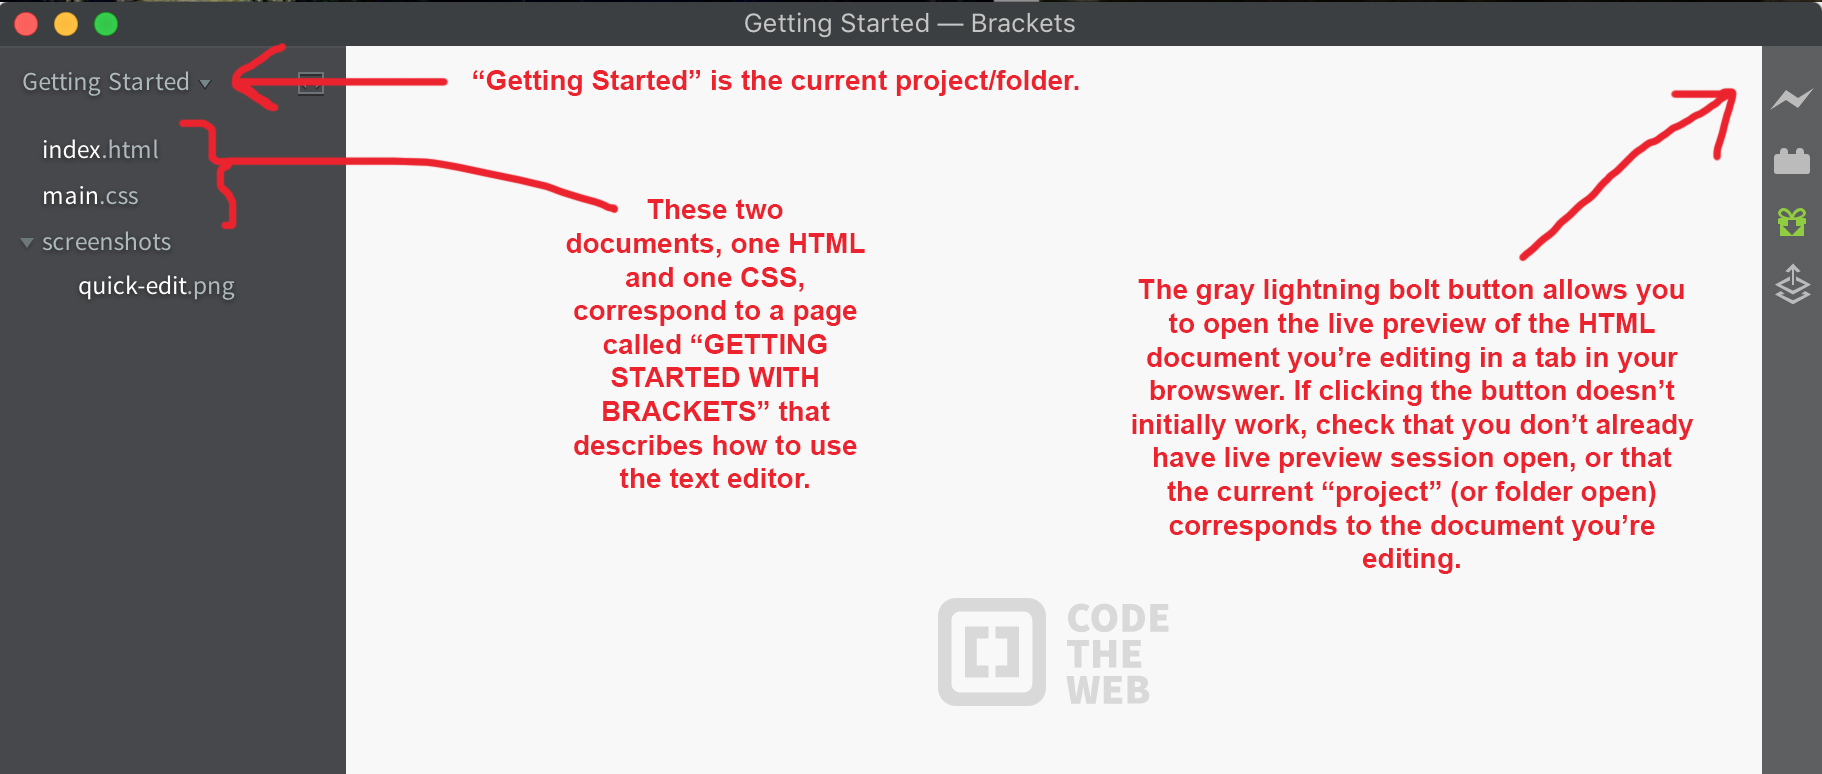
Brackets is a Text Editor well suited for writing HTML and CSS code, especially if you are new to the languages. The editor is visually helpful as it will break up your HTML code by color, and it can launch a live preview of the document you're editing so you'll be able to see how your website is progressing. An important thing to keep in mind when working in Brackets: make sure you keep track of your current project - or, the folder that you're currently working in. You won't be able to launch a live preview of a HTML document in a folder that does not match your current project. In the images and instructions below, I'll note where and how you can change your current Bracket's project.
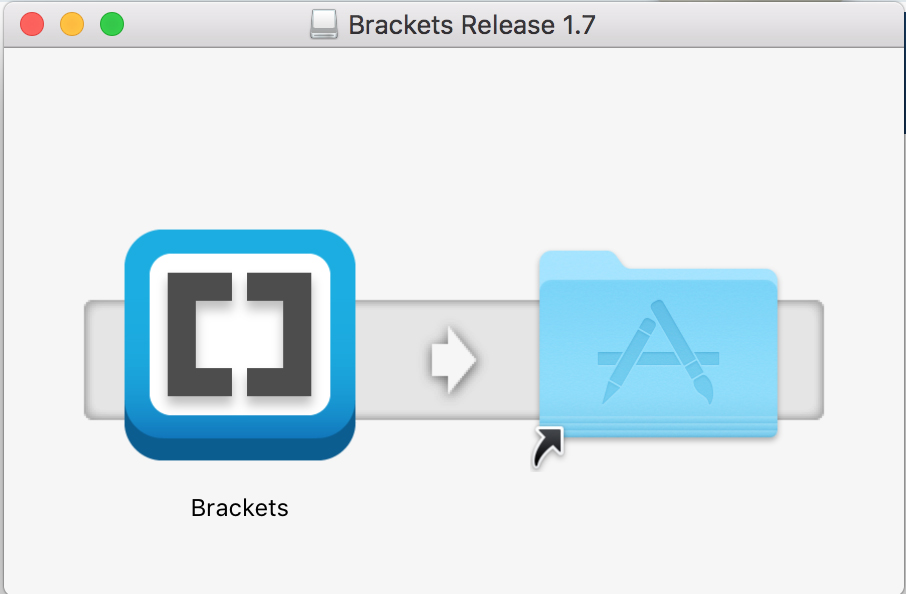
Brackets can be run on both Mac and Windows machines. To begin the download process, visit this website and press the big, blue "Download Brackets 1.7" button. On a Mac, once the download has completed, you should see the following screen. Click and drag the Brackets application icon onto the Applications folder image.
Once Brackets is downloaded, you can open the application. On a Windows machine, once you've downloaded and installed Brackets, it should appear in your applications list. You can access and open Brackets by visiting the "Apps" menu, or by searching your computer using the "Search" tool. On a Mac, you'll be able to open it by visiting your "Launchpad" and clicking on Brackets.
When you first open the text editor, it will likely look like the image directly below. The current project (or working folder) is "Getting Started", and that folder contains two files - one HTML, and one CSS. The lightning bolt button in the top right corner of Brackets will launch Live Preview in a Chrome window (NOTE: Google Chrome is the only browser for which Live Preview will work).
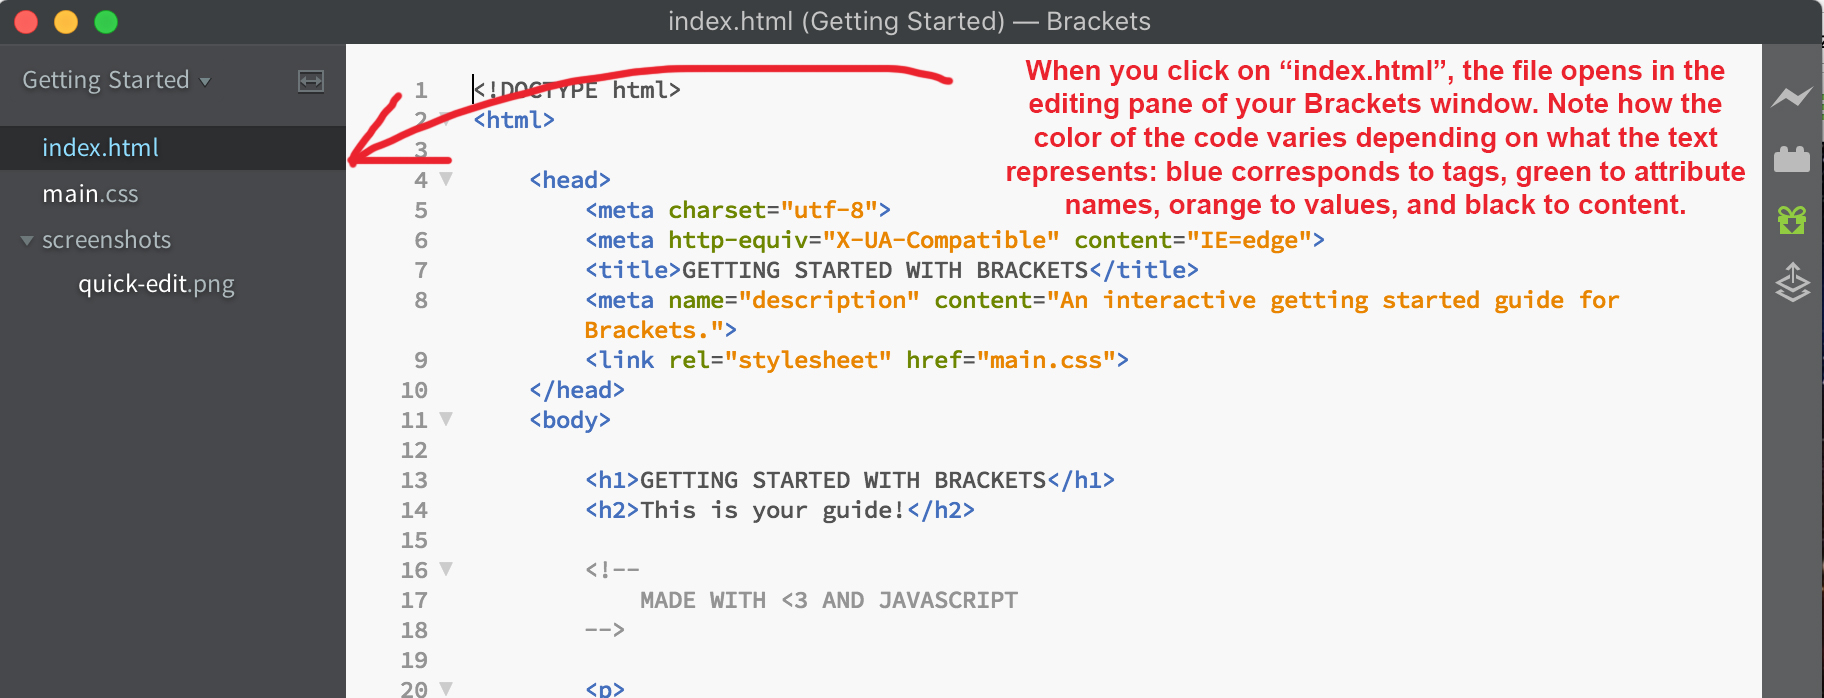
Click on "index.html" to open the file. In the editing pane of Brackets, the contents of the HTML document will appear. By clicking the live preview button, you'll launch a preview of the HTML webpage in Chrome.
Assignment: Open and read the file "index.html" in Chrome using Live Preview
Click the live preview button to launch "index.html" in a Chrome browsing window. Read the contents of the webpage, then close the window and click back into Brackets.
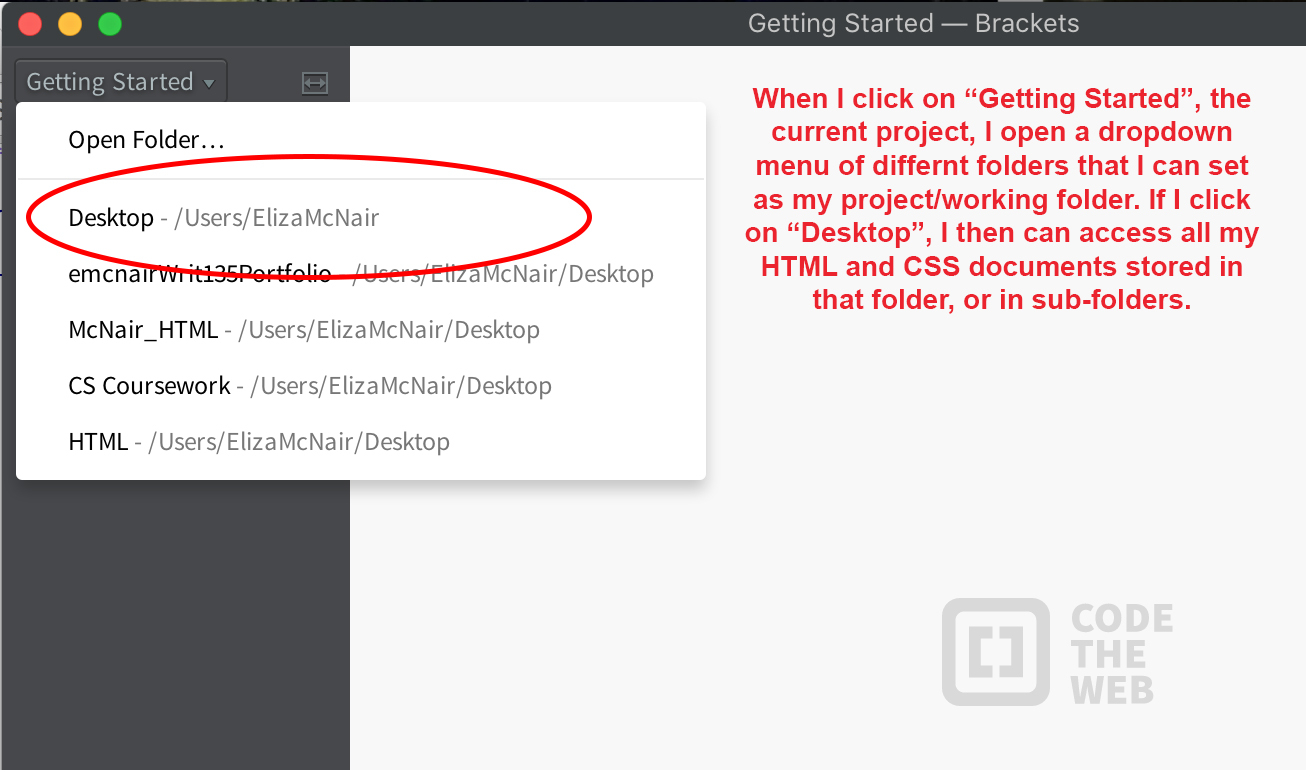
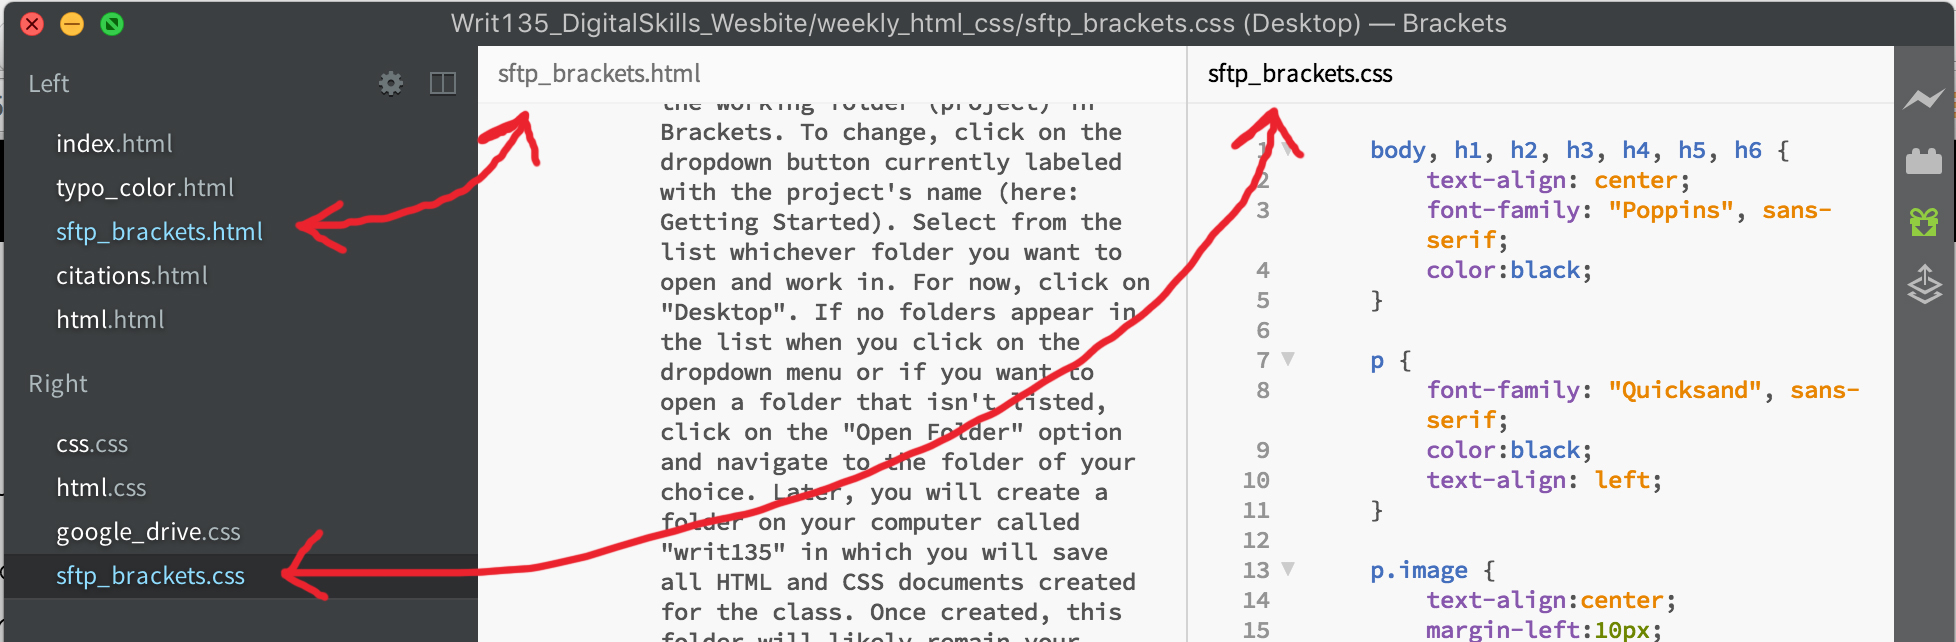
When you've finished the first Brackets assignment, try switching the working folder (project) in Brackets. To change, click on the dropdown button currently labeled with the project's name (here: Getting Started). Select from the list whichever folder you want to open and work in. For now, click on "Desktop". If no folders appear in the list when you click on the dropdown menu or if you want to open a folder that isn't listed, click on the "Open Folder" option and navigate to the folder of your choice. Later, you will create a folder on your computer called "writ135" in which you will save all HTML and CSS documents created for the class. Once created, this folder will likely remain your current project.
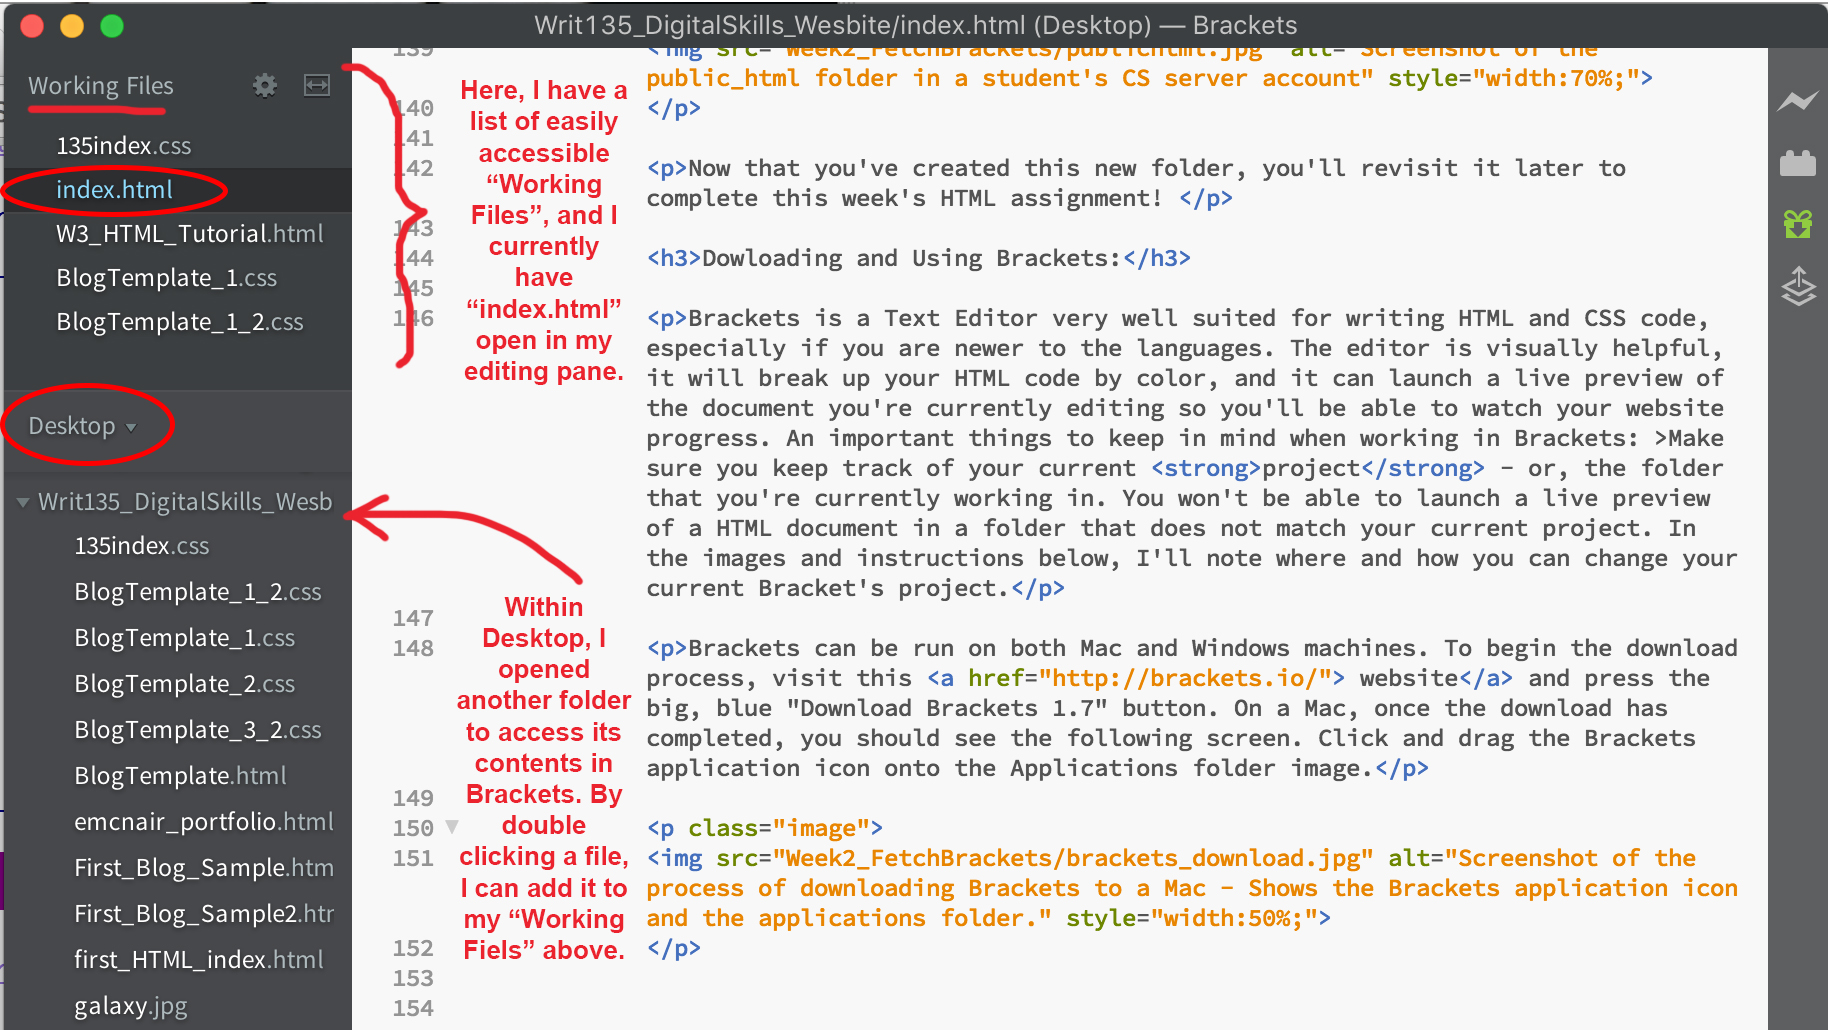
When you have opened a new folder on your computer, you can open files within that folder by clicking on them. You can also add files to the "Working Files" list at the top of the navigation bar on the left of your Brackets window by double-clicking. This makes navigation to those same pages easier in the future, especially if you are switching back and forth between several HTML and CSS documents.
Another useful method for displaying HTML and CSS documents simultaneously is splitting your screen. If you click on the "View" menu in Brackets, you'll be able to choose either a Vertical or a Horizontal Split (Brackets defaults to "No Split", or a single editing pane). Once you've selected a screen split, you'll have two separate "Working Files" lists in the left-side navigation pane that you can add files to. By filling one "Working Files" list with HTML documents and another with CSS documents, you'll be able to edit both documents relevant to a website together. Below is an example of a Vertical Split:
Assignment: Create and Upload your first HTML page!
Now that you've learned how to use Cyberduck and Brackets, you're reading to create and upload your first HTML page. Here is the same HTML template provided above for the page. You will modify it with your name and some introductory text for this first HTML assignment.
First, create a new folder on your computer called "writ135". This will be your Digital Portfolio folder for the rest of the semester, and will correspond to the "writ135" folder you created for your server account using Cyberduck. Open Brackets, then create a new document in that folder by setting that folder as your current project, then clicking "File/New" in the Brackets menu bar. Save this file as "index.html". Then, return to this website and click to open the template link.
Once you've arrived at the template website, right click and select "View Page Source". Congrats! You've accessed the HTML code for the website, and you can copy and paste this code into Brackets to modify, save, and upload it to Cyberduck! To add this file to your folder "writ135" in Cyberduck, open Finder, navigate into the folder, and drag the file "index.html" into the folder in Cyberduck.
To see if you were successful, go to cs.wellesley.edu/~your_username_here. Click on the folder labeled "writ135" --> You should see your first HTML page!
Later on, instead of adding files to the "writ135" folder in Cyberduck, you can delete the outdated contents and replace them with more current versions. To do this, just select multiple files within the folder in Cyberduck, then find the "Delete" button in the application. Once the contents are deleted, you can drag the updated versions from your computer files into Cyberduck.
When you've finished the assignment, send me an email so I know to visit your CS Server website and check your progress.
Congratulations! You're done!